
Android——Android Bundle类(转)
今天发现自己连Bundle类都没有搞清楚,于是花时间研究了一下。
根据google官方的文档(http://developer.android.com/reference/android/os/Bundle.html)
Bundle类是一个key-value对,“A mapping from String values to various Parcelable types.”
类继承关系:
java.lang.Object
android.os.Bundle
Bundle类是一个final类:
public final class
Bundle
extends Objectimplements Parcelable Cloneable
两个activity之间的通讯可以通过bundle类来实现,做法就是:
(1)新建一个bundle类
Bundle mBundle = new Bundle();
(2)bundle类中加入数据(key -value的形式,另一个activity里面取数据的时候,就要用到key,找出对应的value)
mBundle.putString("Data", "data from TestBundle");
(3)新建一个intent对象,并将该bundle加入这个intent对象
Intent intent = new Intent();

intent.setClass(TestBundle.this, Target.class);

intent.putExtras(mBundle);
完整代码如下:
android mainfest.xml如下:
<?xml version="1.0" encoding="utf-8"?>

<manifest xmlns:android="http://schemas.android.com/apk/res/android"

      package="com.tencent.test"

      android:versionCode="1"

      android:versionName="1.0">

    <application android:icon="@drawable/icon" android:label="@string/app_name">

        <activity android:name=".TestBundle"

                  android:label="@string/app_name">

            <intent-filter>

                <action android:name="android.intent.action.MAIN" />

                <category android:name="android.intent.category.LAUNCHER" />

            </intent-filter>

        </activity>

    <activity android:name=".Target"></activity>

    </application>

    <uses-sdk android:minSdkVersion="7" />

</manifest>
两个类如下:intent从TestBundle类发起,到Target类。
类1:TestBundle类:
import android.app.Activity;

import android.content.Intent;

import android.os.Bundle;

import android.view.View;

import android.view.View.OnClickListener;

import android.widget.Button;

public class TestBundle extends Activity {

    private Button button1;

    private OnClickListener cl;

    public void onCreate(Bundle savedInstanceState) {

        super.onCreate(savedInstanceState);

        setContentView(R.layout.main);

        button1 = (Button) findViewById(R.id.button1);

        cl = new OnClickListener(){

            @Override

            public void onClick(View arg0) {

                // TODO Auto-generated method stub

                Intent intent = new Intent();

                intent.setClass(TestBundle.this, Target.class);

                Bundle mBundle = new Bundle();

                mBundle.putString("Data", "data from TestBundle");//压入数据

                intent.putExtras(mBundle);

                startActivity(intent);

            }

        };

        button1.setOnClickListener(cl);

    }

}
类2: Target
import android.app.Activity;

import android.os.Bundle;

public class Target extends Activity{

    public void onCreate(Bundle savedInstanceState) {

        super.onCreate(savedInstanceState);

        setContentView(R.layout.target);

        <span style="color:#ff6600;">Bundle bundle = getIntent().getExtras();   </span> //得到传过来的bundle

        String data = bundle.getString("Data");//读出数据

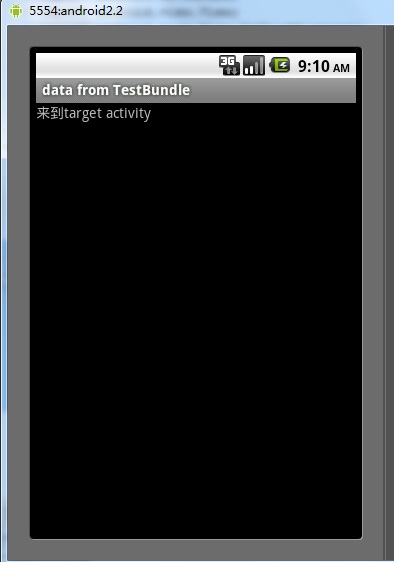
        setTitle(data);

    }

}
布局文件:
main.xml
<?xml version="1.0" encoding="utf-8"?>

<LinearLayout xmlns:android="http://schemas.android.com/apk/res/android"

    android:orientation="vertical"

    android:layout_width="fill_parent"

    android:layout_height="fill_parent"

    >

<TextView

    android:layout_width="fill_parent"

    android:layout_height="wrap_content"

    android:text="@string/hello"

    />

<Button

    android:layout_width="fill_parent"

    android:layout_height="wrap_content"

    android:text="@string/button"

    android:id = "@+id/button1"

    />

</LinearLayout>
target.xml
<?xml version="1.0" encoding="utf-8"?>

<LinearLayout xmlns:android="http://schemas.android.com/apk/res/android"

    android:orientation="vertical"

    android:layout_width="fill_parent"

    android:layout_height="fill_parent"

    >

<TextView

    android:layout_width="fill_parent"

    android:layout_height="wrap_content"

    android:text="@string/target"

    />

</LinearLayout>
String.xml
<?xml version="1.0" encoding="utf-8"?>

<resources>

    <string name="hello">Hello World, TestBundle!</string>

    <string name="app_name">测试Bundle用法</string>

    <string name="button">点击跳转</string>

    <string name="target">来到target activity</string>

</resources>
结果:
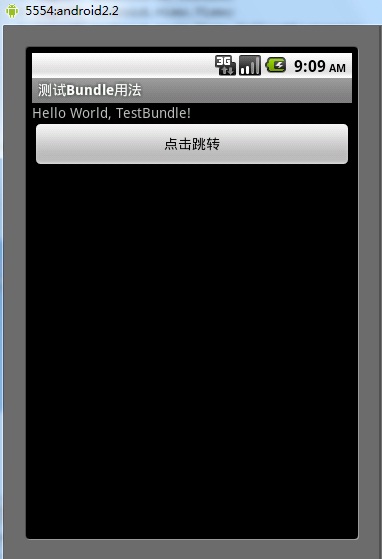
跳转结果:
Android——Android Bundle类(转)的更多相关文章
- Android之Bundle类
API文档说明 1.介绍 用于不同Activity之间的数据传递 1.重要方法 clear():清除此Bundle映射中的所有保存的数据. clone():克隆当前Bundle containsKey ...
- android 18 Bundle类
Bundle类:竖屏的activity换到横屏的activity的时候,会把竖屏的activity杀掉横屏的activity创建,竖屏的activity会有一些计算结果,可以用数据存起来,存到内存里面 ...
- Android笔记——Bundle类的作用
Bundle类用作携带数据,它类似于Map,用于存放key-value键值对形式的值.相对于Map,它提供了各种常用类型的putXxx()/getXxx()方法,如:putString()/getSt ...
- Android Bundle类
根据google官方的文档(http://developer.android.com/reference/android/os/Bundle.html) Bundle类是一个key-value对,“A ...
- Android中Path类的lineTo方法和quadTo方法画线的区别
转载:http://blog.csdn.net/stevenhu_223/article/details/9229337 当我们需要在屏幕上形成画线时,Path类的应用是必不可少的,而Path类的li ...
- Android 自定义Dialog类,并在Activity中实现按钮监听。
实际开发中,经常会用到Dialog,比如退出时候会弹出是否退出,或者还有一些编辑框也会用Dialog实现,效果图如下: 开发中遇到的问题无非在于如果在Activity中监听这个Dialog中实现的 ...
- Android中GPS类及方法简介
GPS是Global Positioning System(全球定位系统)的简称,它的作用就是为全球的物体提供定位功能.GPS定位是一门高新技术,但对于Android程序员来说,开发GPS功能的应用程 ...
- Android之TelephonyManager类的方法详解
TelephonyManager类主要提供了一系列用于访问与手机通讯相关的状态和信息的get方法.其中包括手机SIM的状态和信息.电信网络的状态及手机用户的信息.在应用程序中可以使用这些get方法获取 ...
- android中Handle类的用法
android中Handle类的用法 当我们在处理下载或是其他需要长时间执行的任务时,如果直接把处理函数放Activity的OnCreate或是OnStart中,会导致执行过程中整个Activity无 ...
随机推荐
- Android研究之动态创建UI界面具体解释
Android的基本UI界面一般都是在xml文件里定义好,然后通过activity的setContentView来显示在界面上.这是Android UI的最简单的构建方式.事实上,为了实现更加复 ...
- C#基础视频教程7.1 如何编写简单游戏
要做一个FlappyBird,最核心的功能是创建几个区块,如果发生碰撞则游戏结束(小鸟撞到管子上,或者小鸟到地上),至于随机生成一些管子,小鸟如何跳跃,最后如何统计分数,都不难想通要怎么做. 首先 ...
- angularjs中的ng-src和ng-href
ng-src和ng-href等同于html中的src和href,只是ng是在dom加载完毕之后才能够发挥作用,如果在src或href中绑定变量,如果ng没有加载完,会导致链接地址出错,如果用对应的ng ...
- 【PAT】1028. List Sorting (25)
题目链接:http://pat.zju.edu.cn/contests/pat-a-practise/1028 题目描述: Excel can sort records according to an ...
- sublime text 全局搜索快捷键
sublime text 全局搜索快捷键 ctrl+shift+F
- WCF学习笔记之序列化
DataContractAttribute 与 DataMenberAttribute DataContractAttribute该特性只能用于枚举.类和结构体,而不能用于接口:又因为DataCont ...
- JVM是怎么工作的?
了解JVM的工作机制能够更好的帮助我们理解java语言本身,规避各种可能的错误.所以,今天趁此机会好好复习一下.来看看JVM是怎么工作的. 一.啥是JVM JVM可以理解为用来运行java程序的一种运 ...
- 37、EnumSet详解
EnumSet类也是有顺序的,EnumSet按照枚举值在Enum类内定义的顺序决定集合元素的顺序 EnumSet在内部已位向量的形式存储,这种存储方式非常紧凑.搞笑,因此EnumSet占用内存很小,而 ...
- lucene 学习一
索引工具的三部分 1.索引部分 2.分词部分 3.搜索部分 查看索引的工具:luke java -jar fileName.jar 目标:为文件夹的所有的文档生成索引并搜索它 package co ...
- 【Espruino】NO.17 使用平板电脑调试Espruino(OTG方式)
http://blog.csdn.net/qwert1213131/article/details/38068379 本文属于个人理解,能力有限,纰漏在所难免,还望指正! [小鱼有点电] [Espru ...