alibaba sentinel限流组件 源码分析
如何使用?
maven引入:
<dependency>
<groupId>com.alibaba.csp</groupId>
<artifactId>sentinel-core</artifactId>
<version>1.5.1</version>
</dependency>
该组件是保护资源用,什么资源呢?Conceptually, physical or logical resource,明白了吧。
web应用中大部分情况都是用于保护接口,防止负载过大,支持限流、降级处理,规则可配。
入门级使用方法如下:
public void foo() {

    Entry entry = null;

    try {

       entry = SphU.entry("abc");

       // resource that need protection

    } catch (BlockException blockException) {

        // when goes there, it is blocked

        // add blocked handle logic here

    } catch (Throwable bizException) {

        // business exception

        Tracer.trace(bizException);

    } finally {

        // ensure finally be executed

        if (entry != null){

            entry.exit();

        }

    }

 }

或者
public void foo() {
if (SphO.entry("abc")) {
try {
// business logic
} finally {
SphO.exit(); // must exit()
}
} else {
// failed to enter the protected resource.
}
}
入口为com.alibaba.csp.sentinel.SphU和com.alibaba.csp.sentinel.SphO。两者的区别从使用就可以看出,限流发生时,SphU是通过异常的形式反馈出来,SphO是通过entry的返回值反馈出来的。
查看SphO的代码,如下图,其实是内部捕获了异常,然后返回boolean类型。所以,我们就从SphU开始分析吧。

SphU
最终会调用到com.alibaba.csp.sentinel.CtSph.entryWithPriority(ResourceWrapper, int, boolean, Object...)这个方法。
里面的核心为调用com.alibaba.csp.sentinel.CtSph.lookProcessChain(ResourceWrapper)获取对应的处理链,方法如下:
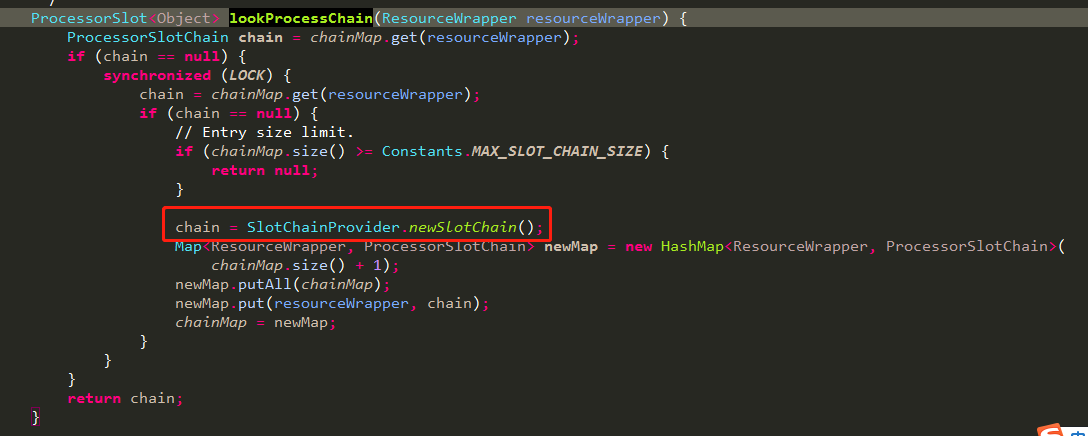
从上面代码可知,一个chain关联一个资源,这一点很重要,后面分析node节点结构时会用到。
public static ProcessorSlotChain newSlotChain() {

        if (builder != null) {

            return builder.build();

        }

     // 构建chainBuilder,具体说明见下面代码

        resolveSlotChainBuilder();

        if (builder == null) {

            RecordLog.warn("[SlotChainProvider] Wrong state when resolving slot chain builder, using default");

            builder = new DefaultSlotChainBuilder();

        }

        return builder.build();

    }

    private static void resolveSlotChainBuilder() {

        List<SlotChainBuilder> list = new ArrayList<SlotChainBuilder>();

        boolean hasOther = false;
     // java.util.ServiceLoader 方式扩展功能,这是jdk的,简称spi扩展,sentinel有很多地方用到这种扩展方式
     // 关于ServiceLoader扩展的详解不在这里讨论,后面有时间可以单独拎出来分析下
        for (SlotChainBuilder builder : LOADER) {

            if (builder.getClass() != DefaultSlotChainBuilder.class) {

                hasOther = true;

                list.add(builder);

            }

        }

        if (hasOther) {

            builder = list.get(0);

        } else {

            // No custom builder, using default.

            builder = new DefaultSlotChainBuilder();

        }

        RecordLog.info("[SlotChainProvider] Global slot chain builder resolved: "

            + builder.getClass().getCanonicalName());

    }
通过上面代码可知,一般情况下采用的默认chainBuilder,那我们就来看看这个build:

通过上面com.alibaba.csp.sentinel.CtSph.entryWithPriority(ResourceWrapper, int, boolean, Object...)方法可知,最终调用方式如下:
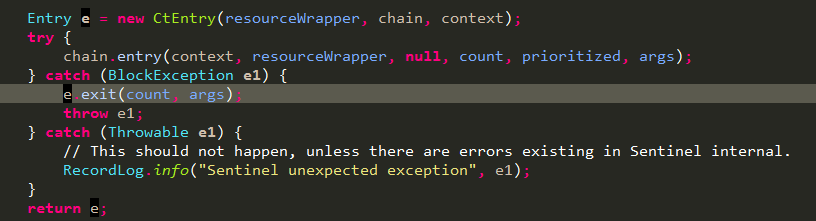
通过entry调用把chain中的所有ProcessorSlot串起来,挨个调用。
主体已经清晰了,重点其实也就是chain中添加的那些ProcessorSlot,下面我们就一个个看下这些slot到底干了啥,划下重点,StatisticSlot这个slot是核心,用于统计各种数量。
NodeSelectorSlot
构建调用资源调用路径,最终在内存中会形成一个树状结构。
ContextUtil.enter("entrance1", "appA");

  Entry nodeA = SphU.entry("nodeA");

  if (nodeA != null) {

      nodeA.exit();

  }

  ContextUtil.exit();
上述代码对象结构如下:
machine-root
/
/
EntranceNode1
/
/
DefaultNode(nodeA)- - - - - -> ClusterNode(nodeA);
ContextUtil.enter("entrance1", "appA");

      Entry nodeA = SphU.entry("nodeA");

      if (nodeA != null) {

          nodeA.exit();

      }

      ContextUtil.exit();

      ContextUtil.enter("entrance2", "appA");

      nodeA = SphU.entry("nodeA");

      if (nodeA != null) {

          nodeA.exit();

      }

ContextUtil.exit();
上述代码会形成结构如下:
machine-root
/ \
/ \
EntranceNode1 EntranceNode2
/ \
/ \
DefaultNode(nodeA) DefaultNode(nodeA)
| |
+- - - - - - - - - - +- - - - - - -> ClusterNode(nodeA);
ContextUtil.enter("entrance1", "appA");

      Entry nodeA = null;

      try {

            nodeA = SphU.entry("nodeA");

            Entry nodeB = null;

            try {

          nodeB = SphU.entry("nodeB");

          }finally {

            if (nodeB != null) {

              nodeB.exit();

            }

          }

      }finally {

        if (nodeA != null) {

            nodeA.exit();

    }

      }

ContextUtil.exit();
上述代码会形成结构如下:
machine-root
/
/
EntranceNode1
/
/
DefaultNode(nodeA) - - - - - -> ClusterNode(nodeA);
/
/
DefaultNode(nodeB)- - - - - -> ClusterNode(nodeB);
说明:
a.一条路径对应一个Context;如果是入门的那种使用方法,即没有显式使用ContextUtil.enter("entrance1", "appA")方式创建context的话,会默认使用MyContextUtil.myEnter创建一个名为sentinel_default_context的context;
源码释义:
一次资源的访问都会走到com.alibaba.csp.sentinel.CtSph.entryWithPriority(ResourceWrapper, int, boolean, Object...),方法开始处通过ContextUtil.getContext()从threadlocal中获取context,ContextUtil.enter会检查threadlocal有没有context,没有就创建,有就直接返回。如果限流时没有调用ContextUtil.enter显式开启context,就会走到下面MyContextUtil.myEnter处创建默认名为


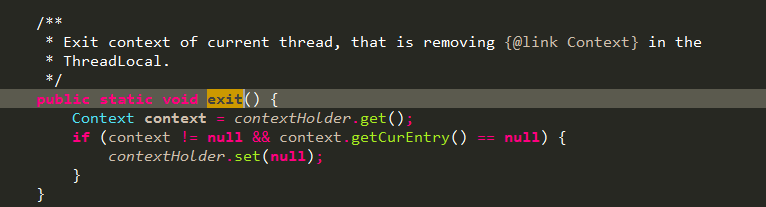
b.一次资源的调用会根据threadlocal获取Context,同一线程下如果要切换context必须调用ContextUtil.exit();结束上一个context,再ContextUtil.enter("entrance2", "appA")开启新的context;
源码释义:
context的获取见上面一条释义,这里看下ContextUtil.exit()方法,要想真正的将threadlocal清空,还得将context的CurEntry清空,怎么做?就是按照entry的调用顺序反向依次调用com.alibaba.csp.sentinel.CtEntry.exit(int, Object...):
c.一个DefaultNode对应同一个资源调用在某一个Context下的统计数据;
源码释义:
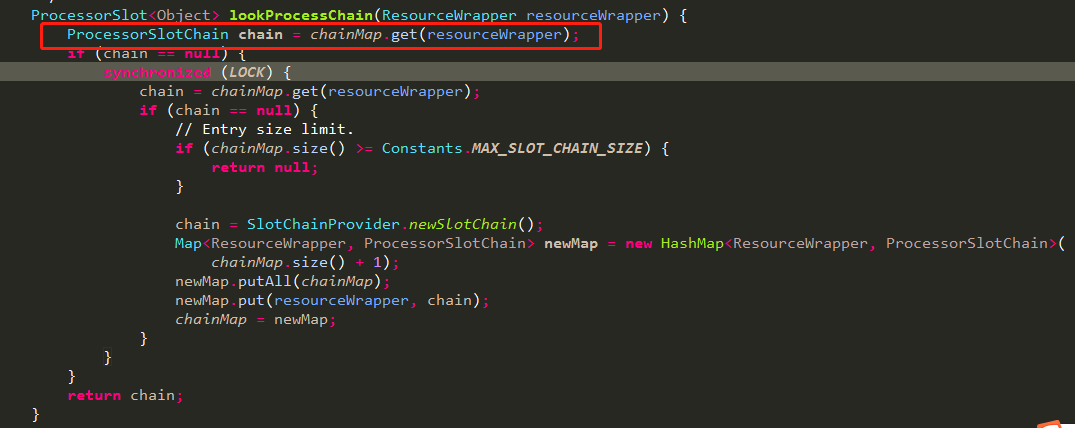
首先,一次资源的entry调用会先去寻找ProcessorSlotChain,查看代码可知,chain是以ResourceWrapper为key缓存在map中的,由DefaultSlotChainBuilder可以对应到一次entry调用对应一个NodeSelectorSlot实例,而NodeSelectorSlot中缓存了一个以contextName为key,DefaultNode为value的map,一句话总结下就是先去com.alibaba.csp.sentinel.context.ContextUtil.trueEnter(String, String)方法中通过contextNameNodeMap获取以contextName缓存的该name对应的EntranceNode节点并以该EntranceNode为参数new一个context对象返回,然后在该资源对应的slotChain中的NodeSelectorSlot获取一contextName为key缓存的DefaultNode。
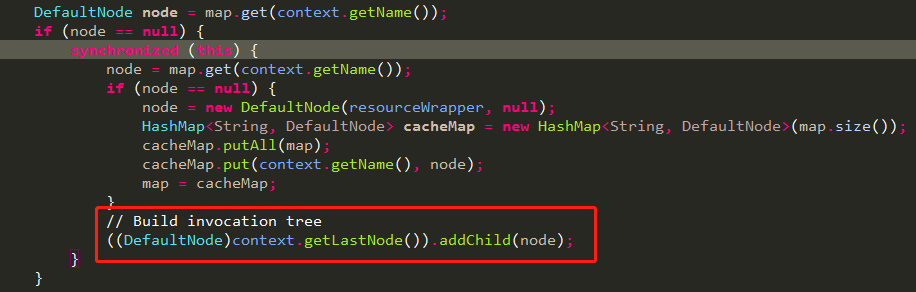
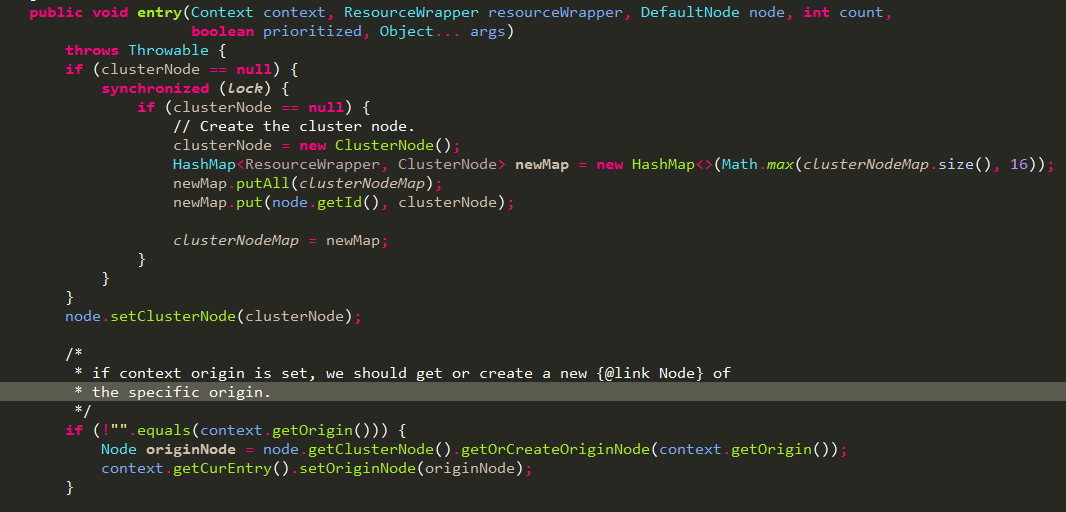
这里解释下DefaultNode第一次是怎么挂到context的EntranceNode下的。
代码如下,重点是红框中的代码,获取context中最末尾的节点,并把当前节点挂在后面。
我们再看下context的getLastNode节点,代码如下:
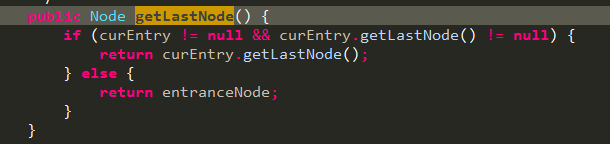
由上面代码自然会想的curEntry是什么时候设置的呢?如下图所示,是在com.alibaba.csp.sentinel.CtSph.entryWithPriority(ResourceWrapper, int, boolean, Object...)中构建CtEntry时设置的,entry之间的关系在context中是以双向链表结构维护的:
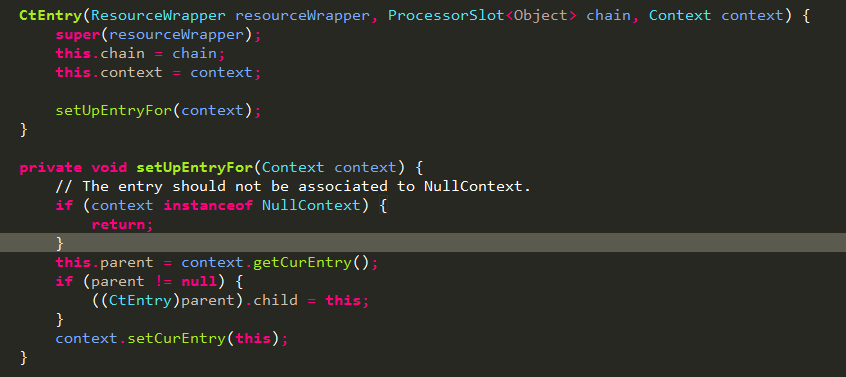
回到上一步,我们看下entry的getLastNode方法,如下图所示,从parentEntry中获取curNode,如果是第一次调用的话parent肯定为null,回到上一步的话就是返回该context的entranceNode。

NodeSelectorSlot中就会将当次entry在该context下首次调用创建的DefaultNode挂到刚刚获取到的entranceNode节点下,也就是该context的入口节点下,如果该context下之前有过别的资源调用,就会顺序挂到那次调用产生的DefaultNode下面,形成上面描述的树状结构图。

DefaultNode处理完后会将context的CurNode设置为该DefaultNode,如下图所示:
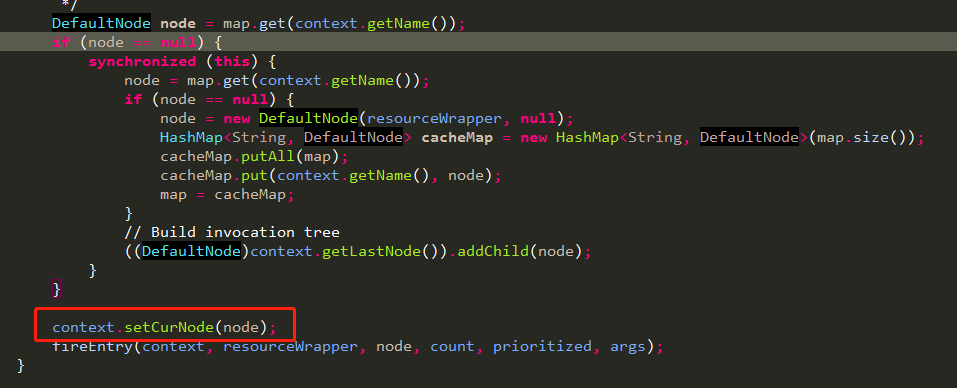
实际上是设置的context中当前entry对应的CurNode,如下图所示,所以上面getLastNode是从parenEntry中获取的CurNode。

d.ClusterNode对应同一个资源在所有context下的统计数据;
源码释义:
ClusterBuilderSlot中维护的一个实例变量实际就是对应一个资源,原因上面已经分析了,一个资源对应一个slotChain,然后将该clusterNode设置到本次调用对应的DefaultNode中,在DefaultNode做加法操作时,会同时调用clusterNode的加法操作,这样,分布在不同context下的同一个资源对应的所有DefaultNode都会去调用clusterNode去汇总统计相同资源的统计数据。

e.一个资源对应一个ProcessChain,自然就对应一个NodeSelectorSlot实例,所以在NodeSelectorSlot里面DefaultNode node = map.get(context.getName());这行代码的一维是资源,二维才是context,如果搞反了可能看到这行会蒙圈;
源码释义:
见c的分析。
ClusterBuilderSlot
构建ClusterNode并设置到上面slot选中的node中,如果context中有设置调用来源Origin就创建一个StatisticNode针对具体某个调用方统计数据
Note that 'origin' usually is Service Consumer's app name:
StatisticSlot
核心slot,用于统计各种数据的地方,然后被后面的slot应用。

先调用fireEntry执行后面的slot,检查本次请求能否通过,如果通过,就给对应的node做加法操作。
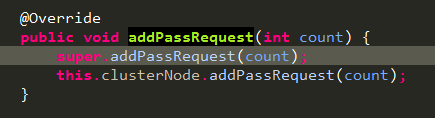
先给自身node做加法,在给ClusterBuilderSlot中创建并传入的closterNode做加法。
最终调用ArrayMetric的addPass:

需要申明的是,sentinel统计采用的是滑动窗口的实现方式,这里的重点是com.alibaba.csp.sentinel.slots.statistic.base.LeapArray.currentWindow(long)方法,我们看下如何获取当前窗口。
// 根据当前时间戳计算当前窗口的索引
private int calculateTimeIdx(/*@Valid*/ long timeMillis) {
     // 索引从0开始,整除后得到的结果就是当前时间戳所在的窗口,实际上我们的窗口只有array长度的固定几个,
     // 可以想象一下这是在一个无限延长的虚拟时间线窗口,再对array的length取余数就得到了实际所在的窗口索引

        long timeId = timeMillis / windowLengthInMs;

        // Calculate current index so we can map the timestamp to the leap array.

        return (int)(timeId % array.length());

    }

    protected long calculateWindowStart(/*@Valid*/ long timeMillis) {
     // 计算虚拟窗口对应的开始时间,当前时间减去超出当前窗口的那一段时间就得到开始时间

        return timeMillis - timeMillis % windowLengthInMs;

    }

    /**

     * Get bucket item at provided timestamp.

     *

     * @param timeMillis a valid timestamp in milliseconds

     * @return current bucket item at provided timestamp if the time is valid; null if time is invalid

     */

    public WindowWrap<T> currentWindow(long timeMillis) {

        if (timeMillis < 0) {

            return null;

        }

     // 获取当前窗口索引

        int idx = calculateTimeIdx(timeMillis);

        // Calculate current bucket start time.
     // 获取窗口开始时间
        long windowStart = calculateWindowStart(timeMillis);

        /*

         * Get bucket item at given time from the array.

         *

         * (1) Bucket is absent, then just create a new bucket and CAS update to circular array.

         * (2) Bucket is up-to-date, then just return the bucket.

         * (3) Bucket is deprecated, then reset current bucket and clean all deprecated buckets.

         */

        while (true) {

            WindowWrap<T> old = array.get(idx);
       // 如果索引对应的窗口还没有创建就新建窗口对象

            if (old == null) {

                /*

                 *     B0       B1      B2    NULL      B4

                 * ||_______|_______|_______|_______|_______||___

                 * 200     400     600     800     1000    1200  timestamp

                 *                             ^

                 *                          time=888

                 *            bucket is empty, so create new and update

                 *

                 * If the old bucket is absent, then we create a new bucket at {@code windowStart},

                 * then try to update circular array via a CAS operation. Only one thread can

                 * succeed to update, while other threads yield its time slice.

                 */

                WindowWrap<T> window = new WindowWrap<T>(windowLengthInMs, windowStart, newEmptyBucket(timeMillis));
         // 原子操作,如果设置成功就返回,如果设置失败就让出cpu,等待再次被翻牌

                if (array.compareAndSet(idx, null, window)) {

                    // Successfully updated, return the created bucket.

                    return window;

                } else {

                    // Contention failed, the thread will yield its time slice to wait for bucket available.

                    Thread.yield();

                }
       // 如果当前窗口时间一致,说明当前窗口还未过期,就返回该窗口对象

            } else if (windowStart == old.windowStart()) {

                /*

                 *     B0       B1      B2     B3      B4

                 * ||_______|_______|_______|_______|_______||___

                 * 200     400     600     800     1000    1200  timestamp

                 *                             ^

                 *                          time=888

                 *            startTime of Bucket 3: 800, so it's up-to-date

                 *

                 * If current {@code windowStart} is equal to the start timestamp of old bucket,

                 * that means the time is within the bucket, so directly return the bucket.

                 */

                return old;
       // 如果窗口开始时间过期了,就重置当前窗口的开始时间为最新的时间

            } else if (windowStart > old.windowStart()) {

                /*

                 *   (old)

                 *             B0       B1      B2    NULL      B4

                 * |_______||_______|_______|_______|_______|_______||___

                 * ...    1200     1400    1600    1800    2000    2200  timestamp

                 *                              ^

                 *                           time=1676

                 *          startTime of Bucket 2: 400, deprecated, should be reset

                 *

                 * If the start timestamp of old bucket is behind provided time, that means

                 * the bucket is deprecated. We have to reset the bucket to current {@code windowStart}.

                 * Note that the reset and clean-up operations are hard to be atomic,

                 * so we need a update lock to guarantee the correctness of bucket update.

                 *

                 * The update lock is conditional (tiny scope) and will take effect only when

                 * bucket is deprecated, so in most cases it won't lead to performance loss.

                 */

                if (updateLock.tryLock()) {

                    try {

                        // Successfully get the update lock, now we reset the bucket.

                        return resetWindowTo(old, windowStart);

                    } finally {

                        updateLock.unlock();

                    }

                } else {

                    // Contention failed, the thread will yield its time slice to wait for bucket available.

                    Thread.yield();

                }
       // 正常情况下不会走这里,因为时间是往前走的

            } else if (windowStart < old.windowStart()) {

                // Should not go through here, as the provided time is already behind.

                return new WindowWrap<T>(windowLengthInMs, windowStart, newEmptyBucket(timeMillis));

            }

        }

    }
最终是在MetricBucket中用LongAdder做的原子加,LongAdder是jdk8的特性,这里sentinel直接挪了过来,避免要求sentinel用户必须使用jdk8.为什么是LongAdder而不是AtomicLong,因为前者在并发下表现更优异,具体区别请自行了解。
SystemSlot
通过之前统计节点中Constants.ENTRY_NODE这个node中的数据检查全局qps等是否满足要求。
AuthoritySlot
黑白名单匹配。通过com.alibaba.csp.sentinel.slots.block.authority.AuthorityRuleManager.loadRules(List<AuthorityRule>)设置规则。
FlowSlot
流量控制。通过com.alibaba.csp.sentinel.slots.block.flow.FlowRuleManager.loadRules(List<FlowRule>)设置规则。
DegradeSlot
降级处理。通过com.alibaba.csp.sentinel.slots.block.degrade.DegradeRuleManager.loadRules(List<DegradeRule>)设置规则。
alibaba sentinel限流组件 源码分析的更多相关文章
- 面试官:来谈谈限流-RateLimiter源码分析
RateLimiter有两个实现类:SmoothBursty和SmoothWarmingUp,其都是令牌桶算法的变种实现,区别在于SmoothBursty加令牌的速度是恒定的,而SmoothWarmi ...
- Django-restframework 源码之认证组件源码分析
Django-restframework 源码之认证组件源码分析 一 前言 之前在 Django-restframework 的流程分析博客中,把最重要的关于认证.权限和频率的方法找到了.该方法是 A ...
- element-ui 组件源码分析整理笔记目录
element-ui button组件 radio组件源码分析整理笔记(一) element-ui switch组件源码分析整理笔记(二) element-ui inputNumber.Card .B ...
- ceph-csi组件源码分析(1)-组件介绍与部署yaml分析
更多ceph-csi其他源码分析,请查看下面这篇博文:kubernetes ceph-csi分析目录导航 ceph-csi组件源码分析(1)-组件介绍与部署yaml分析 基于tag v3.0.0 ht ...
- 开源MyBatisGenerator组件源码分析
开源MyBatisGenerator组件源码分析 看源码前,先了解Generator能做什么? MyBatisGenerator是用来生成mybatis的Mapper接口和xml文件的工具,提供多种启 ...
- Alibaba Sentinel 限流与熔断初探(技巧篇)
目录 1.Sentinel 是什么 ?主要能解决什么问题? 2.限流与熔断的使用场景 3.Sentinel 源码结构 4.在 IntelliJ IDEA 中运行 Sentine Demo 温馨提示:源 ...
- element-ui button组件 radio组件源码分析整理笔记(一)
Button组件 button.vue <template> <button class="el-button" @click="handleClick ...
- element-ui MessageBox组件源码分析整理笔记(十二)
MessageBox组件源码,有添加部分注释 main.vue <template> <transition name="msgbox-fade"> < ...
- Django REST framework —— 权限组件源码分析
在上一篇文章中我们已经分析了认证组件源码,我们再来看看权限组件的源码,权限组件相对容易,因为只需要返回True 和False即可 代码 class ShoppingCarView(ViewSetMix ...
随机推荐
- MySQL 5.5.62 安装方法(标准配置版)
1.此安装方法适用于绝大多数MySQL版本,首先在MySQL官网上下载好所需版本. 2.(官网可能不太好找)在我的博客列表中有一篇是MySQL官网下载链接,直达下载界面,方便. 3.下载.(安装版 ...
- C++文件写入,读出函数ofstream,ifstream的使用方法
ofstream是从内存到硬盘,ifstream是从硬盘到内存,其实所谓的流缓冲就是内存空间. 1.插入器(<<) 向流输出数据.比如说系统有一个默认的标准输出流(cout),一般情况下 ...
- 老段带你学鸟哥Linux视频教程 包含基础班+提高班
老段带你学鸟哥Linux视频教程 包含基础班+提高班,附带pdf文档. 目录结构如下: 目录:/-老段带你学鸟哥Linux视频教程 [.9G] ┣━━老段带你学鸟哥-服务器篇 [1009.4M] ┃ ...
- PHP将json或对象转成数组
今天老大突然给了我一个小任务,给我一个txt文件,里边是很多的json字串,要求将这些字串转换成php中的数组: 于是开足火力,用了将进5分钟的时间完成了任务,代码如下: $jsonStr = fil ...
- 最全的Java操作Redis的工具类,使用StringRedisTemplate实现,封装了对Redis五种基本类型的各种操作!
转载自:https://github.com/whvcse/RedisUtil 代码 ProtoStuffSerializerUtil.java import java.io.ByteArrayInp ...
- 在java的静态方法中访问类的实例成员
直接来看代码: public class Example { int x = 3;//类的实例变量,初始化值为3 static int y = 4;//类的静态变量,初始化值为4 public sta ...
- mybatis源码探索笔记-1(构建SqlSessionFactory)
前言 mybatis是目前进行java开发 dao层较为流行的框架,其较为轻量级的特性,避免了类似hibernate的重量级封装.同时将sql的查询与与实现分离,实现了sql的解耦.学习成本较hibe ...
- 【译】高级T-SQL进阶系列 (二)【下篇】:使用 APPLY操作符
[译注:此文为翻译,由于本人水平所限,疏漏在所难免,欢迎探讨指正] 原文链接:传送门. 使用OUTER APPLY 操作符 OUTER APPLY操作符工作起来和CROSS APPLY比较类似.唯一的 ...
- 刚下载好的 vscode 不能运行,一片黑 以及终端不能输入 解决办法
1.鼠标右键vscode快捷方式点击属性,选择兼容性,勾选以兼容模式运行,下拉列表调整为windows vista (service pack 1)即可解决. 2.如果打开终端不能输入命令,首先点击属 ...
- vue.js_①
前言: Vue (读音 /vjuː/,类似于 view) 是一套用于构建用户界面的渐进式框架.与其它大型框架不同的是,Vue 被设计为可以自底向上逐层应用.Vue 的核心库只关注视图层,不仅易于上手, ...