基于深度学习的人脸识别系统(Caffe+OpenCV+Dlib)【三】VGG网络进行特征提取
前言
基于深度学习的人脸识别系统,一共用到了5个开源库:OpenCV(计算机视觉库)、Caffe(深度学习库)、Dlib(机器学习库)、libfacedetection(人脸检测库)、cudnn(gpu加速库)。
用到了一个开源的深度学习模型:VGG model。
最终的效果是很赞的,识别一张人脸的速度是0.039秒,而且最重要的是:精度高啊!!!
CPU:intel i5-4590
GPU:GTX 980
系统:Win 10
OpenCV版本:3.1(这个无所谓)
Caffe版本:Microsoft caffe (微软编译的Caffe,安装方便,在这里安利一波)
Dlib版本:19.0(也无所谓
CUDA版本:7.5
cudnn版本:4
libfacedetection:6月份之后的(这个有所谓,6月后出了64位版本的)
这个系列纯C++构成,有问题的各位朋同学可以直接在博客下留言,我们互相交流学习。
====================================================================
本篇是该系列的第三篇博客,介绍如何使用VGG网络模型与Caffe的 MemoryData层去提取一个OpenCV矩阵类型Mat的特征。
思路
VGG网络模型是牛津大学视觉几何组提出的一种深度模型,在LFW数据库上取得了97%的准确率。VGG网络由5个卷积层,两层fc图像特征,一层fc分类特征组成,具体我们可以去读它的prototxt文件。这里是模型与配置文件的下载地址。
http://www.robots.ox.ac.uk/~vgg/software/vgg_face/
话题回到Caffe。在Caffe中提取图片的特征是很容易的,其提供了extract_feature.exe让我们来实现,提取格式为lmdb与leveldb。关于这个的做法,可以看我的这篇博客:
http://blog.csdn.net/mr_curry/article/details/52097529
显然,我们在程序中肯定是希望能够灵活利用的,使用这种方法不太可行。Caffe的Data层提供了type:MemoryData,我们可以使用它来进行Mat类型特征的提取。
注:你需要先按照本系列第一篇博客的方法去配置好Caffe的属性表。
http://blog.csdn.net/mr_curry/article/details/52443126
实现
首先我们打开VGG_FACE_deploy.prototxt,观察VGG的网络结构。

有意思的是,MemoryData层需要图像均值,但是官方网站上并没有给出mean文件。我们可以通过这种方式进行输入:
    mean_value:129.1863

    mean_value:104.7624

    mean_value:93.5940
我们还需要修改它的data层:(你可以用下面这部分的代码去替换下载下来的prototxt文件的data层)
   layer {

  name: "data"

  type: "MemoryData"

  top: "data"

  top: "label"

  transform_param {

    mirror: false

    crop_size: 224

    mean_value:129.1863

    mean_value:104.7624

    mean_value:93.5940

  }

  memory_data_param {

    batch_size: 1

    channels:3

    height:224

    width:224

  }

}
为了不破坏原来的文件,把它另存为vgg_extract_feature_memorydata.prototxt。

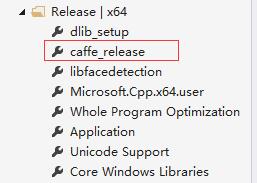
好的,然后我们开始编写。添加好这个属性表:
然后,新建caffe_net_memorylayer.h、ExtractFeature_.h、ExtractFeature_.cpp开始编写。
caffe_net_memorylayer.h:
#include "caffe/layers/input_layer.hpp"

#include "caffe/layers/inner_product_layer.hpp"

#include "caffe/layers/dropout_layer.hpp"

#include "caffe/layers/conv_layer.hpp"

#include "caffe/layers/relu_layer.hpp"

#include <iostream>

#include "caffe/caffe.hpp"

#include <opencv.hpp>

#include <caffe/layers/memory_data_layer.hpp>

#include "caffe/layers/pooling_layer.hpp"

#include "caffe/layers/lrn_layer.hpp"

#include "caffe/layers/softmax_layer.hpp"

// must predefined

caffe::MemoryDataLayer<float> *memory_layer;

caffe::Net<float>* net;
ExtractFeature_.h
#include <opencv.hpp>

using namespace cv;

using namespace std;

std::vector<float> ExtractFeature(Mat FaceROI);//给一个图片 返回一个vector<float>容器

void Caffe_Predefine();
ExtractFeature_.cpp:
#include <ExtractFeature_.h>

#include <caffe_net_memorylayer.h>

namespace caffe

{

    extern INSTANTIATE_CLASS(InputLayer);

    extern INSTANTIATE_CLASS(InnerProductLayer);

    extern INSTANTIATE_CLASS(DropoutLayer);

    extern INSTANTIATE_CLASS(ConvolutionLayer);

    REGISTER_LAYER_CLASS(Convolution);

    extern INSTANTIATE_CLASS(ReLULayer);

    REGISTER_LAYER_CLASS(ReLU);

    extern INSTANTIATE_CLASS(PoolingLayer);

    REGISTER_LAYER_CLASS(Pooling);

    extern INSTANTIATE_CLASS(LRNLayer);

    REGISTER_LAYER_CLASS(LRN);

    extern INSTANTIATE_CLASS(SoftmaxLayer);

    REGISTER_LAYER_CLASS(Softmax);

    extern INSTANTIATE_CLASS(MemoryDataLayer);

}

template <typename Dtype>

caffe::Net<Dtype>* Net_Init_Load(std::string param_file, std::string pretrained_param_file, caffe::Phase phase)

{

    caffe::Net<Dtype>* net(new caffe::Net<Dtype>("vgg_extract_feature_memorydata.prototxt", caffe::TEST));

    net->CopyTrainedLayersFrom("VGG_FACE.caffemodel");

    return net;

}

void Caffe_Predefine()//when our code begining run must add it

{

    caffe::Caffe::set_mode(caffe::Caffe::GPU);

    net = Net_Init_Load<float>("vgg_extract_feature_memorydata.prototxt", "VGG_FACE.caffemodel", caffe::TEST);

    memory_layer = (caffe::MemoryDataLayer<float> *)net->layers()[0].get();

}

std::vector<float> ExtractFeature(Mat FaceROI)

{

    caffe::Caffe::set_mode(caffe::Caffe::GPU);

    std::vector<Mat> test;

    std::vector<int> testLabel;

    std::vector<float> test_vector;

    test.push_back(FaceROI);

    testLabel.push_back(0);

    memory_layer->AddMatVector(test, testLabel);// memory_layer and net , must be define be a global variable.

    test.clear(); testLabel.clear();

    std::vector<caffe::Blob<float>*> input_vec;

    net->Forward(input_vec);

    boost::shared_ptr<caffe::Blob<float>> fc8 = net->blob_by_name("fc8");

    int test_num = 0;

    while (test_num < 2622)

    {

        test_vector.push_back(fc8->data_at(0, test_num++, 1, 1));

    }

    return test_vector;

}
=============注意上面这个地方可以这么改:==============
(直接可以知道这个向量的首地址、尾地址,我们直接用其来定义vector)
        float* begin = nullptr;

        float* end = nullptr;

        begin = fc8->mutable_cpu_data();

        end = begin + fc8->channels();

        CHECK(begin != nullptr);

        CHECK(end != nullptr);

        std::vector<float> FaceVector{ begin,end };

        return std::move(FaceVector);
请特别注意这个地方:
namespace caffe

{

    extern INSTANTIATE_CLASS(InputLayer);

    extern INSTANTIATE_CLASS(InnerProductLayer);

    extern INSTANTIATE_CLASS(DropoutLayer);

    extern INSTANTIATE_CLASS(ConvolutionLayer);

    REGISTER_LAYER_CLASS(Convolution);

    extern INSTANTIATE_CLASS(ReLULayer);

    REGISTER_LAYER_CLASS(ReLU);

    extern INSTANTIATE_CLASS(PoolingLayer);

    REGISTER_LAYER_CLASS(Pooling);

    extern INSTANTIATE_CLASS(LRNLayer);

    REGISTER_LAYER_CLASS(LRN);

    extern INSTANTIATE_CLASS(SoftmaxLayer);

    REGISTER_LAYER_CLASS(Softmax);

    extern INSTANTIATE_CLASS(MemoryDataLayer);

}
为什么要加这些?因为在提取过程中发现,如果不加,会导致有一些层没有注册的情况。我在Github的Microsoft/Caffe上帮一外国哥们解决了这个问题。我把问题展现一下:
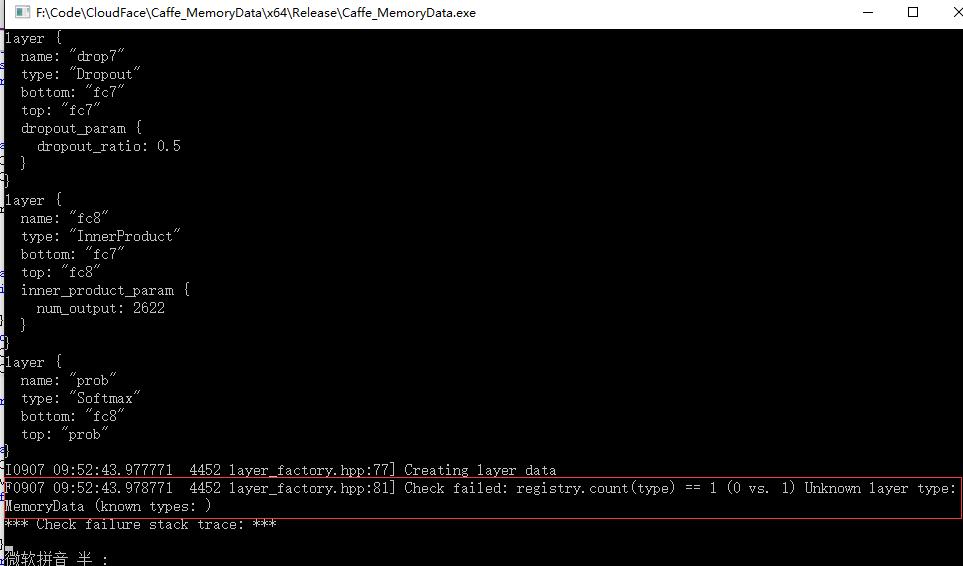
如果我们加了上述代码,就相当于注册了这些层,自然就不会有这样的问题。
在提取过程中,我提取的是fc8层的特征,2622维。当然,最后一层都已经是分类特征了,最好还是提取fc7层的4096维特征。
在这个地方:
void Caffe_Predefine()//when our code begining run must add it

{

    caffe::Caffe::set_mode(caffe::Caffe::GPU);

    net = Net_Init_Load<float>("vgg_extract_feature_memorydata.prototxt", "VGG_FACE.caffemodel", caffe::TEST);

    memory_layer = (caffe::MemoryDataLayer<float> *)net->layers()[0].get();

}
是一个初始化的函数,用于将VGG网络模型与提取特征的配置文件进行传入,所以很明显地,在提取特征之前,需要先:
Caffe_Predefine();进行了这个之后,这些全局量我们就能一直用了。
我们可以试试提取特征的这个接口。新建一个main.cpp,调用之:
#include <ExtractFeature_.h>

int main()

{

    Caffe_Predefine();

    Mat lena = imread("lena.jpg");

    if (!lena.empty())

    {

        ExtractFeature(lena);

    }

}
因为我们得到的是一个vector< float>类型,所以我们可以把它逐一输出出来看看。当然,在ExtractFeature()的函数中你就可以这么做了。我们还是在main()函数里这么做。
来看看:
#include <ExtractFeature_.h>

int main()

{

    Caffe_Predefine();

    Mat lena = imread("lena.jpg");

    if (!lena.empty())

    {

        int i = 0;

        vector<float> print=ExtractFeature(lena);

        while (i<print.size())

        {

            cout << print[i++] << endl;

        }

    }

    imshow("Extract feature",lena);

    waitKey(0);

}
那么对于这张图片,提取出的特征,就是很多的这些数字:

提取一张224*224图片特征的时间为:0.019s。我们可以看到,GPU加速的效果是非常明显的。而且我这块显卡也就是GTX980。不知道泰坦X的提取速度如何(泪)。
附:net结构 (prototxt),注意layer和layers的区别:
name: "VGG_FACE_16_layer"

layer {

  name: "data"

  type: "MemoryData"

  top: "data"

  top: "label"

  transform_param {

    mirror: false

    crop_size: 224

    mean_value:129.1863

    mean_value:104.7624

    mean_value:93.5940

  }

  memory_data_param {

    batch_size: 1

    channels:3

    height:224

    width:224

  }

}

layer {

  bottom: "data"

  top: "conv1_1"

  name: "conv1_1"

  type: "Convolution"

  convolution_param {

    num_output: 64

    pad: 1

    kernel_size: 3

  }

}

layer {

  bottom: "conv1_1"

  top: "conv1_1"

  name: "relu1_1"

  type: "ReLU"

}

layer {

  bottom: "conv1_1"

  top: "conv1_2"

  name: "conv1_2"

  type: "Convolution"

  convolution_param {

    num_output: 64

    pad: 1

    kernel_size: 3

  }

}

layer {

  bottom: "conv1_2"

  top: "conv1_2"

  name: "relu1_2"

  type: "ReLU"

}

layer {

  bottom: "conv1_2"

  top: "pool1"

  name: "pool1"

  type: "Pooling"

  pooling_param {

    pool: MAX

    kernel_size: 2

    stride: 2

  }

}

layer {

  bottom: "pool1"

  top: "conv2_1"

  name: "conv2_1"

  type: "Convolution"

  convolution_param {

    num_output: 128

    pad: 1

    kernel_size: 3

  }

}

layer {

  bottom: "conv2_1"

  top: "conv2_1"

  name: "relu2_1"

  type: "ReLU"

}

layer {

  bottom: "conv2_1"

  top: "conv2_2"

  name: "conv2_2"

  type: "Convolution"

  convolution_param {

    num_output: 128

    pad: 1

    kernel_size: 3

  }

}

layer {

  bottom: "conv2_2"

  top: "conv2_2"

  name: "relu2_2"

  type: "ReLU"

}

layer {

  bottom: "conv2_2"

  top: "pool2"

  name: "pool2"

  type: "Pooling"

  pooling_param {

    pool: MAX

    kernel_size: 2

    stride: 2

  }

}

layer {

  bottom: "pool2"

  top: "conv3_1"

  name: "conv3_1"

  type: "Convolution"

  convolution_param {

    num_output: 256

    pad: 1

    kernel_size: 3

  }

}

layer {

  bottom: "conv3_1"

  top: "conv3_1"

  name: "relu3_1"

  type: "ReLU"

}

layer {

  bottom: "conv3_1"

  top: "conv3_2"

  name: "conv3_2"

  type: "Convolution"

  convolution_param {

    num_output: 256

    pad: 1

    kernel_size: 3

  }

}

layer {

  bottom: "conv3_2"

  top: "conv3_2"

  name: "relu3_2"

  type: "ReLU"

}

layer {

  bottom: "conv3_2"

  top: "conv3_3"

  name: "conv3_3"

  type: "Convolution"

  convolution_param {

    num_output: 256

    pad: 1

    kernel_size: 3

  }

}

layer {

  bottom: "conv3_3"

  top: "conv3_3"

  name: "relu3_3"

  type: "ReLU"

}

layer {

  bottom: "conv3_3"

  top: "pool3"

  name: "pool3"

  type: "Pooling"

  pooling_param {

    pool: MAX

    kernel_size: 2

    stride: 2

  }

}

layer {

  bottom: "pool3"

  top: "conv4_1"

  name: "conv4_1"

  type: "Convolution"

  convolution_param {

    num_output: 512

    pad: 1

    kernel_size: 3

  }

}

layer {

  bottom: "conv4_1"

  top: "conv4_1"

  name: "relu4_1"

  type: "ReLU"

}

layer {

  bottom: "conv4_1"

  top: "conv4_2"

  name: "conv4_2"

  type: "Convolution"

  convolution_param {

    num_output: 512

    pad: 1

    kernel_size: 3

  }

}

layer {

  bottom: "conv4_2"

  top: "conv4_2"

  name: "relu4_2"

  type: "ReLU"

}

layer {

  bottom: "conv4_2"

  top: "conv4_3"

  name: "conv4_3"

  type: "Convolution"

  convolution_param {

    num_output: 512

    pad: 1

    kernel_size: 3

  }

}

layer {

  bottom: "conv4_3"

  top: "conv4_3"

  name: "relu4_3"

  type: "ReLU"

}

layer {

  bottom: "conv4_3"

  top: "pool4"

  name: "pool4"

  type: "Pooling"

  pooling_param {

    pool: MAX

    kernel_size: 2

    stride: 2

  }

}

layer {

  bottom: "pool4"

  top: "conv5_1"

  name: "conv5_1"

  type: "Convolution"

  convolution_param {

    num_output: 512

    pad: 1

    kernel_size: 3

  }

}

layer {

  bottom: "conv5_1"

  top: "conv5_1"

  name: "relu5_1"

  type: "ReLU"

}

layer {

  bottom: "conv5_1"

  top: "conv5_2"

  name: "conv5_2"

  type: "Convolution"

  convolution_param {

    num_output: 512

    pad: 1

    kernel_size: 3

  }

}

layer {

  bottom: "conv5_2"

  top: "conv5_2"

  name: "relu5_2"

  type: "ReLU"

}

layer {

  bottom: "conv5_2"

  top: "conv5_3"

  name: "conv5_3"

  type: "Convolution"

  convolution_param {

    num_output: 512

    pad: 1

    kernel_size: 3

  }

}

layer {

  bottom: "conv5_3"

  top: "conv5_3"

  name: "relu5_3"

  type: "ReLU"

}

layer {

  bottom: "conv5_3"

  top: "pool5"

  name: "pool5"

  type: "Pooling"

  pooling_param {

    pool: MAX

    kernel_size: 2

    stride: 2

  }

}

layer {

  bottom: "pool5"

  top: "fc6"

  name: "fc6"

  type: "InnerProduct"

  inner_product_param {

    num_output: 4096

  }

}

layer {

  bottom: "fc6"

  top: "fc6"

  name: "relu6"

  type: "ReLU"

}

layer {

  bottom: "fc6"

  top: "fc6"

  name: "drop6"

  type: "Dropout"

  dropout_param {

    dropout_ratio: 0.5

  }

}

layer {

  bottom: "fc6"

  top: "fc7"

  name: "fc7"

  type: "InnerProduct"

  inner_product_param {

    num_output: 4096

  }

}

layer {

  bottom: "fc7"

  top: "fc7"

  name: "relu7"

  type: "ReLU"

}

layer {

  bottom: "fc7"

  top: "fc7"

  name: "drop7"

  type: "Dropout"

  dropout_param {

    dropout_ratio: 0.5

  }

}

layer {

  bottom: "fc7"

  top: "fc8"

  name: "fc8"

  type: "InnerProduct"

  inner_product_param {

    num_output: 2622

  }

}

layer {

  bottom: "fc8"

  top: "prob"

  name: "prob"

  type: "Softmax"

}
=================================================================
基于深度学习的人脸识别系统系列(Caffe+OpenCV+Dlib)——【三】使用Caffe的MemoryData层与VGG网络模型提取Mat的特征 完结,如果在代码过程中出现了任何问题,直接在博客下留言即可,共同交流学习。
基于深度学习的人脸识别系统(Caffe+OpenCV+Dlib)【三】VGG网络进行特征提取的更多相关文章
- 基于深度学习的人脸识别系统(Caffe+OpenCV+Dlib)【一】如何配置caffe属性表
前言 基于深度学习的人脸识别系统,一共用到了5个开源库:OpenCV(计算机视觉库).Caffe(深度学习库).Dlib(机器学习库).libfacedetection(人脸检测库).cudnn(gp ...
- 基于深度学习的人脸识别系统(Caffe+OpenCV+Dlib)【二】人脸预处理
前言 基于深度学习的人脸识别系统,一共用到了5个开源库:OpenCV(计算机视觉库).Caffe(深度学习库).Dlib(机器学习库).libfacedetection(人脸检测库).cudnn(gp ...
- 基于深度学习的人脸识别系统系列(Caffe+OpenCV+Dlib)——【四】使用CUBLAS加速计算人脸向量的余弦距离
前言 基于深度学习的人脸识别系统,一共用到了5个开源库:OpenCV(计算机视觉库).Caffe(深度学习库).Dlib(机器学习库).libfacedetection(人脸检测库).cudnn(gp ...
- 基于深度学习的人脸识别系统Win10 环境安装与配置(python+opencv+tensorflow)
一.需要下载的软件.环境及文件 (由于之前见识短浅,对Anaconda这个工具不了解,所以需要对安装过程做出改变:就是Python3.7.2的下载安装是可选的,因为Anaconda已经为我们解决Pyt ...
- 基于深度学习的人脸性别识别系统(含UI界面,Python代码)
摘要:人脸性别识别是人脸识别领域的一个热门方向,本文详细介绍基于深度学习的人脸性别识别系统,在介绍算法原理的同时,给出Python的实现代码以及PyQt的UI界面.在界面中可以选择人脸图片.视频进行检 ...
- 基于深度学习的中文语音识别系统框架(pluse)
目录 声学模型 GRU-CTC DFCNN DFSMN 语言模型 n-gram CBHG 数据集 本文搭建一个完整的中文语音识别系统,包括声学模型和语言模型,能够将输入的音频信号识别为汉字. 声学模型 ...
- 【OCR技术系列之四】基于深度学习的文字识别(3755个汉字)
上一篇提到文字数据集的合成,现在我们手头上已经得到了3755个汉字(一级字库)的印刷体图像数据集,我们可以利用它们进行接下来的3755个汉字的识别系统的搭建.用深度学习做文字识别,用的网络当然是CNN ...
- 【OCR技术系列之四】基于深度学习的文字识别
上一篇提到文字数据集的合成,现在我们手头上已经得到了3755个汉字(一级字库)的印刷体图像数据集,我们可以利用它们进行接下来的3755个汉字的识别系统的搭建.用深度学习做文字识别,用的网络当然是CNN ...
- 基于深度学习的回声消除系统与Pytorch实现
文章作者:凌逆战 文章代码(pytorch实现):https://github.com/LXP-Never/AEC_DeepModel 文章地址(转载请指明出处):https://www.cnblog ...
随机推荐
- jquery源码03 (3184 , 3295) support : 功能检测
<!DOCTYPE HTML> <html> <head> <meta http-equiv="Content-Type" content ...
- button按钮怎么实现超链接
button按钮怎么实现超链接 一.总结 1.我的按钮实现超链接是通过button内嵌a标签来实现的 <button class="am-btn am-btn-default am-b ...
- 蓝桥杯训练 2n皇后
问题描述 给定一个n*n的棋盘,棋盘中有一些位置不能放皇后.现在要向棋盘中放入n个黑皇后和n个白皇后,使任意的两个黑皇后都不在同一行.同一列或同一条对角线上,任意的两个白皇后都不在同一行.同一列或同一 ...
- POJ 2141 模拟
思路:字符串解密 啥都告诉你了 模拟就好 //By SiriusRen #include <cstdio> #include <cstring> using namespace ...
- win7禁用启用本地连接bat及vbs
平台:Windows 7 .8.1 目的:用bat启用禁用网卡 操作: cls @ECHO OFFtitle 启用或禁用本地连接 CLS color 0a GOTO MENU:MENU ECHO. E ...
- js 判断是不是空、值是否存在
判断数组是否存在某个值: Array.indexOf(val) > -1 //存在 (缺陷:一是不够语义化,它的含义是找到参数值的第一个出现位置,所以要去比较是否不等于-1,表达起来不够直观.二 ...
- 关于css的入门知识
css:叠层样式表,给html添加样式的 接下来说一说,在网页中如何嵌套style样式 1.行间样式:把style(*权重1000)作为属性卸载标签里 eg:<p style="col ...
- ps---报告当前系统的进程状态
ps aux最初用到Unix Style中,而ps -ef被用在System V Style中,两者输出略有不同.现在的大部分Linux系统都是可以同时使用这两种方式的. linux上进程有5种状态: ...
- Logstash之Logstash inputs(file和redis插件)、Logstash outputs(elasticsearch 和redis插件)和Filter plugins
前期博客 Logstash安装和设置(图文详解)(多节点的ELK集群安装在一个节点就好) Filebeat啊,根据input来监控数据,根据output来使用数据!!! 请移步, Filebeat之 ...
- Android 多线程断点续传同时下载多个大文件
最近学习在Android环境中一些网络请求方面的知识,其中有一部分是关于网络下载方面的知识.在这里解析一下自己写的demo,总结一下自己所学的知识.下图为demo的效果图,仿照一些应用下载商城在Lis ...