SpringBoot与数据源
1、JDBC
<dependency>

    <groupId>org.springframework.boot</groupId>

    <artifactId>spring‐boot‐starter‐jdbc</artifactId>

</dependency>

 <dependency>

     <groupId>mysql</groupId>

    <artifactId>mysql‐connector‐java</artifactId>

     <scope>runtime</scope>

 </dependency>
spring:

datasource:

username: root

password:

url: jdbc:mysql://192.168.15.22:3306/jdbc

driver‐class‐name: com.mysql.jdbc.Driver
org.apache.tomcat.jdbc.pool.DataSource、HikariDataSource、BasicDataSource、
/**

* Generic DataSource configuration.

*/

@ConditionalOnMissingBean(DataSource.class)

@ConditionalOnProperty(name = "spring.datasource.type") static class Generic {
schema‐*.sql、data‐*.sql

默认规则:schema.sql,schema‐all.sql;

 可以使用

    schema:

     ‐ classpath:department.sql

    指定位置
2、整合Druid数据源
导入druid数据源

    @Configuration

    public class DruidConfig {

    @ConfigurationProperties(prefix = "spring.datasource")

    @Bean

    public DataSource druid(){

        return new DruidDataSource();

}

    //配置Druid的监控

    //1、配置一个管理后台的Servlet

    @Bean

    public ServletRegistrationBean statViewServlet(){

    ServletRegistrationBean bean = new ServletRegistrationBean(new StatViewServlet(), "/druid/*");

    Map<String,String> initParams = new HashMap<>();

    initParams.put("loginUsername","admin");
    initParams.put("loginPassword","");
   initParams.put("allow","");

    //默认就是允许所有访问

    initParams.put("deny","192.168.15.21");

    bean.setInitParameters(initParams);

    return bean;

}

    //2、配置一个web监控的filter

    @Bean

    public FilterRegistrationBean webStatFilter(){

     FilterRegistrationBean bean = new FilterRegistrationBean();
       bean.setFilter(new WebStatFilter());

      Map<String,String> initParams = new HashMap<>();
     initParams.put("exclusions","*.js,*.css,/druid/*");
     bean.setInitParameters(initParams);
    bean.setUrlPatterns(Arrays.asList("/*"));
     return bean;

 }

}
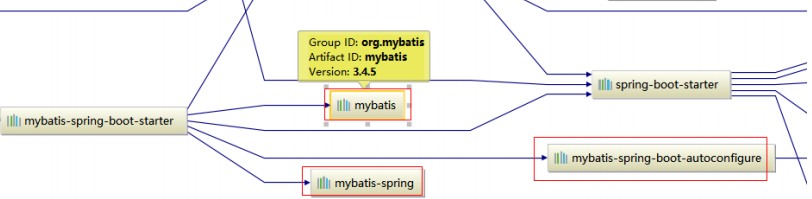
3、整合MyBatis
<dependency>
 <groupId>org.mybatis.spring.boot</groupId>
<artifactId>mybatis‐spring‐boot‐starter</artifactId>
 <version>1.3.</version>
</dependency>
4)、注解版
public interface DepartmentMapper {
   @Select("select * from department where id=#{id}")
  public Department getDeptById(Integer id);

   @Delete("delete from department where id=#{id}")
  public int deleteDeptById(Integer id);

  @Options(useGeneratedKeys = true,keyProperty = "id")
   @Insert("insert into department(departmentName) values(#{departmentName})")
  public int insertDept(Department department);

  @Update("update department set departmentName=#{departmentName} where id=#{id}")
  public int updateDept(Department department);
}
@org.springframework.context.annotation.Configuration

   public class MyBatisConfig {
     @Bean
    public ConfigurationCustomizer configurationCustomizer(){
    return new ConfigurationCustomizer(){

     @Override
     public void customize(Configuration configuration) {
     configuration.setMapUnderscoreToCamelCase(true);
 }
};
}
}
使用MapperScan批量扫描所有的Mapper接口;
@MapperScan(value = "com.atguigu.springboot.mapper")
 @SpringBootApplication
 public class SpringBoot06DataMybatisApplication {
 public static void main(String[] args) {
    SpringApplication.run(SpringBoot06DataMybatisApplication.class, args);
 }
}
5)、配置文件版
mybatis:
   config‐location: classpath:mybatis/mybatis‐config.xml 指定全局配置文件的位置
  mapper‐locations: classpath:mybatis/mapper/*.xml 指定sql映射文件的位置
4、整合SpringData JPA
1)、SpringData简介
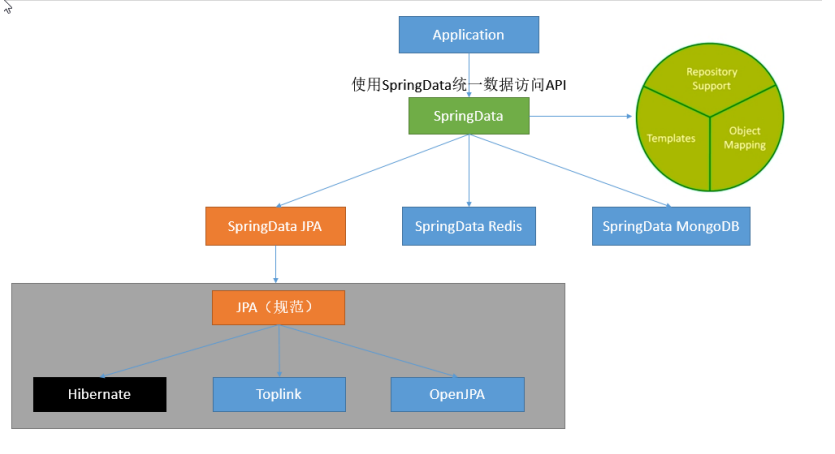
2)、整合SpringData JPA
//使用JPA注解配置映射关系
@Entity //告诉JPA这是一个实体类(和数据表映射的类)
@Table(name = "tbl_user")

//@Table来指定和哪个数据表对应;如果省略默认表名就是user;
 public class User {
   @Id //这是一个主键
   @GeneratedValue(strategy = GenerationType.IDENTITY)//自增主键
  private Integer id;
  @Column(name = "last_name",length = 50) //这是和数据表对应的一个列
   private String lastName;
  @Column //省略默认列名就是属性名
  private String email;
//继承JpaRepository来完成对数据库的操作
  public interface UserRepository extends JpaRepository<User,Integer> { }
spring:
  jpa:
  hibernate:
  # 更新或者创建数据表结构
    ddl‐auto: update
   # 控制台显示SQL
    show‐sql: true
SpringBoot与数据源的更多相关文章
- Spring-Boot配置文件数据源配置项
Spring-Boot配置文件数据源配置项(常用配置项为红色) 参数 介绍 spring.datasource.continue-on-error = false 初始化数据库时发生错误时,请勿停止 ...
- SpringBoot多数据源动态切换数据源
1.配置多数据源 spring: datasource: master: password: erp_test@abc url: jdbc:mysql://127.0.0.1:3306/M201911 ...
- SpringBoot学习笔记(三):SpringBoot集成Mybatis、SpringBoot事务管理、SpringBoot多数据源
SpringBoot集成Mybatis 第一步我们需要在pom.xml里面引入mybatis相关的jar包 <dependency> <groupId>org.mybatis. ...
- 搞定SpringBoot多数据源(1):多套源策略
目录 1. 引言 2. 运行环境 3. 多套数据源 3.1 搭建 Spring Boot 工程 3.1.1 初始化 Spring Boot 工程 3.1.2 添加 MyBatis Plus 依赖 3. ...
- 搞定SpringBoot多数据源(2):动态数据源
目录 1. 引言 2. 动态数据源流程说明 3. 实现动态数据源 3.1 说明及数据源配置 3.1.1 包结构说明 3.1.2 数据库连接信息配置 3.1.3 数据源配置 3.2 动态数据源设置 3. ...
- 搞定SpringBoot多数据源(3):参数化变更源
目录 1. 引言 2. 参数化变更源说明 2.1 解决思路 2.2 流程说明 3. 实现参数化变更源 3.1 改造动态数据源 3.1.1 动态数据源添加功能 3.1.2 动态数据源配置 3.2 添加数 ...
- SpringBoot多数据源:动态数据源
目录 1. 引言 2. 动态数据源流程说明 3. 实现动态数据源 3.1 说明及数据源配置 3.1.1 包结构说明 3.1.2 数据库连接信息配置 3.1.3 数据源配置 3.2 动态数据源设置 3. ...
- Springboot 多数据源配置,结合tk-mybatis
一.前言 作为一个资深的CRUD工程师,我们在实际使用springboot开发项目的时候,难免会遇到同时使用多个数据库的情况,比如前脚刚查询mysql,后脚就要查询sqlserver. 这时,我们很直 ...
- springBoot多数据源(不同类型数据库)项目
一个基于springboot的多数据源(mysql.sqlserver)项目,先看看项目结构,注意dao层 多数据源mysql配置代码: package com.douzi.robotcenter.c ...
- springboot 双数据源+aop动态切换
# springboot-double-dataspringboot-double-data 应用场景 项目需要同时连接两个不同的数据库A, B,并且它们都为主从架构,一台写库,多台读库. 多数据源 ...
随机推荐
- SpringBoot 使用 RestTemplate 调用exchange方法 显示错误信息
SpringBoot使用RestTempate SpringBoot使用RestTemplate摘要认证 SpringBoot使用RestTemplate基础认证 SpringBoot使用RestTe ...
- MySql日期加天数,小时,分钟...得到新的时间
在当前的日期上加三天,天数随便改: SELECT date_add(CURRENT_DATE(), interval 3 day); 在指定的日期上加三天: SELECT date_add('2014 ...
- [Vim] 01 凡人操作
历史评价 编辑器之神 一个凡人的自我修养 成神是不可能成神的,只能是先入个门,然后一点一点学 Vim 官网 三种模式 插入模式(注意看光标) 命令模式(注意看光标) 编辑模式(注意看光标) 其实还有一 ...
- zookeeper 分布式协调服务
分布式协调服务作用是将多机协调的职责从分布式应用中独立出来,以减少系统的耦合性和增加扩展性. 而zookeeper采用分布式中经典的主从架构:master->slave,通常以动态的存储分布式应 ...
- vue+express利用token 完成前后端登录
token是后端给前端的一个二维码, 这个二维码一般是暗码, 前端拿着这个二维码到后端, 后端便可以通过这个二维码得知用户是否登录过, 用户是谁等信息(具体什么信息,是后端在返回token时候设置的 ...
- adb,aapt等命令使用
adb install/uninstall:安装/卸载手机中的应用. devices:查看当前连接到电脑中的设备. adb shell 首先运行adb ...
- You-Get,多网站视频下载工具,非常方便
You-Get是一个非常优秀的网站视频下载工具.使用You-Get可以很轻松的下载到网络上的视频.图片及音乐. 按Win+R键打开运行,输入cmd,再输入命令 pip install you-get, ...
- PythonDay07
第七章 今日内容 基础数据类型补充 以后会遇到的坑 二次编码 基础类型补充 stra = "One two"print(a.capitalize()) # 首字母大写print ...
- 有十个div,怎样实现选中其中一个,改变其背景色,另外九个不变,当选中另一个时又改变另一个的背景色
这个是jq写的,可以自己下载一个js库,配上这个就可以了,里面的div可以用class控制,比如你10个div class为a1 也就是<div class="a1"> ...
- Hive常用非交互式命令
[hadoop@hadoop hive-0.13.1]$ bin/hive -help usage: hive -d,--define <key=value> Variable subsi ...