springboot2.0整合redis的发布和订阅
1.Maven引用
        <dependency>

            <groupId>org.springframework.boot</groupId>

            <artifactId>spring-boot-starter-web</artifactId>

        </dependency>

        <dependency>

            <groupId>org.springframework.boot</groupId>

            <artifactId>spring-boot-starter-data-redis</artifactId>

        </dependency>
2.redis属性配置
spring.redis.database=

spring.redis.host=127.0.0.1

spring.redis.port=

spring.redis.password=******

server.port=
3.设置监听相关对象
3.1接听对象
RedisReceiver可以是普通类或者继承MessageListener,普通类的写法如下,接收的时候只接收到消息,没有频道名
package com.example.redistest.config;

import org.springframework.data.redis.connection.Message;

import org.springframework.data.redis.connection.MessageListener;

import org.springframework.stereotype.Component;

@Component

public class RedisReceiver {

    public void receiveMessage(String message) {

        // TODO 这里是收到通道的消息之后执行的方法

        System.out.println(message);

    }

}
继承MessageListener,就能拿到消息体和频道名。
package com.example.redistest.config;

import org.springframework.data.redis.connection.Message;

import org.springframework.data.redis.connection.MessageListener;

import org.springframework.stereotype.Component;

@Component

public class RedisReceiver implements MessageListener {

    @Override

    public void onMessage(Message message, byte[] pattern) {

        System.out.println(new String(message.getBody()));

        System.out.println(new String(message.getChannel()));

    }

}
3.2 配置监听适配器、消息监听容器
container.addMessageListener(listenerAdapter, new PatternTopic("channel:test"));
消息监听容器增加监听的消息,第一个参数是监听适配器,第2个参数是监听的频道。
package com.example.redistest.config;

import org.springframework.cache.annotation.EnableCaching;

import org.springframework.context.annotation.Bean;

import org.springframework.context.annotation.Configuration;

import org.springframework.data.redis.connection.MessageListener;

import org.springframework.data.redis.connection.RedisConnectionFactory;

import org.springframework.data.redis.core.StringRedisTemplate;

import org.springframework.data.redis.listener.PatternTopic;

import org.springframework.data.redis.listener.RedisMessageListenerContainer;

import org.springframework.data.redis.listener.adapter.MessageListenerAdapter;

@Configuration

@EnableCaching

public class RedisCacheConfig {

    @Bean

    RedisMessageListenerContainer container(RedisConnectionFactory connectionFactory,

                                            MessageListenerAdapter listenerAdapter) {

        RedisMessageListenerContainer container = new RedisMessageListenerContainer();

        container.setConnectionFactory(connectionFactory);

        // 可以添加多个 messageListener,配置不同的交换机

        container.addMessageListener(listenerAdapter, new PatternTopic("channel:test"));

        return container;

    }

    @Bean

    MessageListenerAdapter listenerAdapter(RedisReceiver receiver) {

        System.out.println("消息适配器1");

        return new MessageListenerAdapter(receiver, "onMessage");

    }

    @Bean

    StringRedisTemplate template(RedisConnectionFactory connectionFactory) {

        return new StringRedisTemplate(connectionFactory);

    }

}
3.3 消息发送
package com.example.redistest.controller;

import org.springframework.beans.factory.annotation.Autowired;

import org.springframework.data.redis.core.RedisTemplate;

import org.springframework.data.redis.core.StringRedisTemplate;

import org.springframework.data.redis.core.ValueOperations;

import org.springframework.stereotype.Controller;

import org.springframework.web.bind.annotation.PathVariable;

import org.springframework.web.bind.annotation.RequestMapping;

import java.util.Date;

@RequestMapping("/redis")

@Controller

public class RedisController {

    @Autowired

    StringRedisTemplate template;

    /**

     * 发布消息

     *

     * @param id

     * @return

     */

    @RequestMapping("/sendMessage/{id}")

    public String sendMessage(@PathVariable String id) {

        for(int i = 1; i <= 5; i++) {

            template.convertAndSend("channel:test", String.format("我是消息{%d}号: %tT", i, new Date()));

        }

        return "";

    }

}
测试
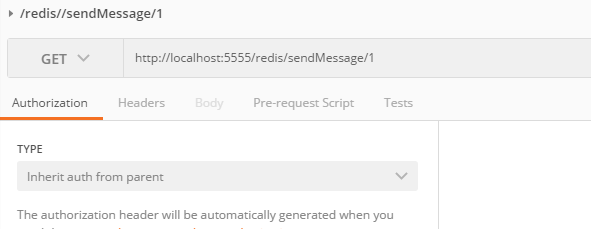
postman访问http://localhost:5555/redis/sendMessage/1
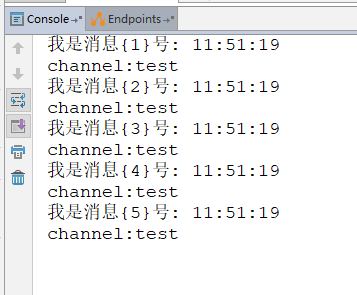
接收消息后打印
springboot2.0整合redis的发布和订阅的更多相关文章
- SpringBoot2.0 整合 Redis集群 ,实现消息队列场景
本文源码:GitHub·点这里 || GitEE·点这里 一.Redis集群简介 1.RedisCluster概念 Redis的分布式解决方案,在3.0版本后推出的方案,有效地解决了Redis分布式的 ...
- Springboot2.0整合Redis(注解开发)
一. pom.xm文件引入对应jar包 <dependency> <groupId>org.springframework.boot</groupId> <a ...
- SpringBoot2.0整合Redis
Spring Boot2.0在2018年3月份正式发布,相比1.0还是有比较多的改动,例如SpringBoot 自2.0起支持jdk1.8及以上的版本.第三方类库升级.响应式 Spring 编程支持等 ...
- springboot2.0整合redis作为缓存以json格式存储对象
步骤1 <dependency> <groupId>org.springframework.boot</groupId> <artifactId>spr ...
- SpringBoot2.x整合Redis实战 4节课
1.分布式缓存Redis介绍 简介:讲解为什么要用缓存和介绍什么是Redis,新手练习工具 1.redis官网 https://redis.io/download 2.新手 ...
- redis实现发布(订阅)消息
redis实现发布(订阅)消息 什么是redis的发布订阅(pub/sub)? Pub/Sub功能(means Publish, Subscribe)即发布及订阅功能.基于事件的系统中,Pub/S ...
- 小D课堂 - 零基础入门SpringBoot2.X到实战_第9节 SpringBoot2.x整合Redis实战_39、SpringBoot2.x整合redis实战讲解
笔记 3.SpringBoot2.x整合redis实战讲解 简介:使用springboot-starter整合reids实战 1.官网:https://docs.spring.io/spring-bo ...
- 第二篇:SpringBoot2.0整合ActiveMQ
本篇开始将具体介绍SpringBoot如何整合其它项目. 如何创建SpringBoot项目 访问https://start.spring.io/. 依次选择构建工具Maven Project.语言ja ...
- SpringBoot2.0 整合 QuartJob ,实现定时器实时管理
一.QuartJob简介 1.一句话描述 Quartz是一个完全由java编写的开源作业调度框架,形式简易,功能强大. 2.核心API (1).Scheduler 代表一个 Quartz 的独立运行容 ...
随机推荐
- git 指定从其他分支拉取commit
git cherry-pick commit-id (github 上的短号)
- 5分钟让你知道什么是PKI
转:https://www.cnblogs.com/jerain6312/p/8572841.html 前言 Public Key Infrastructure(PKI),中文叫做公开密钥基础设施,也 ...
- NSIS打包后无法解压7z资源包的问题
以前产品一直都是好好的.今天突然不行了.找了半天原因,原来发现7Z的压缩属性变成了"LZMA2"了. 要LZMA才行.
- php对bom的处理
通常只有在windows的notepad中 , 创建文本文件, 保存为UTF-8 时, 它会自动添加3个字节: ef bb bf. 用editplus来看txt文件就可以看得很清楚. 但是, 只有wi ...
- Firefox,Chrome使用
Firefox 插件 REDIRECTOR Automatically redirect pages based on user-defined rules. 根据用户定义的规则自动重定向页面的插件. ...
- python-网络编程requests模块
urllib模块去请求的确比较麻烦,需要不断的encode和decode:而requests模块就比较方便了,它是基于requests模块开发的第三方模块,安装简单只需要 pip install r ...
- Python Error: “ImportError: No module named six”,用自动安装解决依赖问题
在初次运行带有matplotlib包的程序时,被告知了缺少模块(如标题所示).搜索调查后发现在自己安装的python中确实缺少此安装包,接下来,进行了下载.安装.运行,又少了一个模块,再下载.再运行, ...
- 随机访问RandomAccessFile
public native long getFilePointer() throws IOException;//当前文件的指针位置是 import java.io.IOException; impo ...
- Flink流式引擎技术分析--大纲
Flink简介 Flink组件栈 Flink特性 流处理特性 API支持 Libraries支持 整合支持 Flink概念 Stream.Transformation.Operator Paralle ...
- Java 高级-集合框架
参考资料 参考 HashMap 类似 C++ 中的 STL 标准模板库,Java 也在 java.util 包中封装了一套常用数据结构及其算法,称为集合框架.所有的集合框架都包含如下内容: 接口:代表 ...