Using HAProxy as an API Gateway, Part 2 [Authentication]
转自:https://www.haproxy.com/blog/using-haproxy-as-an-api-gateway-part-2-authentication/
HAProxy is a powerful API gateway due to its ability to provide load balancing, rate limiting, observability and other features to your service endpoints. It also integrates with OAuth 2, giving you control over who can access your APIs. In this blog post, you’ll see how.
In the previous blog post, Using HAProxy as an API Gateway, Part 1 [Introduction], we touched upon how simple it is for you to evade that proverbial avalanche of complexity by setting up an immensely powerful point of entry to your services—an API gateway. HAProxy creates a unified front that clients can connect to, distributing requests to your backend without breaking a sweat, allowing you to operate at any scale and in any environment. HAProxy, at the same time, provides best-in-class load balancing, advanced DDoS and bot protection, rate limiting and observability.
The second part of our API gateway series focuses on how to authenticate and authorize users that want to connect. After all, APIs provide direct access to backend systems and may return sensitive information such as healthcare, financial and PII data. Recent data breaches due to API vulnerabilities have hit organizations as large as Amazon and the USPS. APIs often expose create, update and delete operations on your data too, which shouldn’t be open to just anyone.
In this post, we’ll demonstrate how HAProxy defends your APIs from unauthorized access via JWT access tokens and shrinks the attack surface that you might otherwise expose. You’ll learn how HAProxy can be extended with Lua, which provides a flexible way to integrate with other tools, protocols, and frameworks.
Authentication and Authorization
Let’s begin with a scenario where you have an API to protect. For example, let’s say that this API provides methods related to listing hamsters up for adoption. It has the following API endpoints:
| API endpoint | What it does |
| GET /api/hamsters | Returns a list of hamsters ready to be adopted |
| POST /api/hamsters/{name} | Adds a newly arrived hamster to the list |
| DELETE /api/hamsters/{name} | Removes a hamster from the list after it’s found a home |
This fictitious API lets you view available hamsters, add new hamsters to the list, and remove the furry critters after they’ve been adopted to loving homes. For example, you could call GET /api/hamsters like this:
GET https://api.mywebsite.com/api/hamsters
| [ | |
| "robo-hamster", | |
| "space-hamster", | |
| "commando-hamster", | |
| "pirate_hamster" | |
| ] |
This would be consumed by your frontend application, perhaps through Ajax or when loading the page. For requests like this that retrieve non-sensitive information, you may not ask users to log in and there may not be any authentication necessary. For other requests, such as those that call the POST and DELETE endpoints for adding or deleting records, you may want users to log in first. If an anonymous user tries to call the POST and DELETE API methods, they should receive a 403 Forbidden response.
| <html> | |
| <body> | |
| <h1>403 Forbidden</h1> | |
| Request forbidden by administrative rules. | |
| </body> | |
| </html> |
There are two terms that we need to explain: authentication and authorization. Authentication is the process of getting a user’s identity. Its primary question is: Who is using your API? Authorization is the process of granting access. Its primary question is: Is this client approved to call your API?
OAuth 2 is a protocol that authenticates a client and then gives back an access token that tells you whether or not that client is authorized to call your API. By and large, the concept of identity doesn’t play a big part in OAuth 2, which is mostly concerned with authorization. Think of it like going to the airport, and at the first gate you are meticulously inspected by a number of set criteria. Upon inspection, you are free to continue on to your terminal where you can buy overpriced coffee, duty-free souvenir keychains and maybe a breakfast bagel. Since you’ve been inspected and have raised no red flags, you are free to roam around.
In a similar way, OAuth 2 issues tokens that typically don’t tell you the identity of the person accessing the API. They simply show that the user, or the client application that the user has delegated their permissions to, should be allowed to use the API. That’s not to say that people never layer on identity properties into an OAuth token. However, OAuth 2 isn’t officially meant for that. Instead, other protocols like OpenID Connect should be used when you need identity information.
As we described in Part 1 of this series, an API gateway is a proxy between the client and your backend API services that routes requests intelligently. It also acts as a security layer. When you use HAProxy as your API gateway, you can validate OAuth 2 access tokens that are attached to requests.
For simplifying your API gateway and keeping the complicated authentication pieces out of it, you’ll offload the task of authenticating clients to a third-party service like Auth0 or Okta. These services handle logging users in and can distribute tokens to clients that successfully authenticate. A client application would then include the token with any requests it sends to your API.
After you’ve updated HAProxy with some custom Lua code, it will inspect each request and look at the token that the client is presenting. It will then decide whether or not to allow the request through.
OAuth2 Access Tokens
An access token uses the JSON Web Token (JWT) format and contains three base64-encoded sections:
- A header that contains the type of token (“JWT” in this case) and the algorithm used to sign the token
- A payload that contains:
- the URL of the token issuer
- the audience that the token is intended for (your API URL)
- an expiration date
- any scopes (e.g. read and write) that the client application should have access to
- A signature to ensure that the token is truly from the issuer and that it has not been tampered with since being issued
In this article, we won’t focus on how a client application gets a token. In short, you’d redirect users to a login page hosted by a third-party service like Auth0 or Okta. Instead, we’ll highlight how to validate a token. You will see how HAProxy can inspect a token that’s presented to it and then decide whether to let the request proceed.
If you’re curious about what the JWT data looks like, you can use the debugger at https://jwt.io to decode it.
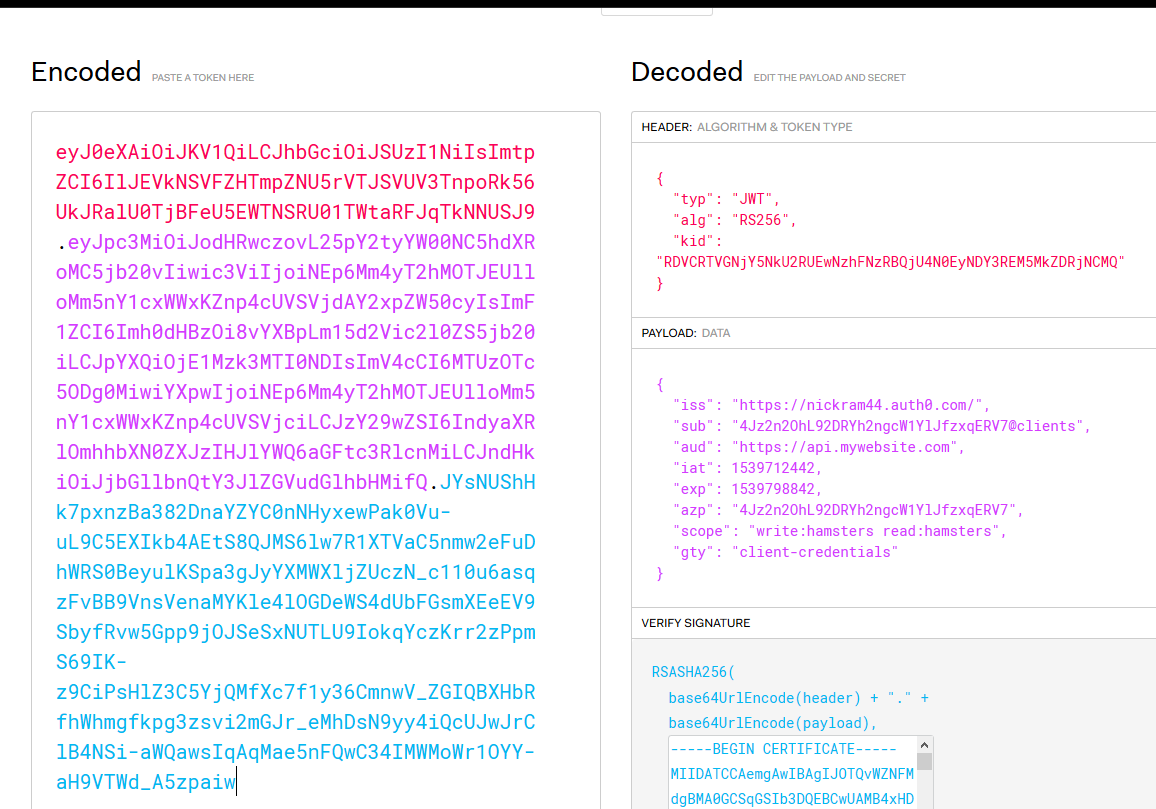
Decoding JWT data
Some interesting fields to note are:
alg, the algorithm, which is RS256 in this example, that was used to sign the tokeniss, the issuer, or the service that authenticated the client and created the tokenaud, the audience, which is the URL of your API gatewayexp, the expiration date, which is a UNIX timestampscope, which lists the granular permissions that the client has been granted (Note that Okta calls this field “scp”, so the Lua code would have to be modified to suit.)
API Gateway Sample Application
To follow this tutorial, you have two options:
- You can clone the sample application from Github and use Vagrant to set it up.
- You can clone the JWT Lua code repository by itself. It provides an install script to assist with installing the Lua library and its dependencies into your own environment.
The workflow for authorizing users looks like this:
- A client application uses one of the grant workflows to request a token from the authentication service. For example, a frontend JavaScript application may use the implicit grant flow to get a token.
- Once the client has received a token, it stores it so that it can continue to use it until it expires.
- When calling an API method, the application attaches the token to the request in an HTTP header called Authorization. The header’s value is prefixed with Bearer, like so:
Authorization: Bearer <token> - HAProxy receives the request and performs the following checks:
- Was the token signed using an algorithm that the Lua code understands?
- Is the signature valid?
- Is the token expired?
- Is the issuer of the token (the authenticating service) who you expect it to be?
- Is the audience (the URL of your API gateway) what you expect?
- Are there any scopes that would limit which resources the client can access?
- The application continues to send the token with its requests until the token expires, at which time it repeats Step 1 to get a new one.
To test it out, sign up for an account with Auth0. Then, you can use curl to craft an HTTP request to get a new token using the client credential grant flow. POST a request to https://{your_account}.auth0.com/oauth/token and get an access token back. The Auth0 website gives you some helpful guidance on how to do this.
Here’s an example that asks for a new token via the /oauth/token endpoint. It sends a JSON object containing the client’s credentials, client_id and client_secret:
| curl --request POST \ | |
| --url 'https://myaccount.auth0.com/oauth/token' \ | |
| --header 'content-type: application/json' \ | |
| --data '{"client_id": "abcdefg12345", "client_secret": "HIJKLMNO67890", "audience": "https://api.mywebsite.com", "grant_type": "client_credentials", "scope": "read:hamsters write:hamsters"}' |
You’ll get back a response that contains the JWT access token:
| { | |
| "access_token": "eyJ0eXAiOiJKV1QiLCJhbGciOiJSUzI1NiIsImtpZCI6IlJEVkNSVFZHTmpZNU5rVTJSVUV3TnpoRk56UkJRalU0TjBFeU5EWTNSRU01TWtaRFJqTkNNUSJ9.eyJpc3MiOiJodHRwczovL25pY2tyYW00NC5hdXRoMC5jb20vIiwic3ViIjoiNEp6Mm4yT2hMOTJEUlloMm5nY1cxWWxKZnp4cUVSVjdAY2xpZW50cyIsImF1ZCI6Imh0dHBzOi8vYXBpLm15d2Vic2l0ZS5jb20iLCJpYXQiOjE1NDE1Mzk2MzgsImV4cCI6MTU0MTYyNjAzOCwiYXpwIjoiNEp6Mm4yT2hMOTJEUlloMm5nY1cxWWxKZnp4cUVSVjciLCJzY29wZSI6IndyaXRlOmhhbXN0ZXJzIHJlYWQ6aGFtc3RlcnMiLCJndHkiOiJjbGllbnQtY3JlZGVudGlhbHMifQ.hI44dM3ROdnowjjbbnoLWZkeHKx0k-9nu-TWUmABRo3CC40O69aOSIzn4p24qni_5q65MNaSqsznXSb0x0saABawHG8rQ09Y1PcRmBCSNnS43ptkl4a302yGAvYOzNE0F7NkWYNVFoGqheFK88kHG3grWU94ZvAzJEai_ITVnG7n2-sgvaxk7AGpd5xLycrtMHxMC8iHvNja9YfnMgwlqW7b8B9M9KyTJrWGOg687-mGY9UEf4nD9doDa1owD4UcsONDppU7bBxgLEVlUbWth6Pd3Rc6pVfWQpzwY83FxIXiIGFr69ABlcoHajcoty7l_PyN3hmobhyZ-8hnqBWSeA", | |
| "scope": "write:hamsters read:hamsters", | |
| "expires_in": 86400, | |
| "token_type": "Bearer" | |
| } |
In a production environment, you’d use the client credentials grant workflow only with trusted client applications where you can protect the client ID and secret. It works really well for testing though.
Now that you have a token, you can call methods on your API. One of the benefits of OAuth 2 over other authorization schemes like session cookies is that you control the process of attaching the token to the request. Whereas cookies are always passed to the server with every request, even those submitted from an attacker’s website as in CSRF attacks, your client-side code controls sending the access token. An attacker will not be able to send a request to your API URL with the token attached.
The request will look like this:
| curl --request POST \ | |
| --url https://api.mywebsite.com/api/hamsters/turbo-hamster \ | |
| --header 'authorization: Bearer eyJ0eXAiOiJKV1QiLCJhbGciOiJSUzI1NiI...' |
In the next section, you’ll see how HAProxy can, with the addition of some Lua code, decode and validate access tokens.
Configuring HAProxy for OAuth 2
Before an issuer like Auth0 gives a client an access token, it signs it. Since you’ll want to verify that signature, you’ll need to download the public key certificate from the token issuer’s website. On the Auth0 site, you’ll find the download link under Applications > [Your application] > Settings > Show Advanced Settings > Certificates. Note, however, that it will give you a certificate in the following format:
| -----BEGIN CERTIFICATE----- | |
| MIIDATCCAemgAwIBAgIJOTQvWZNFMdgBMA0GCSqGSIb3DQEBCwUAMB4xHDAaBgNV | |
| BAMTE25pY2tyYW00NC5hdXRoMC5jb20wHhcNMTgxMDA5MDA1OTMyWhcNMzIwNjE3 | |
| MDA1OTMyWjAeMRwwGgYDVQQDExNuaWNrcmFtNDQuYXV0aDAuY29tMIIBIjANBgkq | |
| hkiG9w0BAQEFAAOCAQ8AMIIBCgKCAQEAvIL8bebCh+pi68Rt0CCu104VqR10kuD0 | |
| E1yzwaywvaEiyhfUeDDKAyKC8yS5ilu9xyWK/pg/84RiWq7WoqhUm8L06jtknn/Z | |
| COuyUdkn1QcdOG10lbbrUF1AOduTIvFYyT4zHrIcKt6MyeQUO0kHcXQU7lvM2C62 | |
| BboAasZFupDts1m1kPZMWaiSjLrE1eruhl8NrfipiPWMZJSJoYCQcmtN3REXk9z8 | |
| X7ZPgcMJ9hNN+Kv0fTYLZI4wS4TpHscVfbK18cL4uLrTCcip7jNey2KZ/YdbeHgm | |
| mcQAdiB4veH4I2dAyqIdsy8Jk+KTs3Ae8qp+S3XtC8z/uXMbN7lRAwIDAQABo0Iw | |
| QDAPBgNVHRMBAf8EBTADAQH/MB0GA1UdDgQWBBRh4OxTHcFgxEk96rKbvWHibUeB | |
| wzAOBgNVHQ8BAf8EBAMCAoQwDQYJKoZIhvcNAQELBQADggEBACYMzTV0kHcRDwJy | |
| j+XHmmFimPCcgOPOwo4h4eSRIq8XCyFhdOlhuyj8T6ESClKaAz5OmKvXBBP7Onpk | |
| Ucrbv1VaNCluc/X6in2hptru3L/Ouxjv22QwCWNVB288ns3cYszr5M1ycaWnqXDm | |
| Y4/xoK3phUcTIQBFY1I1JuKxDzSihDeEAlkXMYwiCSreG1WuAmyA3oWEfdpfnwwz | |
| 3QT2YTRs3P/IKSlLeYzC1Wn5BYrmyHK1EC7scTofdFz+OqldINLB08kk7Axv73hw | |
| D72zNfYVzX9Eh+d3jH6u6TsLD2M6dvTvYyMP8yRLy1LbbRpaZBfFdDrEtqOO0+61 | |
| o9gGYJE= | |
| -----END CERTIFICATE----- |
This contains the public key that you can use to validate the signature, but also extra metadata that can’t be used. Invoke the following OpenSSL command to convert it to a file containing just the public key:
| openssl x509 -pubkey -noout -in ./mycert.pem > pubkey.pem |
This will give you a new file called pubkey.pem that is much shorter:
| -----BEGIN PUBLIC KEY----- | |
| MIIBIjANBgkqhkiG9w0BAQEFAAOCAQ8AMIIBCgKCAQEAvIL8bebCh+pi68Rt0CCu | |
| 104VqR10kuD0E1yzwaywvaEiyhfUeDDKAyKC8yS5ilu9xyWK/pg/84RiWq7WoqhU | |
| m8L06jtknn/ZCOuyUdkn1QcdOG10lbbrUF1AOduTIvFYyT4zHrIcKt6MyeQUO0kH | |
| cXQU7lvM2C62BboAasZFupDts1m1kPZMWaiSjLrE1eruhl8NrfipiPWMZJSJoYCQ | |
| cmtN3REXk9z8X7ZPgcMJ9hNN+Kv0fTYLZI4wS4TpHscVfbK18cL4uLrTCcip7jNe | |
| y2KZ/YdbeHgmmcQAdiB4veH4I2dAyqIdsy8Jk+KTs3Ae8qp+S3XtC8z/uXMbN7lR | |
| AwIDAQAB | |
| -----END PUBLIC KEY----- |
In the sample project, I store this file in the pem folder and then Vagrant syncs that folder to the VM. I then use an environment variable to tell the Lua code where to find it. In fact, I use environment variables for passing in several other parameters as well. Use setenv in your HAProxy configuration file to set an environment variable.
| global | |
| lua-load /usr/local/share/lua/5.3/jwtverify.lua | |
| setenv OAUTH_PUBKEY_PATH /usr/local/etc/haproxy/pem/pubkey.pem | |
| setenv OAUTH_ISSUER https://myaccount.auth0.com/ | |
| setenv OAUTH_AUDIENCE https://api.mywebsite.com |
A lua-load directive loads a Lua file called jwtverify.lua that contains code for validating access tokens. It gets this from the JWT Lua code repository.
Next, the frontend receives requests on port 443 and performs various checks by invoking the jwtverify.lua file. Here we’re using ACL statements to define conditional logic that allows or denies a request. ACLs are a powerful and flexible system within HAProxy and one of the building blocks that make it so versatile.
| frontend api_gateway | |
| # Always use HTTPS to protect the secrecy of the token | |
| bind :443 ssl crt /usr/local/etc/haproxy/pem/test.com.pem | |
| # Accept GET requests and skip further checks | |
| http-request allow if { method GET } | |
| # Deny the request if it's missing an Authorization header | |
| http-request deny unless { req.hdr(authorization) -m found } | |
| # Verify the token by invoking the jwtverify Lua script | |
| http-request lua.jwtverify | |
| # Deny the request unless 'authorized' is true | |
| http-request deny unless { var(txn.authorized) -m bool } | |
| # (Optional) Deny the request if it's a POST/DELETE to a | |
| # path beginning with /api/hamsters, but the token doesn't | |
| # include the "write:hamsters" scope | |
| http-request deny if { path_beg /api/hamsters } { method POST DELETE } ! { var(req.oauth_scopes) -m sub write:hamsters } | |
| # If no problems, send to the apiservers backend | |
| default_backend apiservers |
The first http-request deny line rejects the request if the client did not send an Authorization header at all. The next line, http-request lua.jwtverify, invokes our Lua script, which will perform the following actions:
- Decodes the JWT
- Checks that the algorithm used to sign the token is supported (RS256)
- Verifies the signature
- Ensures that the token is not expired
- Compares the issuer in the token to the
OAUTH_ISSUERenvironment variable - Compares the audience in the token to the
OAUTH_AUDIENCEenvironment variable - If any scopes are defined in the token, adds them to an HAProxy variable called
req.oauth_scopesso that subsequent ACLs can check them - If everything passes, sets a variable called
txn.authorizedto true
The next http-request deny line rejects the request if the Lua script did not set a variable called txn.authorized to a value of true. Notice how booleans are evaluated by adding the -m bool flag.
The next two lines reject the request if the token does not contain a scope that matches what we expect for the HTTP path and method. Scopes in OAuth 2 allow you to define specific access restrictions. In this case, POST and DELETE requests require the write:hamsters permission. Scopes are optional and some APIs don’t use them. You can set them up on the Auth0 website and associate them with your API. If the client should have these scopes, they’ll be included in the token.
To summarize, any request for /api/hamsters must meet the following rules:
- It must send an Authorization header containing a JWT
- The token must be valid, per the jwtverify.lua script
- The token must contain a scope that matches what you expect
With this configuration in place, you can use curl to send requests to your API, attaching a valid token, and expect to get a successful response. Using this same setup, you’d lock down your APIs so that only authenticated and approved clients can use them.
Conclusion
In the blog post, you learned more about using HAProxy as an API gateway, leveraging it to secure your API endpoints using OAuth 2. Clients request tokens from an authentication server, which sends back a JWT. That token is then used to gain access to your APIs. With the help of some Lua code, HAProxy can validate the token and protect your APIs from unauthorized use.
Using HAProxy as an API Gateway, Part 2 [Authentication]的更多相关文章
- Using HAProxy as an API Gateway, Part 3 [Health Checks]
转自:https://www.haproxy.com/blog/using-haproxy-as-an-api-gateway-part-3-health-checks/ Achieving high ...
- Using HAProxy as an API Gateway, Part 1 [Introduction]
转自:https://www.haproxy.com/blog/using-haproxy-as-an-api-gateway-part-1/ An API gateway handles load ...
- API Gateway : Kong
what problems 多个服务要写自己的log,auth,对于比较耗时的,有时还要高流量限制. solution intro 单点部署的情况: why not just haproxy log ...
- API gateway 之 kong 基本介绍 (一)
一.API网关概念介绍 API 网关,即API Gateway,是大型分布式系统中,为了保护内部服务而设计的一道屏障,可以提供高性能.高可用的 API托管服务,从而帮助服务的开发者便捷地对外提供服务, ...
- Using Amazon API Gateway with microservices deployed on Amazon ECS
One convenient way to run microservices is to deploy them as Docker containers. Docker containers ar ...
- Aws api gateway Domain name
Set Up a Custom Domain Name for an API Gateway API The following procedure describes how to set up a ...
- [转载] 构建微服务:使用API Gateway
原文: http://mp.weixin.qq.com/s?__biz=MzA5OTAyNzQ2OA==&mid=206889381&idx=1&sn=478ccb35294c ...
- Amazon API Gateway Importer整合过程小结
(1)需要将swagger json转换成amazon api gateway 所需要的格式(根据Method Request中 Request PathsURL Query String Param ...
- 微服务API Gateway
翻译-微服务API Gateway 原文地址:http://microservices.io/patterns/apigateway.html,以下是使用google翻译对原文的翻译. 让我们想象一下 ...
随机推荐
- S02_CH12_ AXI_Lite 总线详解
S02_CH12_ AXI_Lite 总线详解 12.1前言 ZYNQ拥有ARM+FPGA这个神奇的架构,那么ARM和FPGA究竟是如何进行通信的呢?本章通过剖析AXI总线源码,来一探其中的秘密. 1 ...
- C# vb .net图像合成-合成富文本
在.net中,如何简单快捷地实现图像合成呢,比如合成文字,合成艺术字,多张图片叠加合成等等?答案是调用SharpImage!专业图像特效滤镜和合成类库.下面开始演示关键代码,您也可以在文末下载全部源码 ...
- oracle 逻辑对象
视图 视图的作用: a 让查询返回的字段更容易理解. b 对复杂select语句的封装. c 安全性.视图可以单独授权.对于数据量巨大的表,可以创建视图仅仅返回前100条数据,将该视图select权限 ...
- selenium自动化测试框架之PO设计模式
面向对象的特性:封装.继承.多态.在自动化中一样适用,Selenium自动化测试中有一个名字常常被提及PageObject(思想与面向对象的特性相同),通过PO模式可以大大提高测试用例的维护效率. 传 ...
- LocalStorageUtils
对localStorage进行封装: var LocalStorageUtils = new function (){ if(window.localStorage==null){ throw new ...
- The Middle English word was Affrike非洲
Africa (n.) Latin Africa (terra) "African land, Libya, the Carthaginian territory, the province ...
- 修改Nodejs内置的npm默认配置路径方法
Nodejs 内置的npm默认会把模块安装在c盘的用户AppData目录下(吐槽一下:不明白为啥现在的软件都喜欢把资源装在这里) C盘这么小,肯定是不行的,下面一步步修改到D盘 1.打开cmd命令行, ...
- sqlserver 保存 立方米(m³)
转载来源:https://bbs.csdn.net/topics/370186797 解决方案:在前面加 N,如:N'm³' 案例: create table tbn(name nvarchar(10 ...
- UVA572 Oil Deposits DFS求解
小白书上经典DFS题目. 1. 递归实现 // from: https://www.cnblogs.com/huaszjh/p/4686092.html #include <stdio.h> ...
- mysql导入数据和导出数据
导入数据: 首页进入mysql命令行界面: use 数据库名: source d:/data/test.sql; 如果是windows系统必须使用d:/,如果使用d:\会报语法错误. 那么如何导出(备 ...