Centos7 搭建wordpress
WordPress是使用PHP语言开发的博客平台,用户可以在支持PHP和MySQL数据库的服务器上架设属于自己的网站。也可以把 WordPress当作一个内容管理系统(CMS)来使用。
搭建WordPress 要分搭建php apache mysql 环境、配置数据库、安装WordPress
第一部分:搭建php apache mysql 环境,分开来搭建这些环境比较复杂,网络上有现成的工具包类似一键安装就能把环境搭建好,这个工具就是XAMPP 。这一部分步骤如下:
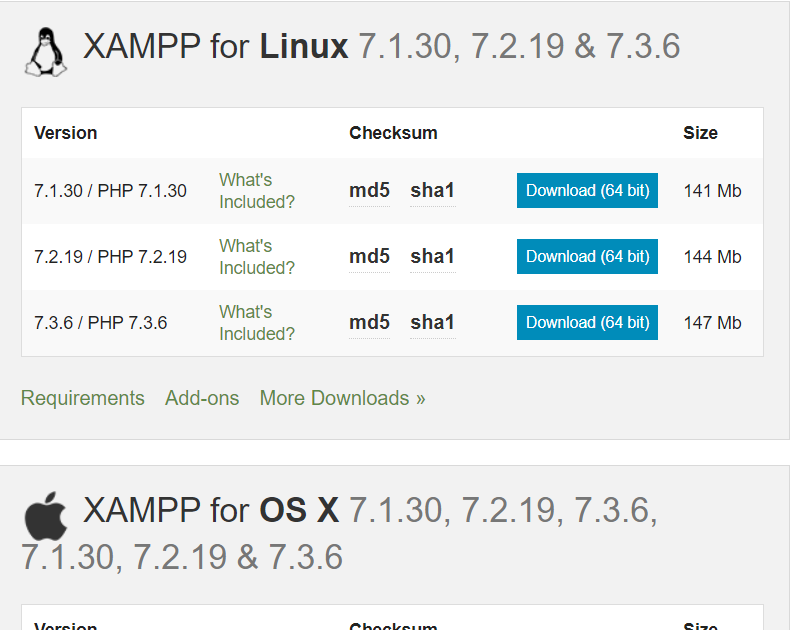
1、下载XAMPP ,下载地址:https://www.apachefriends.org/download.html 有windows、linux、macOS平台的可以下载。选择适合自己的系统。我这里下载的是linux版本
2、执行下载文件:xampp-linux-x64-7.2.8-0-installer.run ,把下载文件上传到centos服务器/opt 目录下。执行命令: ./xampp-linux-x64-7.2.8-0-installer.run (如果安装文件没有可执行权限,执行命令chmod +x xampp-linux-x64-7.2.8-0-installer.run 赋给可执行权限)。在执行过程中会遇到确认提示,选择y或者n,这里都选择y。选择完成后再和你确认安装路径安装在:/opt/lampp 目录下
[root@bogon opt]# pwd

/opt

[root@bogon opt]# ls

xampp-linux-x64-7.2.--installer.run

[root@bogon opt]# ./xampp-linux-x64-7.2.--installer.run

----------------------------------------------------------------------------

Welcome to the XAMPP Setup Wizard.

----------------------------------------------------------------------------

Select the components you want to install; clear the components you do not want

to install. Click Next when you are ready to continue.

XAMPP Core Files : Y (Cannot be edited)

XAMPP Developer Files [Y/n] :y

Is the selection above correct? [Y/n]: y

----------------------------------------------------------------------------

Installation Directory

XAMPP will be installed to /opt/lampp

Press [Enter] to continue:

----------------------------------------------------------------------------

Setup is now ready to begin installing XAMPP on your computer.

Do you want to continue? [Y/n]: y

----------------------------------------------------------------------------

Please wait while Setup installs XAMPP on your computer.

 Installing

 % ______________ % ______________ %

 #########################################

----------------------------------------------------------------------------

Setup has finished installing XAMPP on your computer.

[root@bogon opt]#
3、安装xampp完成后,可以通过命令来启动xampp环境
/opt/lampp/lampp start 启动
/opt/lampp/lampp stop 停止
/opt/lampp/lampp restart 重启
启动后,可以通过ps -aef |grep lampp 来查看lampp 环境是否正常启动。如下提示中,可以看出Apache 和MySQL都启动正常
[root@bogon opt]# /opt/lampp/lampp stop

Stopping XAMPP for Linux 7.2.-...

XAMPP: Stopping Apache...ok.

XAMPP: Stopping MySQL...ok.

XAMPP: Stopping ProFTPD...not running.

[root@bogon opt]# /opt/lampp/lampp start

Starting XAMPP for Linux 7.2.-...

XAMPP: Starting Apache...ok.

XAMPP: Starting MySQL...ok.

XAMPP: Starting ProFTPD...fail.

Contents of "/opt/lampp/var/proftpd/start.err":

bogon proftpd[]: warning: unable to determine IP address of 'bogon'

bogon proftpd[]: error: no valid servers configured

bogon proftpd[]: Fatal: error processing configuration file '/opt/lampp/etc/proftpd.conf'

[root@bogon opt]# /opt/lampp/lampp restart

Restarting XAMPP for Linux 7.2.-...

XAMPP: Stopping Apache...ok.

XAMPP: Stopping MySQL...ok.

XAMPP: Stopping ProFTPD...not running.

XAMPP: Starting Apache...ok.

XAMPP: Starting MySQL...ok.

XAMPP: Starting ProFTPD...fail.

Contents of "/opt/lampp/var/proftpd/start.err":

bogon proftpd[]: warning: unable to determine IP address of 'bogon'

bogon proftpd[]: error: no valid servers configured

bogon proftpd[]: Fatal: error processing configuration file '/opt/lampp/etc/proftpd.conf'

[root@bogon opt]# ps -aef |grep lampp

root                : ?        :: /opt/lampp/bin/httpd -k start -E /opt/lampp/logs/error_log -DSSL -DPHP

daemon           : ?        :: /opt/lampp/bin/httpd -k start -E /opt/lampp/logs/error_log -DSSL -DPHP

daemon           : ?        :: /opt/lampp/bin/httpd -k start -E /opt/lampp/logs/error_log -DSSL -DPHP

daemon           : ?        :: /opt/lampp/bin/httpd -k start -E /opt/lampp/logs/error_log -DSSL -DPHP

daemon           : ?        :: /opt/lampp/bin/httpd -k start -E /opt/lampp/logs/error_log -DSSL -DPHP

daemon           : ?        :: /opt/lampp/bin/httpd -k start -E /opt/lampp/logs/error_log -DSSL -DPHP

daemon           : ?        :: /opt/lampp/bin/httpd -k start -E /opt/lampp/logs/error_log -DSSL -DPHP

root                : pts/    :: /bin/sh /opt/lampp/bin/mysqld_safe --datadir=/opt/lampp/var/mysql --pid-file=/opt/lampp/var/mysql/bogon.pid

mysql            : pts/    :: /opt/lampp/sbin/mysqld --basedir=/opt/lampp --datadir=/opt/lampp/var/mysql --plugin-dir=/opt/lampp/lib/mysql/
4、关闭Centos7 防火墙命令:systemctl stop firewalld.service,关闭防火墙后,可以从外部访问到这台服务器,到此,第一部分完成
第二部分:配置数据库,数据库服务在第一部分一键安装好了,还需要配置下访问权限
1、登录mysql服务,执行命令:/opt/lampp/bin/mysql -uroot
2、登录后执行SQL
use mysql;

select t.host from user t where t.user='root';

GRANT ALL PRIVILEGES ON *.* TO 'root'@'%' IDENTIFIED BY '' WITH GRANT OPTION;

GRANT ALL PRIVILEGES ON *.* TO 'root'@'localhost' IDENTIFIED BY '' WITH GRANT OPTION;

FLUSH PRIVILEGES;
[root@bogon opt]# /opt/lampp/bin/mysql -uroot

Welcome to the MariaDB monitor.  Commands end with ; or \g.

Your MariaDB connection id is

Server version: 10.1.-MariaDB Source distribution

Copyright (c) , , Oracle, MariaDB Corporation Ab and others.

Type 'help;' or '\h' for help. Type '\c' to clear the current input statement.

MariaDB [(none)]> use mysql;

Database changed

MariaDB [mysql]> select t.host from user t where t.user='root';

+-----------+

| host      |

+-----------+

| 127.0.0.1 |

| ::       |

| localhost |

+-----------+

 rows in set (0.00 sec)

MariaDB [mysql]> GRANT ALL PRIVILEGES ON *.* TO 'root'@'%' IDENTIFIED BY '' WITH GRANT OPTION;

Query OK,  rows affected (0.00 sec)

MariaDB [mysql]> GRANT ALL PRIVILEGES ON *.* TO 'root'@'localhost' IDENTIFIED BY '' WITH GRANT OPTION;

Query OK,  rows affected (0.01 sec)

MariaDB [mysql]> FLUSH PRIVILEGES;

Query OK,  rows affected (0.00 sec)

MariaDB [mysql]>
3、登录mysql 服务创建wordpress 数据库,执行命令: /opt/lampp/bin/mysql -uroot -p 弹出输入password ,输入123456。登入后执行SQL:CREATE DATABASE IF NOT EXISTS wordpress DEFAULT CHARSET utf8 COLLATE utf8_general_ci;
[root@bogon opt]# /opt/lampp/bin/mysql -uroot -p

Enter password:

Welcome to the MariaDB monitor.  Commands end with ; or \g.

Your MariaDB connection id is

Server version: 10.1.-MariaDB Source distribution

Copyright (c) , , Oracle, MariaDB Corporation Ab and others.

Type 'help;' or '\h' for help. Type '\c' to clear the current input statement.

MariaDB [(none)]> CREATE DATABASE IF NOT EXISTS wordpress DEFAULT CHARSET utf8 COLLATE utf8_general_ci;

Query OK,  row affected (0.00 sec)

MariaDB [(none)]> show databases;

+--------------------+

| Database           |

+--------------------+

| information_schema |

| mysql              |

| performance_schema |

| phpmyadmin         |

| test               |

| wordpress          |

+--------------------+

 rows in set (0.00 sec)

MariaDB [(none)]>
第三部分:安装Wordpress
1、下载Wordpress:https://wordpress.org/download/ 点击Download .tar.gz 下载wordpress 压缩包
2、解压wordepress 到目录/opt/lampp/htdocs/下:tar -xzvf wordpress-5.2.1.tar.gz -C /opt/lampp/htdocs/
3、浏览器中输入http://192.168.1.108/wordpress/index.php ip 为centos7 的ip,由于是首次打开,自动跳转到安装页面http://192.168.1.108/wordpress/wp-admin/setup-config.php
在安装页面,可以看出页面提示的必要数据库信息,这些信息在第二部分已经完成了
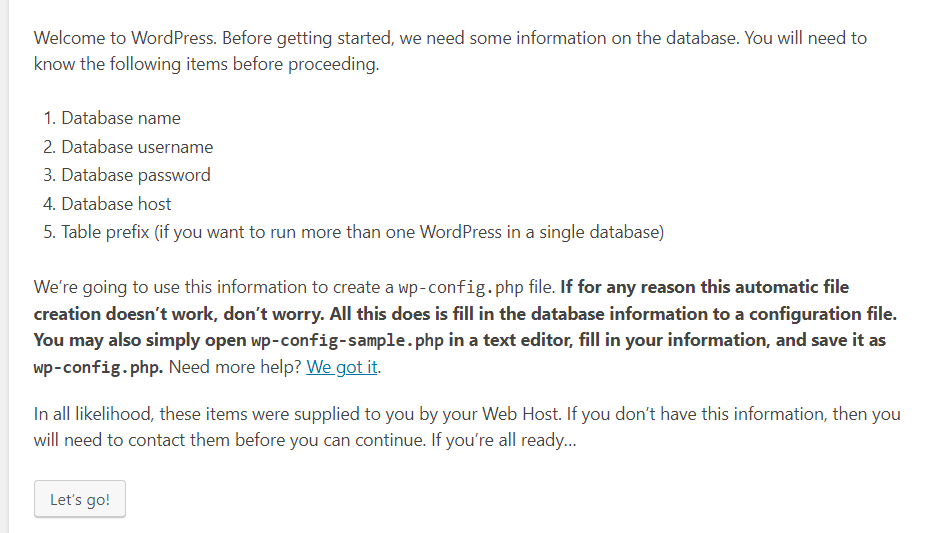
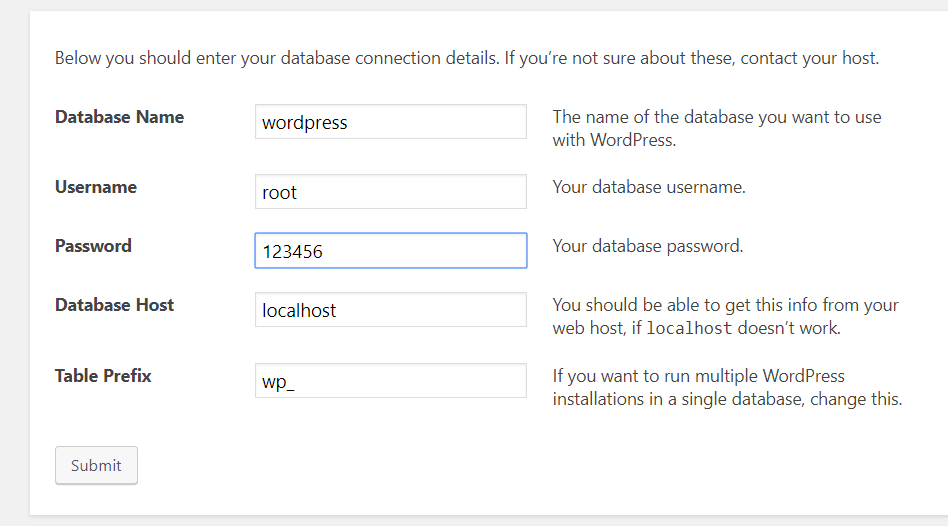
3、点击 【Let‘s go’】 进入填写数据库信息页面,点击【submit】
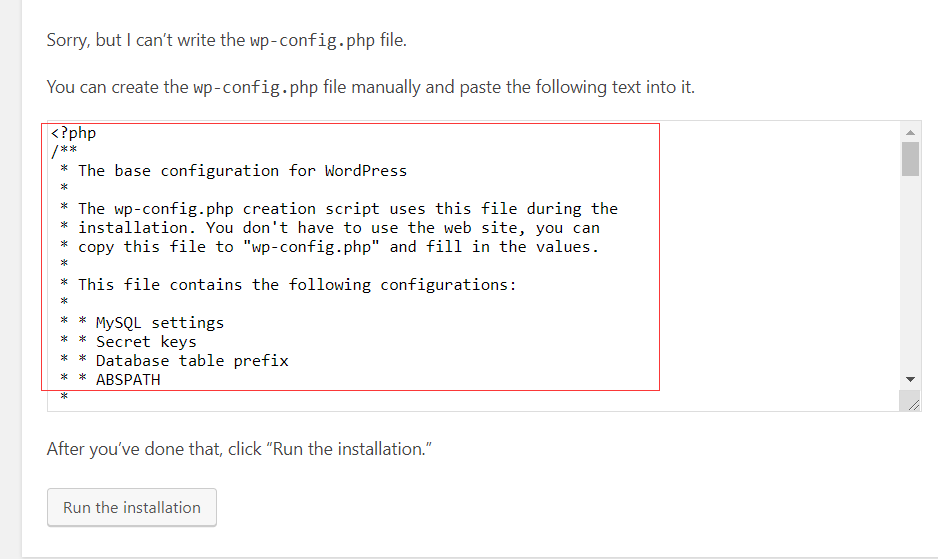
4、如果点击【Submit 】 按钮后出现如下提示:
说明在写wp-config.php 文件的时候没有权限,提示中也给了解决方法,就是手动在wordpress 目录下新建wp-config.php 文件,并且把提示中的代码复制保存到wp-config.php 文件中再点击【run the installation】就能继续安装
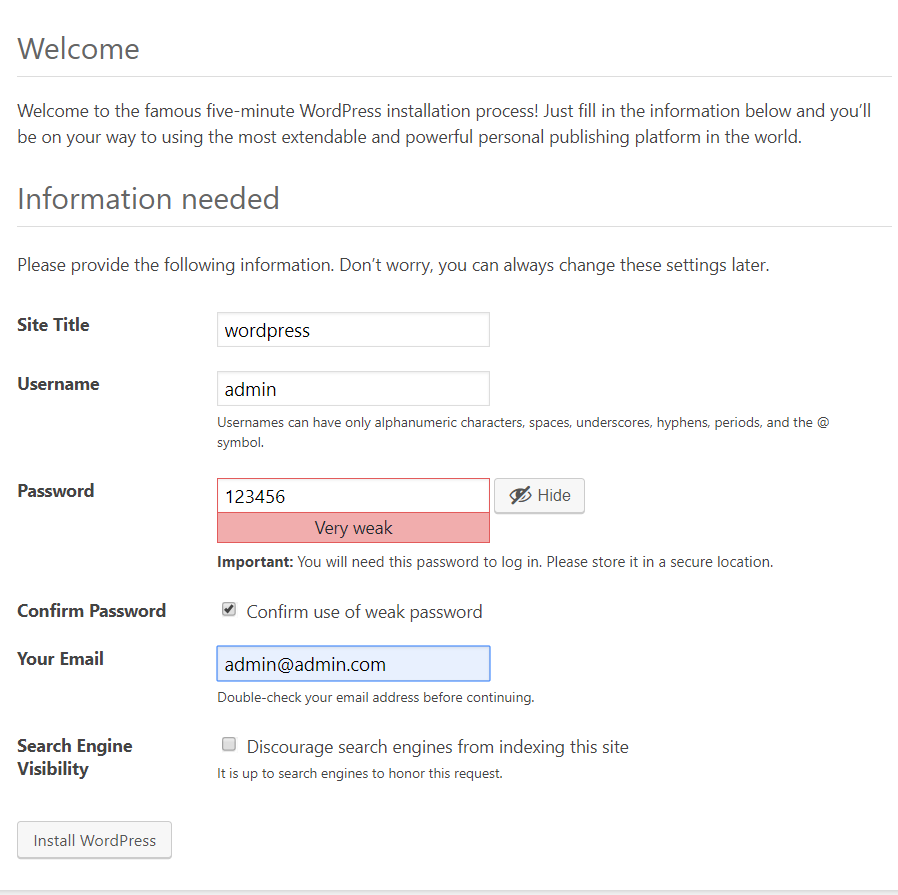
5、输入站点信息,管理员账号密码后 点击【Install WordPress】
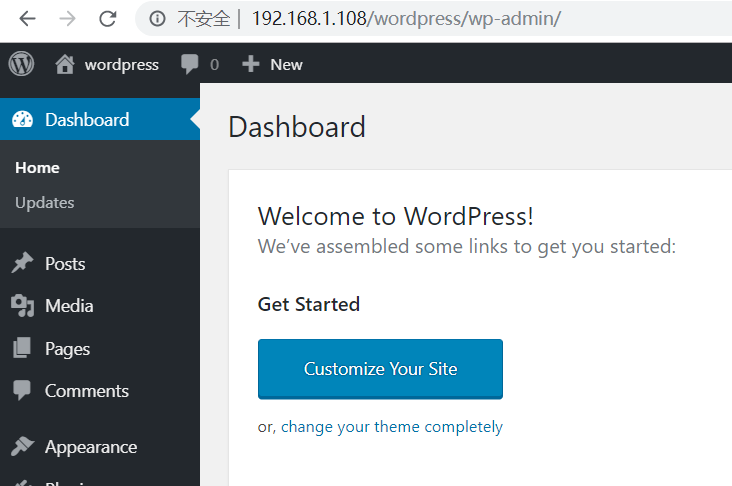
6、安装完成后,进入登录页:http://192.168.1.108/wordpress/wp-login.php,并登录成功,说明安装成功
欢迎关注技术微信公众号:

Centos7 搭建wordpress的更多相关文章
- 阿里云centos7搭建wordpress环境
阿里云搭建wordpress系统 一.购买阿里云 二.安装php开发环境 1. https://www.apachefriends.org/zh_cn/index.html网站下载linux下的xam ...
- Docker搭建wordpress博客环境(Centos7)
Docker搭建wordpress博客环境(Centos7) 升级系统 yum -y update 设置docker库 sudo yum install -y yum-utils sudo yum-c ...
- CentOS7——搭建LNMP环境(WordPress案例)
CentOS7--搭建LNMP环境(WordPress案例) LNMP组成介绍 LNMP(Linux-Nginx-MySQL-PHP)网站架构是目前国际流行的Web框架,该框架包括:Linux操作系统 ...
- centos7+腾讯云服务器搭建wordpress
title: centos7+腾讯云服务器搭建wordpress date: 2020-03-04 categories: web tags: [wordpress] 分两部分:1.搭建LEMP环境 ...
- LNMP环境下搭建wordpress
WordPress 下载WordPress安装包,可以直接wget获取也可以ftp上传,解压到/usr/share/nginx/html/blog-wp,访问index.php即进行安装: wor ...
- CenterOS7.5中搭建wordpress
centeros7.5中搭建wordpress 1.环境 云平台:华为云 服务器操作系统:CentOS7.: 博客部署的服务器:Apache HTTP: 数据库:mysql: 框架:wordpress ...
- CentOS 7.4 基于LNMP搭建wordpress
之前有好多次搭建wordpress的经历,有在Ubuntu系统上,有在CentOS7.2系统上,但都是搭完还是稀里糊涂的,因为好多都是教程上照着敲的.这次好好出个教程,以便以后方便查看. 准备工作:C ...
- centos7 搭建GlusterFS
centos7 搭建GlusterFS 转载http://zhaijunming5.blog.51cto.com/10668883/1704535 实验需求:4台机器安装GlusterFS组成一个集群 ...
- 烂泥:使用nginx利用虚拟主机搭建WordPress博客
本文由秀依林枫提供友情赞助,首发于烂泥行天下. 最近开始打算学习nginx web服务器,既然是学习还是以实用为目的的.我们在此以搭建WordPress博客为例. 搭建WordPress博客,我们需要 ...
随机推荐
- Ansible-目录
Ansible-概念 Ansible-安装 YAML语法
- 机器学习笔记6:K-Means
目录 目标函数 目标函数的表现函数 针对u和r求解: 最优解的表达式的意义: K-means聚类的形象化展示 聚类前 第一轮循环 第二轮循环 第三轮循环 最终结果 演示代码: 关于K-means的几个 ...
- linux内核--wait_event_interruptible_timeout()函数分析(转)
原文:https://blog.csdn.net/wuyongpeng0912/article/details/45723657 网上有关于此函数的分析,但大都是同一篇文章转载来转载去,没有进一步的分 ...
- 【爬虫】Condition版的生产者和消费者模式
Condition版的生产者和消费者模式 threading.Condition 在没有数据的时候处于阻塞状态,有数据可以使用notify的函数通知等等待状态的线程运作 threading.Condi ...
- 为什么要指定HashMap的容量?HashMap指定容量初始化后,底层Hash数组已经被分配内存了吗?
为什么要指定HashMap的容量? 首先创建HashMap时,指定容量比如1024后,并不是HashMap的size不是1024,而是0,插入多少元素,size就是多少: 然后如果不指定HashMap ...
- 洛谷P2495 [SDOI2011]消耗战(虚树dp)
P2495 [SDOI2011]消耗战 题目链接 题解: 虚树\(dp\)入门题吧.虚树的核心思想其实就是每次只保留关键点,因为关键点的dfs序的相对大小顺序和原来的树中结点dfs序的相对大小顺序都是 ...
- python测试开发django-68.templates模板标签{% for %}
前言 有些标签类似这样: {% tag %} ,需要开始和结束标签 例如:{% tag %} ...标签 内容 ... {% endtag %},一般用于循环列表对象输出内容. for 标签 {% f ...
- P3398 仓鼠找sugar[LCA]
题目描述 小仓鼠的和他的基(mei)友(zi)sugar住在地下洞穴中,每个节点的编号为1~n.地下洞穴是一个树形结构.这一天小仓鼠打算从从他的卧室(a)到餐厅(b),而他的基友同时要从他的卧室(c) ...
- solr中特殊字符的处理
如查询的条件为:params.add("fq", "jiucaiyun_brand:Double A" ),这样是查不出带有空格的条件,需要把空格转义 if(b ...
- 设置web应用的 context root (转)-- web project setting
context root确定了Tomcat将那些URL请求转发到Web应用. 如果应用的context root 设置为 myapp,除非存在更为明确context root的Web应用,那么所有 / ...