
Nancy之Forms authentication的简单使用
一、前言
想必大家或多或少都听过微软推出的ASP.NET Identity技术,可以简单的认为就是一种授权的实现
很巧的是,Nancy中也有与之相类似的技术Authentication,这两者之间都用到了一些相通的安全技术
(我没有去看ASP.NET Identity的内部实现,是从它的简单用法中判断的)
正式开始介绍之前先推荐几篇ASP.NET Identity的好文章
r01cn 的 ASP.NET Identity系列教程(目录)
腾飞(Jesse) 的 MVC5 - ASP.NET Identity登录原理 - Claims-based认证和OWIN
好了,下面还是用demo的形式来介绍怎么简单使用Forms authentication吧
二、简单使用
1)、新建一个空的asp.net项目
2)、通过NuGet安装相应的包
       Install-Package Nancy

      Install-Package Nancy.Hosting.Aspnet

       Install-Package Nancy.Authentication.Forms

       Install-Package Dapper
由于用到了数据库访问,所以还安装了Dapper
3)、建立数据表
 CREATE TABLE [dbo].[SystemUser](

     [SystemUserId] [uniqueidentifier] NOT NULL,

     [SystemUserName] [nvarchar](50) NOT NULL,

     [SystemUserPassword] [nvarchar](50) NOT NULL,

  CONSTRAINT [PK_SystemUser] PRIMARY KEY CLUSTERED

 (

     [SystemUserId] ASC

 )WITH (PAD_INDEX = OFF, STATISTICS_NORECOMPUTE = OFF, IGNORE_DUP_KEY = OFF, ALLOW_ROW_LOCKS = ON, ALLOW_PAGE_LOCKS = ON) ON [PRIMARY]

 ) ON [PRIMARY]

 GO
同时像表中插入两条数据
 INSERT INTO [dbo].[SystemUser]([SystemUserId],[SystemUserName],[SystemUserPassword])

 VALUES(newid(),'catcher','')

 INSERT INTO [dbo].[SystemUser]([SystemUserId],[SystemUserName],[SystemUserPassword])

 VALUES(newid(),'admin','')
注:由于是演示,所以密码没有进行加密处理
4)、建立相应的文件夹
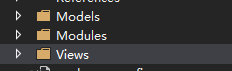
Models用于存放模型
Modules用于存放相应的操作
Views用于存放视图
5)、编写模型 SystemUser.cs
     public class SystemUser

     {

         public Guid SystemUserId { get; set; }

         public string SystemUserName { get; set; }

         public string SystemUserPassword { get; set; }

     }
6)、编写HomeModule.cs
 using Dapper;

 using Nancy;

 using Nancy.Authentication.Forms;

 using Nancy.ModelBinding;

 using NancyDemoForFormsauthentication.Models;

 using System.Data;

 using System.Data.SqlClient;

 using System.Linq;

 namespace NancyDemoForFormsauthentication.Modules

 {

     public class HomeModule : NancyModule

     {

         public HomeModule()

         {

             Get["/"] = _ =>

             {

                 return View["index"];

             };

             Get["/login"] = _ =>

             {

                 return View["login"];

             };

             Post["/login"] = _ =>

             {

                 var loginUser = this.Bind<SystemUser>();

                 SystemUser user = GetValidUser(loginUser.SystemUserName, loginUser.SystemUserPassword);

                 if (user == null)

                 {

                     return Response.AsText("出错了", "text/html;charset=UTF-8");

                 }

                 return this.LoginAndRedirect(user.SystemUserId, fallbackRedirectUrl: "/secure");

             };

         }

         private readonly string sqlconnection =

                "Data Source=127.0.0.1;Initial Catalog=NancyDemo;User Id=sa;Password=dream_time1314;";

         private SqlConnection OpenConnection()

         {

             SqlConnection connection = new SqlConnection(sqlconnection);

             connection.Open();

             return connection;

         }

         private SystemUser GetValidUser(string name, string pwd)

         {

             using (IDbConnection conn = OpenConnection())

             {

                 const string query = "select * from SystemUser where SystemUserName=@SystemUserName and SystemUserPassword=@SystemUserPassword";

                 return conn.Query<SystemUser>(query, new { SystemUserName = name, SystemUserPassword = pwd }).SingleOrDefault();

             }

         }

     }

 }
其中,登录的post方法中用到了 LoginAndRedirect 这个静态方法
这个方法位于ModuleExtensions.cs中,返回值是Response类型的
         public static Response LoginAndRedirect(this INancyModule module, Guid userIdentifier, DateTime? cookieExpiry = null, string fallbackRedirectUrl = "/")

         {

             return FormsAuthentication.UserLoggedInRedirectResponse(module.Context, userIdentifier, cookieExpiry, fallbackRedirectUrl);

         }
看方法名都能知道这个是用来干什么的!
还有Response.AsText后面的第二个参数可以让中文不乱码!!
7)、编写相应的视图
index.html
 <!DOCTYPE html>

 <html>

 <head>

     <title></title>

     <meta charset="utf-8" />

 </head>

 <body>

     <h2>Nancy之基于Forms authentication的简单使用</h2>

     <p>访问需要权限的页面</p>

     <a href="/secure">secure</a>

 </body>

 </html>
login.html
 <!DOCTYPE html>

 <html>

 <head>

     <title></title>

     <meta charset="utf-8" />

 </head>

 <body>

     <form method="post" action="/login">

         <label>姓名:</label><input type="text" name="SystemUserName" /><br />

         <label>密码:</label><input type="password" name="SystemUserPassword" /><br />

         <input type="submit" />

     </form>

 </body>

 </html>
8)、编写SecureModule.cs
 using Nancy;

 using Nancy.Security;

 namespace NancyDemoForFormsauthentication.Modules

 {

     public class SecureModule : NancyModule

     {

         public SecureModule()

         {

             this.RequiresAuthentication();

             Get["/secure"] = _ =>

             {

                 return "Hello ," + this.Context.CurrentUser.UserName;

             };

         }

     }

 }
其中
this.RequiresAuthentication();
这句是关键!!表明需要验证才能通过。位于Nancy.Security这个命名空间
通过验证访问后会打印出当前的用户名称。
9)、编写Bootstraper.cs
 using Nancy;

 using Nancy.Authentication.Forms;

 using Nancy.TinyIoc;

 using Nancy.Bootstrapper;

 namespace NancyDemoForFormsauthentication

 {

     public class Bootstrapper : DefaultNancyBootstrapper

     {

         protected override void ConfigureRequestContainer(TinyIoCContainer container, NancyContext context)

         {

             base.ConfigureRequestContainer(container, context);

             container.Register<IUserMapper, UserMapper>();

         }

         protected override void RequestStartup(TinyIoCContainer container, IPipelines pipelines, NancyContext context)

         {

             base.RequestStartup(container, pipelines, context);

             var formsAuthConfiguration = new FormsAuthenticationConfiguration

             {

                 RedirectUrl = "~/login",

                 UserMapper = container.Resolve<IUserMapper>(),

             };

             FormsAuthentication.Enable(pipelines, formsAuthConfiguration);

         }

     }

 }
这里是至关重要的一步!!!
要在RequestStartup中启用我们的FormsAuthentication!!
同时我们还要配置FormsAuthenticationConfiguration
注册了UserMapper,所以我们接下来就是实现UserMapper
10)、编写UserMapper.cs
 using Dapper;

 using Nancy;

 using Nancy.Authentication.Forms;

 using Nancy.Security;

 using NancyDemoForFormsauthentication.Models;

 using System;

 using System.Data;

 using System.Data.SqlClient;

 using System.Linq;

 namespace NancyDemoForFormsauthentication

 {

     public class UserMapper : IUserMapper

     {

         public IUserIdentity GetUserFromIdentifier(Guid identifier, NancyContext context)

         {

             using (IDbConnection conn = OpenConnection())

             {

                 const string query = "select * from SystemUser where SystemUserId=@SystemUserId";

                 var user = conn.Query<SystemUser>(query, new { SystemUserId = identifier }).SingleOrDefault();

                 if (user == null)

                 {

                     return null;

                 }

                 else

                 {

                     return new UserIdentity

                     {

                         UserName = user.SystemUserName,

                         Claims = new[] { "SystemUser"}

                     };

                 }

             }

         }

         private readonly string sqlconnection =

                 "Data Source=127.0.0.1;Initial Catalog=NancyDemo;User Id=sa;Password=dream_time1314;";

         private SqlConnection OpenConnection()

         {

             SqlConnection connection = new SqlConnection(sqlconnection);

             connection.Open();

             return connection;

         }

     }

 }
UserMapper必须要实现IUserMapper这个接口!同时返回一个实现IUserIdentity接口的对象。
11)、编写UserIdentity.cs
 using Nancy.Security;

 using System.Collections.Generic;

 namespace NancyDemoForFormsauthentication

 {

     public class UserIdentity : IUserIdentity

     {

         public string UserName { get; set; }

         public IEnumerable<string> Claims { get; set; }

     }

 }
到这里所有的工作都已经做完了,下面就是看看效果了
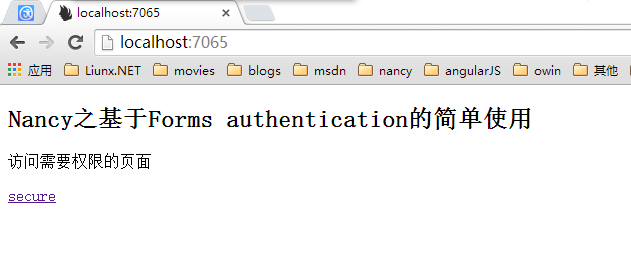
我们点击 secure链接,发现自动跳转到登录界面了!!
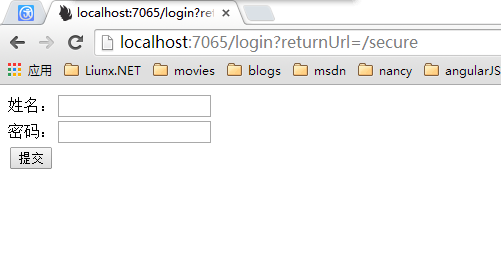
我们输入用户名和密码

登录成功,并返回到secure页面了!

当我们输入错误的用户名和密码时

最后是本次示例代码:
https://github.com/hwqdt/Demos/tree/master/src/NancyDemoForFormsauthentication
Nancy之Forms authentication的简单使用的更多相关文章
- Nancy 学习-身份认证(Forms authentication) 继续跨平台
开源 示例代码:https://github.com/linezero/NancyDemo 上篇讲解Nancy的Basic Authentication,现在来学习Nancy 的Forms身份认证. ...
- ASP.NET 4.0 forms authentication issues with IE11
As I mentioned earlier, solutions that rely on User-Agent sniffing may break, when a new browser or ...
- Forms Authentication in ASP.NET MVC 4
原文:Forms Authentication in ASP.NET MVC 4 Contents: Introduction Implement a custom membership provid ...
- Forms Authentication and Role based Authorization: A Quicker, Simpler, and Correct Approach
https://www.codeproject.com/Articles/36836/Forms-Authentication-and-Role-based-Authorization Problem ...
- An Overview of Forms Authentication (C#)
https://docs.microsoft.com/en-us/aspnet/web-forms/overview/older-versions-security/introduction/an-o ...
- .net core 共享 .Net Forms Authentication cookie
Asp.net 项目迁移到 asp.net core 项目后需要 兼容以前老的项目的登录方式. Forms Authentication cookie 登录. 从网上搜集到关于这个问题的解决思路都没有 ...
- ASP.NET Session and Forms Authentication and Session Fixation
https://peterwong.net/blog/asp-net-session-and-forms-authentication/ The title can be misleading, be ...
- Forms authentication timeout vs sessionState timeout
https://stackoverflow.com/questions/17812994/forms-authentication-timeout-vs-sessionstate-timeout Th ...
- SSRS 2016 Forms Authentication
SSRS 2016 comes with completely new report manager web interface and implementing form authenticatio ...
随机推荐
- Javaee中文乱码解决方法
分类: javaee2015-07-09 16:35 29人阅读 评论(0) 收藏 编辑 删除 post 中文乱码解决方式 接受数据的时候设置 request.setCharacterEncoding ...
- SQL Server最近怎样了
SQL Server最近怎样了 又到年终了,大家都作最后冲刺 最近园子里真的多了很多口水帖,无论大家争论得多么激烈,时间依然滴答滴答地过,争论完之后我们依然要继续埋头苦干 为年终奖.为明年做准备 这里 ...
- windows下Meteor+AngularJS开发的坑
有复杂的地方我再开贴记录,这里只记录容易解决的坑. 1. windows下手工增加smart package.直接将下载下来的包扔到meteor package中.记得将文件夹名字改得和smart.j ...
- MySQL 启动原理剖析
200 ? "200px" : this.width)!important;} --> 介绍 本篇文章主要从查看MySQL的启动命令的代码来详细了解MySQL的启动过程,内容 ...
- Java 浅析三大特性之一继承
上文Java 浅析三大特性之一封装我们说到Java是一个注重编写类,注重于代码和功能复用的语言.Java实现代码复用的方式有很多,这里介绍一个重要的复用方式--继承. 在介绍继承之前,我们要明确一点, ...
- python 栈和队列(使用list实现)
5.1.1. Using Lists as Stacks The list methods make it very easy to use a list as a stack, where the ...
- FASTJSON
package com.hanqi.test; import java.util.ArrayList;import java.util.Date;import java.util.List; impo ...
- 2013 duilib入门简明教程 -- XML基础类(7)
现在大家应该对XML描述界面不那么陌生了,那么我们做进一步介绍. 前面的教程我们写了很多代码,为的是让大家了解下基本流程,其实duilib已经对常用的操作做了很好的包装,正式使用时无需像前面的教程那样 ...
- Atitti 存储引擎支持的国内点与特性attilax总结
Atitti 存储引擎支持的国内点与特性attilax总结 存储引擎处理的事情: · 并发性:某些应用程序比其他应用程序具有很多的颗粒级锁定要求(如行级锁定). · 事务支持:并非所有的应用程序都需要 ...
- Package Configurations的使用示例
SSIS提供Package Configurations功能,能够动态修改配置数据,使package执行不同的变量,从不同的connection中获取数据,而这些变化,不需要修改Package,不需要 ...