颜色下拉菜单(combox)
using System;
using System.Drawing;
using System.Collections;
using System.ComponentModel;
using System.Windows.Forms;
using System.Data; namespace Combox
{
/// <summary>
/// Form1 的摘要说明。
/// </summary>
public class Form1 : System.Windows.Forms.Form
{
private System.Windows.Forms.ComboBox comboBox1;
private System.Windows.Forms.Label label1;
private System.Windows.Forms.Panel panel1;
/// <summary>
/// 必需的设计器变量。
/// </summary>
private System.ComponentModel.Container components = null; public Form1()
{
//
// Windows 窗体设计器支持所必需的
//
InitializeComponent(); //
// TODO: 在 InitializeComponent 调用后添加任何构造函数代码
//
} /// <summary>
/// 清理所有正在使用的资源。
/// </summary>
protected override void Dispose( bool disposing )
{
if( disposing )
{
if (components != null)
{
components.Dispose();
}
}
base.Dispose( disposing );
} #region Windows 窗体设计器生成的代码
/// <summary>
/// 设计器支持所需的方法 - 不要使用代码编辑器修改
/// 此方法的内容。
/// </summary>
private void InitializeComponent()
{
this.comboBox1 = new System.Windows.Forms.ComboBox();
this.label1 = new System.Windows.Forms.Label();
this.panel1 = new System.Windows.Forms.Panel();
this.SuspendLayout();
//
// comboBox1
//
this.comboBox1.DrawMode = System.Windows.Forms.DrawMode.OwnerDrawFixed;
this.comboBox1.DropDownStyle = System.Windows.Forms.ComboBoxStyle.DropDownList;
this.comboBox1.Location = new System.Drawing.Point(, );
this.comboBox1.Name = "comboBox1";
this.comboBox1.Size = new System.Drawing.Size(, );
this.comboBox1.TabIndex = ;
this.comboBox1.SelectedIndexChanged = new System.EventHandler(this.comboBox1_SelectedIndexChanged);
this.comboBox1.MeasureItem = new System.Windows.Forms.MeasureItemEventHandler(this.comboBox1_MeasureItem);
this.comboBox1.DrawItem = new System.Windows.Forms.DrawItemEventHandler(this.comboBox1_DrawItem);
//
// label1
//
this.label1.Location = new System.Drawing.Point(, );
this.label1.Name = "label1";
this.label1.Size = new System.Drawing.Size(, );
this.label1.TabIndex = ;
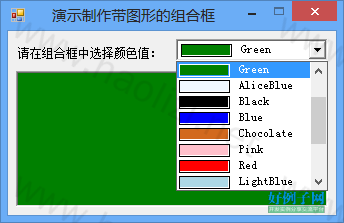
this.label1.Text = "请在组合框中选择颜色值:";
//
// panel1
//
this.panel1.BorderStyle = System.Windows.Forms.BorderStyle.Fixed3D; this.panel1.Location = new System.Drawing.Point(, );
this.panel1.Name = "panel1";
this.panel1.Size = new System.Drawing.Size(, );
this.panel1.TabIndex = ;
//
// Form1
//
this.AutoScaleBaseSize = new System.Drawing.Size(, );
this.ClientSize = new System.Drawing.Size(, );
this.Controls.Add(this.panel1);
this.Controls.Add(this.label1);
this.Controls.Add(this.comboBox1);
this.MaximizeBox = false;
this.Name = "Form1";
this.StartPosition = System.Windows.Forms.FormStartPosition.CenterScreen;
this.Text = "演示制作带图形的组合框";
this.Load = new System.EventHandler(this.Form1_Load);
this.ResumeLayout(false); }
#endregion /// <summary>
/// 应用程序的主入口点。
/// </summary>
[STAThread]
static void Main()
{
Application.Run(new Form1());
} private void Form1_Load(object sender, System.EventArgs e)
{
// this.comboBox1.DisplayMember="Color";
this.comboBox1.Items.Add(Brushes.Cyan);
this.comboBox1.Items.Add(Brushes.DarkSalmon);
this.comboBox1.Items.Add(Brushes.Gray);
this.comboBox1.Items.Add(Brushes.Green);
this.comboBox1.Items.Add(Brushes.AliceBlue);
this.comboBox1.Items.Add(Brushes.Black);
this.comboBox1.Items.Add(Brushes.Blue);
this.comboBox1.Items.Add(Brushes.Chocolate);
this.comboBox1.Items.Add(Brushes.Pink);
this.comboBox1.Items.Add(Brushes.Red);
this.comboBox1.Items.Add(Brushes.LightBlue);
this.comboBox1.Items.Add(Brushes.Brown);
this.comboBox1.Items.Add(Brushes.DodgerBlue);
this.comboBox1.Items.Add(Brushes.MediumPurple);
this.comboBox1.Items.Add(Brushes.White);
this.comboBox1.Items.Add(Brushes.Yellow);
} private void comboBox1_MeasureItem(object sender, System.Windows.Forms.MeasureItemEventArgs e)
{//设置列表项宽
e.ItemHeight=this.comboBox1.ItemHeight-;
} private void comboBox1_DrawItem(object sender, System.Windows.Forms.DrawItemEventArgs e)
{//绘制列表项 ComboBox MyCombox=(ComboBox)sender;
if(e.Index==-)
return;
if(sender==null)
return;
SolidBrush MyBrush=(SolidBrush)MyCombox.Items[e.Index];
Graphics g=e.Graphics;
//如果已经进行选择,则绘制正确的背景颜色和聚集框
e.DrawBackground();
e.DrawFocusRectangle();
//绘制颜色的预览框
Rectangle MyRect=e.Bounds;
MyRect.Offset(,);
MyRect.Width=;
MyRect.Height-=;
g.DrawRectangle(new Pen(e.ForeColor),MyRect);
//获取选定颜色的相应画刷对象,并填充预览框
MyRect.Offset(,);
MyRect.Width-=;
MyRect.Height-=;
g.FillRectangle(MyBrush,MyRect);
//绘制选定颜色的名称
g.DrawString(MyBrush.Color.Name.ToString(),Font,new SolidBrush(e.ForeColor),e.Bounds.X ,e.Bounds.Y );
} private void comboBox1_SelectedIndexChanged(object sender, System.EventArgs e)
{//显示选择的颜色
if(this.comboBox1.SelectedIndex>=)
{
SolidBrush MyBrush=(SolidBrush)(this.comboBox1.SelectedItem);
this.panel1.BackColor=MyBrush.Color;
}
}
}
}
颜色下拉菜单(combox)的更多相关文章
- jQuery 小特效【文本框折叠隐藏,展开显示】【下拉菜单】【颜色渐变】【弹窗+遮罩】
<%@ Page Language="C#" AutoEventWireup="true" CodeFile="Default.aspx.cs& ...
- vue实现隔行换色,下拉菜单控制隔行换色的颜色
<!DOCTYPE html> <html lang="en"> <head> <meta charset="UTF-8&quo ...
- IOS第二天-新浪微博 - 添加搜索框,弹出下拉菜单 ,代理的使用 ,HWTabBar.h(自定义TabBar)
********HWDiscoverViewController.m(发现) - (void)viewDidLoad { [super viewDidLoad]; // 创建搜索框对象 HWSearc ...
- Bootstrap之样式风格与下拉菜单
背景颜色 bg-primary 字体颜色 text-primary 文字居中 text-center 按钮 btn btn-primary btn-default默认 btn-link链接 按钮大小 ...
- SJPullDownMenu下拉菜单框架使用
SJPullDownMenu 快速集成类似淘宝筛选下拉菜单 如果页面显示不全等问题请转至:http://www.jianshu.com/p/d07c6393830c 查看使用 Getting Star ...
- Bootstrap框架(基础篇)之按钮,网格,导航栏,下拉菜单
一,按钮 注意:虽然在Bootstrap框架中使用任何标签元素都可以实现按钮风格,但个人并不建议这样使用,为了避免浏览器兼容性问题,个人强烈建议使用button或a标签来制作按钮. 框架中提供了基础按 ...
- Dwz下拉菜单的二级联动
在DWZ文档中对组合框combox的是这样描述的: 在传统的select 用class 定义:class=”combox”, html 扩展:保留原有属性name, 增加了属性:ref. ref 属 ...
- 形行色色的下拉菜单(HTML/CSS JS方法 jQuery方法实现)
HTML/CSS方法实现下拉菜单来源:慕课网<!DOCTYPE html PUBLIC "-//W3C//DTD XHTML 1.0 Transitional//EN" &q ...
- excel设置下拉菜单,并且不同值会显示不同颜色
工作中常常要用的excel,每次都会有新的需求,然后不会,然后百度,然后过段时间可能就又忘了,于是就想说,自己记录下来~~~因为自己用的都是2010,其实哪个版本都差不多,都是应该可以找到相应的按钮滴 ...
随机推荐
- 对象属性 Object.getOwnPropertyNames() Object.keys for...in
1.Object.getOwnPropertyNames()方法返回一个由指定对象的所有自身属性的属性名(包括不可枚举属性但不包括Symbol值作为名称的属性)组成的数组. Object.getOwn ...
- CDQZ集训DAY0 日记
貌似没发生什么事…… 按照教练员的交代,写一下流水账…… 早上5:30到了机场,然后就默默地坐着飞机到了成都.然后就按预定好的被GXY的父亲的朋友接机(貌似因为觉得GXY和他爸的同学挺像被批判一番). ...
- Spring MVC + Spring + MyBatis 框架整合
本文介绍使用SSM框架开发web项目Demo. 一.创建一个web-Poject项目 1.导入相关jar文件至lib下.“相关jar文件” --提取密码 oraw 2.修改web.xml文件 < ...
- MyBatis框架之SQL映射和动态SQL
使用MyBatis实现条件查询 1.SQL映射文件: MyBatis真正的强大之处就在于SQL映射语句,MyBatis专注于SQL,对于开发人员来说也是极大限度的进行SQL调优,以保证性能.下面是SQ ...
- Python -----函数(基础部分)
函数: 1.定义: 函数是对功能的封装 2.语法: def 函数名 函数体 函数名 函数名的命名规则和变量一样 3.函数的返回值: return,函数执行完毕,不会执行后面的 1.如果函数中不写ret ...
- TP框架基础(四)----添加数据
[数据添加] add() 该方法返回被添加的新记录的主键id值 两种方式实现数据添加 1. 数组方式数据添加 $goods = D(“Goods”); $arr = array(‘goods_name ...
- CIDR的介绍
CIDR的介绍: CIDR(Classless Inter-Domain Routing,无类域间路由选择)它消除了传统的A类.B类和C类地址以及划分子网的概念,因而可以更加有效地分配IPv4的地址空 ...
- webstorm mac 版破解
一.打开终端,输入: sudo vim /etc/hosts 回车后输入密码,编辑 hosts 文件,如图: 二.进入编辑模式(按 i 键),在最后一行添加如下代码: 0.0.0.0 account. ...
- isMemberOfClass、isKindOfClass原理分析
isMemberOfClass - 调用者必须是传入的类的实例对象才返回YES- 判断调用者是否是传入对象的实例,别弄反了,如 [s1 isMemberOfClass:p1] ,意思是s1是否是p1的 ...
- 【Android Studio】查看源码时提示“throw new RuntimeException("Stub!")”
如题-- 详细问题及解决方法: http://blog.csdn.net/u010917495/article/details/51234179