
SpringBoot+vue整合websocket
0.引言
这里我先说下,网上对于websocket的解释有一堆不懂自己查,我这就不做原理解释,只上代码。
1.SpringBoot引入websocket
maven 依赖
<dependency>

            <groupId>org.springframework.boot</groupId>

            <artifactId>spring-boot-starter-websocket</artifactId>

</dependency>
WebSocketConfig 配置文件
import org.springframework.context.annotation.Configuration;

import org.springframework.messaging.simp.config.MessageBrokerRegistry;

import org.springframework.web.socket.config.annotation.EnableWebSocketMessageBroker;

import org.springframework.web.socket.config.annotation.StompEndpointRegistry;

import org.springframework.web.socket.config.annotation.WebSocketMessageBrokerConfigurer;

@Configuration

@EnableWebSocketMessageBroker

public class WebSocketConfig implements WebSocketMessageBrokerConfigurer {

    @Override

    public void configureMessageBroker(MessageBrokerRegistry config){

        config.enableSimpleBroker("/topic");

        config.setApplicationDestinationPrefixes("/app");

    }

    @Override

    public void registerStompEndpoints(StompEndpointRegistry registry){

        registry.addEndpoint("/chat").setAllowedOrigins("*").withSockJS();

    }

}
配置了之后基本上不用做其他的配置了
setAllowedOrigins()为跨域函数
然后是Controller
import org.just.computer.mathproject.Bean.Message;

import org.springframework.messaging.handler.annotation.MessageMapping;

import org.springframework.messaging.handler.annotation.SendTo;

import org.springframework.stereotype.Controller;

import java.security.Principal;

import java.util.Date;

@Controller

public class GreetingController {

    @MessageMapping("/hello")

    @SendTo("/topic/greetings")

    public Message greeting(String content, Principal pl) throws Exception{

        Message message = new Message();

        message.setContent(content.substring(1,content.length()-1));

        message.setData(new Date().toString());

        message.setName(pl.getName());

        return message;

    }

}
这里的Principal 为SpringSecurity相关知识,目的是通过session获得用户名。
到此为止,SpringBoot的配置已经没了
2、Vue通过stompClient使用webSocket
package.json
"dependencies": {

    "@tinymce/tinymce-vue": "^3.0.1",

    "axios": "^0.19.0",

    "echarts": "^4.2.1",

    "element-ui": "^2.11.1",

    "net": "^1.0.2",

    "nprogress": "^0.2.0",

    "sockjs-client": "^1.4.0",

    "stompjs": "^2.3.3",

    "tinymce": "^4.8.5",

    "tinymce-vue": "^1.0.0",

    "vue": "^2.5.2",

    "vue-axios": "^2.1.4",

    "vue-echarts": "^4.0.3",

    "vue-router": "^3.0.1",

    "vue-stomp": "0.0.5"

  }
一定要填加的有vue-stomp sockjs-client stompjs这三个
想用的地方直接引入。
import SockJS from 'sockjs-client'

import Stomp from 'webstomp-client'
vue中完整代码如下
<template>

  <div>

    <input type="text" v-model="text">

    <button @click="sendMessage">发送消息</button>

    <div class="bubble">

    </div>

    <div>

      <div v-for="(data,key) in datas" :key="key">

        {{data.content}}

      </div>

    </div>

  </div>

</template>

<script>

import SockJS from 'sockjs-client'

import Stomp from 'webstomp-client'

export default {

  name: 'ChatRoom',

  data () {

    return {

      text: '',

      datas: [],

      stompClient: null

    }

  },

  mounted () {

    if ('WebSocket' in window) {

      this.initWebSocket()

    } else {

      alert('当前浏览器 Not support websocket')

    }

  },

  methods: {

    sendMessage () {

      this.stompClient.send('/app/hello', JSON.stringify(this.text), {})

    },

    initWebSocket () {

      this.connection()

    },

    connection () {

      const socket = new SockJS(this.$baseUrl + '/chat')

      this.stompClient = Stomp.over(socket)

      this.stompClient.connect({}, (frame) => {

        this.stompClient.subscribe('/topic/greetings', (greeting) => {

          console.log(JSON.parse(greeting.body))

          this.datas.push(JSON.parse(greeting.body))

        })

      })

    }

  }

}

</script>

<style scoped>

</style>
注意在这行代码this.stompClient.send('/app/hello', JSON.stringify(this.text), {}) {}的位置,有的版本可能是相反的。
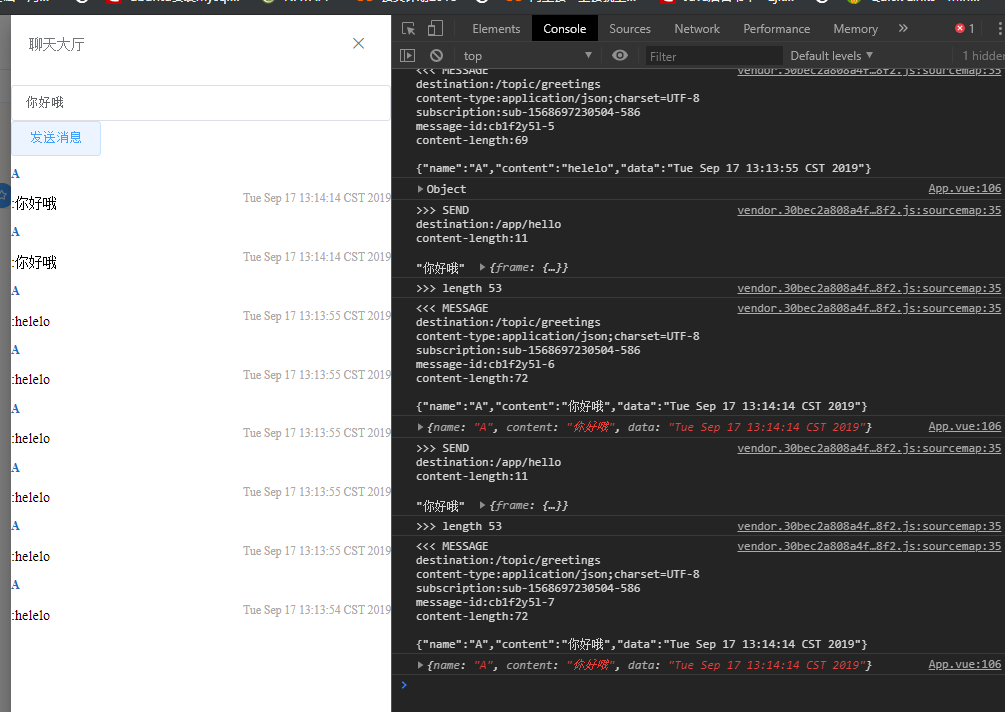
运行结果如下所示
SpringBoot+vue整合websocket的更多相关文章
- SpringBoot 同时整合thymeleaf html、vue html和jsp
问题描述 SpringBoot如何同时访问html和jsp SpringBoot访问html页面可以,访问jsp页面报错 SpringBoot如何同时整合thymeleaf html.vue html ...
- springboot 学习之路 8 (整合websocket(1))
目录:[持续更新.....] spring 部分常用注解 spring boot 学习之路1(简单入门) spring boot 学习之路2(注解介绍) spring boot 学习之路3( 集成my ...
- Springboot整合Websocket遇到的坑
Springboot整合Websocket遇到的坑 一.使用Springboot内嵌的tomcat启动websocket 1.添加ServerEndpointExporter配置bean @Confi ...
- SpringBoot 整合 WebSocket
SpringBoot 整合 WebSocket(topic广播) 1.什么是WebSocket WebSocket为游览器和服务器提供了双工异步通信的功能,即游览器可以向服务器发送消息,服务器也可以向 ...
- Websocket教程SpringBoot+Maven整合(详情)
1.大话websocket及课程介绍 简介: websocket介绍.使用场景分享.学习课程需要什么基础 笔记: websocket介绍: WebSocket协议是基于TCP的一种新的网络协议.它实现 ...
- springboot整合websocket原生版
目录 HTTP缺点 HTTP websocket区别 websocket原理 使用场景 springboot整合websocket 环境准备 客户端连接 加入战队 微信公众号 主题 HTTP请求用于我 ...
- SpringBoot+Vue+WebSocket 实现在线聊天
一.前言 本文将基于 SpringBoot + Vue + WebSocket 实现一个简单的在线聊天功能 页面如下: 在线体验地址:http://www.zhengqingya.com:8101 二 ...
- WebSocket的简单认识&SpringBoot整合websocket
1. 什么是WebSocket?菜鸟对websocket的解释如下 WebSocket 是 HTML5 开始提供的一种在单个 TCP 连接上进行全双工通讯的协议. WebSocket 使得客户端和服务 ...
- SpringBoot + Vue + ElementUI 实现后台管理系统模板 -- 后端篇(一): 搭建基本环境、整合 Swagger、MyBatisPlus、JSR303 以及国际化操作
相关 (1) 相关博文地址: SpringBoot + Vue + ElementUI 实现后台管理系统模板 -- 前端篇(一):搭建基本环境:https://www.cnblogs.com/l-y- ...
随机推荐
- 阿里云centos7安装python3.7.4和pip3
亲测有效,针对 阿里云 centos 7 轻量服务器 python ==> 3.7.4 pip ==> 3 一,打开python官网,找到下载Python的tgz文件,有两种方式下载 ( ...
- Hibernate Validator Engine的用法
一.引入架包 maven地址 点击即可. <!-- https://mvnrepository.com/artifact/org.hibernate.validator/hibernate-v ...
- 学习CNN系列一:原理篇
CNN的发展历程: 1962年,卷积神经网络的研究起源于Hubel和Wiesel研究毛脑皮层的发现局部互连网络可以有效降低反馈神经网络的复杂性. 1980年,CNN的第一个实现网络:Fukushima ...
- C++学习五 const vector<int>类型的迭代器使用
一情景: 算法功能:对于传入的vector, 能够找到两个数字,使其相加之和为target,然后返回这两个数字的位置(也就是秩) 最开始是这样的一个问题: 对于一个传入的const vector< ...
- anaconda换源及创建虚拟环境
0x01:换源,依次输入一下两条命令 conda config --add channels https://mirrors.tuna.tsinghua.edu.cn/anaconda/pkgs/fr ...
- web之ics-06
打开网址,四处点击,点到报表中心,跳转新页面 查看源码也没有什么特别的,发现URL栏有?id=1 以为是sql注入,但是并不是,查看大佬的wp 发现这题采用brupsuite爆破 先将抓到的包放到In ...
- window系统下的pycharm对虚拟机中的Ubuntu系统操作MySQL数据库
问题:程序员和数据库的爱情故事:程序为了追一个叫MySQL数据库的姑娘,先苦练功夫,自己模拟泡妹过程积累经验,于是想到一个解决方法:[解决虚拟机跑需要连接数据库的程序卡的问题,通过在物理机Window ...
- oracle 周岁年龄计算
以下三种方法均可实现周岁年龄的计算: --算法一: SELECT TRUNC(months_between(sysdate, csrq)/12) AS "Age" FROM wrx ...
- scrapyd--scrapydweb
scrapyd-实际的管理爬虫程序 scrapyd 是由scrapy 官方提供的爬虫管理工具,使用它我们可以非常方便地上传.控制爬虫并且查看运行日志. scrapyd是c/s架构 所有的爬虫调度工作全 ...
- C实现string字符串
在C中实现string字符串,使用typedef将string定义为char *. #include <stdio.h> #include <stdlib.h> #includ ...