Setting up Storm and Running Your First Topology
http://www.haroldnguyen.com/blog/2015/01/setting-up-storm-and-running-your-first-topology/
------------------------------------------------------------------------------------------------------------------------
Setting up Storm and Running Your First Topology
This guide will setup Storm on a single Ubuntu instance, and show you how to run a simple Word Count Topology. This guide assumes no experience with Storm.
Storm was created by Nathan Marz, and is designed for real-time event processing, and improves on some of Hadoop’s distributed design. Storm provides excellent documentation, which you are highly encouraged to go through. If you’re pressed for time, though, the following guide gets you started with running a simple real-time event processor (this is called a topology, but I assume you haven’t read any documentation and just want to get the thing up and running. Though this puts you at a conceptual disadvantage, there’s nothing like getting your hands dirty right away).
Setting up Storm
First grab version 0.9.2 of Storm (already compiled version)
$ wget http://apache.mesi.com.ar/storm/apache-storm-0.9.2-incubating/apache-storm-0.9.2-incubating.tar.gz
Extract the files:
$ tar -zxvf apache-storm-0.9.2-incubating.tar.gz
Grab the latest version of maven:
$ sudo apt-get install maven
If you are on a Mac:
$ brew install maven
also set the JAVA_HOME path in Mac through the ~/.bash_profile file:
$ export JAVA_HOME=$(/usr/libexec/java_home)
Check the maven version to see that it installed correctly:
$ mvn -version

If you checked out the src version of Storm, you can build and install the Storm jars locally with the following command (requires pom.xml file). This doesn’t need to be done if you already downloaded the compiled version as this guide has shown. However, it’s worth noting now because you’ll be using this command to compile your projects if you modify any of the source code.
Instead of building jars for the Storm project (since we’ve checked out the compiled version), let’s build the jar file for the storm-starter example project. First go into the storm-starter project within the apache-storm-0.9.2-incubating/examples folder:
$ cd apache-storm-0.9.2-incubating/examples/storm-starter
Now compile and build the jar files:
$ mvn clean install -DskipTests=true
It should take a few minutes, and you’ll see a lot of output. At the end of the output, you should see:

You are now ready to run your first Storm job (called a “topology”). We are going to run the topology located in apache-storm-0.9.2-incubating/examples/storm-starter/src/jvm/storm/starter/WordCountTopology.java
Let’s run the topology first, and then go briefly into the details of what is happening.
In the storm-starter directory, issue:
$ mvn compile exec:java -Dstorm.topology=storm.starter.WordCountTopology
The whole process will take about 50 seconds, and you will see a whole bunch of output. The main thing to look for in this output is something like this:

It should occur near the middle of all the output being shown. The end of the output should a bunch of shutdown messages, along with a success message like this:

Congratulations! You have ran your first Storm topology!
Storm has a local mode (called “Local Cluster”) and a production-cluster mode. The local mode is helpful for development and debugging, while the production-cluster mode is intended to run in a production environment. You just submitted the WordCountTopology in local mode.
Let’s take a look at what you just did.
A Storm topology consists of “Spouts” and “Bolts”. You can think of Spouts as obtaining the data, and Bolts as transforming the data. In a topology, you typically have one or more Bolts stemming from one Spout. The “data” in a Storm topology is called a “Tuple”.

In the WordCountTopology, the Spout used is the RandomSentenceSpout:

RandomSetenceSpout is located at apache-storm-0.9.2-incubating/examples/storm-starter/src/jvm/storm/starter/spout/RandomSentenceSpout.java
If you take a peak at this file, you can see the sentences being used:

That explains our output in our example – the words being “emitted” are taken from these sentences. The nextTuple method is common in all Spouts, and determines what you want the Spout to do. As you can see, it is a method that is commonly overridden.
Let’s now take a look at the Bolts in WordCountTopology.java:

These bolts are methods defined with the same file (WordCountTopology.java). By their name, we can guess what they do. Let’s take a look at “SplitSentence”:

It looks like it is calling a python script called “splitsentence.py”. Doing a little digging, we find this script located in apache-storm-0.9.2-incubating/examples/storm-starter/multilang/resources/splitsentence.py
We’ve just stumbled upon a cool thing that Storm can do – bolts are allowed to be language-agnostic! This means, we can write our logic in any language we please. In this case, we are splitting sentences with Python! Here is the splitsentence.py logic:

As you can see, it’s splitting the sentences by a single space, and “emitting” each word in that sentence.
So our first bolt “SplitSentence” is actually a python script that splits the sentences into words. Let’s take a look at our second bolt, “WordCount”, which is defined in WordCountTopology.java:

As you can see, a HashMap called “counts” is created, which stores the counts of each word going through.
This is the basic and fundamental template of a Storm topology. All other topologies you see are just different variations on this.
Just for completeness, let’s take a look at the rest of WordCountTopology:

As you might guess based on the names of the variables, the rest of the file is used for configuration information.
conf.setDebug controls the verbosity of the output. The block of code within the “if” statement is configuration for production, and the block of code in the “else” statement is for local mode (which is what we just saw). The topology being submitted is called “word-count”, and we’ve asked the job to run for 10 seconds.
In the meantime, as a “homework” assignment, you are encouraged to get the ExplanationTopology.java working, located in examples/storm-starter/src/jvm/ExclamationTopology.java
If you are feeling ambitious, try modifying the input Spout (TestWordSpout.java), and see how things change. However, you will need to download the source version and build storm-core from scratch, as TestWordSpout.java is part of storm-core. Remember to issue the compile command at the top storm level after each modification of the code:
$ mvn clean install -DskipTests=true
Deploying Storm on Production
Package the project for use on a Storm cluster. For instance, in storm-starter, do:
$ mvn package
The package should be in:
target/storm-starter-{version}-jar-with-dependences.jar
You can check out the binary version of storm (as we did above), and use the “storm” command from there. You can also add the bin path to $PATH.
Read this to fill in the storm.yam part.
I only modified the following in storm.yam:
storm.zookeeper.servers:
– “localhost”
# – “server2”
nimbus.host: “localhost”
Then start nimbus, supervisor, and UI:
$ storm nimbus$ storm supervisor$ storm ui
(localhost:8080 by default)
Then, from the machine that has the storm-jar-dependencies.jar, submit it:
$ storm jar /Users/haroldnguyen/workspace/storm-tutorial/apache-storm-0.9.2-incubating-src/examples/storm-starter/target/storm-starter-0.9.2-incubating-jar-with-dependencies.jar storm.starter.ExclamationTopology production-topology-1
The logs are located in the binary version of storm/logs.
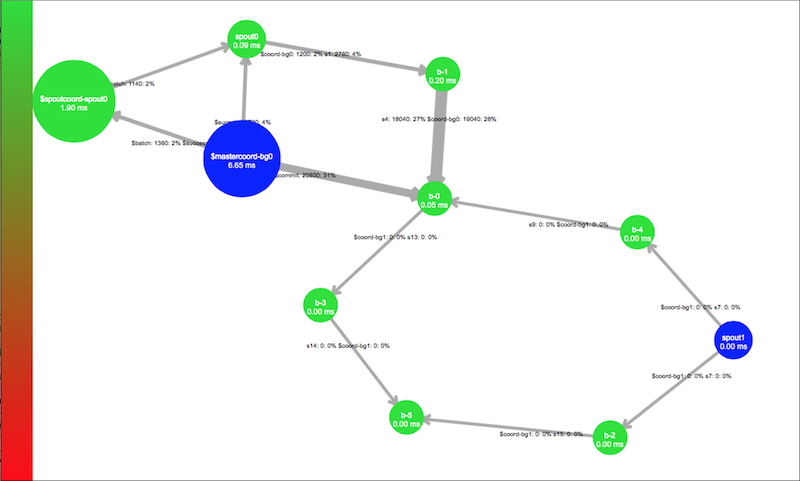
The storm ui is pretty neat, giving you a summary of running topologies and visualization:

If you still have trouble, please read through this excellent documentation on Running Topologies on a Production Cluster.
Conclusion
Congratulations – you went from knowing nothing about Storm to running a Word Count topology! The world is really your oyster!
In our next post, we’ll see how to connect Storm with Kafka!
This entry was posted in Storm. Bookmark the permalink.
Setting up Storm and Running Your First Topology的更多相关文章
- storm源码分析之topology提交过程
storm集群上运行的是一个个topology,一个topology是spouts和bolts组成的图.当我们开发完topology程序后将其打成jar包,然后在shell中执行storm jar x ...
- storm的作业单元:Topology
Storm系统的数据处理应用单元,是被打包的被称为Topology的作业. 它是由多个数据处理阶段组合而成的,而每个处理阶段在构造时被称为组件(Component),在运行时被称为任务. 那么,组件根 ...
- 通过 IDE 向 Storm 集群远程提交 topology
转载: http://weyo.me/pages/techs/storm-topology-remote-submission/ http://www.javaworld.com/article/20 ...
- kerberos环境storm配置:Running Apache Storm Securely
Running Apache Storm Securely Apache Storm offers a range of configuration options when trying to se ...
- 关于Storm 中Topology的并发度的理解
来自:https://storm.apache.org/documentation/Understanding-the-parallelism-of-a-Storm-topology.html htt ...
- storm环境搭建(前言)—— 翻译 Setting Up a Development Environment
Setting Up a Development Environment 搭建storm开发环境所需步骤: Download a Storm release , unpack it, and put ...
- Storm入门教程 第二章 构建Topology[转]
2.1 Storm基本概念 在运行一个Storm任务之前,需要了解一些概念: Topologies Streams Spouts Bolts Stream groupings Reliability ...
- 2 storm的topology提交执行
本博文的主要内容有 .storm单机模式,打包,放到storm集群 .Storm的并发机制图 .Storm的相关概念 .附PPT 打包,放到storm集群去.我这里,是单机模式下的storm. wee ...
- Storm编程入门API系列之Storm的Topology的stream grouping
概念,见博客 Storm概念学习系列之stream grouping(流分组) Storm的stream grouping的Shuffle Grouping 它是随机分组,随机派发stream里面的t ...
随机推荐
- Vue全局添加组件或者模块
import Api from './api.js' export default { install (Vue) { Vue.prototype.$Api = Api } } 这种格式就可以在mai ...
- [WDS] Warnings while compiling. vue项目运行控制台输出太多警告信息
vue项目运行控制台输出太多警告信息,我们需要vue 忽略警告,如Expected indentation of 0 spaces but found 2 这种警告都提示,很影响视觉体验! 解 ...
- python Matplotlib 系列教程(三)——绘制直方图和条形图
在本章节我们将学习如何绘制条形图和直方图 条形图与直方图的区别:首先,条形图是用条形的长度表示各类别频数的多少,其宽度(表示类别)则是固定的: 直方图是用面积表示各组频数的多少,矩形的高度表示每一组的 ...
- android ListView几个比较特别的属性
由于这两天在做listView的东西,所以整理出来一些我个人认为比较特别的属性,通过设置这样的属性可以做出更加美观的列表 首先是stackFromBottom属性,这只该属性之后你做好的列表就会显示你 ...
- LOJ 2321 清华集训2017 无限之环 拆点+最小费用最大流
题面:中文题面,这里不占用篇幅 分析: 看到题面,我就想弃疗…… 但是作为任务题单,还是抄了题解…… 大概就是将每个格子拆点,拆成五个点,上下左右的触点和一个负责连源汇点的点(以下简称本点). 这个这 ...
- Linux 内核框架图
- <Redis> 入门五 持久化RBD/AOF
RDB RDB持久化是指在指定的时间间隔内将内存中的数据集快照写入磁盘(默认是 dump.rdb). 默认持久化机制,就是将内存中的数据以快照的方式写入二进制文件dump.rbd中. 触发快照的条件 ...
- Bootstrap-Table 总结
Bootstrap-Table 总结 jQuery Java Bootstrap-Table JS文件 传参:直接将需要的参数置于 queryParams 方法中,例如 line:formData注意 ...
- 用python爬取一张仓鼠图片
一. 找到一张仓鼠图片并复制一下它的url url='http://img.go007.com/2017/08/16/c407f5b732f4e748_2.jpg' 二. 调用urllib库 impo ...
- popup介绍
一.作用 用于使浏览器自动生成弹窗 二.示例 1.新建Django项目,新建APP:app01, 项目根目录下新建文件夹static 2.静态文件配置,在settings.py中配置static: 3 ...