Booting LPC-Link2, Updating LPCXpresso firmware
Booting LPC-Link2
The recommended way to use LPC-Link2 with the LPCXpresso IDE is to boot and soft load a debug firmware image at the start of a debug session.
Normally, LPC-Link 2 is booted automatically, however under certain circumstances - such as when using the command line flash utility, you may need to boot it manually.
Note: Both the LPCXpresso V2/V3 boards and RDB4078 incorporate a built in LPC-Link2 debug probe, so this FAQ equally applies to these boards.
Note: This FAQ only applies to LPC-Link2 hardware when configured to operate in DFU mode, it does not apply if the LPC-Link2 hardware is configured to boot from a debug firmware image held in flash such as CMSIS-DAP.
Background
When powered on, LPC-Link 2 hardware makes use of the DFU mechanism (Device Firmware Update)
to allow the LPCXpresso IDE to download debug firmware into the on-board RAM.
This scheme offers great flexibility and ensures that the latest compatible firmware will be used for a given version of the IDE.
Before boot, LPC-Link 2 appears as a USB device with details:
For LPCXpresso IDE prior to v7.8: After boot, LPC-Link2 will by default appear as a USB device with details:
From LPCXpresso IDE v7.8 onwards: After boot, LPC-Link2 will by default appear as a USB device with details:

For information on setting the LPCXpresso IDE default debug firmware see: Configuring which LPC-Link2 firmware image to soft-load
Note: the standard utilities to explore USB devices on our supported host platforms are:
- Windows - Device Manager
- LPCXpressoIDE also provides a listusb utility in:
- <install_dir>\lpcxpresso\bin\Scripts
- LPCXpressoIDE also provides a listusb utility in:
- Linux - terminal command: lsusb
- Mac OSX - terminal command: system_profiler SPUSBDataType
The procedure to manually boot the probe is shown below.
Using the Command Line
From LPCXpresso IDE version 7.3x and later, we now supply a boot script for all supported platforms. To make use of this script:
- cd <install_dir>\lpcxpresso\bin and run
- boot_link2
For version of LPCXpresso IDE earlier than version 7.3 - you will need to locate the dfu-util utility and pass the parameters for the device and code etc. as below:
cd <install_dir>\lpcxpresso\bin and run
- dfu-util -d 1FC9:000C -c 0 -t 2048 -R -D LPC432x_Redlink_V4_30.bin.hdr
- LPC432x_Redlink_V4_30.bin.hdr is the file name for the firmware supplied in LPCXpresso IDE V 7.2.0
- Note: The exact name of the .hdr file may change between different tools releases, please ensure you use the name of the correct name!
- LPC432x_Redlink_V4_30.bin.hdr is the file name for the firmware supplied in LPCXpresso IDE V 7.2.0
Using the GUI
It is also possible to manually boot LPC-Link 2 from the GUI, on occasion this may be a more convenient solution than using the command line.
To do this, locate the red Boot icon on the Toolbar:

Troubleshooting
If you have been able to use LPC-Link 2 in a debug session but now see issues such as "No compatible emulator available"
or "Priority 0 connection to this core already taken" when trying to perform a debug operation ...
- ensure you have shut down any previous debug session
- You must close a debug session (press the Red 'terminate' button) before starting another debug session
- It is possible that the debug driver is still running in the background. Use the task manager or equivalent to kill any tasks called:
- redlinkserv
- arm-none-eabi_gdb*
- crt_emu_*
If your host has never worked with LPC-Link 2, first perform some basic checks with reference to the background information at the beginning of this FAQ.
- Try a different USB cable!
- Try a different USB port. If your host has USB3 and USB2, then try a USB2 port
- there are know issues with motherboard USB3 firmware, ensure your host is using the latest driver from the manufacturer
- Note: this is not referencing the host OS driver but the motherboard firmware of the USB port
- there are know issues with motherboard USB3 firmware, ensure your host is using the latest driver from the manufacturer
- If using a USB hub, first try a direct connection to the host computer
- Try completely removing and re-installing the host device driver. See also LPC-Link2 fails to enumerate with CMSIS-DAP
- If using Windows 8.1, then sometimes the Windows USB power settings can cause problems.
For more details use your favourite search engine to search for "windows 8 usb power settings" or similar. For example:
Updating LPCXpresso firmware
LPCXpresso range of development boards from NXP which include the LPC-Link 2 interface can be firmware updated to include mbed USB disk programming capabilities.
Below is a quick guide to how to carry out this update.
Requirements
- A Windows computer
- Download and install the latest DFU Boot drivers
- Download and install the latest NXP DFU Download utility
Instructions
1. Fit jumper JP3
2. Connect the "link" micro-B connector to the PC

3. Run dfusec.exe
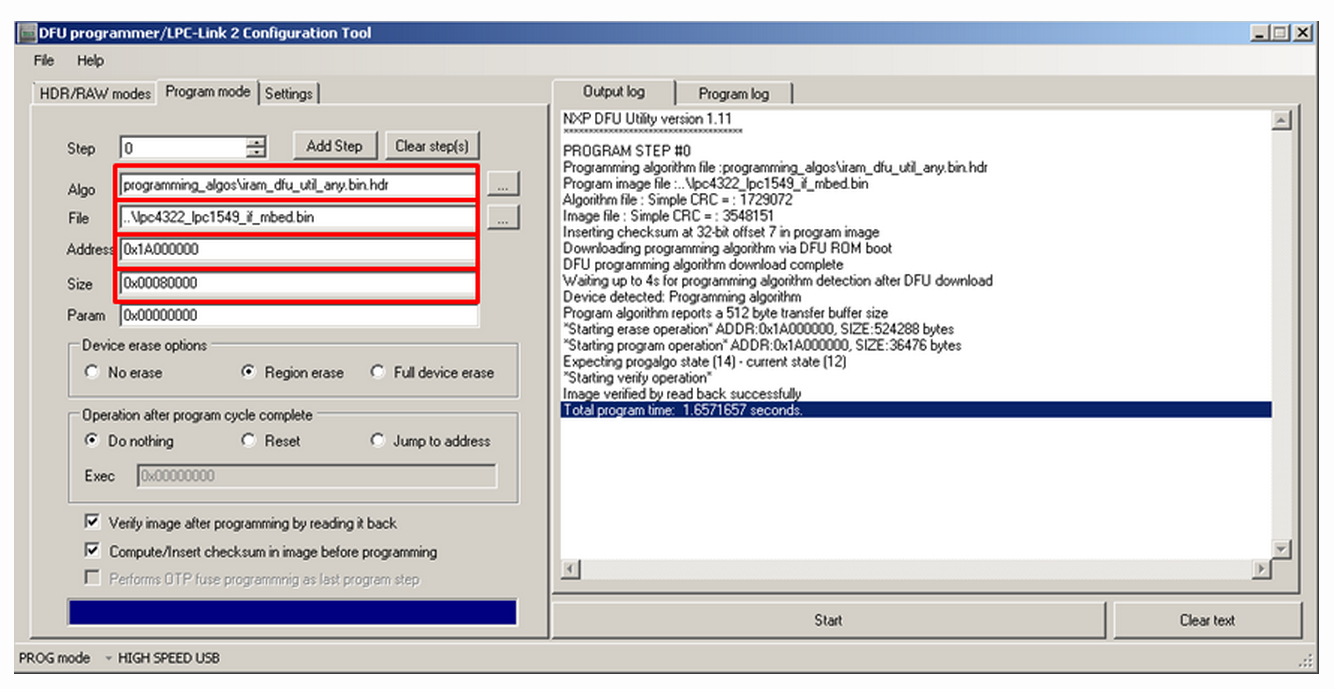
- Browse to the correct Algorithm file (the correct one should be selected by default)
- Download the binary for your board from the list below, and then :
- Browse to the binary
- Set the parameter : "Address"
- Set the parameter : "Size"
- Press the start button on the PC application... wait... done :-)
4. Remove the jumper JP3 and unplug/plug in the LPCXpresso
You should now have an mbed flash disk for drag and drop programming
Binary Downloads
- LPCXpresso1549
- LPCXpresso1549 firmware image 2015-07-14 v0221 (fixed the MBED.HTM file only)
- LPCXpresso1549 firmware image 2015-04-18 v0221
- LPCXpresso1549 firmware image 2014-04-03 v0202
- Address : 0x1A000000
- Size : 0x00080000
- LPCXpresso11U68
- LPCXpresso11U68 firmware image 2015-04-28 v0221
- LPCXpresso11U68 firmware image 2014-04-03 v0202
- Address : 0x1A000000
- Size : 0x00080000
- LPCXpresso4337
- LPCXpresso4337 firmware image 2015-04-27 v0221
- Address : 0x1A000000
- Size : 0x00080000
Booting LPC-Link2, Updating LPCXpresso firmware的更多相关文章
- LabTool : LPC LINK2, LPC4370 cheap scope: 80Ms/s 12 bit
80MHz 12 bit ADC processor LPC4370.LPCxpresso do a LPC LINK2 and LABTOOLS open source oscilloscope d ...
- LPC LINK2 IO CONNECTOR
- CyanogenMod wiki reading tips | Android tips
To Enable the Developer and Performance settings on CyanogenMod 10.1 In the Settings app, choose the ...
- UEFI boot: how does that actually work, then?
原文地址:https://www.happyassassin.net/2014/01/25/uefi-boot-how-does-that-actually-work-then/ 翻译:https:/ ...
- Booting the Linux/ppc kernel without Open Firmware
The DT block format 这一章定义了传递给内核的FDT(flattened device tree)的格式.关于它包含的内容以及内核需要的属性将在后续章节描述. 注:DT block应 ...
- Booting dircetly into Redlink FW from flash
Booting dircetly into Redlink FW from flash Hello, the usual way to use the Redlink FW is a two-step ...
- LPCScrypt, DFUSec : USB FLASH download, programming, and security tool, LPC-Link 2 Configuration tool, Firmware Programming
What does this tool do? The LPC18xx/43xx DFUSec utility is a Windows PC tool that provides support f ...
- cmsis dap interface firmware
cmsis dap interface firmware The source code of the mbed HDK (tools + libraries) is available in thi ...
- RPI学习--环境搭建_更新firmware
(用以解决USB摄像头不识别的状况) rpi-update是老外开发的一个更新树莓派firmware的工具 $ sudo apt-get update $ sudo apt-get install ...
随机推荐
- python导出数据到excel
1,SMTP发送带excel附件的邮件: def sendMail(filename, addressee): """ :param content: 发送内容 :par ...
- 【译】SQLskills SQL101:Trace Flags、ERRORLOG、Update Statistics
最近阅读SQLskills SQL101,将Erin Stellato部分稍作整理.仅提取自己感兴趣的知识点,详细内容请阅读原文. 一.Trace Flags推荐开启三个跟踪标记1118.3023.3 ...
- SQL008存储过程总结
1.如何调用存储过程 DECLARE @Id INT --输入参数 DECLARE @OutPutID INT --输出参数 EXEC [dbo].Order_SellPR @Id,@OutPutID ...
- centos7系统下安装配置jdk、tomcat教程
JDK安装与配置 1.下载linux版本的jdk,我下的版本是jdk6.0,下载rpm版本的. 可通过百度搜索文件名:jdk-6u45-linux-x64-rpm.bin下载 也可通过oracle官网 ...
- npm tls证书报错
Error: unable to verify the first certificate 设置node环境(零时使用,再次使用需要重新使用) set NODE_TLS_REJECT_UNAUTHOR ...
- DedeCMS常见问题和技巧
1: dedecms 访问空白(织梦如何显示详细错误) 我们在使用织梦的时候,有的时候会遇到访问空白的情况,尤其是再刚刚搬家之后,织梦会出现访问空白或者返给您一个500的友好界面错误,遇到这种情况该怎 ...
- 【AtCoder】AtCoder Petrozavodsk Contest 001
A - Two Integers 如果\(X\)是\(Y\)的倍数的话不存在 可以输出\(X \cdot (\frac{Y}{gcd(X,Y)} - 1)\) 代码 #include <bits ...
- oracle SQL学习总结
1.候选键.主键和外键约束: create table Employee( id int primary key, name char(20), birthday Date, address varc ...
- 【Java】 大话数据结构(6) 栈的顺序与链式存储
本文根据<大话数据结构>一书,实现了Java版的栈的顺序存储结构.两栈共享空间.栈的链式存储机构. 栈:限定仅在表尾进行插入和删除操作的线性表. 栈的插入(进栈)和删除(出栈)操作如下图所 ...
- DSP 中关键字extern,cregister,Near ,Far,restrict,volatile
extern:extern可以置于变量或者函数前,以表示变量或者函数的定义在别的文件中,提示编译器遇到此变量和函数时在其他模块中寻找其定义.另外,extern也可用来进行链接指定. const: 可以 ...