
Synergy CORTEX M 启动流程
1、启动文件“startup_S7G2.c”
中断向量表地址指针:“0xe000ed08”
/* Vector table. */

BSP_DONT_REMOVE const exc_ptr_t __Vectors[BSP_CORTEX_VECTOR_TABLE_ENTRIES] BSP_PLACE_IN_SECTION(BSP_SECTION_VECTOR) =

{

    (exc_ptr_t)(&g_main_stack[] + BSP_CFG_STACK_MAIN_BYTES),           /*      Initial Stack Pointer     */

    Reset_Handler,                                                      /*      Reset Handler             */

    NMI_Handler,                                                        /*      NMI Handler               */

    HardFault_Handler,                                                  /*      Hard Fault Handler        */

    MemManage_Handler,                                                  /*      MPU Fault Handler         */

    BusFault_Handler,                                                   /*      Bus Fault Handler         */

    UsageFault_Handler,                                                 /*      Usage Fault Handler       */

    ,                                                                  /*      Reserved                  */

    ,                                                                  /*      Reserved                  */

    ,                                                                  /*      Reserved                  */

    ,                                                                  /*      Reserved                  */

    SVC_Handler,                                                        /*      SVCall Handler            */

    DebugMon_Handler,                                                   /*      Debug Monitor Handler     */

    ,                                                                  /*      Reserved                  */

    PendSV_Handler,                                                     /*      PendSV Handler            */

    SysTick_Handler,                                                    /*      SysTick Handler           */

};
2、“入口函数”在“链接脚本”中配置,S7G2.ld
/* Linker script to configure memory regions. */

MEMORY

{

  FLASH (rx)         : ORIGIN = 0x00000000, LENGTH = 0x0040000  /* 256K */

  RAM (rwx)          : ORIGIN = 0x1FFE0000, LENGTH = 0x00A0000  /* 640K */

  DATA_FLASH (rx)    : ORIGIN = 0x40100000, LENGTH = 0x0010000  /*  64K */

  QSPI_FLASH (rx)    : ORIGIN = 0x60000000, LENGTH = 0x0800000  /*   8M, Change in QSPI section below also */

  SDRAM (rwx)        : ORIGIN = 0x90000000, LENGTH = 0x2000000  /*  32M */

}

ENTRY(Reset_Handler)
入口函数如下:
/***********************************************************************************************************************

* Function Name: Reset_Handler

* Description  : MCU starts executing here out of reset. Main stack pointer is setup already.

* Arguments    : none

* Return Value : none

***********************************************************************************************************************/

void Reset_Handler (void)

{

    /* Initialize system using BSP. */

    SystemInit();

    /* Call user application. */

    main();

    while ()

    {

        /* Infinite Loop. */

    }

}
HOOK设置 R_BSP_WarmStart(),用户可以有机会在“main()”执行前加入自己的操作。如:BOOT下判断是否有OTA升级。
void SystemInit (void)

{

#if ( defined ( __GNUC__ ) && defined (__VFP_FP__) && !defined (__SOFTFP__) ) || \

    ( defined ( __ICCARM__ ) && defined ( __ARMVFP__ ) && (__FPU_PRESENT == ) )

    /* Enable the Cortex-M4 FPU only when -mfloat-abi=hard.

       Code taken from Section 7.1, Cortex-M4 TRM (DDI0439C) */

    /* Set bits 20-23 to enable CP10 and CP11 coprocessor */

    /*LDRA_NOANALYSIS LDRA_INSPECTED below not working. */

    /*LDRA_INSPECTED 96 S *//*LDRA_INSPECTED 93 S SCB is a CMSIS defined element over which we have no control.*/

    SCB->CPACR = (uint32_t)((uint32_t)SCB->CPACR | (uint32_t)CP_MASK);

    /*LDRA_ANALYSIS */

#endif

    /* Call Pre C runtime initialization hook. */

    R_BSP_WarmStart(BSP_WARM_START_PRE_C);

    /* Initialize grouped interrupts. */

    bsp_group_interrupt_open();

    /* Initialize FMI. */

    g_fmi_on_fmi.init();

    /* Initialize register protection. */

    bsp_register_protect_open();

    /* Configure system clocks using CGC module. */

    bsp_clock_init();

    /* Temporary fix to initialize ioport reference counter to 0, needed before C runtime init. This will be removed

     * in the next release in favor of a more complete solution. */

    HW_IOPORT_Init_Reference_Counter();

    /* Initialize pins. */

    g_ioport_on_ioport.init(&g_bsp_pin_cfg);

    /* Initialize C runtime environment. */

    /* Zero out BSS */

#if defined(__GNUC__)

    bsp_section_zero((uint8_t *)&__bss_start__, ((uint32_t)&__bss_end__ - (uint32_t)&__bss_start__));

#elif defined(__ICCARM__)

    bsp_section_zero((uint8_t *)__section_begin(".bss"), (uint32_t)__section_size(".bss"));

#endif

    /* Copy initialized RAM data from ROM to RAM. */

#if defined(__GNUC__)

    bsp_section_copy((uint8_t *)&__etext,

                     (uint8_t *)&__data_start__,

                     ((uint32_t)&__data_end__ - (uint32_t)&__data_start__));

#elif defined(__ICCARM__)

    bsp_section_copy((uint8_t *)__section_begin(".data_init"),

                     (uint8_t *)__section_begin(".data"),

                     (uint32_t)__section_size(".data"));

    /* Copy functions to be executed from RAM. */

    #pragma section=".code_in_ram"

    #pragma section=".code_in_ram_init"

    bsp_section_copy((uint8_t *)__section_begin(".code_in_ram_init"),

                     (uint8_t *)__section_begin(".code_in_ram"),

                     (uint32_t)__section_size(".code_in_ram"));

    /* Copy main thread TLS to RAM. */

    #pragma section="__DLIB_PERTHREAD_init"

    #pragma section="__DLIB_PERTHREAD"

    bsp_section_copy((uint8_t *)__section_begin("__DLIB_PERTHREAD_init"),

                     (uint8_t *)__section_begin("__DLIB_PERTHREAD"),

                     (uint32_t)__section_size("__DLIB_PERTHREAD_init"));

#endif

    /* Initialize SystemCoreClock variable. */

    SystemCoreClockUpdate();

    /* Call Post C runtime initialization hook. */

    R_BSP_WarmStart(BSP_WARM_START_POST_C);

    /* Initialize Static Constructors */

#if defined(__GNUC__)

    /*LDRA_INSPECTED 219 S In the GCC compiler, __init_array_start and __init_array_end starts with underscore. */

    /*LDRA_INSPECTED 219 S */

    int32_t count = __init_array_end - __init_array_start;

    for (int32_t i = ; i < count; i++)

    {

        __init_array_start [i]();

    }

#elif defined(__ICCARM__)

    void const * pibase = __section_begin("SHT$$PREINIT_ARRAY");

    void const * ilimit = __section_end("SHT$$INIT_ARRAY");

    __call_ctors(pibase, ilimit);

#endif

    /* Initialize the Hardware locks to 'Unlocked' */

    bsp_init_hardware_locks();

    /* Initialize ELC events that will be used to trigger NVIC interrupts. */

    bsp_irq_cfg();

    /* Initialize ELC. */

    g_elc_on_elc.init(&g_elc_cfg);

    /* Call any BSP specific code. No arguments are needed so NULL is sent. */

    bsp_init(NULL);

}
R_BSP_WarmStart()下实现的“BCH”升级
void R_BSP_WarmStart (bsp_warm_start_event_t event)

{

    if (BSP_WARM_START_PRE_C == event)

    {

        /* C runtime environment has not been setup so you cannot use globals. System clocks and pins are not setup. */

    }

    else if (BSP_WARM_START_POST_C == event)

    {

        /* if S5 is pressed */

        if ( == ((R_IOPORT0->PCNTR2 >> ) & 0x1))

        {

            boot_status = ;

        }

        /* if S4 is pressed */

        else if ( == ((R_IOPORT0->PCNTR2 >> ) & 0x1))

        {

            boot_status = ;

        }

        /* if S4 and S5 are not pressed */

        else

        {

            /* Initialize the Hardware locks to 'Unlocked' */

            bsp_init_hardware_locks();

            ssp_err_t status;

            status = g_sf_bootloader_mcu.p_api->open(g_sf_bootloader_mcu.p_ctrl, g_sf_bootloader_mcu.p_cfg);

            if (!status)

            {

                status = g_sf_bootloader_mcu.p_api->appStart(g_sf_bootloader_mcu.p_ctrl);

                if (status)

                {

                    /* Notify the bootloader that appStart failed */

                    boot_status = ;

                    g_sf_bootloader_mcu.p_api->close(g_sf_bootloader_mcu.p_ctrl);

                }

            }

            else

            {

                /* Notify the bootloader that open failed */

                boot_status = ;

            }

        }

    }

    else

    {

        /* Do nothing */

    }

}
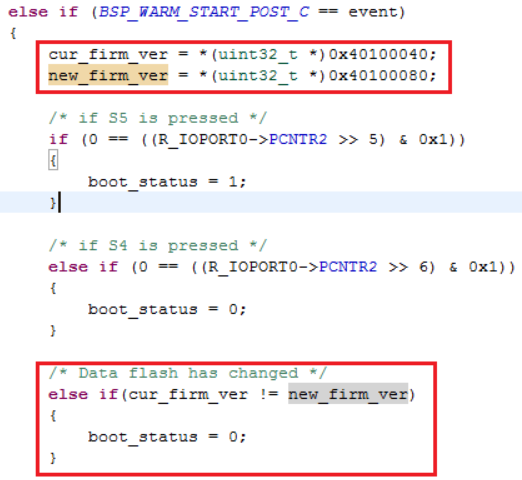
当然也可以判断DATA FLASH数据作为是否升级的依据:
Synergy CORTEX M 启动流程的更多相关文章
- 转载-Qualcomm MSM8953启动流程:PBL-SBL1-(bootloader)LK-Android
文章转载链接: https://blog.csdn.net/RadianceBlau/article/details/73229005 对于嵌入式工程师了解芯片启动过程是十分有必要的,在分析.调试各种 ...
- MyCat源码分析系列之——配置信息和启动流程
更多MyCat源码分析,请戳MyCat源码分析系列 MyCat配置信息 除了一些默认的配置参数,大多数的MyCat配置信息是通过读取若干.xml/.properties文件获取的,主要包括: 1)se ...
- Android进阶系列之源码分析Activity的启动流程
美女镇楼,辟邪! 源码,是一个程序猿前进路上一个大的而又不得不去翻越障碍,我讨厌源码,看着一大堆.5000多行,要看完得啥时候去了啊.不过做安卓的总有这一天,自从踏上这条不归路,我就认命了.好吧,我慢 ...
- Spring Boot启动流程详解(一)
环境 本文基于Spring Boot版本1.3.3, 使用了spring-boot-starter-web. 配置完成后,编写了代码如下: @SpringBootApplication public ...
- linux启动流程及自定义gurb
linux 启动流程 POST BIOS(boot sequence) 所选择的启动设备次序的MBR中是否有引导程序, ----> MBR(bootloader) 提供内核列表 -------& ...
- linux启动流程
看了深入理解linux内核一书的最后对linux启动流程的介绍,下面就把我能理解的写一下吧: bios(硬件加电自检POST,寻找第一个启动设备) the boot loader(可以从硬盘启动也可以 ...
- webapp启动流程
webapp启动流程 看了这个教程,其实所有的webapp大致都是这个流程了.
- Tomcat源码分析之—具体启动流程分析
从Tomcat启动调用栈可知,Bootstrap类的main方法为整个Tomcat的入口,在init初始化Bootstrap类的时候为设置Catalina的工作路径也就是Catalina_HOME信息 ...
- 嵌入式Linux驱动学习之路(五)u-boot启动流程分析
这里说的u-boot启动流程,值得是从上电开机执行u-boot,到u-boot,到u-boot加载操作系统的过程.这一过程可以分为两个过程,各个阶段的功能如下. 第一阶段的功能: 硬件设备初始化. 加 ...
随机推荐
- nginx默认配置
user nobody; worker_processes 2; worker_cpu_affinity 000000001000 000000010000; worker_rlimit_nofile ...
- 【zznu-2093】毁掉这颗二叉树
题目描述 广寒宫下有株二叉树,树上共有n个节点,通过n-1条树枝连接,树下有一只玉兔,吴刚提着斧子站在一旁. 他恼恨一切同他争夺嫦娥的事物,所以他决定通过砍二叉树上的n-1条树枝来毁掉这颗二叉树. 妙 ...
- mysqldump 使用方法
1.仅导出数据: mysqldump -t -uroot -proot pgenius RES_COM_PFT_FCST>RES_COM_PFT_FCST.sql 2.有条的导出数据: mysq ...
- Docker的大坑小洼(二)
再谈<Docker的大坑小洼> 今天闲暇看了一下宏亮同学写的一篇<Docker的大坑小洼>,非常受启发.因为Docker的文章真的很多了,但大家如果只是玩一玩,有很多坑是不会碰 ...
- rsync的服务端和客户端搭建
首先要看看有没有rsync,没有就按装一个rsync 1配置文件 然后创建rsyncd.conf文件,并添加如下内容(文件默认不存在) [root@chensiqi2 backup]# cat /et ...
- 使用游标、存储过程、pivot 三种方法导入数据
--使用游标循环 if (exists (select * from sys.objects where name = 'Base_RecordTend_Test')) drop proc Base_ ...
- Goal+企互区别+Map
1.目标:我想通过本学期这门java ee来提升自己对于java整合开发的应用技术,并加深对上学期学习的java的技术.java目前是应用最广泛的语言,对于企业级应用的开发来说学好java ee是非常 ...
- Redis数据结构:SDS
1. 简单动态字符串(simple dynamic string,SDS)是Redis的默认字符串表示结构,底层的string都是基于SDS实现.Redis基于C语言,并引用了部分C函数. 使用场景: ...
- 20165202 week10课下补做
相关知识点总结 在数据结构和算法中,排序是很重要的操作,要让一个类可以进行排序,有两种方法: 有类的源代码,针对某一成员变量排序,让类实现Comparable接口,调用Collection.sort( ...
- 在.NET Core中连接使用Zookeeper
一开始找到的是ZookeeperNetEx,但是很多API都很原始,不怎么好用. 最后确定用Rabbit.Zookeeper来做,他对ZookeeperNetEx进行了封装,要简单不少. 和c语言和j ...