读书摘要观后感与总结:《Glibc内存管理:ptmalloc2源代码分析》
更新中
在Linux平台下做漏洞利用的时候,针对于Heap部分总是有些不求甚解,下面开个博文来记录下《Glibc内存管理:ptmalloc2源代码分析》这本书的读后感和收获,一些简单的点将不再记录
说明,本博文中所有的实验均在Linux Ubuntu16.04的环境下进行
目录树:
一些关于计算size的宏
"chunk to mem" and "mem to chunk"
about size
分箱式内存管理
smallbins
largebins
一些关于计算size的宏
Ptmalloc设计的时候很巧妙的一点就是利用宏来屏蔽不同平台的差异,一些简单的细节比如chunk的形式在此我就不再赘述,下面记录一下读后有收获的点
"chunk to mem" and "mem to chunk"
/* conversion from malloc headers to user pointers, and back */

#define chunk2mem(p)   ((void*)((char*)(p) + 2*SIZE_SZ))

#define mem2chunk(mem) ((mchunkptr)((char*)(mem) - 2*SIZE_SZ))
about size
MIN_CHUNK_SIZE定义了最小的chunk大小,MINSIZE定义了最小的分配的内存大小,是对MIN_CHUNK_SIZE进行了2*SIZE_SZ对齐,对齐后与MIN_CHUNK_SIZE的大小仍然是一样的
/* The smallest possible chunk */

#define MIN_CHUNK_SIZE        (offsetof(struct malloc_chunk, fd_nextsize))

/* The smallest size we can malloc is an aligned minimal chunk */

#define MINSIZE  \

  (unsigned long)(((MIN_CHUNK_SIZE+MALLOC_ALIGN_MASK) & ~MALLOC_ALIGN_MASK))
下面说明一下chunk是如何计算其size的
/* size field is or'ed with PREV_INUSE when previous adjacent chunk in use */

#define PREV_INUSE 0x1

/* extract inuse bit of previous chunk */

#define prev_inuse(p)       ((p)->mchunk_size & PREV_INUSE)

/* size field is or'ed with IS_MMAPPED if the chunk was obtained with mmap() */

#define IS_MMAPPED 0x2

/* check for mmap()'ed chunk */

#define chunk_is_mmapped(p) ((p)->mchunk_size & IS_MMAPPED)

/* size field is or'ed with NON_MAIN_ARENA if the chunk was obtained

   from a non-main arena.  This is only set immediately before handing

   the chunk to the user, if necessary.  */

#define NON_MAIN_ARENA 0x4
#define SIZE_BITS (PREV_INUSE | IS_MMAPPED | NON_MAIN_ARENA)

/* Like chunksize, but do not mask SIZE_BITS.  */

#define chunksize_nomask(p)         ((p)->mchunk_size)

/* Get size, ignoring use bits */

#define chunksize(p) (chunksize_nomask (p) & ~(SIZE_BITS))

/* Ptr to next physical malloc_chunk. */

#define next_chunk(p) ((mchunkptr) (((char *) (p)) + chunksize (p)))

/* Size of the chunk below P.  Only valid if !prev_inuse (P).  */

#define prev_size(p) ((p)->mchunk_prev_size)
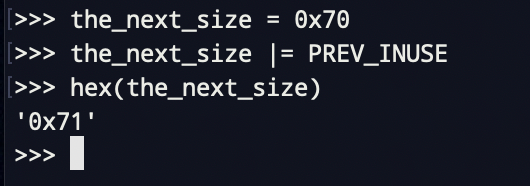
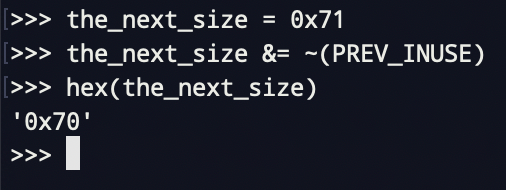
比如做个实验来验证下,我们的chunksize为0x71,那么它本身的真实size是如何计算的?
根据宏定义来计算
可以看到计算得出的结果显然正确

下面这一组宏定义用来check/set/clear当前chunk使用标志位,有当前chunk的使用标志位存储在下一个chunk的size的P位,所以下面的宏都要首先算出来下一个chunk的地址
然后再做处理
/* extract p's inuse bit */

#define inuse(p)                                                              \

  ((((mchunkptr) (((char *) (p)) + chunksize (p)))->mchunk_size) & PREV_INUSE)

/* set/clear chunk as being inuse without otherwise disturbing */

#define set_inuse(p)                                                              \

  ((mchunkptr) (((char *) (p)) + chunksize (p)))->mchunk_size |= PREV_INUSE

#define clear_inuse(p)                                                              \

  ((mchunkptr) (((char *) (p)) + chunksize (p)))->mchunk_size &= ~(PREV_INUSE)
我们可以简单来实验一下
define inuse(p) 定义p的inuse

define set_inuse(p) 设置p的inuse位(p的nextchuhnk来设置)
define clear_inuse(p) 清理p的inuse位
下面三个宏用来check/set/clear指定chunk的size域中的使用标志位
/* check/set/clear inuse bits in known places */

#define inuse_bit_at_offset(p, s)                                              \

  (((mchunkptr) (((char *) (p)) + (s)))->mchunk_size & PREV_INUSE)

#define set_inuse_bit_at_offset(p, s)                                              \

  (((mchunkptr) (((char *) (p)) + (s)))->mchunk_size |= PREV_INUSE)

#define clear_inuse_bit_at_offset(p, s)                                              \

  (((mchunkptr) (((char *) (p)) + (s)))->mchunk_size &= ~(PREV_INUSE))
分箱式内存管理
smallbins
smallbins有64个bin,实际共62个bin,bin[0]和bin[1]不存在
chunk_size = 2 * SIZE_SZ * index
范围:16B-504B (32B-1008B)
ptmalloc维护了62个双向环形链表,每个链表都有头节点,便于管理,每个链表内各个空闲的chunk的大小一致
largebins
32:大于等于512B
64:大于等于1024B
一共63个bins
每个bin中的chunk大小不是一个固定公差的等差数列,而是分成6组bin,每组bin是一个固定公差的等差数列
每组的bin数量依次为:32,16, 8, 4, 2, 1
公差依次为: 64,512,4096,32768,262144
可以用数学来描述计算largebins的chunk_size
第一组:chunksize = 512 + 64 * index
第二组:chunksize = 512 + 64 * 32 + 512 * index
……
可以看到,其实smallbins和largebins差不多满足同样的规律,所以可以将small bins和large bins放在同一个包含128个chunk的数组上,数组前一部分为small bins,后一部分为large bins。
每个bin的index是chunk数组的下标,于是,可以根据下标来计算chunk大小(small bins)或者chunk大小范围(large bins)
同样也可以计算所需chunk所属bin的index,ptmalloc使用一组宏来完成计算
宏bin_index(sz)根据所需内存大小来计算出所需bin的index(如果是用户要分配的size,先使用checked_request2size来计算出chunk的大小)
/*
Indexing
Bins for sizes < 512 bytes contain chunks of all the same size, spaced
8 bytes apart. Larger bins are approximately logarithmically spaced:
64 bins of size 8
32 bins of size 64
16 bins of size 512
8 bins of size 4096
4 bins of size 32768
2 bins of size 262144
1 bin of size what's left
There is actually a little bit of slop in the numbers in bin_index
for the sake of speed. This makes no difference elsewhere.
The bins top out around 1MB because we expect to service large
requests via mmap.
Bin 0 does not exist. Bin 1 is the unordered list; if that would be
a valid chunk size the small bins are bumped up one.
*/
#define NBINS 128
#define NSMALLBINS 64
#define SMALLBIN_WIDTH MALLOC_ALIGNMENT
#define SMALLBIN_CORRECTION (MALLOC_ALIGNMENT > 2 * SIZE_SZ)
#define MIN_LARGE_SIZE ((NSMALLBINS - SMALLBIN_CORRECTION) * SMALLBIN_WIDTH)
#define in_smallbin_range(sz) \
((unsigned long) (sz) < (unsigned long) MIN_LARGE_SIZE)
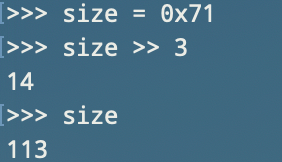
#define smallbin_index(sz) \
((SMALLBIN_WIDTH == 16 ? (((unsigned) (sz)) >> 4) : (((unsigned) (sz)) >> 3))\
+ SMALLBIN_CORRECTION)
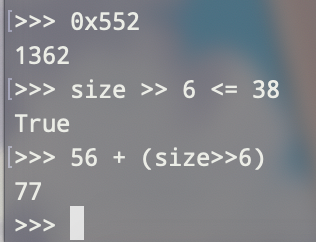
#define largebin_index_32(sz) \
(((((unsigned long) (sz)) >> 6) <= 38) ? 56 + (((unsigned long) (sz)) >> 6) :\
((((unsigned long) (sz)) >> 9) <= 20) ? 91 + (((unsigned long) (sz)) >> 9) :\
((((unsigned long) (sz)) >> 12) <= 10) ? 110 + (((unsigned long) (sz)) >> 12) :\
((((unsigned long) (sz)) >> 15) <= 4) ? 119 + (((unsigned long) (sz)) >> 15) :\
((((unsigned long) (sz)) >> 18) <= 2) ? 124 + (((unsigned long) (sz)) >> 18) :\
126)
#define largebin_index_32_big(sz) \
(((((unsigned long) (sz)) >> 6) <= 45) ? 49 + (((unsigned long) (sz)) >> 6) :\
((((unsigned long) (sz)) >> 9) <= 20) ? 91 + (((unsigned long) (sz)) >> 9) :\
((((unsigned long) (sz)) >> 12) <= 10) ? 110 + (((unsigned long) (sz)) >> 12) :\
((((unsigned long) (sz)) >> 15) <= 4) ? 119 + (((unsigned long) (sz)) >> 15) :\
((((unsigned long) (sz)) >> 18) <= 2) ? 124 + (((unsigned long) (sz)) >> 18) :\
126)
// XXX It remains to be seen whether it is good to keep the widths of
// XXX the buckets the same or whether it should be scaled by a factor
// XXX of two as well.
#define largebin_index_64(sz) \
(((((unsigned long) (sz)) >> 6) <= 48) ? 48 + (((unsigned long) (sz)) >> 6) :\
((((unsigned long) (sz)) >> 9) <= 20) ? 91 + (((unsigned long) (sz)) >> 9) :\
((((unsigned long) (sz)) >> 12) <= 10) ? 110 + (((unsigned long) (sz)) >> 12) :\
((((unsigned long) (sz)) >> 15) <= 4) ? 119 + (((unsigned long) (sz)) >> 15) :\
((((unsigned long) (sz)) >> 18) <= 2) ? 124 + (((unsigned long) (sz)) >> 18) :\
126)
#define largebin_index(sz) \
(SIZE_SZ == 8 ? largebin_index_64 (sz) \
: MALLOC_ALIGNMENT == 16 ? largebin_index_32_big (sz) \
: largebin_index_32 (sz))
#define bin_index(sz) \
((in_smallbin_range (sz)) ? smallbin_index (sz) : largebin_index (sz))
对于x86,bin[0]和bin[1]不存在,而NBINS定义为128,其实bin[0]和bin[127]都不存在,bin[1]为unsorted bin的chunk链表头
通过查表可验证以上算法的正确性
宏bin_at通过bin_index来获得bin的链表头,next_bin用于获得下一个bin的地址,first用于获得bin的第一个可用chunk,last用于获得最后一个可用chunk
/* addressing -- note that bin_at(0) does not exist */

#define bin_at(m, i) \

  (mbinptr) (((char *) &((m)->bins[((i) - 1) * 2]))                              \

             - offsetof (struct malloc_chunk, fd))

/* analog of ++bin */

#define next_bin(b)  ((mbinptr) ((char *) (b) + (sizeof (mchunkptr) << 1)))

/* Reminders about list directionality within bins */

#define first(b)     ((b)->fd)

#define last(b)      ((b)->bk)
读书摘要观后感与总结:《Glibc内存管理:ptmalloc2源代码分析》的更多相关文章
- 《Glibc内存管理》笔记DAY5
目录 分箱式内存管理 Unsorted bin Fast bins 核心结构体分析 malloc_state 内容来源 分箱式内存管理 Unsorted bin Unsorted bin 可以看作 ...
- 《Glibc内存管理》笔记DAY4
目录 分箱式内存管理 Small bins Large bins 内容来源 分箱式内存管理 对于空闲的 chunk,ptmalloc 采用分箱式内存管理方式,根据空闲 chunk 的大小和处于的状 ...
- 《Glibc内存管理》笔记DAY3
目录 边界标记法 内容来源 边界标记法 /* conversion from malloc headers to user pointers, and back */ #define chunk2me ...
- 《Glibc内存管理》笔记DAY2
目录 Ptmalloc内存管理设计 Main_arena 与 non_main_arena chunk 的组织 空闲 chunk 容器 sbrk 与 mmap 内存分配概述 内存回收概述 边界标记法 ...
- 《Glibc内存管理》笔记DAY1
目录 x86_64栈和mmap固定映射地址 内存的延迟分配 内核数据结构 mm_struct Heap 操作相关函数 Mmap 映射区域操作相关函数 内容来源 x86_64栈和mmap固定映射地址 ...
- glibc内存管理那些事儿
本文转载自glibc内存管理那些事儿 Linux内存空间简介 32位Linux平台下进程虚拟地址空间分布如下图: 进程虚拟地址空间分布 图中,0xC0000000开始的最高1G空间是内核地址空间,剩下 ...
- 2万字|30张图带你领略glibc内存管理精髓(因为OOM导致了上千万损失)
前言 大家好,我是雨乐. 5年前,在上家公司的时候,因为进程OOM造成了上千万的损失,当时用了一个月的时间来分析glibc源码,最终将问题彻底解决. 最近在逛知乎的时候,发现不少人有对malloc/f ...
- Linux-0.11内核源代码分析系列:内存管理get_free_page()函数分析
Linux-0.11内存管理模块是源码中比較难以理解的部分,如今把笔者个人的理解发表 先发Linux-0.11内核内存管理get_free_page()函数分析 有时间再写其它函数或者文件的:) /* ...
- objective-C 的内存管理之-实例分析
objective-C 的内存管理之-实例分析 注:这是<Objective-C基础教程>一书上的实例,但是原书限于篇幅,分析得比较简单,初次阅读看得比较费劲,这里展开详细讨论一下. 场景 ...
随机推荐
- 针对于Java的35 个代码性能优化总结
针对于Java的35 个代码性能优化总结前言代码优化,一个很重要的课题.可能有些人觉得没用,一些细小的地方有什么好修改的,改与不改对于代码的运行效率有什么影响呢?这个问题我是这么考虑的,就像大海里面的 ...
- http走私攻击
http走私攻击 前端服务器和后端服务器接收数据不同步,引起对客户端传入的数据理解不一致,从而导致漏洞. 因为当服务器同时在处理Content-Length和Transfer-Encoding,Con ...
- MySQL存储引擎入门介绍
什么是MySQL? MySQL 是一种关系型数据库,在Java企业级开发中非常常用,因为 MySQL 是开源免费的,并且方便扩展.阿里巴巴数据库系统也大量用到了 MySQL,因此它的稳定性是有保障的. ...
- Linux里面的压缩和解压类指令
gzip/gunzip 指令 ( .gz 不能压缩目录) gzip 用于压缩文件, gunzip 用于解压的 . gzip gzip命令用来压缩文件.gzip是个使用广泛的压缩程序,文件经它压缩过后 ...
- 读完这篇,让你真正理解Redis持久化
什么叫持久化? 用一句话可以将持久化概括为:将数据(如内存中的对象)保存到可永久保存的存储设备中. 持久化的主要应用是将内存中的对象存储在数据库中,或者存储在磁盘文件中. XML 数据文件中等等. 也 ...
- springboot项目整合rabbitMq涉及消息的发送确认,消息的消费确认机制,延时队列的实现
1.引入maven依赖 <dependency> <groupId>org.springframework.boot</groupId> <artifactI ...
- Spring学习(五)--Spring的IOC
1.BeanDefinition在IOC的注册 当BeanDefinition完成载入和解析之后,用户定义的BeanDefinition在IOC容器中已经建立自己的数据结构和数据表示,但是无法使用,需 ...
- django 的初始项目结构
2.创建Django项目 root@dev:shiyanlou_project# workon syl (syl) root@dev:shiyanlou_project# cd /aaa/shiy ...
- 朴素贝叶斯分类器Naive Bayes
优点Naive Bayes classifiers tend to perform especially well in one of the following situations: When t ...
- 01 Arcgis10.6 安装教程
一.ArcGIS系统要求 包括: Win7 SP1(及以上) 32/64位系统 Win8.1 32/64位系统 Win10 32/64位系统 二.下载ArcGIS 10.6安装文件 链接:https: ...