caffe-window搭建自己的小项目例子
手头有一个实际的视觉检测的项目,用的是caffe来分类,于是需要用caffe新建自己的项目的例子。在网上找了好久都没有找到合适的,于是自己开始弄。
1 首先是配置caffe的VC++目录中的include和库文件。配置include lib dll都是坑,而且还分debug和release两个版本。添加输入项目需要注意,而且需要把编译好的caffe.lib等等一系列东西拷贝到当前项目下。也就是caffe bulid文件夹下面的东西,包括caffe.lib 、libcaffe.lib、还有很多dll.
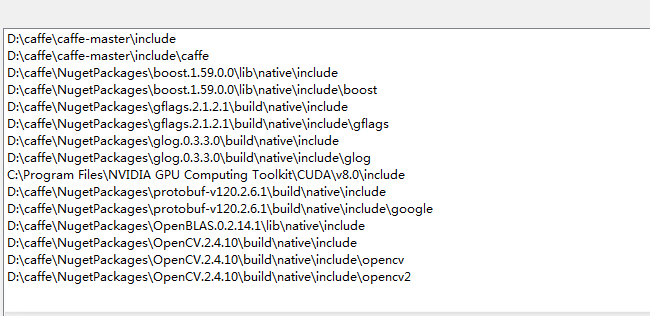 这个是debug_include配置图
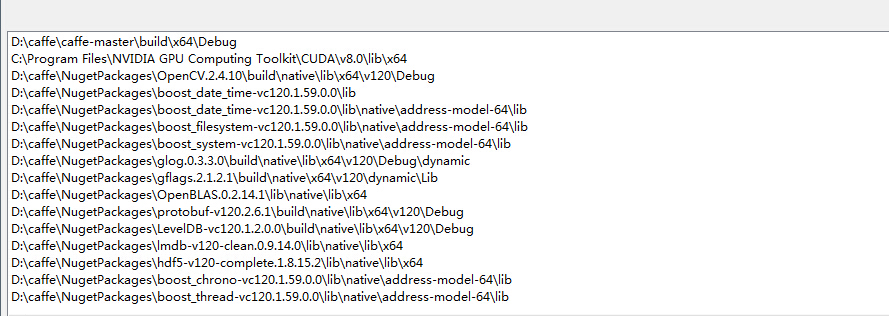 这个是debug_lib配置图
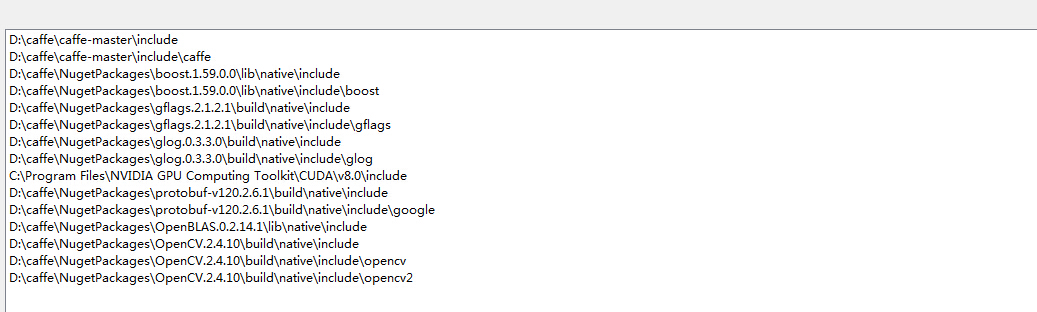 这个是release_include配置图
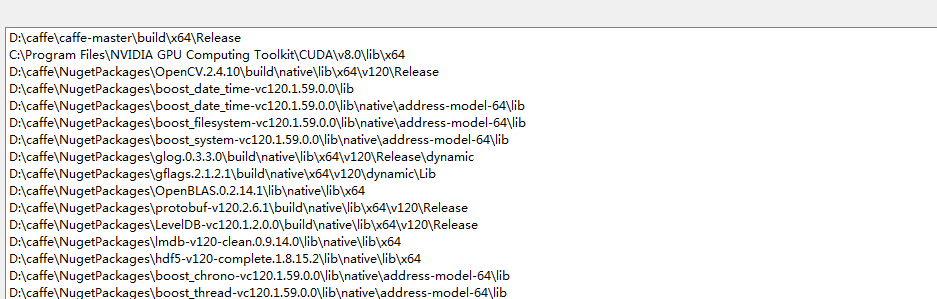 这个是release_lib配置图
同时也需要在,项目属性页的链接器输入中,填写相应的lib,其中debug和release是不同的。以下是需要填写的相应lib
//debug

opencv_calib3d2413d.lib

opencv_contrib2413d.lib

opencv_core2413d.lib

opencv_features2d2413d.lib

opencv_flann2413d.lib

opencv_gpu2413d.lib

opencv_highgui2413d.lib

opencv_imgproc2413d.lib

opencv_legacy2413d.lib

opencv_ml2413d.lib

opencv_objdetect2413d.lib

opencv_ts2413d.lib

opencv_video2413d.lib

caffe.lib

libcaffe.lib

cudart.lib

cublas.lib

curand.lib

gflagsd.lib

libglog.lib

libopenblas.dll.a

libprotobuf.lib

leveldb.lib

hdf5.lib

hdf5_hl.lib

Shlwapi.lib

//release

opencv_calib3d2413.lib

opencv_contrib2413.lib

opencv_core2413.lib

opencv_features2d2413.lib

opencv_flann2413.lib

opencv_gpu2413.lib

opencv_highgui2413.lib

opencv_imgproc2413.lib

opencv_legacy2413.lib

opencv_ml2413.lib

opencv_objdetect2413.lib

opencv_ts2413.lib

opencv_video2413.lib

caffe.lib

libcaffe.lib

cudart.lib

cublas.lib

curand.lib

gflags.lib

libglog.lib

libopenblas.dll.a

libprotobuf.lib

leveldb.lib

lmdb.lib

hdf5.lib

hdf5_hl.lib

Shlwapi.lib
2 新建一个Classifier的c++类,其中头文件为
#include "stdafx.h"

#include <caffe/caffe.hpp>

#include <opencv2/core/core.hpp>

#include <opencv2/highgui/highgui.hpp>

#include <opencv2/imgproc/imgproc.hpp>

#include <algorithm>

#include <iosfwd>

#include <memory>

#include <string>

#include <utility>

#include <vector>

#pragma once

using namespace caffe;  // NOLINT(build/namespaces)

using std::string;

//using namespace boost; 注意不需要添加这个

/* Pair (label, confidence) representing a prediction. */

typedef std::pair<string, float> Prediction;

class Classifier

{

public:

	Classifier(const string& model_file,

		const string& trained_file,

		const string& mean_file,

		const string& label_file);

	std::vector<Prediction> Classify(const cv::Mat& img, int N = 5);

	~Classifier();

private:

	void SetMean(const string& mean_file);

	std::vector<float> Predict(const cv::Mat& img);

	void WrapInputLayer(std::vector<cv::Mat>* input_channels);

	void Preprocess(const cv::Mat& img,

		std::vector<cv::Mat>* input_channels);

private:

	boost::shared_ptr<Net<float> > net_;

	cv::Size input_geometry_;

	int num_channels_;

	cv::Mat mean_;

	std::vector<string> labels_;

};
c++文件为
#include "stdafx.h"

#include "Classifier.h"

Classifier::Classifier(const string& model_file,

	const string& trained_file,

	const string& mean_file,

	const string& label_file) {

#ifdef CPU_ONLY

	Caffe::set_mode(Caffe::CPU);

#else

	Caffe::set_mode(Caffe::GPU);

#endif

	/* Load the network. */

	net_.reset(new Net<float>(model_file, TEST));

	net_->CopyTrainedLayersFrom(trained_file);

	CHECK_EQ(net_->num_inputs(), 1) << "Network should have exactly one input.";

	CHECK_EQ(net_->num_outputs(), 1) << "Network should have exactly one output.";

	Blob<float>* input_layer = net_->input_blobs()[0];

	num_channels_ = input_layer->channels();

	CHECK(num_channels_ == 3 || num_channels_ == 1)

		<< "Input layer should have 1 or 3 channels.";

	input_geometry_ = cv::Size(input_layer->width(), input_layer->height());

	/* Load the binaryproto mean file. */

	SetMean(mean_file);

	/* Load labels. */

	std::ifstream labels(label_file.c_str());

	CHECK(labels) << "Unable to open labels file " << label_file;

	string line;

	while (std::getline(labels, line))

		labels_.push_back(string(line));

	Blob<float>* output_layer = net_->output_blobs()[0];

	CHECK_EQ(labels_.size(), output_layer->channels())

		<< "Number of labels is different from the output layer dimension.";

}

static bool PairCompare(const std::pair<float, int>& lhs,

	const std::pair<float, int>& rhs) {

	return lhs.first > rhs.first;

}

/* Return the indices of the top N values of vector v. */

static std::vector<int> Argmax(const std::vector<float>& v, int N) {

	std::vector<std::pair<float, int> > pairs;

	for (size_t i = 0; i < v.size(); ++i)

		pairs.push_back(std::make_pair(v[i], static_cast<int>(i)));

	std::partial_sort(pairs.begin(), pairs.begin() + N, pairs.end(), PairCompare);

	std::vector<int> result;

	for (int i = 0; i < N; ++i)

		result.push_back(pairs[i].second);

	return result;

}

/* Return the top N predictions. */

std::vector<Prediction> Classifier::Classify(const cv::Mat& img, int N) {

	std::vector<float> output = Predict(img);

	N = std::min<int>(labels_.size(), N);

	std::vector<int> maxN = Argmax(output, N);

	std::vector<Prediction> predictions;

	for (int i = 0; i < N; ++i) {

		int idx = maxN[i];

		predictions.push_back(std::make_pair(labels_[idx], output[idx]));

	}

	return predictions;

}

/* Load the mean file in binaryproto format. */

void Classifier::SetMean(const string& mean_file) {

	BlobProto blob_proto;

	ReadProtoFromBinaryFileOrDie(mean_file.c_str(), &blob_proto);

	/* Convert from BlobProto to Blob<float> */

	Blob<float> mean_blob;

	mean_blob.FromProto(blob_proto);

	CHECK_EQ(mean_blob.channels(), num_channels_)

		<< "Number of channels of mean file doesn't match input layer.";

	/* The format of the mean file is planar 32-bit float BGR or grayscale. */

	std::vector<cv::Mat> channels;

	float* data = mean_blob.mutable_cpu_data();

	for (int i = 0; i < num_channels_; ++i) {

		/* Extract an individual channel. */

		cv::Mat channel(mean_blob.height(), mean_blob.width(), CV_32FC1, data);

		channels.push_back(channel);

		data += mean_blob.height() * mean_blob.width();

	}

	/* Merge the separate channels into a single image. */

	cv::Mat mean;

	cv::merge(channels, mean);

	/* Compute the global mean pixel value and create a mean image

	* filled with this value. */

	cv::Scalar channel_mean = cv::mean(mean);

	mean_ = cv::Mat(input_geometry_, mean.type(), channel_mean);

}

std::vector<float> Classifier::Predict(const cv::Mat& img) {

	Blob<float>* input_layer = net_->input_blobs()[0];

	input_layer->Reshape(1, num_channels_,

		input_geometry_.height, input_geometry_.width);

	/* Forward dimension change to all layers. */

	net_->Reshape();

	std::vector<cv::Mat> input_channels;

	WrapInputLayer(&input_channels);

	Preprocess(img, &input_channels);

	net_->Forward();

	/* Copy the output layer to a std::vector */

	Blob<float>* output_layer = net_->output_blobs()[0];

	const float* begin = output_layer->cpu_data();

	const float* end = begin + output_layer->channels();

	return std::vector<float>(begin, end);

}

/* Wrap the input layer of the network in separate cv::Mat objects

* (one per channel). This way we save one memcpy operation and we

* don't need to rely on cudaMemcpy2D. The last preprocessing

* operation will write the separate channels directly to the input

* layer. */

void Classifier::WrapInputLayer(std::vector<cv::Mat>* input_channels) {

	Blob<float>* input_layer = net_->input_blobs()[0];

	int width = input_layer->width();

	int height = input_layer->height();

	float* input_data = input_layer->mutable_cpu_data();

	for (int i = 0; i < input_layer->channels(); ++i) {

		cv::Mat channel(height, width, CV_32FC1, input_data);

		input_channels->push_back(channel);

		input_data += width * height;

	}

}

void Classifier::Preprocess(const cv::Mat& img,

	std::vector<cv::Mat>* input_channels) {

	/* Convert the input image to the input image format of the network. */

	cv::Mat sample;

	if (img.channels() == 3 && num_channels_ == 1)

		cv::cvtColor(img, sample, cv::COLOR_BGR2GRAY);

	else if (img.channels() == 4 && num_channels_ == 1)

		cv::cvtColor(img, sample, cv::COLOR_BGRA2GRAY);

	else if (img.channels() == 4 && num_channels_ == 3)

		cv::cvtColor(img, sample, cv::COLOR_BGRA2BGR);

	else if (img.channels() == 1 && num_channels_ == 3)

		cv::cvtColor(img, sample, cv::COLOR_GRAY2BGR);

	else

		sample = img;

	cv::Mat sample_resized;

	if (sample.size() != input_geometry_)

		cv::resize(sample, sample_resized, input_geometry_);

	else

		sample_resized = sample;

	cv::Mat sample_float;

	if (num_channels_ == 3)

		sample_resized.convertTo(sample_float, CV_32FC3);

	else

		sample_resized.convertTo(sample_float, CV_32FC1);

	cv::Mat sample_normalized;

	cv::subtract(sample_float, mean_, sample_normalized);

	/* This operation will write the separate BGR planes directly to the

	* input layer of the network because it is wrapped by the cv::Mat

	* objects in input_channels. */

	cv::split(sample_normalized, *input_channels);

	CHECK(reinterpret_cast<float*>(input_channels->at(0).data)

		== net_->input_blobs()[0]->cpu_data())

		<< "Input channels are not wrapping the input layer of the network.";

}

Classifier::~Classifier()

{

}
c++,文件来自于\caffe-master\examples\cpp_classification中的classification.cpp文件
3 直接编译后会出现的问题是F0519 14:54:12.494139 14504 layer_factory.hpp:77] Check failed: registry.count(t ype) == 1 (0 vs. 1) Unknown layer type: Input (known types: Input ),百度后发现是要加头文件!http://blog.csdn.net/fangjin_kl/article/details/50936952#0-tsina-1-63793-397232819ff9a47a7b7e80a40613cfe1
因此安装上面说的新建一个head.h
#include "caffe/common.hpp"

#include "caffe/layers/input_layer.hpp"

#include "caffe/layers/inner_product_layer.hpp"

#include "caffe/layers/dropout_layer.hpp"

#include "caffe/layers/conv_layer.hpp"

#include "caffe/layers/relu_layer.hpp"

#include "caffe/layers/pooling_layer.hpp"

#include "caffe/layers/lrn_layer.hpp"

#include "caffe/layers/softmax_layer.hpp"

namespace caffe

{

	extern INSTANTIATE_CLASS(InputLayer);

	extern INSTANTIATE_CLASS(InnerProductLayer);

	extern INSTANTIATE_CLASS(DropoutLayer);

	extern INSTANTIATE_CLASS(ConvolutionLayer);

	REGISTER_LAYER_CLASS(Convolution);

	extern INSTANTIATE_CLASS(ReLULayer);

	REGISTER_LAYER_CLASS(ReLU);

	extern INSTANTIATE_CLASS(PoolingLayer);

	REGISTER_LAYER_CLASS(Pooling);

	extern INSTANTIATE_CLASS(LRNLayer);

	REGISTER_LAYER_CLASS(LRN);

	extern INSTANTIATE_CLASS(SoftmaxLayer);

	REGISTER_LAYER_CLASS(Softmax);

}
注意上述网络可能不全,需要根据实际的网络添加层。参考
 #include<caffe/common.hpp>

 #include<caffe/proto/caffe.pb.h>

 #include<caffe/layers/batch_norm_layer.hpp>

 #include<caffe/layers/bias_layer.hpp>

 #include <caffe/layers/concat_layer.hpp>

 #include <caffe/layers/conv_layer.hpp>

 #include <caffe/layers/dropout_layer.hpp>

 #include<caffe/layers/input_layer.hpp>

 #include <caffe/layers/inner_product_layer.hpp>

 #include "caffe/layers/lrn_layer.hpp"

 #include <caffe/layers/pooling_layer.hpp>

 #include <caffe/layers/relu_layer.hpp>

 #include "caffe/layers/softmax_layer.hpp"

 #include<caffe/layers/scale_layer.hpp>

 namespace caffe

 {

     extern INSTANTIATE_CLASS(BatchNormLayer);

     extern INSTANTIATE_CLASS(BiasLayer);

     extern INSTANTIATE_CLASS(InputLayer);

     extern INSTANTIATE_CLASS(InnerProductLayer);

     extern INSTANTIATE_CLASS(DropoutLayer);

     extern INSTANTIATE_CLASS(ConvolutionLayer);

     REGISTER_LAYER_CLASS(Convolution);

     extern INSTANTIATE_CLASS(ReLULayer);

     REGISTER_LAYER_CLASS(ReLU);

     extern INSTANTIATE_CLASS(PoolingLayer);

     REGISTER_LAYER_CLASS(Pooling);

     extern INSTANTIATE_CLASS(LRNLayer);

     REGISTER_LAYER_CLASS(LRN);

     extern INSTANTIATE_CLASS(SoftmaxLayer);

     REGISTER_LAYER_CLASS(Softmax);

     extern INSTANTIATE_CLASS(ScaleLayer);

     extern INSTANTIATE_CLASS(ConcatLayer);

 }
4 出现的第二个问题是有些符号GLOG_NO_ABBREVIATED_SEVERITIES未定义,因此在项目属性页 c++预处理器中添加下面两个:
GLOG_NO_ABBREVIATED_SEVERITIES
_SCL_SECURE_NO_WARNINGS
5 同时需要把
#include <caffe/proto/caffe.pb.h>
#include "head.h"
这两个头文件放到stdafx.h中,必须放到里面。
6 编译通过后,编写测试分类的程序,首先加载caffermodle.
string model_file = "D:\\caffe\\caffe-master\\mypower\\deploy.prototxt";//prototxt 这个必须是depoly,这个是计算输出的类别概率
string trained_file = "D:\\caffe\\caffe-master\\mypower_iter_2000.caffemodel"; //这个是训练好的model
string mean_file = "D:\\caffe\\caffe-master\\mypower\\imagenet_mean.binaryproto";//这个是均值文件
string label_file ="D:\\caffe\\caffe-master\\mypower\\label.txt"; //这个是样本标签 ,如果两类,可以新建一个txt文件,里面写作如下
0 good

1 bad
定义一个指针 Classifier *classifier;
classifier = new Classifier(model_file, trained_file, mean_file, label_file);
分类程序:
   cv::Mat img(roiimage, 0);//加载图像

   //CHECK(!img.empty()) << "Unable to decode image " ;

   std::vector<Prediction> predictions = classifier->Classify(img);

   /* Print the top N predictions. */

   string precision_p0="";

   for (size_t i = 0; i < predictions.size()-1; ++i)//只输出了概率最大的那一类,通常就是第一类

   {

	Prediction p = predictions[i];

	precision_p0 = p.first;

	std::cout << std::fixed << std::setprecision(4) << p.second << " - \""

	<< p.first << "\"" << std::endl;
   }

   char firstc = precision_p0[0];

   if (firstc == '0')//第一类正样本 好的
   {

	//AfxMessageBox("good");

   }

   else //第二类负样本 存在缺陷

   {

	//AfxMessageBox("bad");

  }
caffe-window搭建自己的小项目例子的更多相关文章
- 【vuejs小项目】一、脚手架搭建工作
一.关于vuejs 这是一个MVVM的前端开发框架,model(数据).viewmode(通讯).view(视图),它吸取了reactjs和angularjs的长处,核心重点在于组件化的设计原则. 我 ...
- docker项目——搭建飞机大战小游戏
项目2:搭建打飞机小游戏,验证数据持久化(最底下有链接) 第一步:拉取镜像 [root@localhost docker-image]# docker load < httpd_img.tar. ...
- 跟我一起用node-express搭建一个小项目(mongodb)[二]
我的小项目主要是会用到MongoDB. 呵呵,我也是现学现卖. 都说小公司十八般武艺样样稀疏,没有办法啊! 兵来兵挡,将来将挡!自己是个兵呢?还是一个将呢! 没有公司培养,就自己培养自己呗.差的远一点 ...
- Flask框架的学习与实战(二):实战小项目
昨天写了一篇flask开发环境搭建,今天继续,进行一个实战小项目-blog系统. blog系统很简单,只有一个页面,然而麻雀虽小五脏俱全.这里目的不是为了做项目而做项目,这篇文章本意是通过这次练习传达 ...
- 10分钟掌握Python-机器学习小项目
学习机器学习相关技术的最好方式就是先自己设计和完成一些小项目. Python 是一种非常流行和强大的解释性编程语言.不像 R 语言,Python 是个很完整的语言和平台,你既可以用来做研发,也可以用来 ...
- Andriod小项目——在线音乐播放器
转载自: http://blog.csdn.net/sunkes/article/details/51189189 Andriod小项目——在线音乐播放器 Android在线音乐播放器 从大一开始就已 ...
- 【PHP小项目使用MVC架构】
小项目名称是雇员管理系统. mvc是一种项目的开发模式,中文名称为模式视图控制器,是强制程序员将数据的输入.处理.输出分开的一种开发模式. 在这个小项目中,控制器使用service作为后缀名. 项目u ...
- MOGRE学习笔记(3)--MOGRE小项目练习
学习OGRE有一段时间了,领导为了检测学习效果,根据已有C++项目,弄一个类似的用c#语言编写的小项目. 配置:win7,DirectX2009,vs2010. 项目要求: 1.有Ogre窗口(尺寸1 ...
- Django集成celery实战小项目
上一篇已经介绍了celery的基本知识,本篇以一个小项目为例,详细说明django框架如何集成celery进行开发. 本系列文章的开发环境: window 7 + python2.7 + pychar ...
随机推荐
- mysql客户端导入sql文件命令
mysql -h localhost -u root -p dbname < filename
- 如何快速清空项目中的session值
/清空session //第一种:按照指定的名称清空session //request.getSession().removeAttribute("globle_user"); / ...
- 深入理解openstack网络架构(1)
原文地址: https://blogs.oracle.com/ronen/entry/diving_into_openstack_network_architecture 译文转载自:http://b ...
- 使用ABP时报错“UPDATE 语句与 FOREIGN KEY SAME TABLE 约束"FK_dbo.AbpUsers_dbo.AbpUsers_LastModifierUserId"冲突”的解决办法
ABP理论学习总目录 一步一步使用ABP框架搭建正式项目系列教程 ABP之Module-Zero学习目录 本篇目录 问题 原因 解决办法 问题 问题的是在下面这种情况下出现的: 我在使用CodeFir ...
- MySQL7:视图
什么是视图 数据库中的视图是一个虚拟表.视图是从一个或者多个表中导出的表,视图的行为与表非常相似,在视图中用户可以使用SELECT语句查询数据,以及使用INSERT.UPDATE和DELETE修改记录 ...
- C#可扩展编程之MEF学习笔记(三):导出类的方法和属性
前面说完了导入和导出的几种方法,如果大家细心的话会注意到前面我们导出的都是类,那么方法和属性能不能导出呢???答案是肯定的,下面就来说下MEF是如何导出方法和属性的. 还是前面的代码,第二篇中已经提供 ...
- 用1、2、2、3、4、5这六个数字,用java写一个main函数,打印出所有不同的排列,如:512234、412345等,要求:"4"不能在第三位,"3"与"5"不能相连。
最近在看算法,看到这个题,觉得挺经典的,收起. 分析: 1 .把问题归结为图结构的遍历问题.实际上6个数字就是六个结点,把六个结点连接成无向连通图,对于每一个结点求这个图形的遍历路径,所有结点的遍历路 ...
- buildbot入门系列—介绍篇
一.介绍 1. buildbot是一个开源的基于python的持续集成系统,它能够以下三种方式触发相应的自动构建和测试运行,从而迅速的发现问题所在,同时指出造成这个错误的开发人员,当然我们还可以通过页 ...
- 跟我一起云计算(4)——lucene
了解lucene的基本概念 这一部分可以参考我以前写的博客: http://www.cnblogs.com/skyme/tag/lucene/ lucene是什么 下图是一个很好的说明: 1.luce ...
- 三天学会HTML5——SVG和Canvas的使用
在第一天学习了HTML5的一些非常重要的基本知识,今天将进行更深层学习 首先来回顾第一天学习的内容,第一天学习了新标签,新控件,验证功能,应用缓存等内容. 第2天将学习如何使用Canvas 和使用SV ...