
spring源码解析之IOC容器(一)
学习优秀框架的源码,是提升个人技术水平必不可少的一个环节。如果只是停留在知道怎么用,但是不懂其中的来龙去脉,在技术的道路上注定走不长远。最近,学习了一段时间的spring源码,现在整理出来,以便日后温故知新。
IOC容器是spring最核心的模块之一,是整个spring体系的基石,spring其他模块中,都需要用到IOC容器的功能。spring框架为我们提供了多种IOC容器,DefaultableBeanFact
ory、FileSystemXmlApplicationContext、ClassPathXmlApplicationContext、XmlWebApplicationContext等。虽然我们平时很少在项目中使用这种硬编码的方式来获取IOC容器,继而获取IOC容器中的bean,但是研究这些IOC容器的源码,对我们理解IOC容器的原理还是很有必要的。BeanFactory这个接口是spring所有IOC容器最上层的接口,getBean()这个方法就是在这个接口中定义的,下面是其中定义的方法:
 public interface BeanFactory {

     Object getBean(String name) throws BeansException;

     <T> T getBean(String name, Class<T> requiredType) throws BeansException;

     Object getBean(String name, Object... args) throws BeansException;

     <T> T getBean(Class<T> requiredType) throws BeansException;

     <T> T getBean(Class<T> requiredType, Object... args) throws BeansException;

     boolean containsBean(String name);

     boolean isSingleton(String name) throws NoSuchBeanDefinitionException;

     boolean isPrototype(String name) throws NoSuchBeanDefinitionException;

     boolean isTypeMatch(String name, ResolvableType typeToMatch) throws NoSuchBeanDefinitionException;

     boolean isTypeMatch(String name, Class<?> typeToMatch) throws NoSuchBeanDefinitionException;

     Class<?> getType(String name) throws NoSuchBeanDefinitionException;

     String[] getAliases(String name);

 }
可以看到其中定义了获取bean的多种方式,和各种对bean的判断,以及获取bean的类型和别名的方法。这个接口是spring框架IOC容器的入口。下面以FileSystemXmlApplicatio
nContext为例,深入源码探究IOC容器的实现原理。IOC容器的初始化过程分为三个阶段:定位、载入和注册。接下来一一进行分析,先从XML的定位开始。
相信我们大家都使用以下代码获取过IOC容器,获取IOC容器之后,我们就可以得到想要的bean,然后进行操作了:
FileSystemXmlApplicationContext context = new FileSystemXmlApplicationContext("bean.xml");
进入FileSystemXmlApplicationContext这个类,发现它定义了各种构造器,但最终都会调用下面这个构造器:
 public FileSystemXmlApplicationContext(String[] configLocations, boolean refresh, ApplicationContext parent)

             throws BeansException {

         super(parent);

         setConfigLocations(configLocations);

         if (refresh) {

             refresh();

         }

     }
在分析它的流程之前,有必要给一下它的UML图,上面标注了它的继承体系结构:
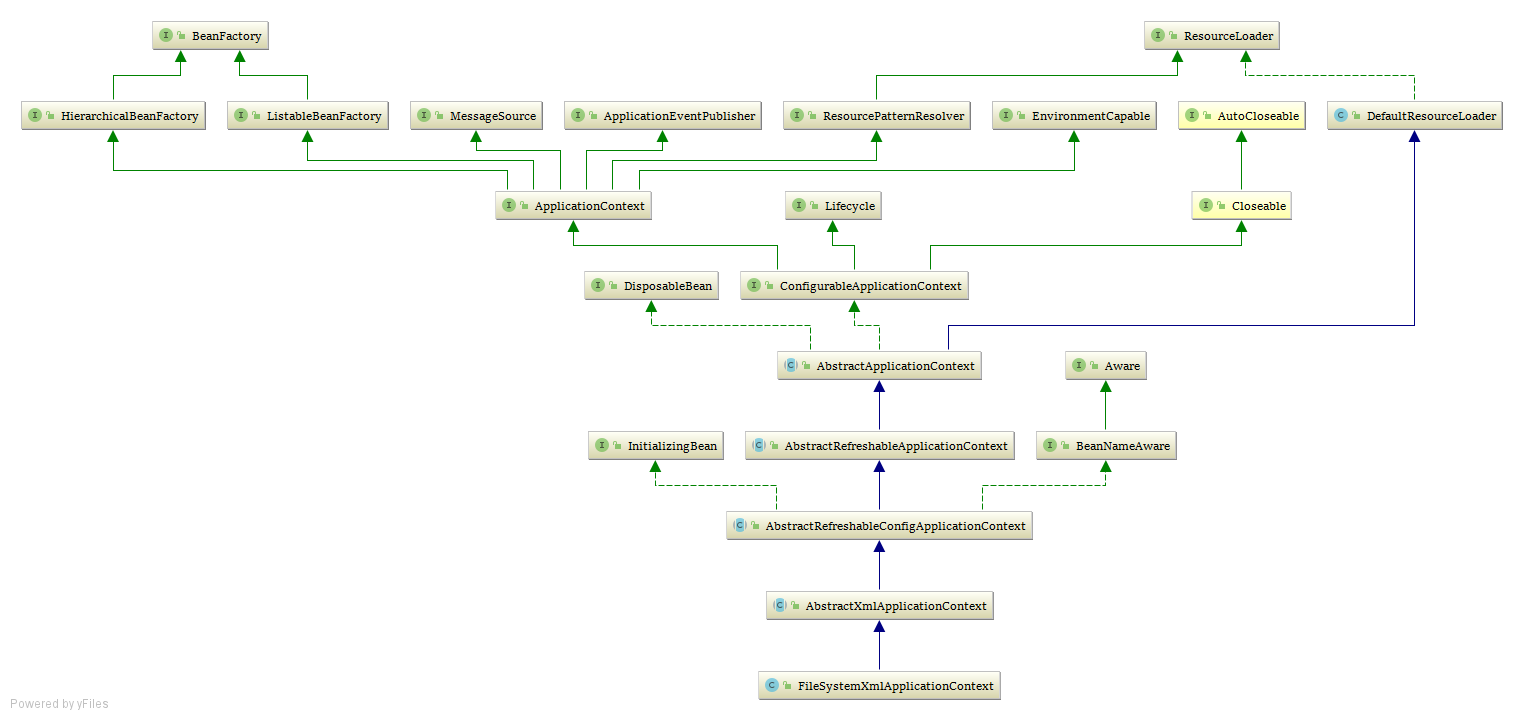
FileSystemXmlApplicationContext的构造器中有个重要的方法refresh(),这是IOC容器的启动方法,在它的父类AbstractXmlApplicationContext中有实现,其代码如下:
 @Override

     public void refresh() throws BeansException, IllegalStateException {

         synchronized (this.startupShutdownMonitor) {

             // Prepare this context for refreshing.

             //准备要进行刷新的上下文对象

             //例如对系统环境进行准备和验证

             prepareRefresh();

             // Tell the subclass to refresh the internal bean factory.

             ConfigurableListableBeanFactory beanFactory = obtainFreshBeanFactory();

             // Prepare the bean factory for use in this context.

             prepareBeanFactory(beanFactory);

             try {

                 // Allows post-processing of the bean factory in context subclasses.

                 postProcessBeanFactory(beanFactory);

                 // Invoke factory processors registered as beans in the context.

                 invokeBeanFactoryPostProcessors(beanFactory);

                 // Register bean processors that intercept bean creation.

                 registerBeanPostProcessors(beanFactory);

                 // Initialize message source for this context.

                 initMessageSource();

                 // Initialize event multicaster for this context.

                 initApplicationEventMulticaster();

                 // Initialize other special beans in specific context subclasses.

                 onRefresh();

                 // Check for listener beans and register them.

                 registerListeners();

                 // Instantiate all remaining (non-lazy-init) singletons.

                 finishBeanFactoryInitialization(beanFactory);

                 // Last step: publish corresponding event.

                 finishRefresh();

             }

             catch (BeansException ex) {

                 if (logger.isWarnEnabled()) {

                     logger.warn("Exception encountered during context initialization - " +

                             "cancelling refresh attempt: " + ex);

                 }

                 // Destroy already created singletons to avoid dangling resources.

                 destroyBeans();

                 // Reset 'active' flag.

                 cancelRefresh(ex);

                 // Propagate exception to caller.

                 throw ex;

             }

             finally {

                 // Reset common introspection caches in Spring's core, since we

                 // might not ever need metadata for singleton beans anymore...

                 resetCommonCaches();

             }

         }

     }
进入obtainFreshBeanFactory()方法,其代码如下:
 protected ConfigurableListableBeanFactory obtainFreshBeanFactory() {

         refreshBeanFactory();

         ConfigurableListableBeanFactory beanFactory = getBeanFactory();

         if (logger.isDebugEnabled()) {

             logger.debug("Bean factory for " + getDisplayName() + ": " + beanFactory);

         }

         return beanFactory;

     }
继续跟,进入refreshBeanFactory()方法,在父类AbstractRefreshableApplicationContext中有实现,其代码如下:
 @Override

     protected final void refreshBeanFactory() throws BeansException {

         if (hasBeanFactory()) {

             destroyBeans();

             closeBeanFactory();

         }

         try {

             //创建DefaultListableBeanFactory

             DefaultListableBeanFactory beanFactory = createBeanFactory();

             //指定序列化的id,所以,如果需要反序列化这个BeanFactory,则可以直接根据这个id来进行反序列化

             beanFactory.setSerializationId(getId());

             //定制化

             customizeBeanFactory(beanFactory);

             //初始化DocumentReader,读取XML

             loadBeanDefinitions(beanFactory);

             synchronized (this.beanFactoryMonitor) {

                 this.beanFactory = beanFactory;

             }

         }

         catch (IOException ex) {

             throw new ApplicationContextException("I/O error parsing bean definition source for " + getDisplayName(), ex);

         }

     }
这段代码可以看到:
1、首先,创建了一个DefaultListableBeanFactory的IOC容器;
2、对容器进行了一些设置;
3、调用loadBeanDefinitions()方法对XML文件进行定位和加载。
所以,进入loadBeanDefinitions()方法继续探索,在类AbstractXmlApplicationContext中有实现,它是FileSystemXmlApplicationContext的父类,其代码如下:
 protected void loadBeanDefinitions(DefaultListableBeanFactory beanFactory) throws BeansException, IOException {

         // Create a new XmlBeanDefinitionReader for the given BeanFactory.

         XmlBeanDefinitionReader beanDefinitionReader = new XmlBeanDefinitionReader(beanFactory);

         // Configure the bean definition reader with this context's

         // resource loading environment.

         beanDefinitionReader.setEnvironment(this.getEnvironment());

         beanDefinitionReader.setResourceLoader(this);

         beanDefinitionReader.setEntityResolver(new ResourceEntityResolver(this));

         // Allow a subclass to provide custom initialization of the reader,

         // then proceed with actually loading the bean definitions.

         initBeanDefinitionReader(beanDefinitionReader);

         loadBeanDefinitions(beanDefinitionReader);

     }
这个方法中,使用XmlBeanDefinitionReader类来加载XML文件,最后经过一系列的设置,调用了loadBeanDefinitions(beanDefinitionReader)这个方法,进入:
 protected void loadBeanDefinitions(XmlBeanDefinitionReader reader) throws BeansException, IOException {

         Resource[] configResources = getConfigResources();

         if (configResources != null) {

             reader.loadBeanDefinitions(configResources);

         }

         String[] configLocations = getConfigLocations();

         if (configLocations != null) {

             reader.loadBeanDefinitions(configLocations);

         }

     }
跟到这里,到底是走哪个方法呢?我们再回过头看一下,FileSystemXmlApplicationContext的那个构造器,其中有个setConfigLocations(configLocations)方法,通过这个方法将我们配置的XML文件的路径设置进来了,跟代码,发现它调用的是父类的方法,并将路径赋给了AbstractRefreshableConfigApplicationContext类中的configLocations成员变量,而getConfigLocations()方法也是AbstractRefreshableConfigApplicationContext类中的,它正好获取了configLocations的值,所以configLocations一定不为null,上面方法应该走下面的loadBeanDefinitions()方法。跟进,其代码如下:
 public int loadBeanDefinitions(String... locations) throws BeanDefinitionStoreException {

         Assert.notNull(locations, "Location array must not be null");

         int counter = 0;

         for (String location : locations) {

             counter += loadBeanDefinitions(location);

         }

         return counter;

     }
 public int loadBeanDefinitions(String location) throws BeanDefinitionStoreException {

         return loadBeanDefinitions(location, null);

     }
 public int loadBeanDefinitions(String location, Set<Resource> actualResources) throws BeanDefinitionStoreException {

         ResourceLoader resourceLoader = getResourceLoader();

         if (resourceLoader == null) {

             throw new BeanDefinitionStoreException(

                     "Cannot import bean definitions from location [" + location + "]: no ResourceLoader available");

         }

         if (resourceLoader instanceof ResourcePatternResolver) {

             // Resource pattern matching available.

             try {

                 Resource[] resources = ((ResourcePatternResolver) resourceLoader).getResources(location);

                 int loadCount = loadBeanDefinitions(resources);

                 if (actualResources != null) {

                     for (Resource resource : resources) {

                         actualResources.add(resource);

                     }

                 }

                 if (logger.isDebugEnabled()) {

                     logger.debug("Loaded " + loadCount + " bean definitions from location pattern [" + location + "]");

                 }

                 return loadCount;

             }

             catch (IOException ex) {

                 throw new BeanDefinitionStoreException(

                         "Could not resolve bean definition resource pattern [" + location + "]", ex);

             }

         }

         else {

             // Can only load single resources by absolute URL.

             Resource resource = resourceLoader.getResource(location);

             int loadCount = loadBeanDefinitions(resource);

             if (actualResources != null) {

                 actualResources.add(resource);

             }

             if (logger.isDebugEnabled()) {

                 logger.debug("Loaded " + loadCount + " bean definitions from location [" + location + "]");

             }

             return loadCount;

         }

     }
这里先得到一个ResourceLoader对象。在类AbstractXmlApplicationContext中的loadBeanDefinitions()方法中有beanDefinitionReader.setResourceLoader(this)这段代码,而
DefaultListableBeanFactory又是继承了DefaultResourceLoader的,所以,这里的resourceLoader对象是DefaultResourceLoader类型的,所以走下面的逻辑。首先,获取一个resource
对象,getResource方法在DefaultResourceLoader中有实现,其代码如下:
 public Resource getResource(String location) {

         Assert.notNull(location, "Location must not be null");

         for (ProtocolResolver protocolResolver : this.protocolResolvers) {

             Resource resource = protocolResolver.resolve(location, this);

             if (resource != null) {

                 return resource;

             }

         }

         if (location.startsWith("/")) {

             return getResourceByPath(location);

         }

         else if (location.startsWith(CLASSPATH_URL_PREFIX)) {

             return new ClassPathResource(location.substring(CLASSPATH_URL_PREFIX.length()), getClassLoader());

         }

         else {

             try {

                 // Try to parse the location as a URL...

                 URL url = new URL(location);

                 return new UrlResource(url);

             }

             catch (MalformedURLException ex) {

                 // No URL -> resolve as resource path.

                 //如果都不是,则使用子类重写的方法,例如子类FileSystemXMLApplicationContext中就重写了这个方法

                 return getResourceByPath(location);

             }

         }

     }
根据不同的情况,生成一个ResourceLoader对象,这样就完成了对配置的xml文件的定位。
经过这么一长条的跟踪,终于完成了XML资源的定位工作。spring的继承体系特别深,刚开始的时候感觉特别绕,但是多跟着代码跟几遍,基本就清晰了,关键是要有耐心。在上面的分析中,我们发现,spring使用了很多的模板方法,比如getResource方法,还有就是单一职责原则,每个类很清晰,每个方法中都是一个一个方法的调用,而不是代码的堆砌,这点是值得我们平时好好学习和运用的。
spring源码解析之IOC容器(一)的更多相关文章
- spring源码解析之IOC容器(二)------加载和注册
上一篇跟踪了IOC容器对配置文件的定位,现在我们继续跟踪代码,看看IOC容器是怎么加载和注册配置文件中的信息的.开始之前,首先我们先来了解一下IOC容器所使用的数据结构-------BeanDefin ...
- spring源码解析之IOC容器(三)——依赖注入
上一篇主要是跟踪了IOC容器对bean标签进行解析之后存入Map中的过程,这些bean只是以BeanDefinition为载体单纯的存储起来了,并没有转换成一个个的对象,今天继续进行跟踪,看一看IOC ...
- spring源码解析之IOC容器(四)——属性注入
上一篇跟踪了bean的创建过程,接下来,我们继续跟踪bean的属性填充的过程.先回到doCreateBean方法,代码如下: protected Object doCreateBean(final S ...
- 【spring源码分析】IOC容器初始化(总结)
前言:在经过前面十二篇文章的分析,对bean的加载流程大致梳理清楚了.因为内容过多,因此需要进行一个小总结. 经过前面十二篇文章的漫长分析,终于将xml配置文件中的bean,转换成我们实际所需要的真正 ...
- 【spring源码分析】IOC容器初始化(二)
前言:在[spring源码分析]IOC容器初始化(一)文末中已经提出loadBeanDefinitions(DefaultListableBeanFactory)的重要性,本文将以此为切入点继续分析. ...
- 【spring源码分析】IOC容器初始化(三)
前言:在[spring源码分析]IOC容器初始化(二)中已经得到了XML配置文件的Document实例,下面分析bean的注册过程. XmlBeanDefinitionReader#registerB ...
- 【spring源码分析】IOC容器初始化(四)
前言:在[spring源码分析]IOC容器初始化(三)中已经分析了BeanDefinition注册之前的一些准备工作,下面将进入BeanDefinition注册的核心流程. //DefaultBean ...
- 【spring源码分析】IOC容器初始化(十)
前言:前文[spring源码分析]IOC容器初始化(九)中分析了AbstractAutowireCapableBeanFactory#createBeanInstance方法中通过工厂方法创建bean ...
- 转 Spring源码剖析——核心IOC容器原理
Spring源码剖析——核心IOC容器原理 2016年08月05日 15:06:16 阅读数:8312 标签: spring源码ioc编程bean 更多 个人分类: Java https://blog ...
随机推荐
- WPF 自动选择dll,以SQLite为例
在学习sqlite的过程中,发现它的dll是区分32位和64位的,起初觉得很恼火,但是仔细看了下, 发现让程序自行选择dll其实也不是一件很麻烦的事情,如下: 1>创建一个sqlite数据 2& ...
- JavaScript内部是这样运行
编译阶段 词法分析(Lexing) 这个过程会将由字符组成的字符串分解成(对编程语言来说)有意义的代码块,这些代 码块被称为词法单元(token). 简单举个例子:c = b - a 转换为 NAME ...
- MySQL的配置文件无法修改的解决办法(Win8)
问题描述 修改mysql5.7安装目录下my-default.ini发现不起作用: MySQL的版本是5.7,操作系统是window8.1.MySQL安装在 C:\Program Files ...
- hdu 1403 Longest Common Substring 后缀数组 模板题
题目链接 题意 问两个字符串的最长公共子串. 思路 加一个特殊字符然后拼接起来,求得后缀数组与\(height\)数组.扫描一遍即得答案,注意判断起始点是否分别在两个串内. Code #include ...
- 00深入理解C指针之--- 指针之外
该系列文章源于<深入理解C指针>的阅读与理解,由于本人的见识和知识的欠缺可能有误,还望大家批评指教. C语言从诞生之初就非常善于和硬件打交道,经过这么多年的发展之后,其灵活性和超强的特征是 ...
- hdu 4738 无向图缩点断桥 // 细节坑题
Caocao's Bridges 题意:给个无向图,求出边权最小的桥. 一看,直接缩点,若无桥,输出-1,有桥,遍历下边,更新最小..分分钟搞定,以为IA的..一交wa... 坑点:1:若原图不连通, ...
- 分享Kali Linux 2017年第17周镜像文件
分享Kali Linux 2017年第17周镜像文件 Kali Linux官方于4月23日发布2017年的第17周镜像.这次维持了11个镜像文件的规模.默认的Gnome桌面的4个镜像,E17.KD ...
- bzoj 2889: Tree Conundrum
2889: Tree Conundrum Time Limit: 10 Sec Memory Limit: 128 MBSubmit: 61 Solved: 37[Submit][Status][ ...
- getServletConfig().getInitParameter("count1") java.lang.NullPointerException
通常在doget中 System.out.println(getServletConfig()); System.out.println(getServletConfig().getInitParam ...
- 跳转移动端js代码
<script language="JavaScript"> $(function(){ var MobileUA = (function() { var ua = n ...