Spring boot+mybatis+thymeleaf 实现登录注册,增删改查
本文重在实现理解,过滤器,业务,逻辑需求,样式请无视。。
项目结构如下

1.idea新建Spring boot项目,在pom中加上thymeleaf和mybatis支持。pom.xml代码如下
<?xml version="1.0" encoding="UTF-8"?>

<project xmlns="http://maven.apache.org/POM/4.0.0" xmlns:xsi="http://www.w3.org/2001/XMLSchema-instance"

         xsi:schemaLocation="http://maven.apache.org/POM/4.0.0 http://maven.apache.org/xsd/maven-4.0.0.xsd">

    <modelVersion>4.0.0</modelVersion>

    <parent>

        <groupId>org.springframework.boot</groupId>

        <artifactId>spring-boot-starter-parent</artifactId>

        <version>2.1.3.RELEASE</version>

        <relativePath/> <!-- lookup parent from repository -->

    </parent>

    <groupId>com.jz</groupId>

    <artifactId>table</artifactId>

    <version>0.0.1-SNAPSHOT</version>

    <name>table</name>

    <description>Demo project for Spring Boot</description>

    <properties>

        <java.version>1.8</java.version>

    </properties>

    <dependencies>

        <dependency>

            <groupId>org.springframework.boot</groupId>

            <artifactId>spring-boot-starter-web</artifactId>

        </dependency>

        <dependency>

            <groupId>org.springframework.boot</groupId>

            <artifactId>spring-boot-starter-test</artifactId>

            <scope>test</scope>

        </dependency>

        <dependency>

            <groupId>org.springframework.boot</groupId>

            <artifactId>spring-boot-starter-thymeleaf</artifactId>

        </dependency>

        <dependency>

            <groupId>org.mybatis.spring.boot</groupId>

            <artifactId>mybatis-spring-boot-starter</artifactId>

            <version>1.3.1</version>

        </dependency>

        <dependency>

            <groupId>mysql</groupId>

            <artifactId>mysql-connector-java</artifactId>

            <scope>runtime</scope>

        </dependency>

    </dependencies>

    <build>

        <plugins>

            <plugin>

                <groupId>org.springframework.boot</groupId>

                <artifactId>spring-boot-maven-plugin</artifactId>

            </plugin>

        </plugins>

    </build>

</project>
2. 在项目resources目录下新建mybatis文件夹,用于存放mybatis配置文件。 在 application.properties 中配置本地数据源和mybatis配置文件地址, application.properties代码如下
spring.datasource.driverClassName=com.mysql.cj.jdbc.Driver

spring.datasource.url=jdbc:mysql://localhost:3306/student?useUnicode=true&characterEncoding=utf-8&useSSL=false&serverTimezone=UTC

spring.datasource.username=用户名

spring.datasource.password=密码

spring.jpa.showSql=true

mybatis:

mybatis.type-aliases-package=com.jz.table.entity
mybatis.mapper-locations=mybatis/*.xml
com.mysql.cj.jdbc.Driver 是 mysql-connector-java 6中的,需要指定时区serverTimezone

2.2在启动类上加上扫描的Dao包
package com.jz.table;

import org.mybatis.spring.annotation.MapperScan;

import org.springframework.boot.SpringApplication;

import org.springframework.boot.autoconfigure.SpringBootApplication;

@SpringBootApplication

@MapperScan("com.jz.table.dao")

public class TableApplication {

    public static void main(String[] args) {

        SpringApplication.run(TableApplication.class, args);

    }

}
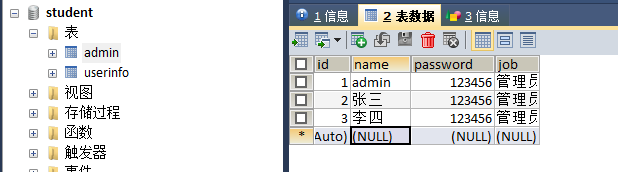
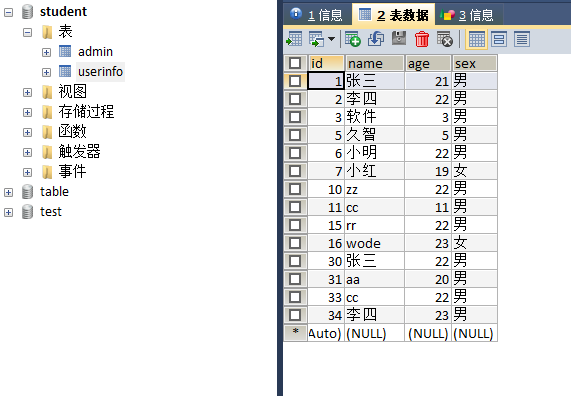
3.数据库建两个表admin和userinfo用于登录和操作用
2019.10.3 现在mysql不能用admin作为表名了,请注意一下
4.开始写代码
entity:实体代码
1.Admin实体类
package com.jz.table.entity;

public class Admin {

    private Integer id;

    private String name;

    private Integer password;

    private String job;

    public Admin() {

    }

    public Admin(Integer id, String name, Integer password, String job) {

        this.id = id;

        this.name = name;

        this.password = password;

        this.job = job;

    }

    public Integer getId() {

        return id;

    }

    public void setId(Integer id) {

        this.id = id;

    }

    public String getName() {

        return name;

    }

    public void setName(String name) {

        this.name = name;

    }

    public Integer getPassword() {

        return password;

    }

    public void setPassword(Integer password) {

        this.password = password;

    }

    public String getJob() {

        return job;

    }

    public void setJob(String job) {

        this.job = job;

    }

}
2.UserInfo实体类
package com.jz.table.entity;

public class UserInfo {

    private Integer id;

    private String name;

    private Integer age;

    private String sex;

    public UserInfo() {

    }

    public UserInfo(Integer id, String name, Integer age, String sex) {

        this.id = id;

        this.name = name;

        this.age = age;

        this.sex = sex;

    }

    public Integer getId() {

        return id;

    }

    public void setId(Integer id) {

        this.id = id;

    }

    public String getName() {

        return name;

    }

    public void setName(String name) {

        this.name = name;

    }

    public Integer getAge() {

        return age;

    }

    public void setAge(Integer age) {

        this.age = age;

    }

    public String getSex() {

        return sex;

    }

    public void setSex(String sex) {

        this.sex = sex;

    }

}
Dao层代码
1.AdminDao
package com.jz.table.dao;

import com.jz.table.entity.Admin;

public interface AdminDao {

    //登录判断

    Admin login(Admin admin);

    //注册

    int addAdmin(Admin admin);

}
2.UserDao
package com.jz.table.dao;

import com.jz.table.entity.UserInfo;

import java.util.List;

public interface UserDao {

    //查

    List<UserInfo> findall();

    //增

    int adduser(UserInfo user);

    //根据Id查,用于修改时页面回显数据

    UserInfo findByid(Integer id);

    //修改

    int updateUser(UserInfo user);

    //删除

    int delUser(Integer id);

}
3.XML文件,因为没有业务逻辑,service省了,controller中直接引入dao
1.AdminMapper.xml
<?xml version="1.0" encoding="UTF-8" ?>

<!DOCTYPE mapper PUBLIC "-//mybatis.org//DTD Mapper 3.0//EN" "http://mybatis.org/dtd/mybatis-3-mapper.dtd" >

<mapper namespace="com.jz.table.dao.AdminDao">

    <select id="login" parameterType="com.jz.table.entity.Admin" resultType="com.jz.table.entity.Admin">

        select name,job FROM admin WHERE name = #{name} AND password = #{password}

    </select>

    <insert id="addAdmin" parameterType="com.jz.table.entity.Admin">

        INSERT INTO admin (name,password,job) VALUES (#{name},#{password},#{job});

    </insert>

</mapper>
2.UserMapper.xml
<?xml version="1.0" encoding="UTF-8" ?>

<!DOCTYPE mapper PUBLIC "-//mybatis.org//DTD Mapper 3.0//EN" "http://mybatis.org/dtd/mybatis-3-mapper.dtd" >

<mapper namespace="com.jz.table.dao.UserDao">

  <select id="findall" resultType="com.jz.table.entity.UserInfo">

      select * from userinfo

  </select>

    <insert id="adduser"  parameterType="com.jz.table.entity.UserInfo">

       INSERT INTO userinfo(name,age,sex) VALUES (#{name},#{age},#{sex})

    </insert>

    <select id="findByid" parameterType="java.lang.Integer" resultType="com.jz.table.entity.UserInfo">

      SELECT  * FROM userinfo where id = #{id}

    </select>

    <update id="updateUser" parameterType="com.jz.table.entity.UserInfo">

      update  userinfo SET name=#{name },age =#{age},sex=#{sex} WHERE id = #{id}

    </update>

    <delete id="delUser" parameterType="java.lang.Integer">

     DELETE from userinfo WHERE id = #{id}

    </delete>

</mapper>
4.页面,在templates文件夹下新建public和user文件夹用来存放公共页面和user操作页面
public文件夹下新建成功、失败提示页
1.success.html
<!DOCTYPE html>

<!--引入thymeleaf-->

<html lang="en"  xmlns:th="http://www.thymeleaf.org">

<head>

    <meta charset="UTF-8">

    <title>操作成功提示页</title>

</head>

<body>

<h1>操作成功</h1>

<a href="/index"> 返回首页</a>

</body>

</html>
2.false.html
<!DOCTYPE html>

<html lang="en" xmlns:th="http://www.thymeleaf.org">

<head>

    <meta charset="UTF-8">

    <title>操作失败提示页</title>

    <script th:src="@{/js/jquery-1.8.0.min.js}"></script>

</head>

<body>

<h1>操作失败,请检查数据重试</h1>

<input onclick="history.go(-1)" type="button" value="返回">

</body>

</html>
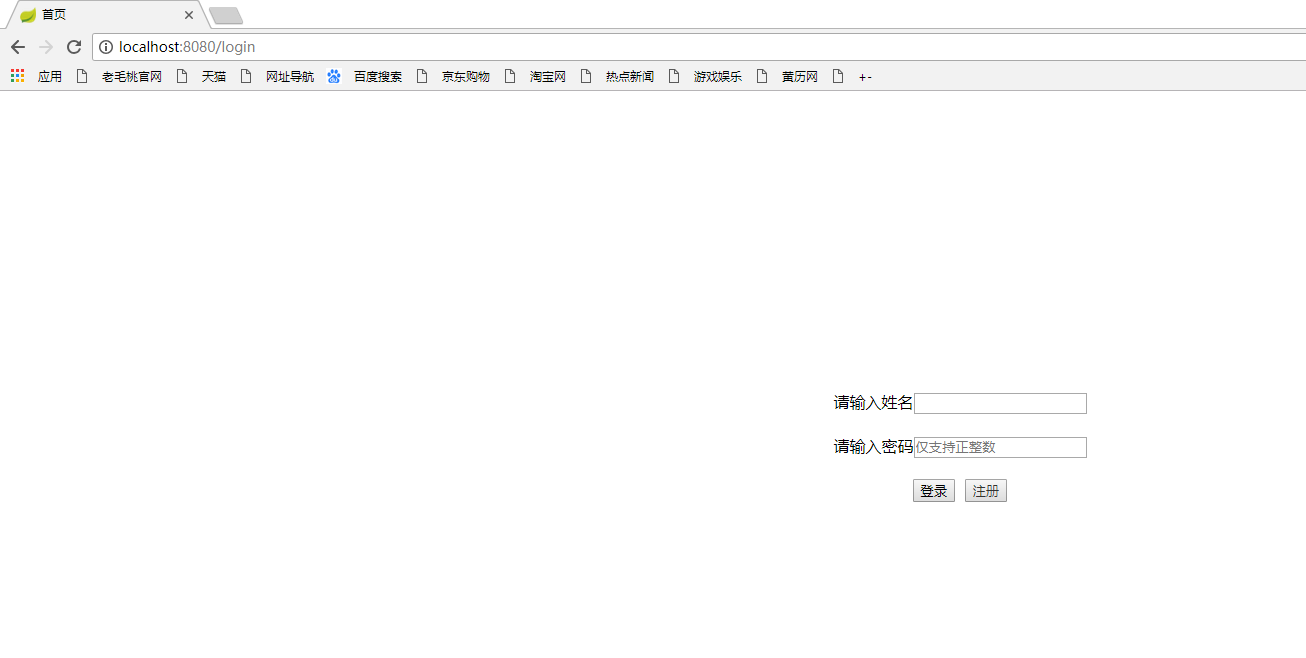
4.2在templates文件夹下新建login和register页面作为登录和注册页面
1.login.html
<!DOCTYPE html>
<html lang="en">
<head>
<meta charset="UTF-8">
<title>首页</title> <style>
/*a标签去下划线和点击不变色,div内容居中*/
a{
text-decoration: none;
color: #333333;
}
#idiv{text-align: center;border-radius: 20px;
width: 300px;
height: 350px;
margin: auto;
position: absolute;
top: 0;
left: 0;
right: 0;
bottom: 0;}
</style>
</head>
<body>
<div id="idiv">
<form action="/gologin" method="post">
请输入姓名<input id="name" name="name" required="required"><br><br>
请输入密码<input id="password" name="password" type="password" placeholder="仅支持正整数" required="required"><br><br>
<input type="submit" value="登录"> <button> <a href="/goregister">注册</a></button>
</form>
</div>
</body>
</html>
2.register.html
<!DOCTYPE html>

<html lang="en" xmlns:th="http://www.thymeleaf.org">

<head>

    <meta charset="UTF-8">

    <title>账号注册</title>

    <script th:src="@{/js/jquery-1.8.0.min.js}"></script>

</head>

<body>

<h2>账号注册</h2>

请输入姓名:<input type="text" id="name"/><br><br>

请输入密码:<input type="password" id="password" placeholder="仅支持整数" /><br><br>

请确认密码:<input type="password" id="passwordTwo" placeholder="仅支持整数"/><br><br>

请选择角色:<select id="job" style="width: 173px">

            <option value="管理员">管理员</option>

            </select><br><br>

<button onclick="register()">注册</button>

</body>

<script>

    function register() {

        var name = $("#name").val();

        var password1 = $("#password").val();

        var password2 = $("#passwordTwo").val();

        var  job = $("#job").val();

        if (Number(password1) == Number(password2)){

           $.post("/register",{name:name,password:password1,job:job},function (res) {

               if (res ==true){

                   alert("注册成功");

                   window.location.href ="/login";

               } else {

                   alert("注册失败,请检查数据重试");

               }

           })

        }else {

            alert("两次密码不一致!");

        }

    }

</script>

</html>
3.controller中代码
@Controller

public class TestController {

    @Resource

    private AdminDao ad;

    @Resource

    private UserDao ud;

    @RequestMapping("/login")//主页

    public String index(){

        return "login";

    }

    @RequestMapping("/goregister")//去注册页面

    public String goregister(){

        return  "register";

    }

    @RequestMapping("/register")//注册

    @ResponseBody

    public boolean register(Admin admin){

        int i = ad.addAdmin(admin);

        if (i>0){

            return true;

        }else {

            return false;

        }

    }

    @RequestMapping("/gologin")//登录获取用户信息存到seccion

    public String  gologin(Admin admin,HttpServletRequest request,Model model){

        Admin aa = ad.login(admin);

        if (aa==null){

            return  "public/false";

        }

        HttpSession session =  request.getSession();

        session.setAttribute("aname",admin.getName());

        session.setAttribute("apassword",admin.getPassword());

        List<UserInfo> userlist = ud.findall();

        model.addAttribute("admin",aa);

        model.addAttribute("alist",userlist);

        return "user/index";

    }

    @RequestMapping("/index")//从其他页面操作后返回列表页面(重复登录)

    public String login(Admin admin,Model model,HttpServletRequest request){

        HttpSession session =  request.getSession();

        admin.setName((String) session.getAttribute("aname"));

        admin.setPassword((Integer) session.getAttribute("apassword"));

        Admin aa = ad.login(admin);

        List<UserInfo> userlist = ud.findall();

        model.addAttribute("admin",aa);

        model.addAttribute("alist",userlist);

        return "user/index";

    }

}
4.3user文件夹下新建index,addUser,updateUser页面,作为主页,添加,修改页面
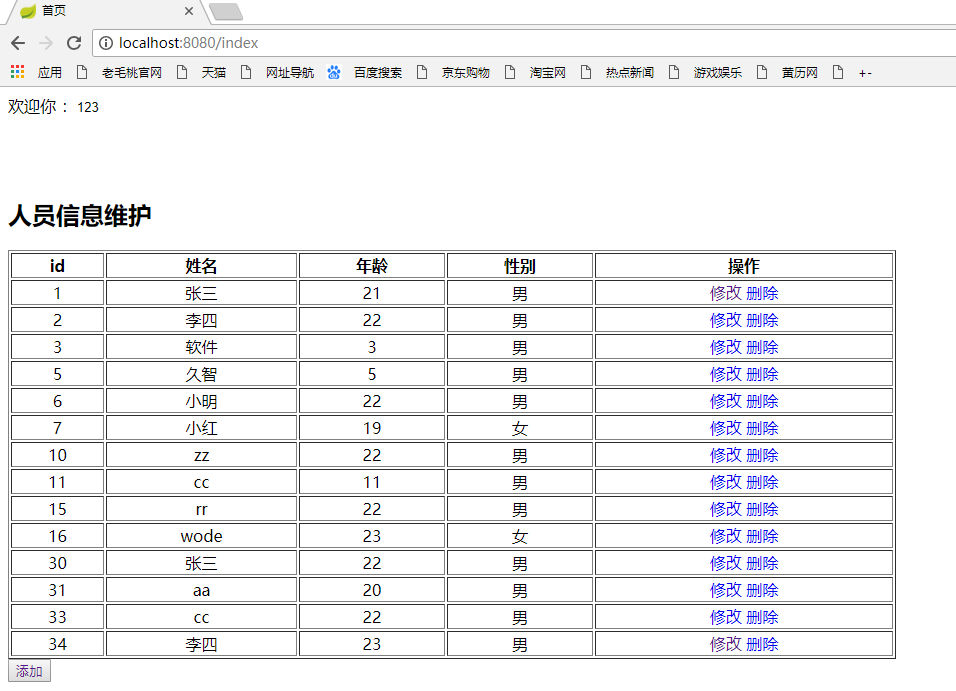
1.index.html
<!DOCTYPE html>

<html lang="en"  xmlns:th="http://www.thymeleaf.org">

<head>

    <meta charset="UTF-8">

    <title>首页</title>

    <style>a{text-decoration:none}</style>

    <script th:src="@{/js/jquery-1.8.0.min.js}"></script>

</head>

<body>

欢迎你 :<input th:value="${admin.name}" style="border: none; outline: none"/><br><br><br><br>

<h2>人员信息维护</h2>

<table width="888" border="1">

    <thead>

    <tr>

        <th>id</th>

        <th>姓名</th>

        <th>年龄</th>

        <th>性别</th>

        <th>操作</th>

    </tr>

    <tr th:each="user:${alist}">

        <td  align="center" th:text="${user.id}"></td>

        <td  align="center" th:text="${user.name}"></td>

        <td  align="center" th:text="${user.age}"></td>

        <td  align="center" th:text="${user.sex}"></td>

        <td  align="center"><a th:href="@{'/goupdate/'+${user.id}}">修改</a>

                              <a th:href="@{'/godel/'+${user.id}}">删除</a>

        </td>

    </tr>

    </thead>

</table>

<button><a href="/goadd">添加</a></button>

</body>

</html>
2.addUser.html
<!DOCTYPE html>

<html lang="en" xmlns:th="http://www.thymeleaf.org">

<head>

    <meta charset="UTF-8">

    <title>添加用户</title>

    <script th:src="@{/js/jquery-1.8.0.min.js}"></script>

</head>

<body>

<h2>我是添加页面</h2>

请输入姓名:<input id="name"  name="name" type="text" /><br><br>

请输入年龄:<input id="age"  name="age" type="text" /><br><br>

请选择性别:<select id="sex" name="sex" style="width: 173px">

            <option value="男">男</option>

            <option value="女">女</option>

            </select><br><br>

<button  onclick="goadd()" name="sub" id="sub">添加</button>

<button  name="button"  onclick="javascript:history.back(-1);">返回</button>

</body>

<script>

    function goadd() {

        var name = $("#name").val();

        var age = $("#age").val();

        var sex = $("#sex").val();

        $.post("/addUser",{name:name,age:age,sex:sex},function (res) {

            if (res==true){

                alert("添加成功")

                window.location.href ="/index";

            }else {

                alert("添加失败,请检查数据重试!");

            }

        })

    }

</script>

</html>
3.updateUser.html
<!DOCTYPE html>
<html lang="en" xmlns:th="http://www.thymeleaf.org">
<head>
<meta charset="UTF-8">
<title>修改用户</title>
<script th:src="@{/js/jquery-1.8.0.min.js}"></script>
</head>
<body>
<h2>这是修改页面</h2>
<input type="hidden" id="id" th:value="${user.id}"><br><br>
请输入姓名:<input id="name" th:value="${user.name}"/><br><br>
请输入年龄:<input id="age" th:value="${user.age}"/><br><br>
请选择性别:<select id="sex" style="width: 173px">
<option value="男">男</option>
<option value="女">女</option>
</select><br><br>
<button onclick="goupdate()">修改</button>
<button name="button" onclick="javascript:history.back(-1);">返回</button>
</body>
<script>
function goupdate() {
var id=$("#id").val();
var name = $("#name").val();
var age = $("#age").val();
var sex = $("#sex").val();
$.post("/update",{id:id,name:name,age:age,sex:sex},function (res) {
if (res==true) {
alert("修改成功");
window.location.href="/index";
}else {
alert("修改失败,请检查数据重试!");
}
})
}
</script>
</html>
4.controller中代码
@RequestMapping("/goadd")//去添加页面

public String goadd(){

    return "user/addUser";

}

@RequestMapping("/addUser")//添加信息

@ResponseBody

public boolean addUser(UserInfo user){

    int i = ud.adduser(user);

    if (i>0){

        return true;

    }else {

        return false;

    }

}

@RequestMapping("/goupdate/{id}")//去修改页面,回显数据

public String goupdate(@PathVariable("id") int id,Model model){

    UserInfo user = ud.findByid(id);

    model.addAttribute("user",user);

    return "user/updateUser";

}

@RequestMapping("/update")//修改

@ResponseBody

public boolean updateUser(UserInfo user){

    int i = ud.updateUser(user);

    if (i>0){

        return true;

    }else {

        return false;

    }

}

@RequestMapping("/godel/{id}")//删除

public String delUser(@PathVariable("id") Integer id){

   ud.delUser(id);

   return "public/success";

}
5.完整controller代码
package com.jz.table.controller;

import com.jz.table.dao.AdminDao;

import com.jz.table.dao.UserDao;

import com.jz.table.entity.Admin;

import com.jz.table.entity.UserInfo;

import org.springframework.stereotype.Controller;

import org.springframework.ui.Model;

import org.springframework.web.bind.annotation.PathVariable;

import org.springframework.web.bind.annotation.RequestMapping;

import org.springframework.web.bind.annotation.ResponseBody;

import javax.annotation.Resource;

import javax.servlet.http.HttpServletRequest;

import javax.servlet.http.HttpSession;

import java.util.List;

@Controller

public class TestController {

    @Resource

    private AdminDao ad;

    @Resource

    private UserDao ud;

    @RequestMapping("/login")//主页

    public String index(){

        return "login";

    }

    @RequestMapping("/goregister")//去注册页面

    public String goregister(){

        return  "register";

    }

    @RequestMapping("/register")//注册

    @ResponseBody

    public boolean register(Admin admin){

        int i = ad.addAdmin(admin);

        if (i>0){

            return true;

        }else {

            return false;

        }

    }

    @RequestMapping("/gologin")//登录获取用户信息存到seccion

    public String  gologin(Admin admin,HttpServletRequest request,Model model){

        Admin aa = ad.login(admin);

        if (aa==null){

            return  "public/false";

        }

        HttpSession session =  request.getSession();

        session.setAttribute("aname",admin.getName());

        session.setAttribute("apassword",admin.getPassword());

        List<UserInfo> userlist = ud.findall();

        model.addAttribute("admin",aa);

        model.addAttribute("alist",userlist);

        return "user/index";

    }

    @RequestMapping("/index")//从其他页面操作后返回列表页面(重复登录)

    public String login(Admin admin,Model model,HttpServletRequest request){

        HttpSession session =  request.getSession();

        admin.setName((String) session.getAttribute("aname"));

        admin.setPassword((Integer) session.getAttribute("apassword"));

        Admin aa = ad.login(admin);

        List<UserInfo> userlist = ud.findall();

        model.addAttribute("admin",aa);

        model.addAttribute("alist",userlist);

        return "user/index";

    }

    @RequestMapping("/goadd")//去添加页面

    public String goadd(){

        return "user/addUser";

    }

    @RequestMapping("/addUser")//添加信息

    @ResponseBody

    public boolean addUser(UserInfo user){

        int i = ud.adduser(user);

        if (i>0){

            return true;

        }else {

            return false;

        }

    }

    @RequestMapping("/goupdate/{id}")//去修改页面,回显数据

    public String goupdate(@PathVariable("id") int id,Model model){

        UserInfo user = ud.findByid(id);

        model.addAttribute("user",user);

        return "user/updateUser";

    }

    @RequestMapping("/update")//修改

    @ResponseBody

    public boolean updateUser(UserInfo user){

        int i = ud.updateUser(user);

        if (i>0){

            return true;

        }else {

            return false;

        }

    }

    @RequestMapping("/godel/{id}")//删除

    public String delUser(@PathVariable("id") Integer id){

       ud.delUser(id);

       return "public/success";

    }

}
效果如图
Spring boot+mybatis+thymeleaf 实现登录注册,增删改查的更多相关文章
- asp.net mvc 三层加EF 登录注册 增删改查
首先打开vs软件新建项目创建web中的mvc项目再右击解决方案创建类库项目分别创建DAL层和BLL层再把DAL层和BLL层的类重命名在mvc项目中的Models文件夹创建model类在DAL创建ADO ...
- Java Spring+Mysql+Mybatis 实现用户登录注册功能
前言: 最近在学习Java的编程,前辈让我写一个包含数据库和前端的用户登录功能,通过看博客等我先是写了一个最基础的servlet+jsp,再到后来开始用maven进行编程,最终的完成版是一个 Spri ...
- SpringBoot+Mybatis+Maven+MySQL逆向工程实现增删改查
SpringBoot+Mybatis+MySQL+MAVEN逆向工程实现增删改查 这两天简单学习了下SpringBoot,发现这玩意配置起来是真的方便,相比于SpringMVC+Spring的配置简直 ...
- SSH登录与增删改查demo详解+源代码
点击下载,测试绝对可用SSH整合框架登录加增删改查demo 下载地址:http://download.csdn.net/detail/qq_33599520/9784679 一.框架概述 spri ...
- 小D课堂-SpringBoot 2.x微信支付在线教育网站项目实战_3-2.使用Mybatis注解开发视频列表增删改查
笔记 2.使用Mybatis注解开发视频列表增删改查 讲解:使用Mybatis3.x注解方式 增删改查实操, 控制台打印sql语句 1.控制台打印sql语句 ...
- 招新系统(jsp+servlet,实现简略前端网页注册登录+后台增删改查,分学生和管理员,Java语言,mysql数据库连接,tomcat服务器)
生活不只是眼前的苟且,还有诗和远方. 架构说明: 要求是采用MVC模式,所以分了下面的几个包,但是由于是第一次写,可能分的也不是很清楚: 这个是后台部分的架构: 这个是前端的的展示: (那个StuLo ...
- Mybatis之基于XML的增删改查
这里先吐槽下,写的半天的东西,IE浏览器弹出调试窗口导致写的东西全部没保存,搞得我还要重新用谷歌写,思路全没了,fuck. 前面学习了下spring的DAO层,说起DAO层,那ORM肯定是少不了的,O ...
- MyBatis之二:简单增删改查
这一篇在上一篇的基础上简单讲解如何进行增删改查操作. 一.在mybatis的配置文件conf.xml中注册xml与注解映射 <!-- 注册映射文件 --> <mappers> ...
- springboot(三 使用mybatis +springboot 完成简单的增删改查)
先说一些注解: @EnableAutoConfiguration 可以帮助SpringBoot应用将所有符合条件的@Configuration配置都加载到当前SpringBoot创建并使用的IoC容器 ...
随机推荐
- mac sed 使用踩坑实录
[转自别处] 比如我sed想做文件原地的替换,但是怎么写都出错,错误提示还莫名其妙,后来多方搜索才知道Mac上的sed如果参数有-i就必须加上备份指令,即-i后添加任意字符,那些字符就作为备份文件的后 ...
- 如何将AAC音频转换成MP3格式
我们应该怎样将AAC音频转换成MP3格式呢?AAC是一种专为声音数据设计的文件压缩格式,相对于MP3音频来说更加高效,性价比跟高.但是因为MP3音频格式的通用性,我们还是时常需要将AAC音频转换成MP ...
- TCP/IP HTPP
TCP/IP:Transmission Control Protocol/Internet Protocol的简写,中译名为传输控制协议/因特网互联协议,又名网络通讯协议,是Internet最基本的协 ...
- 项目实战:负载均衡集群企业级应用实战—LVS详解
目录 一.负载均衡集群介绍 二.lvs 的介绍 三.LVS负载均衡四种工作模式 1.NAT工作模式 2.DR工作模式 3.TUN工作模式 4.full-nat 工作模式 5.四者的区别 四.LVS i ...
- from appium import webdriver 使用python爬虫,批量爬取抖音app视频(requests+Fiddler+appium)
使用python爬虫,批量爬取抖音app视频(requests+Fiddler+appium) - 北平吴彦祖 - 博客园 https://www.cnblogs.com/stevenshushu/p ...
- Jedis 连接池实例
package com.java56.redis; import redis.clients.jedis.Jedis; import redis.clients.jedis.JedisPool; im ...
- docker+kafka+zookeeper+zipkin的安装
1. 启动zookeeper容器 docker search zookeeper docker pull wurstmeister/zookeeper docker run -d --name zoo ...
- [js]js设计模式小结
js设计模式小结 工厂模式/构造函数--减少重复 - 创建对象有new - 自动创建obj,this赋值 - 无return 原型链模式 - 进一步去重 类是函数数据类型,每个函数都有prototyp ...
- 小程序map组件默认层级最高,并且不能设置的解决方案
map组件默认在最上面,若要设置像ofo那样的按钮有两个方法,一是用控件设置,控件就是controls属性,控件只能显示图片,不能显示文字之类的.二是用cover-view组件,这个组件就是悬浮在一些 ...
- pandas apply 添加进度条
Way:from tqdm import tqdmimport pandas as pdtqdm.pandas(desc='pandas bar')df['title_content'] = df.p ...