Nginx错误日志与优化专题
一、Nginx配置和内核优化 实现突破十万并发
二、一次Nignx的502页面的错误记录
(1)错误页面显示

错误日志:
// :: [error] #: * recv() failed (: Connection reset by peer) while reading response header from upstream,
 client: 101.226.125.118, server: live.baidu.com, request: "GET /live/CY00013 HTTP/1.1", upstream: "http://show.baidu.com/live/123.html", host: "live.baidu.com"
(2)配置以及流程设置
本次采用Openresty 搭建的web服务器,使用代理服务器IP(192.168.1.166)代理被代理服务器IP(172.16.0.166)。改配置以及流程一直是合适的,结果在今天下午访问代理服务器出现Nginx 502 错误。配置信息:
    server {

        listen       ;

        #resolver 8.8.8.8;

        server_name   live.baidu.com;

        location / {

                proxy_pass http://show.baidu.com;

                proxy_set_header Host show.baidu.com;

                proxy_set_header X-Real-IP $remote_addr;

                proxy_set_header X-Real-PORT $remote_port;

                proxy_set_header X-Forwarded-For $proxy_add_x_forwarded_for;

        }

    }
IP地址和域名对应关系:
show.baidu.com (172.16.0.166)
live.baidu.com (192.168.1.166)
经过各种百度和google都说是后端服务器的原因,但是访问后端服务器也是正常的show.baidu.com (172.16.0.166),但是当访问关于一个和Redis有关的页面的时候就会出现,redis服务器已经断开连接,重启Redis服务器后正常工作
(3)总结:如果当前服务器是代理服务器,出现502的错误原因,则一般都是后端服务器的异常导致的
三、nginx错误日志文件Error.log常见错误详细说明
我们经常遇到各种各样的nginx错误日志,平时根据一些nginx错误日志就可以分析出原因了。不过不是很系统,这里网上看到一篇资料还是比较系统的关于nginx的error.log的详细说明,这里记录下,方便以后查看了解。

以上表格来自网络资料。这里只是记录下,方便以后查看。
四、Nginx错误日志说明
错误日志类型
类型1: upstream timed out
类型2: connect() failed
类型3: no live upstreams
类型4: upstream prematurely closed connection
类型5: 104: Connection reset by peer
类型6: client intended to send too large body
类型7: upstream sent no valid HTTP/1.0 header
|
类型 |
错误日志 |
原因 |
解决办法 |
|---|---|---|---|
| 1 | upstream timed out (110: Connection timed out) while connecting to upstream | nginx与upstream建立tcp连接超时,nginx默认连接建立超时为200ms | 排查upstream是否能正常建立tcp连接 |
| 1 | upstream timed out (110: Connection timed out) while reading response header from upstream | nginx从upstream读取响应时超时,nginx默认的读超时为20s,读超时不是整体读的时间超时,而是指两次读操作之间的超时,整体读耗时有可能超过20s | 排查upstream响应请求为什么过于缓慢 |
| 2 | connect() failed (104: Connection reset by peer) while connecting to upstream | nginx与upstream建立tcp连接时被reset | 排查upstream是否能正常建立tcp连接 |
| 2 | connect() failed (111: Connection refused) while connecting to upstream | nginx与upstream建立tcp连接时被拒 | 排查upstream是否能正常建立tcp连接 |
| 3 | no live upstreams while connecting to upstream | nginx向upstream转发请求时发现upstream状态全都为down | 排查nginx的upstream的健康检查为什么失败 |
| 4 | upstream prematurely closed connection | nginx在与upstream建立完tcp连接之后,试图发送请求或者读取响应时,连接被upstream强制关闭 | 排查upstream程序是否异常,是否能正常处理http请求 |
| 5 | recv() failed (104: Connection reset by peer) while reading response header from upstream | nginx从upstream读取响应时连接被对方reset | 排查upstream应用已经tcp连接状态是否异常 |
| 6 | client intended to send too large body | 客户端试图发送过大的请求body,nginx默认最大允许的大小为1m,超过此大小,客户端会受到http 413错误码 |
|
| 7 | upstream sent no valid HTTP/1.0 header | nginx不能正常解析从upstream返回来的请求行 |
=====================openresty 遇到的错误信息

错误: an upstream response is buffered to a temporary file
    #允许客户端请求的最大字节

    client_max_body_size 50m;

    #缓冲区最大字节

    client_body_buffer_size 256k;

    #代理服务器链接后端服务器的超时时间

    proxy_connect_timeout ;

    #代理服务器等待后端服务器响应的超时时间

    proxy_read_timeout ;

    #后端服务器返回数据给代理服务器的最大传输时间

    proxy_send_timeout ;

    #代理服务器缓冲区大小,客户端的头信息会保存在这里

    proxy_buffer_size 64k;

    #代理服务器有几个缓冲区,最大是多大

    proxy_buffers  64k;

    #代理服务器烦方式可以申请更大的缓冲区,Nginx官方推荐为*2即可

    proxy_busy_buffers_size 128k;

    #代理服务器临时文件大小

    proxy_temp_file_write_size 256k;
======================Nignx + php5 出现的问题
修复Nginx 502错误:upstream sent too big header while reading response header from upstream

解决办法:
在Nginx配置文件的的http段,加入下面的配置
proxy_buffer_size  128k;

proxy_buffers   32 32k;

proxy_busy_buffers_size 128k;
重启Nginx错误依旧。再在host配置的php段加入下面配置
fastcgi_buffer_size 128k;

fastcgi_buffers 4 256k;

fastcgi_busy_buffers_size 256k;
重启Nginx 服务器即可
error 2
[error] 21501#0: *24372 FastCGI sent in stderr: "Primary script unknown" while reading response header from upstream, client: 12.232.112,
 request: "GET http://clientapi.ipip.net/echo.php?info=1234567890 HTTP/1.1", upstream: "fastcgi://unix:/var/run/php7.0.9-fpm.sock:",
摘要: 近日,为了让更新后台业务系统时,不影响线上用户的使用终止,故使用了nginx+tomcat集群,其中用到了memcached-session-manager组件来集中管理session,确实遇到了各种“坑”,这几天有时间陆续会把各种坑挖出来,记录一下已被忘记。 -----第一篇--nginx监听端口非80时的转发问题
该问题是最先发现的,由于之前对nginx不是特别的熟悉所以该问题是个入门级别的:
server {

    listen ;

    server_name localhost;

    location / {

        proxy_pass http://192.168.1.100:;

        proxy_set_header Host $host;

        proxy_set_header X-Real-IP $remote_addr;

        proxy_set_header X-Forwarded-For $proxy_add_x_forwarded_for;

    }

}
以上是nginx默认监听端口号为80的情况,由于公司系统是内网应用,用户已经将链接收藏起来了,收藏后的地址是之前的单台tomcat的8080端口,为了不影响他们的操作习惯所以决定让nginx继续监听8080端口,保持对外端口相同。
于是乎,我便想当然的把nginx的端口号改成了8080,把tomcat的端口改为了8081。改后的nginx配置如下:
server {

    listen ;

    server_name localhost;

    location / {

        proxy_pass http://192.168.1.100:;

        proxy_set_header Host $host;

        proxy_set_header X-Real-IP $remote_addr;

        proxy_set_header X-Forwarded-For $proxy_add_x_forwarded_for;

    }

}
改完之后,重启测试发现问题了:
当访问http://localhost:8080后,浏览器自动跳转到了 http://localhost去了
这是为什么呢?????
原来,如果nginx的监听端口不是默认的80端口,改为其他非80端口后,后端服务tomcat中的request.getServerPort()方法无法获得正确的端口号,仍然返回到80端口。在response.sendRedirect()时,客户端可能无法获得正确的重定向URL。
所以正确的配置:
server {

    listen ;

    server_name localhost;

    location / {

        proxy_pass http://192.168.1.100:;

        proxy_set_header Host $host:;

        proxy_set_header X-Real-IP $remote_addr;

        proxy_set_header X-Forwarded-For $proxy_add_x_forwarded_for;

    }

}
安装报错:
make[]: Entering directory `/usr/include/openssl'

make[]: *** No rule to make target `clean'.  Stop.

make[]: Leaving directory `/usr/include/openssl'

make[]: *** [/usr/include/openssl//openssl/include/openssl/ssl.h] Error

make[]: Leaving directory `/jowei/nginx-0.8.'

make: *** [build] Error
–with-pcre Nginx的rewrite功能需要使用pcre库才能工作,而Nginx的编译参数里面的这个选项并不是像常规的那样指定pcre的安装目录,而是指定pcre源代码的目录。
也就是说,如果你的系统路径下已经可以找到pcre的lib和include文件,这个选项可以不指定了。如果你的系统没有安装pcre,那么就指定该选项,Nginx会在编译的时候从你指定的这个目录把pcre编译进来。
========20170516 视频直播遇到的问题=========================
遇到的错误1
// :: [alert] #: * socket() failed (24: Too many open files) while connecting to upstream,
client: 122.234.65.111, server: 333.111.com, request: "GET /live/9410.ts HTTP/1.1",
upstream: "http://127.0.1.4:80/live/10.ts",
host: "2.24.87.6:8081",
referrer: "http://y.com/live/12"
遇到的错误2
// :: [crit] #: * open() "/opt/openresty/nginx/html/50x.html" failed (24: Too many open files),
client: 122.234.65.11, server: 333.11.com, request: "GET /live/10.ts HTTP/1.1",
upstream: "http://127.0.1.4:80/live/10.ts",
host: "2.24.87.6:8081",
referrer: "http://y.com/live/12"
遇到的错误3
// :: [crit] #: * open() "/opt/openresty/nginx/proxy_temp/4/19/0000158194" failed (24: Too many open files) while reading upstream,
其原因是Linux / Unix 设置了软硬文件句柄和打开文件的数目,可以使用’ulimit’命令来查看系统文件限制
ulimit -Hn

ulimit -Sn
1、阿里云配置文件
(1)/etc/security/limits.conf
# End of file

root soft nofile

root hard nofile

* soft nofile

* hard nofile

(2)/etc/sysctl.conf
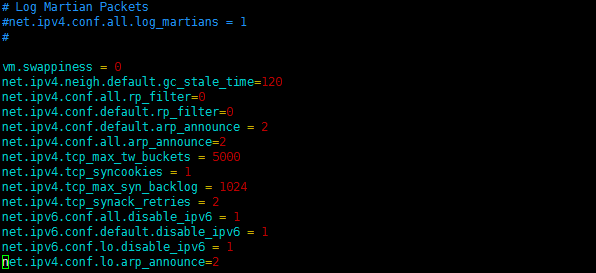
【1】1核512M
vm.swappiness =

net.ipv4.neigh.default.gc_stale_time=

net.ipv4.conf.all.rp_filter=

net.ipv4.conf.default.rp_filter=

net.ipv4.conf.default.arp_announce =

net.ipv4.conf.all.arp_announce=

net.ipv4.tcp_max_tw_buckets =

net.ipv4.tcp_syncookies =

net.ipv4.tcp_max_syn_backlog =

net.ipv4.tcp_synack_retries =

net.ipv6.conf.all.disable_ipv6 =

net.ipv6.conf.default.disable_ipv6 =

net.ipv6.conf.lo.disable_ipv6 =

net.ipv4.conf.lo.arp_announce=
【2】4核4G
vm.swappiness =

net.ipv4.neigh.default.gc_stale_time=

net.ipv4.conf.all.rp_filter=

net.ipv4.conf.default.rp_filter=

net.ipv4.conf.default.arp_announce =

net.ipv4.conf.all.arp_announce=

#net.ipv4.tcp_max_tw_buckets =

net.ipv4.tcp_max_tw_buckets =

net.ipv4.tcp_syncookies =

#add by sss

net.ipv4.ip_local_port_range =

net.ipv4.tcp_tw_reuse=

net.ipv4.tcp_tw_recycle=

net.ipv4.tcp_fin_timeout=

#net.ipv4.tcp_max_syn_backlog =

net.ipv4.tcp_max_syn_backlog =

net.ipv4.tcp_synack_retries =

net.ipv6.conf.all.disable_ipv6 =

net.ipv6.conf.default.disable_ipv6 =

net.ipv6.conf.lo.disable_ipv6 =

net.ipv4.conf.lo.arp_announce=
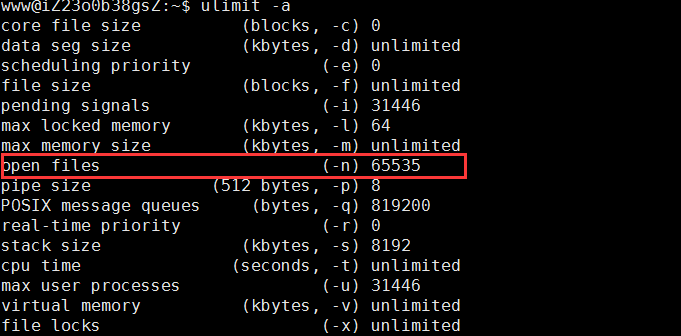
(3)ulimit -a
www@iZ23o0b38gsZ:~$ ulimit -a

core file size          (blocks, -c)

data seg size           (kbytes, -d) unlimited

scheduling priority             (-e)

file size               (blocks, -f) unlimited

pending signals                 (-i)

max locked memory       (kbytes, -l)

max memory size         (kbytes, -m) unlimited

open files                      (-n)

pipe size            ( bytes, -p)

POSIX message queues     (bytes, -q)

real-time priority              (-r)

stack size              (kbytes, -s)

cpu time               (seconds, -t) unlimited

max user processes              (-u)

virtual memory          (kbytes, -v) unlimited

file locks                      (-x) unlimited
2、公司服务器配置信息
(1)/etc/security/limits.conf 是空的

本地服务器信息查看
www@ubuntu5:/opt/openresty/nginx/logs$ ulimit -Hn

www@ubuntu5:/opt/openresty/nginx/logs$ ulimit -Sn
(2)/etc/sysctl.conf 也是空的

(3)ulimit -a
core file size          (blocks, -c)

data seg size           (kbytes, -d) unlimited

scheduling priority             (-e)

file size               (blocks, -f) unlimited

pending signals                 (-i)

max locked memory       (kbytes, -l)

max memory size         (kbytes, -m) unlimited

open files                      (-n)

pipe size            ( bytes, -p)

POSIX message queues     (bytes, -q)

real-time priority              (-r)

stack size              (kbytes, -s)

cpu time               (seconds, -t) unlimited

max user processes              (-u)

virtual memory          (kbytes, -v) unlimited

file locks                      (-x) unlimited

3、解决办法
参考文献1:http://www.drupal001.com/2013/07/nginx-open-files-error/
参考文献2:Nginx 出現 500 Error 修復 (too many open file, connection)
ulimit -a
阿里云4核4G
www@iZ23o0b38gsZ:~$ ulimit -a

core file size          (blocks, -c)

data seg size           (kbytes, -d) unlimited

scheduling priority             (-e)

file size               (blocks, -f) unlimited

pending signals                 (-i)

max locked memory       (kbytes, -l)

max memory size         (kbytes, -m) unlimited

open files                      (-n)

pipe size            ( bytes, -p)

POSIX message queues     (bytes, -q)

real-time priority              (-r)

stack size              (kbytes, -s)

cpu time               (seconds, -t) unlimited

max user processes              (-u)

virtual memory          (kbytes, -v) unlimited

file locks                      (-x) unlimited
阿里云1核512M
root@iZ23nl9zsjyZ:~# ulimit -a

core file size          (blocks, -c)

data seg size           (kbytes, -d) unlimited

scheduling priority             (-e)

file size               (blocks, -f) unlimited

pending signals                 (-i)

max locked memory       (kbytes, -l)

max memory size         (kbytes, -m) unlimited

open files                      (-n)

pipe size            ( bytes, -p)

POSIX message queues     (bytes, -q)

real-time priority              (-r)

stack size              (kbytes, -s)

cpu time               (seconds, -t) unlimited

max user processes              (-u)

virtual memory          (kbytes, -v) unlimited

file locks                      (-x) unlimited
请对比以上数据做出自己的优化方式
[1]vim /etc/security/limits.conf 文件添加以下内容
# End of file

root soft nofile

root hard nofile

* soft nofile

* hard nofile
[2] vim /etc/sysctl.conf 添加以下内容
vm.swappiness =

net.ipv4.neigh.default.gc_stale_time=

net.ipv4.conf.all.rp_filter=

net.ipv4.conf.default.rp_filter=

net.ipv4.conf.default.arp_announce =

net.ipv4.conf.all.arp_announce=

#net.ipv4.tcp_max_tw_buckets =

net.ipv4.tcp_max_tw_buckets =

net.ipv4.tcp_syncookies =

#add by sss

net.ipv4.ip_local_port_range =

net.ipv4.tcp_tw_reuse=

net.ipv4.tcp_tw_recycle=

net.ipv4.tcp_fin_timeout=

#net.ipv4.tcp_max_syn_backlog =

net.ipv4.tcp_max_syn_backlog =

net.ipv4.tcp_synack_retries =

net.ipv6.conf.all.disable_ipv6 =

net.ipv6.conf.default.disable_ipv6 =

net.ipv6.conf.lo.disable_ipv6 =

net.ipv4.conf.lo.arp_announce=
[3]这个只是针对当前客户
sudo echo ulimit -n  >>/etc/profile

source /etc/profile    #加载修改后的profile
查看系统句柄文件数
当前系统文件句柄的最大数目,只用于查看,不能设置修改
cat /proc/sys/fs/file-max

查看进程打开文件数
如果需要查看所有进程的文件打开数,如下图命令lsof |wc -l

Nginx错误日志与优化专题的更多相关文章
- Nginx 错误日志配置
1.Nginx错误日志信息介绍: error_log的语法格式及参数说明: error_log file level; 关键字 日志文件 错误日志级别 其中,关键字 ...
- 场景2 nginx 错误日志格式:
nginx 错误日志格式: 2016/09/01 11:23:36 [error] 28388#0: *14549 open() "/var/www/zjzc-web-frontEnd/im ...
- nginx 错误日志分析
502 1.查看nginx错误日志 tailf /data/log/nginx/error.log // :: [error] #: * recv() failed (: Connection res ...
- Nginx错误日志(error_log)配置及信息详解
Nginx错误日志信息介绍 Nginx的错误信息是调试Nginx服务的重要手段,属于核心功能模块(ngx_core_module)的参数,该参数的名字为error_log,可以放在Main区块中全局配 ...
- nginx 错误日志分析 以及说明
1.日志简介 nginx日志主要有两种:访问日志和错误日志.访问日志主要记录客户端访问nginx的每一个请求,格式可以自定义:错误日志主要记录客户端访问nginx出错时的日志,格式不支持自定义.两种日 ...
- nginx错误日志级别
在配置nginx.conf 的时候,有一项是指定错误日志的,默认情况下你不指定也没有关系,因为nginx很少有错误日志记录的.但有时出现问题时,是有必要记录一下错误日志的,方便我们排查问题.error ...
- Nginx错误日志配置信息详解
Nginx的错误日志可以配置在Main区块,也可以配置在虚拟主机区块中.Nginx软件会把自身运行的故障信息及用户访问的日志信息记录到指定的日志文件里,是我们调试Nginx服务的重要参考. error ...
- nginx错误日志error_log日志级别
error_log 级别分为 debug, info, notice, warn, error, crit 默认为crit,
- logstash 处理nginx 错误日志
2016/08/30 14:52:02 [error] 11325#0: *346 open() "/var/www/zjzc-web-frontEnd/%27%22%2f%3E%3C%2f ...
随机推荐
- hihocoder #1388 : Periodic Signal fft
题目链接: https://hihocoder.com/problemset/problem/1388 Periodic Signal 时间限制:5000ms内存限制:256MB 问题描述 Profe ...
- YFCC 100M数据集分析笔记
--从YFCC 100M数据集中筛选出Geo信息位于中国的数据集 1.YFCC 100M简介 YFCC 100M数据库是2014年来基于雅虎Flickr的影像数据库.该库由1亿条产生于2004年至20 ...
- 51单片机RAM 数据存储区学习笔记
转自:http://www.eepw.com.cn/article/216237_2.htm 1.RAM keil C语言编程 RAM是程序运行中存放随机变量的数据空间.在keil中编写程序,如果当前 ...
- js 对象的合并(3种方法)转载
对象的合并 需求:设有对象 o1 ,o2,需要得到对象 o3 var o1 = { a:'a' }, o2 = { b:'b' }; // 则 var o3 = { a:'a', b:'b' } 方法 ...
- 【转】python win32api win32gui win32con 简单操作教程(窗口句柄 发送消息 常用方法 键盘输入)
作者:https://blog.csdn.net/qq_16234613/article/details/79155632 附:https://www.programcreek.com/python/ ...
- [转帖]脑残式网络编程入门(二):我们在读写Socket时,究竟在读写什么?
脑残式网络编程入门(二):我们在读写Socket时,究竟在读写什么? http://www.52im.net/thread-1732-1-1.html 1.引言 本文接上篇<脑残式网 ...
- uva 1513(线段树)
题目链接:1513 - Movie collection 题意:有一堆电影,按1-n顺序排,有m次操作,每次询问第ai个电影之前有多少个电影,然后将其抽出放在堆顶. 分析:线段树应用. 因为每次查询后 ...
- getcontext makecontext setcontext swapcontext介绍
ucontext簇函数学习 https://github.com/zfengzhen/Blog/blob/master/article/ucontext%E7%B0%87%E5%87%BD%E6%95 ...
- javascript 进阶篇1 正则表达式,cookie管理,userData
首先,什么事正则表达式呢,其实引入概念很多时候并不能帮我们明白它到底是什么,所以我先简单描述下,正则表达式,其实就是一个记录字符串规则则的字符串,等我们看完这一部分,也就能明白它到底是什么了. 基本语 ...
- DispatcherServlet的url mapping为“/”时,对根路径访问的处理
背景 众所周知,Tomcat的Default Servlet的servlet-mapping为 <servlet-mapping> <servlet-name>default& ...