
python之堡垒机(第九天)
通过使用paramiko和sqlalchemy实现堡垒机功能
主要功能实现:
1、用户登录堡垒机后,无需知道密码或密钥可以SSH登录远端服务器;
2、用户对一个组内所有主机批量执行指定命令,获取格式化输出;
3、针对远端主机,可以进行上传下载文件;
4、用户在远端主机上执行的命令,均被记录并入库,实现审计功能;
主要参考了alex的开源代码jumpserver,并添加部分功能。
目前代码仍不尽人如意,即在SSH的交互模式interactive下,将输入缓冲区置为0,但无法还原,故交互结束后,有报错;
故临时解决方法:使用try和except方法,将OSError类的报错,强制exit程序(使用pass,coutinue,break等重置、跳出while无法解决)
结果:经调试将stdin = os.fdopen(sys.stdin.fileno(), 'rb', 0,closefd=False),exit后,正常回到循环。BUG解决了。
一、堡垒机具体介绍:
1、堡垒机功能 :
堡垒机,也称为跳板机,多用于系统运维环境中。指的是在一个特定的网络环境下,为了保障网络和数据不受来自外部和内部用户的入侵和破坏,而运用各种技术手段实时收集和监控网络环境中每一个组成部分的系统状态、安全事件、网络活动,以便集中报警、及时处理及审计定责。
从功能上分析,它综合了核心系统运维和安全审计管控两大主要功能;
从技术实现上分析,它通过切断终端计算机对网络和服务器资源的直接访问,而采用协议代理的方式,接管了终端计算机对网络和服务器的访问。
2、堡垒机服务器 :
IP :192.168.x.x
数据库:mysql5.6
程序开发环境:python3
3、权限说明 :
对访问权限细分了用户、帐号、服务器三块,具体如下:
(1)、用户:即登录堡垒机的ssh 帐号,分配给开发、QA、运维;
(2)、帐号:即堡垒机访问业务服务器的ssh帐号,例:root、ubuntu、只读帐号等;
(3)、远程业务主机:通过绑定主机和主机组跟用户相关联;
三者关系说明:
<1>.同类型业务的主机划分到同一主机组下;方便批量给同一开发小组用户赋权;
<2>.多个用户使用同一帐号来访问同一台业务主机或同一个组下的多台主机;
<3>.一个用户使用多个帐号来访问同一台业务主机或同一个组下的多台主机
<4>.优先以主机组的方式赋权给用户,单个主机赋权次之(无组的主机在登录界面会归于ungroupped hots)
4、安全审计说明:
(1)、通过对远程业务主机进行源地址限制,可以对外拦截非法访问和恶意攻击;
(2)、对登录服务器的操作命令和输入字符进行记录,可以对内部人员误操作和非法操作进行审计监控,以便事后责任追踪;
(3)、堡垒机登录业务主机主要使用ssh公私钥,避免了业务主机的密码泄漏及内部员工离职的密码更新;
5、流程安全管理:
想要正确可靠的发挥堡垒机的作用,只靠堡垒机本身是不够的, 还需要对用户进行安全上的限制,堡垒机部署后,要确保你的系统达到以下条件:
- 所有人包括运维、开发等任何需要访问业务系统的人员,只能通过堡垒机访问业务系统
- 回收所有对业务系统的访问权限,做到除了堡垒机管理人员,没有人知道业务系统任何机器的登录密码
- 网络上限制所有人员只能通过堡垒机的跳转才能访问业务系统
- 确保除了堡垒机管理员之外,所有其它人对堡垒机本身无任何操作权限,只有一个登录跳转功能
- 确保用户的操作纪录不能被用户自己以任何方式获取到并篡改,达到安全审计的作用。
二、堡垒机登录操作流程:
1、管理员为用户在堡垒机服务器上创建账号(使用用户名密码或公钥);
2、用户登录堡垒机,输入堡垒机用户名密码,显示当前用户可管理的服务器得列表;
3、用户选择主机组;
4、用户选择具体的主机,并自动登录;
5、执行操作并同时将用户操作记录;
6、用户exit退出业务主机后,返回到堡垒机,程序结束;
7、程序启动命令:jump
具体截图如下:
<1> . 选择组:

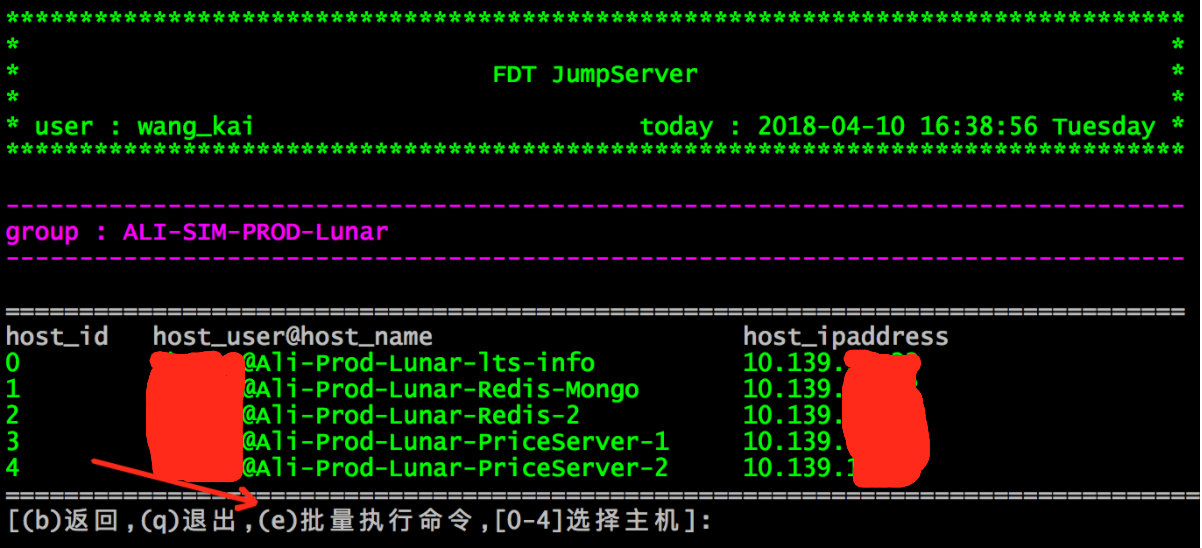
<2> . 批量执行命令:

<3> . 选择主机,输入「t」,可以传输文件:
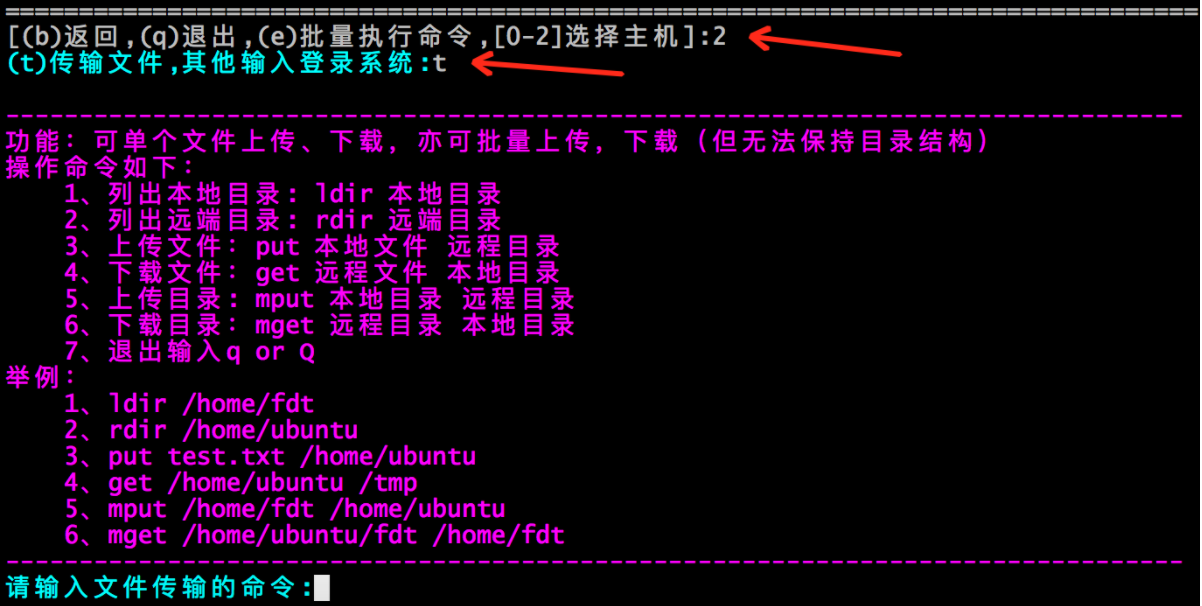
<4> . 输入其他字符即正常登录主机,退出及重启程序:
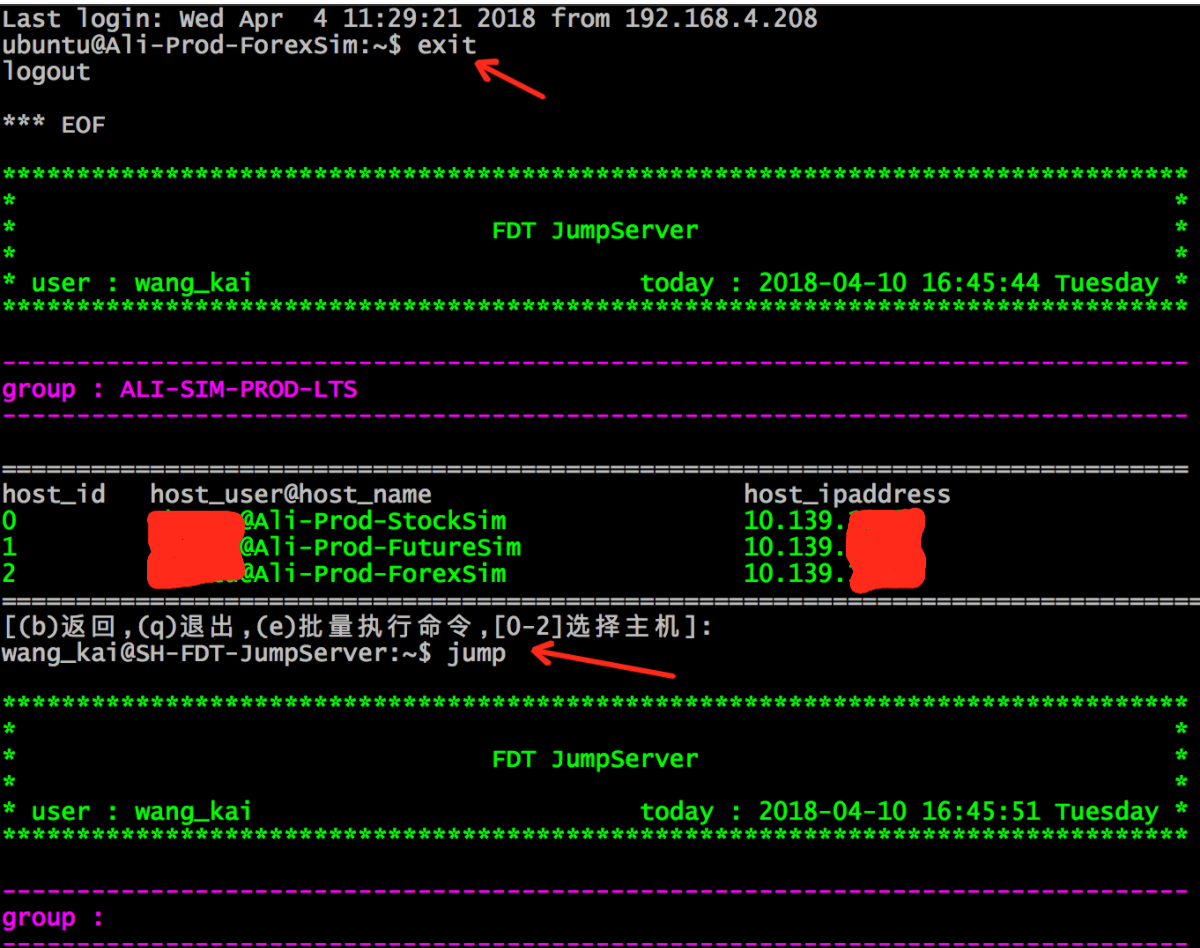
业务主机自身的命令记录:

数据库审计的命令记录:

三、代码具体说明如下:
目录结构:

1、bin (主程序目录)

2、conf   (配置文件目录)

3、modules  (具体模块目录)

4、share  (数据表目录)

一、bin目录下的litter_finger.py主程序:

1、添加当前目录到环境变量;

2、从modules.actions文件里加载excute_from_command_line

3、执行该模块excute_from_command_line(sys.argv)

二、conf目录:

1、目录下的settings.py:

    (1)、定义了BASE_DIR上一级路径;

    (2)、定义了DB_CONN的连接变量;

    (3)、定义了WELCOME_MSG变量,显示欢迎界面;

    (4)、定义了USER_GROUP_MSG变量,显示主机组名称;

    (5)、定义了GROUP_LIST变量,显示主机组列表;

    (6)、定义了HOST_LIST变量,显示主机列表;

    (7)、定义了SSH_SFTP_HELPINFO变量,显示SFTP帮助信息;

2、action_registers.py:

    (1)、加载modules目录下的views模块;

    (2)、定义了actions字典,使用反射指定执行启动、停止、同步、创建用户,组,绑定主机;

               start_session,stop,syncdb,create_users,create_groups,create_hosts

        ,create_bindhosts,create_remoteusers;

三、modules目录:

1、目录下的actions.py:

    (1)、导入conf模块下的settings和action_registers二个函数;

    (2)、导入modules模块下的utils函数;

    (3)、定义help_msg函数,输出执行的命令参数;

    (4)、定义excute_from_command_line(argvs)函数:

                如果参数长度小于2,则输出帮助信息,并结束;

                第一个位置参数不在指定名称中,则调用utils的错误输出函数;

                执行指定的命令action_registers.actions[argvs[1]](argvs[1:]),

                例:createusers -f <the new users file>;

2、目录下的utils.py:

    (1)、导入conf模块下的settings;

    (2)、导入yaml模块;

    (3)、定义print_err(msg,quit=False)函数,如果quit为真,则exit;否则print;

    (4)、定义yaml_parser(yml_filename)解析函数,文件为share目录下的yml格式文件;

3、目录下的db_conn.py:

    (1)、导入sqlalchemy和sqlalchemy.orm模块;

    (2)、导入conf目录下的setting配置文件的DB变量;

    (3)、创建数据库连接engine和session;

4、目录下的models.py:

    (1)、导入连接数据库的各种模块;

    (2)、导入密码hash模块werkzeug.security;

    (3)、生成一个ORM基类 Base = declarative_base();

    (3)、创建BindHost2Group、BindHost2UserProfile和Group2UserProfile

三个关联表;

    (4)、定义用户配置文件UserProfile表,并调用relationship定义关联groups、bind_hosts和audit_logs;

    (5)、定义远端用户RemoteUser表,其中定义了ssh二种认证方法password和key;

    (6)、定义主机Host表,字段为主机名,IP和端口;

    (7)、定义组Group表,其中调用relationship定义关联bind_hosts和user_profiles;

    (8)、定义绑定主机BindHost表,其中host_id外键与host表关联;remoteuser_id外键与remoteuser表关联;并调用relationship定义了groups、user_profiles进行关联;

    (9)、定义审计AuditLog表,其中user_id和bind_host_id用外键关联;

5、目录下的common_filters.py:

    (1)、导入models,db_conn,utils三个模块;

    (2)、定义函数bind_hosts_filter(vals),判断一个主机是不是在绑定主机表中,在则返回,否则退出;

    (3)、定义函数user_profiles_filter(vals),判断一个用户是否在用户配置表中,在则返回,否则退出;

    (4)、定义函数groups_filter(vals),判断一个组是否在组配置表中,在则返回,否则退出;

6、目录下的ssh_login.py:

    (1)、导入base64,getpass,socket,traceback,paramiko,datetime模块;

    (2)、导入models模块;

    (3)、导入interactive模块;

    (4)、定义ssh_login(user_obj,bind_host_obj,mysql_engine,log_recording)函数

                   定义client = paramiko.SSHClient();

          允许连接不在know_hosts文件中的主机ssh.set_missing_host_key_policy(paramiko.AutoAddPolicy());

          定义client.connect(),参数为bind_host表中的主机IP,端口,用户名和密码(如果使用key,则为key的创建密码);

          定义cmd_caches变量为空列表;

          调用client的invoke_shell(指定终端的宽度和高度)函数;

                   cmd_caches列表追加AuditLog的记录;

                  调用log_recording函数进行日志记录

                  调用interactive里的interacitive_shell

                  关闭chan和client

7、目录下的interactive.py:

     (1)、导入socket,os,sys,paramiko,datetime,select,fcntl,signal,struct等模块;

     (2)、导入models模块;

     (3)、使用try导入termios和tty模块,因windows下没有此模块;

     (4)、定义ioctl_GWINSZ,getTerminalSize,resize_pty三个函数,主要目的:终端大小适应。paramiko.channel会创建一个pty(伪终端),有个默认的大小(width=80, height=24),所以登录过去会发现能显示的区域很小,并且是固定的。编

辑vim的时候尤其痛苦。channel中有resize_pty方法,但是需要获取到当前终端的大小。经查找,当终端窗口发生变化时,系统会给前台进程组发送SIGWINCH信号,也就>

是当进程收到该信号时,获取一下当前size,然后再同步到pty中,那pty中的进程等于也感受到了窗口变化,也会收到SIGWINCH信号。

     (5)、定义交互shell函数,如果是linux,则执行posix_shell;否则执行windows_shell函数;

     (6)、定义posix_shell(chan,user_obj,bind_host_obj,cmd_caches,log_recording)函数,进行输入输出操作交互;

     (7)、定义windows的交互模式,目前此功能没有使用到

8、目录下的ssh_cmd.py:

     (1)、导入traceback,paramiko模块;

     (2)、定义ssh_cmd(bind_host_obj,cmd)函数

                  定义client = paramiko.SSHClient();

          允许连接不在know_hosts文件中的主机ssh.set_missing_host_key_policy(paramiko.AutoAddPolicy());

          定义client.connect(),参数为bind_host表中的主机IP,端口,用户名和密码(如果使用key,则为key的创建密码);

                  调用stdin, stdout, stderr = client.exec_command(cmd) ,并返回命令结果;

9、目录下的ssh_sftp.py:

     (1)、导入traceback,paramiko,stat模块;

     (2)、定义ssh_sftp(object)类

     (3)、定义类下的__init__(self, host_obj,timeout=30),定义远端主机变量;

     (4)、显示文件传输帮助信息help(self);

     (5)、定义get下载单个文件函数;

     (6)、定义put上传单个文件函数;

     (7)、定义获取远端linux主机上指定目录及其子目录下的所有文件函数;

     (8)、定义下载远端主机指定目录到本地目录函数 ;

     (9)、定义获取本地指定目录及其子目录下的所有文件函数;

     (10)、定义上传本地目录下的文件到远程主机指定目录函数;

10、目录下的主程序views.py:

     (1)、导入os,sys,getpass,time

     (2)、导入modules目录下的models、common_filters、ssh_login等模块;

     (3)、导入db_conn模块中的变量engine和session;

     (4)、导入utils里的print_err和yaml_parser函数;

     (5)、定义自登录login函数(获取当前系统用户名自登录)

                      获取当前登录跳板机的用户;

                      在数据库的user_profile表中,根据此用户进行查找匹配;

                      如果不存在,则调用auth认证函数;

                      正常返回user_obj;

     (6)、定义认证函数auth:

                循环3次,输入用户名和密码;

                定义user_obj变量,即去数据库取userprofile表中的用户和密码进行比对 ;

                或不为空,则成功返回;为空则继续循环;

     (7)、定义框架函数,输出登录信息framework(user,group);

     (8)、定义显示组函数,输出主机组信息show_group(user);

     (9)、定义显示主机函数,输出主机信息show_host(user_obj,group_name,bind_hosts);

     (10)、定义日志记录到数据库的函数log_recording(user_obj,bind_host_obj,logs);

     (11)、定义调用多线程函数执行命令make_threading(func,tuple_args);

     (12)、定义文件上传下载的try和except报错函数try_exec(client_mode,first_file,second_file);

     (13)、定义调用文件传输函数ssh_transport(host_obj),主要有:ldir,rdir,put,get四种方式;

     (14)、定义启动会话函数start_session(argvs);

                       调用登录login及认证auth函数,获取用户信息实例;

                       进行第一层循环,显示登录信息框架;

                       显示组列表信息,并手工输入组编号,进行一系列判断;

                       显示主机列表进行第二层循环,并手工输入主机编号,如果输入e,则批量执行命令;

                       输入正确主机编号后,输入t,则进行文件传输,输入其他则登录主机,进行命令交互;

      (15)、定义创建本地登录用户函数create_users(argvs),读取指定的yaml文件,将数据导入数据库;

      (16)、定义创建主机组函数create_groups(argvs),读取指定的yaml文件,将数据导入数据库;

      (17)、定义创建远程主机函数create_hosts(argvs),读取指定的yaml文件,将数据导入数据库;

      (18)、定义创建远程主机的登录信息函数create_remoteusers(argvs),读取指定的yaml文件,将数据导入数据库;

      (19)、定义创建绑定主机函数create_bindhosts(argvs),读取指定的yaml文件,将数据导入数据库;

      (20)、定义创建所有表结构函数syncdb(argvs);

代码介绍
代码介绍
四、代码BUG记录
环境说明:

       1、服务器IP:192.168.4.208

        2、运行环境:python3

        3、代码目录:/usr/local/jumpserver

        4、程序运行方式:/usr/bin/python3 /usr/local/jumpserver/bin/jumpserver.py start_session

                                     或jump  (已定义别名:alias jump='/usr/local/jumpserver/bin/jumpserver.py start_session')

        5、调用了python下的ssh访问模块paramiko和交互模块interactive,interactive功能通过读取键盘输入命令,并将结果返回到屏幕输出,同时将输入的字符记录并导入到数据库。

故障说明及解决方法:

1、在调用ssh_login和interactive.py里,ssh交互执行命令的功能已经实现,就是有点在对上下左右控制键上的小问题:1、在命令行按向上键查看历史命令时,第一次按向上键没有输出显示,但回车键可以正常执行命令   2、在vim编辑状态下上下左右键的处理,有时候会回显A,B,C,D

故障原因:

      本程序最大BUG:

       当读取键盘输入时,方向键会有问题,因为按一次方向键会产生3个字节数据,我的理解是按键一次会被select捕捉一次标准输入有变化,但是我每次只处理1个字节的数据,其他的数据会存放在输入缓冲区中,等待下次按键的时候一起发过去。这就导致了本来3个字节才能完整定义一个方向键的行为,但是我只发过去一个字节,所以终端并不知道我要干什么。所以没有变化,当下次触发按键,才会把上一次的信息完整发过去,看起来就是按一下方向键有延迟。多字节的粘贴也是一个原理。

故障解决:

      解决办法是将输入缓冲区置为0,这样就没有缓冲,有多少发过去多少,这样就不会有那种显示的延迟问题了。

          stdin = os.fdopen(sys.stdin.fileno(), 'rb', 0)

          fd = stdin.fileno()

备注:解决方案见https://blog.csdn.net/zlucifer/article/details/70858491

2、Traceback (most recent call last):

  File "/usr/local/jumpserver/bin/jumpserver.py", line 12, in <module>

    excute_from_command_line(sys.argv)

  File "/usr/local/jumpserver/modules/actions.py", line 26, in excute_from_command_line

    action_registers.actions[argvs[1]](argvs[1:])

  File "/usr/local/jumpserver/modules/views.py", line 251, in start_session

    host_choice = input("[(b)back,(q)quit, select host to login]:").strip()

OSError: [Errno 9] Bad file descriptor

故障原因:

      在解决故障1(本程序最大BUG)上产生的一系列新BUG(包括以下全部BUG)

      (1)、 在设置了缓冲区为0后,导致在业务主机和堡垒机之间的标准输入sys.stdin不一致,但尝试了N多方法,也无法还原标准输入;

                    在业务主机上输入exit后,结束SSH登录后,python程序无法识别新的stdin,程序报如上错误;

               经调试将stdin = os.fdopen(sys.stdin.fileno(), 'rb', 0,closefd=False),exit后,正常回到循环。

      (2)、 因python3环境下的标准输入为bytes字节后,读入内存需要decode为unicode编码,保存到文件又需要encode为bytes编码,针对普通字符和汉字产生N多编码问题;

故障解决:

      (1)、临时解决方案:使用try和except方法,将OSError类的报错,强制exit程序(使用pass,coutinue,break等重置、跳出while无法解决)

      (2)、编码解决方案见如下具体故障;

3、*** Caught exception: <class 'ValueError'>: can't have unbuffered text I/O

Traceback (most recent call last):

  File "/usr/local/jumpserver/modules/ssh_login.py", line 54, in ssh_login

    interactive.interactive_shell(chan,user_obj,bind_host_obj,cmd_caches,log_recording)

  File "/usr/local/jumpserver/modules/interactive.py", line 62, in interactive_shell

    posix_shell(chan,user_obj,bind_host_obj,cmd_caches,log_recording)

  File "/usr/local/jumpserver/modules/interactive.py", line 77, in posix_shell

    stdin = os.fdopen(sys.stdin.fileno(), 'r', 0)

  File "/usr/lib/python3.4/os.py", line 980, in fdopen

    return io.open(fd, *args, **kwargs)

ValueError: can't have unbuffered text I/O

 故障原因:

        因python3默认使用的是str类型对字符串编码,默认使用bytes操作二进制数据流,故在标准输入时,打开方式应为二进制;

故障解决:

                 stdin = os.fdopen(sys.stdin.fileno(), 'rb', 0)

       同时在读取标准输入时,应转化为str编码:

                 x = stdin.read(1).decode('utf-8',errors='ignore')

4、Caught exception: <class 'UnicodeDecodeError'>: 'utf-8' codec can't decode bytes in position 1022-1023: unexpected end of data

Traceback (most recent call last):

  File "/usr/local/jumpserver/modules/ssh_login.py", line 53, in ssh_login

    interactive.interactive_shell(chan,user_obj,bind_host_obj,cmd_caches,log_recording)

  File "/usr/local/jumpserver/modules/interactive.py", line 61, in interactive_shell

    posix_shell(chan,user_obj,bind_host_obj,cmd_caches,log_recording)

  File "/usr/local/jumpserver/modules/interactive.py", line 110, in posix_shell

    x = u(chan.recv(1024))

  File "/usr/local/lib/python3.4/dist-packages/paramiko/py3compat.py", line 143, in u

    return s.decode(encoding)

UnicodeDecodeError: 'utf-8' codec can't decode bytes in position 1022-1023: unexpected end of data

故障原因:

       python3环境下,因在interactive交互过程中,标准输出需要转化为str编码,文件中的汉字无法decode;

故障解决:

       使用x = chan.recv(1024).decode('utf-8',errors='ignore')替换原有的 x = u(chan.recv(1024)),即在decode中,如有报错,则忽略;

5、'utf-8' codec can't encode character '\udc9b' in position 0: surrogates not allowed

Traceback (most recent call last):

  File "/usr/lib/python3/dist-packages/CommandNotFound/util.py", line 24, in crash_guard

    callback()

  File "/usr/lib/command-not-found", line 90, in main

    if not cnf.advise(args[0], options.ignore_installed) and not options.no_failure_msg:

  File "/usr/lib/python3/dist-packages/CommandNotFound/CommandNotFound.py", line 265, in advise

    packages = self.getPackages(command)

  File "/usr/lib/python3/dist-packages/CommandNotFound/CommandNotFound.py", line 157, in getPackages

    result.update([(pkg, db.component) for pkg in db.lookup(command)])

  File "/usr/lib/python3/dist-packages/CommandNotFound/CommandNotFound.py", line 85, in lookup

    result = self.db.lookup(command)

  File "/usr/lib/python3/dist-packages/CommandNotFound/CommandNotFound.py", line 41, in lookup

    key = key.encode('utf-8')

UnicodeEncodeError: 'utf-8' codec can't encode character '\udc9b' in position 0: surrogates not allowed

故障原因:

       python3环境下,因在interactive交互过程中,标准输入为bytes字节码,需要转化为str编码,但一个汉字需要3个字节,故原有的x = u(stdin.read(1))会导致汉字无法获取,故报错;

故障解决:

      临时解决方案:x = u(stdin.read(3))

6、Caught exception: <class 'UnicodeEncodeError'>: 'ascii' codec can't encode character '\u4f60' in position 0: ordinal not in range(128)

Traceback (most recent call last):

  File "/usr/local/jumpserver/modules/ssh_login.py", line 53, in ssh_login

    interactive.interactive_shell(chan,user_obj,bind_host_obj,cmd_caches,log_recording)

  File "/usr/local/jumpserver/modules/interactive.py", line 62, in interactive_shell

    posix_shell(chan,user_obj,bind_host_obj,cmd_caches,log_recording)

  File "/usr/local/jumpserver/modules/interactive.py", line 126, in posix_shell

    sys.stdout.write(x)

UnicodeEncodeError: 'ascii' codec can't encode character '\u4f60' in position 0: ordinal not in range(128)

故障原因:

     因mac下的ssh访问终端工具iTerm2编码不是utf-8,故有此报错;

故障解决:

     将终端编码更换为utf-8;

7、/usr/local/lib/python3.4/dist-packages/pymysql/cursors.py:166: Warning: (1265, "Data truncated for column 'cmd' at row 1")

                        result = self._query(query)

故障原因:

       因输出获取以1024字节,偶尔会出现超过1024字节的这类警告;

故障解决:

        因偶尔出现,暂不影响使用,故此warning暂无处理;

        将audit_log表中的cmd字段属性改为text类型即可解决。
BUG
五、代码如下:
目录结构:
<1>、bin (主程序目录)
<2>、conf (配置文件目录)
<3>、modules (具体模块目录)
<4>、share (数据表目录)
1、bin目录下主程序jumpserver.py代码:
#!/usr/bin/python3

#_*_coding:utf-8_*_

__author__ = 'Kevin Wang'

import os,sys,readline

###定义上级目录###

BASE_DIR = os.path.dirname(os.path.dirname(os.path.abspath(__file__)))

###将上级目录添加到环境变量PATH中###

sys.path.append(BASE_DIR)

###主程序,调用actions下的函数excute_from_command_line###

if __name__ == '__main__':

    from modules.actions import excute_from_command_line

    excute_from_command_line(sys.argv)
jumpserver.py
2、conf目录下settings.py代码:
定义些显示输出的变量
#!/usr/bin/python3

#_*_coding:utf-8_*_

__author__ = 'Kevin Wang'

###MYSQL数据库连接地址###

DB_CONN = "mysql+pymysql://user:password@192.168.4.x:3306/db_name?charset=utf8"

###菜单显示主界面,会显示登录的用户名和当前的时间###

WELCOME_MSG = '''\033[32;1m

********************************************************************************

*                                                                              *

*                                FDT JumpServer                                *

*                                                                              *

*{0}*

********************************************************************************

\033[0m'''

###显示主前选择的组名称###

USER_GROUP_MSG = '''\033[35;1m

--------------------------------------------------------------------------------

group : {0}

--------------------------------------------------------------------------------

\033[0m'''

###输出主前的主机组列表###

GROUP_LIST = '''

================================================================================

group_id  group_name                              host_num

'''

###输出选择主机组下的主机列表###

HOST_LIST = '''

================================================================================

host_id   host_user@host_name                     host_ipaddress

'''

###SSH的FTP的帮助信息###

SSH_SFTP_HELPINFO = '''\033[35;1m

--------------------------------------------------------------------------------

功能:可单个文件上传、下载

操作命令如下:

    1、列出本地目录: ldir 本地目录

    2、列出远端目录: rdir 远端目录

    3、上传文件:put 本地文件 远程目录

    4、下载文件:get 远程文件 本地目录

    5、退出输入q or Q

举例:

    1、ldir /home/fdt

    2、rdir /home/ubuntu

    3、put /tmp/test.txt /home/ubuntu

    4、get /home/ubuntu/xx.tar.gz /tmp

--------------------------------------------------------------------------------

\033[0m'''
settings.py
3、conf目录下的action_registers.py代码:
###定义actions字典,使用反射指定执行启动、停止、同步、创建用户,组,绑定主机操作###
#!/usr/bin/python3

#_*_coding:utf-8_*_

__author__ = 'Kevin Wang'

from modules import views

###定义actions字典,使用反射指定执行启动、停止、同步、创建用户,组,绑定主机操作###

actions = {

    'start_session': views.start_session,

    #'stop': views.stop_server,

    'syncdb': views.syncdb,

    'create_users': views.create_users,

    'create_groups': views.create_groups,

    'create_hosts': views.create_hosts,

    'create_bindhosts': views.create_bindhosts,

    'create_remoteusers': views.create_remoteusers,

}
action_registers.py
4、modules目录下的actions.py代码:
#!/usr/bin/python3

#_*_coding:utf-8_*_

__author__ = 'Kevin Wang'

from conf import settings

from conf import action_registers

from modules import utils

###定义帮助函数:提示命令格式###

def help_msg():

    '''

    print help msgs

    :return:

    '''

    print("\033[31;1mAvailable commands:\033[0m")

    for key in action_registers.actions:

        print("\t",key)

###定义excute_from_command_line(argvs)函数###

def excute_from_command_line(argvs):

    ###如果参数长度小于2,则输出帮助信息,并结束###

    if len(argvs) < 2:

        help_msg()

        exit()

    ###第一个位置参数不在指定名称中,则调用utils的错误输出函数###

    if argvs[1] not in action_registers.actions:

        utils.print_err("Command [%s] does not exist!" % argvs[1], quit=True)

    ###执行指定的命令action_registers.actions,例:createusers -f <the new users file>###

    action_registers.actions[argvs[1]](argvs[1:])
actions.py
5、modules目录下的utils.py代码:
定义错误输出函数和yaml配置文件解析函数
#!/usr/bin/python3

#_*_coding:utf-8_*_

__author__ = 'Kevin Wang'

import hashlib

from conf import settings

import yaml

try:

    from yaml import CLoader as Loader, CDumper as Dumper

except ImportError:

    from yaml import Loader, Dumper

###定义print_err(msg,quit=False)函数,如果quit为真,则exit;否则print###

def print_err(msg,quit=False):

    '''

    输出错误信息

    :param msg : 错误信息变量

    :return:

    '''

    output = "\033[31;1mError: %s\033[0m" % msg

    if quit:

        exit(output)

    else:

        print(output)

###定义yaml_parser(yml_filename)解析函数,文件为share目录下的yml格式文件###

def yaml_parser(yml_filename):

    '''

    load yaml file and return

    :param yml_filename : yaml格式的配置文件

    :return:

    '''

    #yml_filename = "%s/%s.yml" % (settings.StateFileBaseDir,yml_filename)

    try:

        yaml_file = open(yml_filename,'r')

        data = yaml.load(yaml_file)

        return data

    except Exception as e:

        print_err(e)
utils.py
6、modules目录下的db_conn.py代码:
定义和创建数据库连接的engine和session
#!/usr/bin/python3

#_*_coding:utf-8_*_

__author__ = 'Kevin Wang'

import os,sys

#BASE_DIR = os.path.dirname(os.path.dirname(os.path.abspath(__file__)))

#sys.path.append(BASE_DIR)

###导入sqlalchemy和sqlalchemy.orm模块###

from sqlalchemy import create_engine,Table

from sqlalchemy.orm import sessionmaker

from conf import settings

###创建数据库连接engine和session###

engine = create_engine(settings.DB_CONN)

#engine = create_engine(settings.DB_CONN,echo=True)

###创建与数据库的会话session class ,注意,这里返回给session的是个class,不是实例###

SessionCls = sessionmaker(bind=engine)

session = SessionCls()
db_conn.py
7、modules目录下的models.py代码:
创建host,group,remoteuser,userprofile,bind_host等数据
#!/usr/bin/python3

#_*_coding:utf-8_*_

__author__ = 'Kevin Wang'

import os,sys

#BASE_DIR = os.path.dirname(os.path.dirname(os.path.abspath(__file__)))

#sys.path.append(BASE_DIR)

from sqlalchemy import create_engine,Table

from sqlalchemy.ext.declarative import declarative_base

from sqlalchemy import Column, Integer, String,ForeignKey,UniqueConstraint,UnicodeText,DateTime,Text

from sqlalchemy.orm import relationship

from sqlalchemy import or_,and_

from sqlalchemy import func

from sqlalchemy_utils import ChoiceType,PasswordType

from sqlalchemy.ext.hybrid import hybrid_property

###导入密码hash模块###

from werkzeug.security import generate_password_hash,check_password_hash

###生成一个ORM基类###

Base = declarative_base() #生成一个ORM 基类

###创建BindHost2Group关联表###

BindHost2Group = Table('bindhost_2_group',Base.metadata,

    Column('bindhost_id',ForeignKey('bind_host.id'),primary_key=True),

    Column('group_id',ForeignKey('group.id'),primary_key=True),

)

###创建BindHost2UserProfile关联表###

BindHost2UserProfile = Table('bindhost_2_userprofile',Base.metadata,

    Column('bindhost_id',ForeignKey('bind_host.id'),primary_key=True),

    Column('userprofile_id',ForeignKey('user_profile.id'),primary_key=True),

)

###创建Group2UserProfile关联表###

Group2UserProfile = Table('group_2_userprofile',Base.metadata,

    Column('userprofile_id',ForeignKey('user_profile.id'),primary_key=True),

    Column('group_id',ForeignKey('group.id'),primary_key=True),

)

#class UserProfile(Base):

#    __tablename__ = 'user_profile'

#    id = Column(Integer,primary_key=True,autoincrement=True)

#    username = Column(String(32),unique=True,nullable=False)

#    password = Column(String(128),unique=True,nullable=False)

#    groups = relationship('Group',secondary=Group2UserProfile)

#    bind_hosts = relationship('BindHost',secondary=BindHost2UserProfile)

#    audit_logs = relationship('AuditLog')

#

#    def __repr__(self):

#        return "<UserProfile(id='%s',username='%s')>" % (self.id,self.username)

###定义用户配置文件UserProfile表,并调用relationship定义关联groups、bind_hosts和audit_logs###

class UserProfile(Base):

    __tablename__ = 'user_profile'

    id = Column(Integer,primary_key=True,autoincrement=True)

    username = Column(String(32),unique=True,nullable=False)

    password = Column(String(255),unique=True,nullable=False)

    groups = relationship('Group',secondary=Group2UserProfile)

    bind_hosts = relationship('BindHost',secondary=BindHost2UserProfile)

    audit_logs = relationship('AuditLog')

    #def __init__(self,name,passwd):

    #    self.username = name

    #    self.password = passwd

    @hybrid_property

    def passwd(self):

        return self.password

    ###通过调用hybrid属性对密码进行加密###

    @passwd.setter

    def passwd(self,plaintext):

        self.password = generate_password_hash(plaintext)

    ###定义密码修改函数###

    def verify_passwd(self,plaintext):

        return check_password_hash(self.password,plaintext)

    def __repr__(self):

        #return "<UserProfile(id='%s',username='%s')>" % (self.id,self.username)

        return "<UserProfile(id='%s',username='%s',password='%s')>" % (self.id,self.username,self.password)

###定义远端用户RemoteUser表,其中定义了ssh二种认证方法password和key###

class RemoteUser(Base):

    __tablename__ = 'remote_user'

    AuthTypes = [

        (u'ssh-passwd',u'SSH/Password'),

        (u'ssh-key',u'SSH/KEY'),

    ]

    id = Column(Integer,primary_key=True,autoincrement=True)

    auth_type = Column(ChoiceType(AuthTypes))

    username = Column(String(64),nullable=False)

    password = Column(String(255))

    __table_args__ = (UniqueConstraint('auth_type', 'username','password', name='_user_passwd_uc'),)

    def __repr__(self):

        return "<RemoteUser(id='%s',auth_type='%s',user='%s')>" % (self.id,self.auth_type,self.username)

###定义主机Host表,字段为主机名,IP和端口###

class Host(Base):

    __tablename__ = 'host'

    id = Column(Integer,primary_key=True,autoincrement=True)

    hostname = Column(String(64),unique=True,nullable=False)

    ip_addr = Column(String(128),unique=True,nullable=False)

    port = Column(Integer,default=22)

    #bind_hosts = relationship("BindHost")

    def __repr__(self):

        return "<Host(id='%s',hostname='%s')>" % (self.id,self.hostname)

###定义组Group表,其中调用relationship定义关联bind_hosts和user_profiles###

class Group(Base):

    __tablename__ = 'group'

    id = Column(Integer,primary_key=True)

    name = Column(String(64),nullable=False,unique=True)

    bind_hosts = relationship("BindHost",secondary=BindHost2Group, back_populates='groups' )

    user_profiles = relationship("UserProfile",secondary=Group2UserProfile )

    def __repr__(self):

        return "<HostGroup(id='%s',name='%s')>" % (self.id,self.name)

###定义绑定主机BindHost表,其中host_id外键与host表关联;remoteuser_id外键与remoteuser表关联;并调用relationship定义了groups、user_profiles进行关联###

class BindHost(Base):

    '''Bind host with different remote user,

       eg. 192.168.1.1 mysql passAbc123

       eg. 10.5.1.6    mysql pass532Dr!

       eg. 10.5.1.8    mysql pass532Dr!

       eg. 192.168.1.1 root

    '''

    __tablename__ = 'bind_host'

    id = Column(Integer,primary_key=True,autoincrement=True)

    host_id = Column(Integer,ForeignKey('host.id'))

    remoteuser_id = Column(Integer,ForeignKey('remote_user.id'))

    host = relationship("Host")

    remoteuser = relationship("RemoteUser")

    groups = relationship("Group",secondary=BindHost2Group,back_populates='bind_hosts')

    user_profiles = relationship("UserProfile",secondary=BindHost2UserProfile)

    audit_logs = relationship('AuditLog')

    __table_args__ = (UniqueConstraint('host_id', 'remoteuser_id', name='_bindhost_and_user_uc'),)

    def __repr__(self):

        return "<BindHost(id='%s',name='%s',user='%s')>" % (self.id,

                                                           self.host.hostname,

                                                           self.remoteuser.username

                                                                      )

###定义审计AuditLog表,其中user_id和bind_host_id用外键关联###

class AuditLog(Base):

    __tablename__ = 'audit_log'

    id = Column(Integer,primary_key=True)

    user_id = Column(Integer,ForeignKey('user_profile.id'))

    bind_host_id = Column(Integer,ForeignKey('bind_host.id'))

    action_choices = [

        (0,'CMD'),

        (1,'Login'),

        (2,'Logout'),

        (3,'GetFile'),

        (4,'SendFile'),

        (5,'Exception'),

    ]

    action_choices2 = [

        (u'cmd',u'CMD'),

        (u'login',u'Login'),

        (u'logout',u'Logout'),

        #(3,'GetFile'),

        #(4,'SendFile'),

        #(5,'Exception'),

    ]

    action_type = Column(ChoiceType(action_choices2))

    #action_type = Column(String(64))

    #cmd = Column(String(255))

    cmd = Column(Text)

    date = Column(DateTime)

    user_profile = relationship("UserProfile")

    bind_host = relationship("BindHost")

    '''

    def __repr__(self):

        return "<user=%s,host=%s,action=%s,cmd=%s,date=%s>" %(self.user_profile.username,

                                                      self.bind_host.host.hostname,

                                                              self.action_type,

                                                              self.date)

    '''
models.py
8、modules目录下的common_filters.py代码:
定义用户、组、绑定主机的表过滤函数
#!/usr/bin/python3

#_*_coding:utf-8_*_

__author__ = 'Kevin Wang'

import os,sys

#BASE_DIR = os.path.dirname(os.path.dirname(os.path.abspath(__file__)))

#sys.path.append(BASE_DIR)

from modules import models

from modules.db_conn import engine,session

from modules.utils import print_err

###定义函数bind_hosts_filter(vals),判断一个主机是不是在绑定主机表中,在则返回,否则退出###

def bind_hosts_filter(vals):

    host = session.query(models.Host).filter(models.Host.hostname.in_(vals.get('bind_hosts'))).all()

    bind_hosts_id = [h.id for h in host]

    bind_hosts = session.query(models.BindHost).filter(models.BindHost.host_id.in_(bind_hosts_id)).all()

    if not bind_hosts:

        print_err("none of [%s] exist in bind_host table." % vals.get('bind_hosts'),quit=True)

    return bind_hosts

###定义函数user_profiles_filter(vals),判断一个用户是否在用户配置表中,在则返回,否则退出###

def user_profiles_filter(vals):

    user_profiles = session.query(models.UserProfile).filter(models.UserProfile.username.in_(vals.get('user_profiles'))).all()

    if not user_profiles:

        print_err("none of [%s] exist in user_profile table." % vals.get('user_profiles'),quit=True)

    return  user_profiles

###定义函数groups_filter(vals),判断一个组是否在组配置表中,在则返回,否则退出;

def groups_filter(vals):

    groups = session.query(models.Group).filter(models.Group.name.in_(vals.get('groups'))).all()

    if not groups:

        print_err("none of [%s] exist in group table." % val.get('groups'),quit=True)

    return groups
common_filters.py
9、modules目录下的ssh_login.py代码:
定义ssh交互函数
#_*_coding:utf-8_*_

__author__ = 'Kevin Wang'

import os,sys

#BASE_DIR = os.path.dirname(os.path.dirname(os.path.abspath(__file__)))

#sys.path.append(BASE_DIR)

import base64,getpass,os,socket,sys,traceback,datetime

from paramiko.py3compat import input

from  modules import models

import paramiko

try:

    import interactive

except ImportError:

    from . import interactive

###定义ssh_login(user_obj,bind_host_obj,mysql_engine,log_recording)函数,连接指定主机###

def ssh_login(user_obj,bind_host_obj,mysql_engine,log_recording):

    '''

    now, connect and use paramiko Client to negotiate SSH2 across the connection

    :param: user_obj : 当前登录的用户实例obj

    :param: bind_host_obj : 当前登录的主机实例obj

    :param: mysql_engine : mysql数据库的实例

    :param: log_recording : 审计命令函数名

    :return: 无返回值

    '''

    try:

        #default_path = os.path.join(os.environ['HOME'], '.ssh', 'id_rsa')

        #private_key = paramiko.RSAKey.from_private_key_file(default_path)

        client = paramiko.SSHClient()

        #client.load_system_host_keys()

        client.load_host_keys('/tmp/.ssh/known_hosts')

        client.save_host_keys('/tmp/.ssh/known_hosts')

        #client.set_missing_host_key_policy(paramiko.WarningPolicy())

        ###允许连接不在know_hosts文件中的主机###

        client.set_missing_host_key_policy(paramiko.AutoAddPolicy())

        print('***...Connecting...***')

        ###定义client.connect(),参数为bind_host表中的主机IP,端口,用户名和密码(如果使用key,则为key的创建密码)###

        client.connect(bind_host_obj.host.ip_addr,

                       bind_host_obj.host.port,

                       bind_host_obj.remoteuser.username,

                       bind_host_obj.remoteuser.password,

                       #pkey=private_key,

                       timeout=30)

        ###定义cmd_caches变量为空列表###

        cmd_caches = []

        ###调用client的invoke_shell,指定终端的宽度和高度###

        chan = client.invoke_shell(term='vt100', width=149, height=39, width_pixels=0, height_pixels=0, environment=None)

        ###cmd_caches列表追加AuditLog的记录###

        cmd_caches.append(models.AuditLog(user_id=user_obj.id,

                                          bind_host_id=bind_host_obj.id,

                                          action_type='login',

                                          date=datetime.datetime.now()

                                          ))

        ###调用log_recording函数进行日志记录###

        log_recording(user_obj,bind_host_obj,cmd_caches)

        ###调用interactive里的interacitive_shell###

        interactive.interactive_shell(chan,user_obj,bind_host_obj,cmd_caches,log_recording)

        ###关闭chan和client###

        chan.close()

        client.close()

    ###异常处理###

    except Exception as e:

        print('*** Caught exception: %s: %s' % (e.__class__, e))

        #traceback.print_exc()

        try:

            client.close()

        except:

            pass

        sys.exit(1)
ssh_login.py
10、modules目录下的interactive.py代码:
#_*_coding:utf-8_*_

# Copyright (C) 2003-2007  Robey Pointer <robeypointer@gmail.com>

#

# This file is part of paramiko.

#

# Paramiko is free software; you can redistribute it and/or modify it under the

# terms of the GNU Lesser General Public License as published by the Free

# Software Foundation; either version 2.1 of the License, or (at your option)

# any later version.

#

# Paramiko is distributed in the hope that it will be useful, but WITHOUT ANY

# WARRANTY; without even the implied warranty of MERCHANTABILITY or FITNESS FOR

# A PARTICULAR PURPOSE.  See the GNU Lesser General Public License for more

# details.

#

# You should have received a copy of the GNU Lesser General Public License

# along with Paramiko; if not, write to the Free Software Foundation, Inc.,

# 59 Temple Place, Suite 330, Boston, MA  02111-1307  USA.

import socket

import os,sys

from paramiko.py3compat import u

from  modules import models

import datetime

import select

import fcntl,signal,struct

# windows does not have termios...

try:

    import termios

    import tty

    has_termios = True

except ImportError:

    has_termios = False

now_channel = None

###终端大小适应。paramiko.channel会创建一个pty(伪终端),有个默认的大小(width=80, height=24),所以登录过去会发现能显示的区域很小,并且是固定的。编辑vim的时候尤其痛苦。channel中有resize_pty方法,但是需要获取到当前终端的大小。经查找,当终端窗口发生变化时,系统会给前台进程组发送SIGWINCH信号,也就是当进程收到该信号时,获取一下当前size,然后再同步到pty中,那pty中的进程等于也感受到了窗口变化,也会收到SIGWINCH信号。###

def ioctl_GWINSZ(fd):

    try:

        cr = struct.unpack('hh', fcntl.ioctl(fd, termios.TIOCGWINSZ,'aaaa'))

    except:

        return

    return cr

def getTerminalSize():

    cr = ioctl_GWINSZ(0) or ioctl_GWINSZ(1) or ioctl_GWINSZ(2)

    return int(cr[1]), int(cr[0])

def resize_pty(signum=0, frame=0):

    width, height = getTerminalSize()

    if now_channel is not None:

        now_channel.resize_pty(width=width, height=height)

###定义交互shell函数,如果是linux,则执行posix_shell;否则执行windows_shell函数###

def interactive_shell(chan,user_obj,bind_host_obj,cmd_caches,log_recording):

    if has_termios:

        posix_shell(chan,user_obj,bind_host_obj,cmd_caches,log_recording)

    else:

        windows_shell(chan)

###定义posix_shell(chan,user_obj,bind_host_obj,cmd_caches,log_recording)函数,进行输入输出操作交互###

def posix_shell(chan,user_obj,bind_host_obj,cmd_caches,log_recording):

    '''

    调用termios和pty进行输入、输出操作交互

    :param chan : invoke_shell的实例obj

    :param user_obj : 当前登录的用户实例obj

    :param: bind_host_obj : 当前登录的主机实例obj

    :cmd_caches : 命令列表

    :param: log_recording : 审计命令函数名

    :return: 无返回值

    '''

    ###定义全局变量now_channel,并将chan赋值###

    global now_channel

    now_channel = chan

    ###执行pty,对宽度和高度进行调整###

    resize_pty()

    ###当终端窗口发生变化时,系统会给前台进程组发送SIGWINCH信号###

    signal.signal(signal.SIGWINCH, resize_pty)

    ###将输入缓冲区置为0###

    stdin = os.fdopen(sys.stdin.fileno(), 'rb', 0)

    ###定义新的文件描述符,为数字ID###

    fd = stdin.fileno()

    oldtty = termios.tcgetattr(fd)

    newtty = termios.tcgetattr(fd)

    newtty[3] = newtty[3] | termios.ICANON

    try:

    ### 为tty设置新属性

    ### 默认当前tty设备属性:

    ### 输入一行回车,执行

    ### CTRL+C 进程退出,遇到特殊字符,特殊处理。

    ### 这是为原始模式,不认识所有特殊符号

    ### 放置特殊字符应用在当前终端,如此设置,将所有的用户输入均发送到远程服务器

        #termios.tcsetattr(fd, termios.TCSANOW, newtty)

        tty.setraw(fd)

        tty.setcbreak(fd)

        chan.settimeout(0.0)

        cmd = ''

        tab_key = False

        while True:

        ### 监视用户输入和服务器返回数据,阻塞,直到句柄可读

        ### sys.stdin 处理用户输入

        ### chan 是之前创建的通道,用于接收服务器返回信息

        ### select模块是IO多路复用模块,功能强大,无处不在,你值得学习和记忆!

            try:

                r, w, e = select.select([chan,stdin], [], [])

            except:

                ### 解决SIGWINCH信号将休眠的select系统调用唤醒引发的系统中断,忽略中断重新调用解决。

                continue

            if chan in r:

                try:

                    x = chan.recv(1024).decode('utf-8',errors='ignore')

                    #x = u(chan.recv(1024))

                    ###在获取到输入为\t时,如能正常补齐并显示的唯一字符串即赋值给x(例:/etc/iss然后tab,可以补齐为issue,则x的值为ue);

                    ###如补齐无值或有多个值时,x的值为二进制的'\x07';

                    ###如多次按tab键时,x的值会为'\r\n'

                    if tab_key:

                        if x not in ('\x07','\r\n'):

                            cmd += x

                        tab_key = False

                    if len(x) == 0:

                        sys.stdout.write('\r\n*** EOF\r\n')

                        break

                    sys.stdout.write(x)

                    sys.stdout.flush()

                except socket.timeout:

                    pass

            if stdin in r:

                ###因为打开的fd是二进制,所以输入的字符需要转换为unicode, 因汉字占3个字节,故一次接收值为3###

                #x = stdin.read(1).decode('utf-8',errors='ignore')

                x = u(stdin.read(3))

                if len(x) == 0:

                    break

                if x == '\t':

                    tab_key = True

                ###如果输入字符为退格键,则命令cmd重新赋值###

                elif x == '\x08':

                    cmd = cmd[0:-1]

                elif x != '\r':

                    cmd += x

                else:

                    ###如果命令不为空或者并非以上下左右键或退格键开头的输入,则导入到数据库中###

                    if len(cmd) >= 1 and not cmd.startswith(('\x07','\x08','\x1b[A','\x1b[B','\x1b[C','\x1b[D')):

                        log_item = models.AuditLog(user_id=user_obj.id,

                                              bind_host_id=bind_host_obj.id,

                                              action_type='cmd',

                                              cmd=cmd,

                                              date=datetime.datetime.now()

                                              )

                        cmd_caches.append(log_item)

                    cmd = ''

                    ###如果命令列表超过1,则调用日记审计函数###

                    if len(cmd_caches)>=1:

                        log_recording(user_obj,bind_host_obj,cmd_caches)

                        cmd_caches = []

                chan.send(x)

    finally:

        ###将标准输入重新定为正常的模式###

        termios.tcsetattr(sys.stdin, termios.TCSADRAIN, oldtty)

###windows交互模式,目前此功能没有使用到###

def windows_shell(chan):

    import threading

    sys.stdout.write("Line-buffered terminal emulation. Press F6 or ^Z to send EOF.\r\n\r\n")

    def writeall(sock):

        while True:

            data = sock.recv(256)

            if not data:

                sys.stdout.write('\r\n*** EOF ***\r\n\r\n')

                sys.stdout.flush()

                break

            sys.stdout.write(data)

            sys.stdout.flush()

    writer = threading.Thread(target=writeall, args=(chan,))

    writer.start()

    try:

        while True:

            d = sys.stdin.read(1)

            if not d:

                break

            chan.send(d)

    except EOFError:

        # user hit ^Z or F6

        pass
interactive.py
11、modules目录下的ssh_cmd.py代码:
定义ssh的批量命令执行函数
#_*_coding:utf-8_*_

__author__ = 'Kevin Wang'

import os,sys

#BASE_DIR = os.path.dirname(os.path.dirname(os.path.abspath(__file__)))

#sys.path.append(BASE_DIR)

import traceback

import paramiko

###定义ssh_cmd(bind_host_obj,cmd)函数###

def ssh_cmd(bind_host_obj,cmd):

    '''

    now, connect and use paramiko Client to negotiate SSH2 across the connection

    :param: bind_host_obj : 当前登录的主机实例obj

    :param: cmd : 需要执行的命令

    '''

    try:

        #default_path = os.path.join(os.environ['HOME'], '.ssh', 'id_rsa')

        #private_key = paramiko.RSAKey.from_private_key_file(default_path)

        client = paramiko.SSHClient()

        #client.load_system_host_keys()

        #client.set_missing_host_key_policy(paramiko.WarningPolicy())

        ###允许连接不在know_hosts文件中的主机###

        client.set_missing_host_key_policy(paramiko.AutoAddPolicy())

        ###定义client.connect(),参数为bind_host表中的主机IP,端口,用户名和密码(如果使用key,则为key的创建密码)###

        client.connect(bind_host_obj.host.ip_addr,

                       bind_host_obj.host.port,

                       bind_host_obj.remoteuser.username,

                       bind_host_obj.remoteuser.password,

                       #pkey=private_key,

                       timeout=30)

        ###调用stdin, stdout, stderr = client.exec_command(cmd) ,并返回命令结果###

        stdin, stdout, stderr = client.exec_command(cmd)  # 执行命令,不可执行类似vim,top watch命令

        result = stdout.read().decode()

        print("=================================================================================")

        print("\033[32;1m%s(%s)【%s】 result is : \033[0m" % (bind_host_obj.host.hostname,bind_host_obj.host.ip_addr,cmd))

        print(result,stderr.read().decode())

        client.close()

    ###错误异常处理###

    except Exception as e:

        print('*** Caught exception: %s: %s' % (e.__class__, e))

        traceback.print_exc()

        try:

            client.close()

        except:

            pass

        sys.exit(1)
ssh_cmd.py
12、modules目录下的ssh_sftp.py代码:
定义ssh的ftp上传下载文件函数
#_*_coding:utf-8_*_

__author__ = 'Kevin Wang'

import os,sys,subprocess

#BASE_DIR = os.path.dirname(os.path.dirname(os.path.abspath(__file__)))

#sys.path.append(BASE_DIR)

import traceback

import paramiko

from conf import settings

from modules import utils

from stat import ST_MODE, S_ISREG, S_ISDIR, S_ISLNK

from progressbar import ETA,FileTransferSpeed,Percentage,ProgressBar,Bar

#def example(file_size):

#    class CrazyFileTransferSpeed(FileTransferSpeed):

#        """It's bigger between 45 and 80 percent."""

#        def update(self, pbar):

#            if 45 < pbar.percentage() < 80:

#                return 'Bigger Now ' + FileTransferSpeed.update(self,pbar)

#            else:

#                return FileTransferSpeed.update(self,pbar)

#

#    #widgets = [CrazyFileTransferSpeed(),' <<<', Bar(), '>>> ', Percentage(),' ', ETA()]

#    widgets = [Percentage(),' <<<', Bar(), '>>> ', ' ',ETA(),CrazyFileTransferSpeed()]

#    pbar = ProgressBar(widgets=widgets, maxval=file_size)

#    # maybe do something

#    pbar.start()

#    new_size = int(file_size / 5)

#    for i in range(new_size):

#        pbar.update(5*i+1)

#    pbar.finish()

###定义SSH下的FTP类,进行文件传输###

class ssh_sftp(object):

    '''

    定义SSH下的FTP类,进行文件传输

    '''

    def __init__(self, host_obj,timeout=30):

        self.host_obj = host_obj

        self.timeout = timeout

        ###定义ssh密钥路径及文件###

        self.__path = os.path.join(os.environ['HOME'], '.ssh', 'id_rsa')

        self.__private_key = paramiko.RSAKey.from_private_key_file(self.__path,password='hkfdt.com')

    ###显示文件传输帮助信息函数###

    def help(self):

        print(settings.SSH_SFTP_HELPINFO,end='')

    ###get下载单个文件函数###

    def sftp_get(self, remotefile, localfile):

        ###调用paramiko.SFTPClient###

        t = paramiko.Transport(sock=(self.host_obj.host.ip_addr,self.host_obj.host.port))

        t.connect(username=self.host_obj.remoteuser.username,pkey=self.__private_key)

        sftp = paramiko.SFTPClient.from_transport(t)

        ###下载远端文件到本地目录###

        print("filename  is %s, the file transferring is starting ..." % remotefile)

        sftp.get(remotefile, localfile)

        print("file transferring is end ...")

        t.close()

    ###put上传单个文件函数###

    def sftp_put(self,localfile,remotefile):

        t = paramiko.Transport(sock=(self.host_obj.host.ip_addr,self.host_obj.host.port))

        t.connect(username=self.host_obj.remoteuser.username,pkey=self.__private_key)

        sftp = paramiko.SFTPClient.from_transport(t)

        ###上传本地文件到远端主机目录###

        print("filename  is %s, the file transferring is starting ..." % localfile)

        sftp.put(localfile, remotefile)

        print("file transferring is end ...")

        t.close()

    ###获取远端linux主机上指定目录及其子目录下的所有文件###

    def get_all_files_in_remote_dir(self,remote_dir):

        t = paramiko.Transport(sock=(self.host_obj.host.ip_addr,self.host_obj.host.port))

        t.connect(username=self.host_obj.remoteuser.username,pkey=self.__private_key)

        sftp = paramiko.SFTPClient.from_transport(t)

        ###保存所有文件的列表###

        all_files = list()

        ###去掉路径字符串最后的字符'/',如果有的话###

        if remote_dir[-1] == '/':

            remote_dir = remote_dir[0:-1]

        ###获取当前指定目录下的所有目录及文件,包含属性值###

        files = sftp.listdir_attr(remote_dir)

        for x in files:

            ###remote_dir目录中每一个文件或目录的完整路径###

            print(x)

            filename = remote_dir + '/' + x.filename

            ###如果是目录,则递归处理该目录,这里用到了stat库中的S_ISDIR方法,与linux中的宏的名字完全一致###

            #if S_ISDIR(x.st_mode):

            #    all_files.extend(self.get_all_files_in_remote_dir(filename))

            #else:

            #    all_files.append(filename)

            all_files.append(filename)

        return all_files

        t.close()

    ###下载远端主机指定目录到本地目录###

    def sftp_get_dir(self, remote_dir, local_dir):

        t = paramiko.Transport(sock=(self.host_obj.host.ip_addr,self.host_obj.host.port))

        t.connect(username=self.host_obj.remoteuser.username,pkey=self.__private_key)

        sftp = paramiko.SFTPClient.from_transport(t)

        ###获取远端linux主机上指定目录及其子目录下的所有文件###

        all_files = self.get_all_files_in_remote_dir(remote_dir)

        ###依次get每一个文件###

        print("the dir is %s, the dir transferring is starting ..." % remote_dir)

        for x in all_files:

            filename = x.split('/')[-1]

            local_filename = os.path.join(local_dir, filename)

            print('Get文件%s传输中...' % filename)

            sftp.get(x, local_filename)

        print("the dir transferring is end ...")

        t.close()

    ###获取本地指定目录及其子目录下的所有文件###

    def get_all_files_in_local_dir(self, local_dir):

        ###保存所有文件的列表###

        all_files = list()

        ###输出本地目录文件信息###

        print(subprocess.getoutput("ls -al %s" % local_dir))

        ###获取当前指定目录下的所有目录及文件,包含属性值###

        files = os.listdir(local_dir)

        for x in files:

            ###local_dir目录中每一个文件或目录的完整路径###

            filename = os.path.join(local_dir, x)

            ###如果是目录,则递归处理该目录###

            #if os.path.isdir(x):

            #    all_files.extend(self.get_all_files_in_local_dir(filename))

            #else:

            #    all_files.append(filename)

            all_files.append(filename)

        return all_files

    ###上传本地目录下的文件到远程主机指定目录###

    def sftp_put_dir(self, local_dir, remote_dir):

        t = paramiko.Transport(sock=(self.host_obj.host.ip_addr,self.host_obj.host.port))

        t.connect(username=self.host_obj.remoteuser.username,pkey=self.__private_key)

        sftp = paramiko.SFTPClient.from_transport(t)

        ###去掉路径字符穿最后的字符'/',如果有的话###

        if remote_dir[-1] == '/':

            remote_dir = remote_dir[0:-1]

        ###获取本地指定目录及其子目录下的所有文件###

        all_files = self.get_all_files_in_local_dir(local_dir)

        ###依次put每一个文件###

        print("the dir is %s, the dir transferring is starting ..." % local_dir)

        for x in all_files:

            filename = os.path.split(x)[-1]

            remote_filename = remote_dir + '/' + filename

            print('Put文件%s传输中...' % filename)

            sftp.put(x, remote_filename)

        print("the dir transferring is end ...")

        t.close()
ssh_sftp.py
13、modules目录下的主功能框架程序views.py代码:
主功能程序,实现yaml文件数据插入表;SSH登录,命令执行,SFTP文件上传下载
#!/usr/bin/python3
#_*_coding:utf-8_*_
__author__ = 'Kevin Wang' import os,sys,getpass,time
import termios,tty,threading
from datetime import date, datetime ###导入settings里的变量值###
from conf import settings from modules import common_filters
from modules import ssh_login
from modules import ssh_cmd
from modules import ssh_sftp
from modules import models
from modules import utils
from modules.db_conn import engine,session
from modules.utils import print_err,yaml_parser ##################################################################
###定义自登录函数(获取当前系统用户名自登录)###
def login():
'''
获取当前系统用户名并免密码登录
:return: user_obj : 返回当前登录用户的实例
'''
os.system('clear')
###获取当前系统的用户名###
username = getpass.getuser()
###获取当前用户在数据库表的信息###
user_obj = session.query(models.UserProfile).filter(models.UserProfile.username==username).first()
###判断获取的用户信息实例为假,则调用认证函数进行用户名密码判断###
#if not user_obj:
# user_obj = auth()
###返回用户信息实例###
return user_obj ##################################################################
###定义认证函数(需要输入用户名和密码)###
def auth():
'''
定义认证函数(需要输入用户名和密码)
:return: user_obj : 返回当前登录用户的实例
''' ###定义认证循环3次###
count = 0
while count <3:
print("\033[31;1mwelcome to FDT jumpserver\033[0m")
###输入用户名###
username = input("\033[32;1mUsername:\033[0m").strip()
if len(username) ==0:
continue
###输入密码,使用getpass隐藏###
password = getpass.getpass("\033[32;1mPassword:\033[0m")
if len(password) ==0:
continue
###去数据库表UserProfile进行用户名和密码验证###
#user_obj = session.query(models.UserProfile).filter(models.UserProfile.username==username,models.UserProfile.password==hash_str(password)).first()
user_obj = session.query(models.UserProfile).filter(models.UserProfile.username==username).first()
###验证成功则返回用户信息实例###
if user_obj and user_obj.verify_passwd(password):
return user_obj
else:
print("wrong username or password, you have %s more chances." %(3-count-1))
count +=1
else:
print_err("too many attempts.") ##################################################################
###框架函数,输出登录信息###
def framework(user,group):
'''
输出框架信息
:param: user : 登录用户的实例
:param: group : 当前选择的组名称 ********************************************************************************
* *
* FDT JumpServer *
* *
* user : hkfdt today : 2018-01-27 18:08:16 Saturday *
******************************************************************************** --------------------------------------------------------------------------------
group :
--------------------------------------------------------------------------------
''' ###定义当前时间变量###
today = datetime.now().strftime("%Y-%m-%d %H:%M:%S %A")
###定义用户信息变量和日期信息变量###
user_info = " user : {0}".format(user.username)
date_info = "today : {0} ".format(today)
###定义二变量的长度###
length = len(user_info) + len(date_info) ###计算空格的长度###
fill_char_size = 78 - length if 78 >= length else 0 ###定义输出信息的变量###
MSG = "%s%s%s" % (user_info,' ' * fill_char_size,date_info) ###调用conf/settings模块下的二个变量名并输出###
print(settings.WELCOME_MSG.format(MSG),end='')
print(settings.USER_GROUP_MSG.format(group),end='') ##################################################################
###显示组函数,输出主机组信息###
def show_group(user):
'''
输出组列表信息
:param: user : 登录用户的实例
:return: 当前选择的组列表字典
''' ###定义组列表变更,key为组编号,value为组名称###
glist = {} ###定义组字典(key为组名,value为组实例)和按组名排序的数组###
group_dict = {}
sorted_group_list = [] ###调用conf/settings模块下的组列表变量并输出###
print(settings.GROUP_LIST,end='') ###判断用户是否有绑定的非组主机并格式输出###
if user.bind_hosts:
glist['h'] = 'ungroupped hosts'
print('\033[32;1m{0}{1}{2}\033[0m'.format("h".ljust(10),"ungroupped hosts".ljust(40),str(len(user.bind_hosts)))) ###遍历用户相关联的组列表,并方便排序进行生成字典###
for group_index in user.groups:
group_dict[group_index.name] = group_index ###按照group_dict字典中的key组名称进行排序,并生成新的排序数组###
sorted_group_list = sorted(group_dict.items(),key=lambda g:g[0]) ###对排序后的数组进行遍历,并格式化输出组列表###
for index in range(len(sorted_group_list)):
glist[index] = sorted_group_list[index][1]
print('\033[32;1m{0}{1}{2}\033[0m'.format(str(index).ljust(10),sorted_group_list[index][0].ljust(40),str(len(sorted_group_list[index][1].bind_hosts)))) ###返回组列表字典###
return glist ##################################################################
###显示主机函数,输出主机信息###
def show_host(user_obj,group_name,bind_hosts):
'''
输出主机列表信息
:param : user_obj : 登录用户的实例
:param : group_name : 选择的组名称
:param : bind_hosts : 绑定主机列表,用作按IP排序
'''
os.system('clear') ###在选择组后,刷新输出当前的框架信息###
framework(user_obj,group_name)
print(settings.HOST_LIST,end='') ###定义绑定主机字典,key为绑定主机的实例,value为绑定主机的IP地址###
bind_dict = {} ###遍历绑定主机列表,并生成需要排序的主机字典###
for bind_host in bind_hosts:
bind_dict[bind_host] = bind_host.host.ip_addr ###定义排序的主机数组###
sorted_host_list = [] ###使用sorted函数对字典的key进行排序###
sort_items = sorted(bind_dict.items(),key=lambda d:d[1]) ###对排序后的数组进行遍历,并生成排序后的数组及格式化输出主机列表###
for index in range(len(sort_items)):
bind_host_index = sort_items[index][0]
sorted_host_list.append(bind_host_index)
bind_host_ip = sort_items[index][1]
user_info = "{0}@{1}".format(bind_host_index.remoteuser.username,bind_host_index.host.hostname)
print('\033[32;1m{0}{1}{2}\033[0m'.format(str(index).ljust(10),user_info.ljust(40),bind_host_ip)) ###返回排序后的主机列表字典,值为绑定主机的实例###
return sorted_host_list ##################################################################
###日志记录函数,记录登录用户的操作命令###
def log_recording(user_obj,bind_host_obj,logs):
'''
flush user operations on remote host into DB
:param user_obj:
:param bind_host_obj:
:param logs: list format [logItem1,logItem2,...]
:return:
'''
#print("\033[41;1m--logs:\033[0m",logs) session.add_all(logs)
session.commit() ###调用多线程函数执行命令###
def make_threading(func,tuple_args):
'''
调用多线程函数
:param: func : 多线程要执行的函数名称
:param: tuple_args : 元组,执行操作的远程主机obj信息,操作命令
:return : 无返回值
''' thread = threading.Thread(target=func,args=tuple_args,daemon=True)
thread.start() ###定义文件上传下载的try和except报错函数###
def try_exec(client_mode,first_file,second_file):
'''
定义文件上传下载的try和except报错
:param: client_mode : 文件操作的方式get或put
:param: first_file : 文件操作的源文件
:param: second_file : 文件操作的目的文件
:return : 无返回值
'''
try:
client_mode(first_file,second_file)
input("请输入「enter」继续...").strip()
except PermissionError as e:
utils.print_err("权限不足(%s)" % e)
except FileNotFoundError as e:
utils.print_err("文件不存在(%s)" % e)
except OSError as e:
utils.print_err("无法传输目录(%s)" % e)
except Exception as e:
utils.print_err("异常,请重新输入(%s)" % e) ###调用文件传输函数###
def ssh_transport(host_obj):
'''
文件传输执行
:param: host_obj : 文件传输的主机
:return : 无返回值
''' ###初始化文件的列表,名称###
local_list = ()
remote_list = ()
local_file = ''
local_dir = ''
remote_file = ''
remote_dir = ''
put_filename = ''
get_filename = '' ###调用ssh_sftp模块的函数,并获取返回值###
client = ssh_sftp.ssh_sftp(host_obj)
while True:
###输出文件上传下载帮助信息###
client.help() ###获取输入的命令,命令一般分2-3块,例:ldir /tmp或put a.txt /tmp###
sftp_cmd = input("\033[36;1m请输入文件传输的命令:\033[0m").strip()
args = sftp_cmd.split() ###输入Q,则退出本次循环;如果参数个数小于2,则重新输入###
if sftp_cmd == 'q' or sftp_cmd == 'Q':
break
elif len(args) < 2:
print("输入有误,请重新输入!")
continue
else:
###操作模式为ldir,查看本地目录信息###
if args[0] == 'ldir':
if os.path.isdir(args[1]): ###调用类中函数列出本地目录信息###
client.get_all_files_in_local_dir(args[1])
else:
utils.print_err("本地目录不存在,请重新输入")
###操作模式为rdir,查看远端目录信息###
elif args[0] == 'rdir':
try:
###调用类中函数列出远端目录信息###
client.get_all_files_in_remote_dir(args[1])
except:
utils.print_err("远端目录不存在,请重新输入")
###操作模式为put,并且参数个数大于3,则进行文件上传操作###
elif args[0] == 'put' and len(args) >= 3:
local_file = args[1] ###判断要上传的文件是否存在###
if os.path.isfile(local_file):
put_filename=args[1].split('/')[-1]
remote_dir = args[2]
if remote_dir.endswith('/'):
remote_file = remote_dir + put_filename
else:
remote_file = remote_dir + '/' + put_filename ###调用try_exec函数进行文件操作,并进行错误信息提示###
try_exec(client.sftp_put,local_file,remote_file) ###多线程操作文件上传###
#make_threading(client.sftp_put,(local_file,remote_file))
#while threading.active_count() != 1:
# #print(threading.active_count(),end='')
# print("#",end='')
# time.sleep(0.1)
#else:
# input("请输入「enter」继续...").strip()
elif os.path.isdir(local_file):
utils.print_err("无法传输目录,请重新输入")
else:
utils.print_err("本地文件不存在,请重新输入")
###操作模式为get,并且参数个数大于3,则进行文件下载操作###
elif args[0] == 'get' and len(args) >= 3:
remote_file = args[1]
get_filename = args[1].split('/')[-1]
local_dir = args[2]
###判断要下载到本地的目录是否存在###
if os.path.isdir(local_dir):
if local_dir.endswith('/'):
local_file = local_dir + get_filename
else:
local_file = local_dir + '/' + get_filename ###调用try_exec函数进行文件操作,并进行错误信息提示###
try_exec(client.sftp_get,remote_file,local_file)
else:
utils.print_err("本地目录不存在,请重新输入") ###多线程操作文件下载###
#make_threading(client.sftp_get,(remote_file,local_file))
#while threading.active_count() != 1:
# #print(threading.active_count(),end='')
# print("#",end='')
# time.sleep(0.1)
#else:
# input("请输入「enter」继续...").strip()
else:
print("输入格式有误,请重新输入!") ##################################################################
###启动会话函数###
def start_session(argvs):
'''
程序运行主函数,启动自登录会话
:param: argvs : 暂未使用
''' ###调用登录及认证函数,获取用户信息实例###
user = login()
if user: ###用户认证后进入第一轮显示组列表循环###
exit_flag = False
while not exit_flag:
os.system('clear') ###第一次显示框架,组信息定义为空###
group_name = ''
framework(user,group_name) ###调用显示组列表函数,并返回选择的组编号###
group_list = show_group(user)
if 'h' in group_list.keys():
group_len = len(group_list) - 2
else:
group_len = len(group_list) - 1 print("================================================================================")
###输出要选择的组编号信息,如果为q,则退出程序###
group_choice = input("[(q)退出,(h,0-%d)选择组]: " % group_len).strip() ###如果组编号为空就重新循环,否则定义主机列表实例###
if not group_choice: continue
if group_choice == 'q':
sys.exit(0)
elif group_choice == 'h':
###如果输入h,即定义组名为ungroupped hosts,绑定主机列表实例###
group_name = group_list[group_choice]
bind_hosts_obj = user.bind_hosts
elif group_choice.isdigit() and int(group_choice) in group_list.keys():
###对组ID进行int,并定义组名和绑定主机列表实例###
group_choice = int(group_choice)
group_name = group_list[group_choice].name
bind_hosts_obj = group_list[group_choice].bind_hosts
else:
continue ###进行主机选择,进入第二轮循环###
while not exit_flag: ###格式化输出主机列表,并获取排序后的主机列表###
sorted_hosts_obj = show_host(user,group_name,bind_hosts_obj)
sorted_hosts_len = len(sorted_hosts_obj) - 1
print("=================================================================================")
#host_choice = input("[(b)back,(q)quit, select host to login]:").strip()
#print("the choice is %s" % host_choice)
try:
host_choice = input("[(b)返回,(q)退出,(e)批量执行命令,[0-%d]选择主机]:" % sorted_hosts_len).strip()
except OSError:
os.system('clear')
sys.exit(0)
###输入字符为空,则重新输入;输入为b,则返回上层重新选择组;输入q,则退出程序;输入正确编号,则执行ssh登录###
if len(host_choice)==0:
continue
if host_choice == 'b':
break
elif host_choice == 'q':
exit_flag=True
elif host_choice == 'e':
exec_cmd = input("请输入批量命令:").strip()
i = 0
while i < len(sorted_hosts_obj):
make_threading(ssh_cmd.ssh_cmd,(sorted_hosts_obj[i],exec_cmd))
i += 1
while threading.active_count() != 1:
time.sleep(0.1)
else:
input("请输入「enter」继续...").strip()
if host_choice.isdigit():
host_choice = int(host_choice)
if host_choice < len(sorted_hosts_obj) :
exec_choice = input("\033[36;1m(t)传输文件,其他输入登录系统:\033[0m").strip()
if exec_choice == "t":
ssh_transport(sorted_hosts_obj[host_choice])
else:
###调用ssh登录指定主机,退出SSH远程主机后,重新第二轮循环,进行重新选择主机###
os.system('clear')
ssh_login.ssh_login(user,
sorted_hosts_obj[host_choice],
session,
log_recording) ##################################################################
###创建关闭会话函数### def stop_server(argvs):
pass ##################################################################
###创建本地登录用户函数###
def create_users(argvs):
'''
创建本地登录用户,并将用户信息插入到数据库表user_profile中
:param: argvs : 指定本地登录用户的配置文件
:return: 无返回值
'''
if '-f' in argvs:
user_file = argvs[argvs.index("-f") +1 ]
else:
print_err("invalid usage, should be:\ncreateusers -f <the new users file>",quit=True) ###读取yaml格式的本地用户配置文件,例:conf/new_user.yml###
source = yaml_parser(user_file)
if source:
for key,val in source.items():
#obj = models.UserProfile(username=key,password=hash_str(val.get('password')))
obj = models.UserProfile(username=key,passwd=val.get('password')) ###如果配置文件中有groups信息,则判断group是否存在###
if val.get('groups'):
groups = common_filters.groups_filter(val)
###绑定主机组存在,则赋值,并将相关数据插入到group_2_userprofile表中###
obj.groups = groups
###如果配置文件中有bind_hosts信息,则判断绑定主机是否存在###
if val.get('bind_hosts'):
bind_hosts = common_filters.bind_hosts_filter(val)
###绑定主机存在,则赋值,并将相关数据插入到bindhost_2_userprofile表中###
obj.bind_hosts = bind_hosts
#print(obj)
session.add(obj)
session.commit() ##################################################################
###创建主机组函数###
def create_groups(argvs):
'''
创建主机组,将组信息插入到数据库表group中
:param: argvs : 指定主机组的配置文件
:return: 无返回值
'''
if '-f' in argvs:
group_file = argvs[argvs.index("-f") +1 ]
else:
print_err("invalid usage, should be:\ncreategroups -f <the new groups file>",quit=True) ###读取yaml格式的主机组配置文件,例:conf/new_groups.yml###
source = yaml_parser(group_file)
if source:
for key,val in source.items():
print(key,val)
obj = models.Group(name=key)
###如果配置文件中有bind_hosts信息,则判断绑定主机是否存在###
if val.get('bind_hosts'):
bind_hosts = common_filters.bind_hosts_filter(val)
###绑定主机存在,则赋值,并将相关数据插入到bindhost_2_group表中###
obj.bind_hosts = bind_hosts ###如果配置文件中有登录用户信息,则判断该用户是否存在###
if val.get('user_profiles'):
user_profiles = common_filters.user_profiles_filter(val)
###登录用户存在,则赋值,并将相关数据插入到group_2_userprofile表中###
obj.user_profiles = user_profiles
session.add(obj)
session.commit() ##################################################################
###创建远程主机函数###
def create_hosts(argvs):
'''
创建远程主机,将主机信息插入到数据库表host中
:param: argvs : 指定远程主机的配置文件
:return: 无返回值
'''
if '-f' in argvs:
hosts_file = argvs[argvs.index("-f") +1 ]
else:
print_err("invalid usage, should be:\ncreate_hosts -f <the new hosts file>",quit=True) ###读取yaml格式的远程主机配置文件,例:conf/new_hosts.yml###
source = yaml_parser(hosts_file)
if source:
for key,val in source.items():
print(key,val)
obj = models.Host(hostname=key,ip_addr=val.get('ip_addr'), port=val.get('port') or 22)
session.add(obj)
:
if source:
for key,val in source.items():
print(key,val)
obj = models.Group(name=key)
###如果配置文件中有bind_hosts信息,则判断绑定主机是否存在###
if val.get('bind_hosts'):
bind_hosts = common_filters.bind_hosts_filter(val)
###绑定主机存在,则赋值,并将相关数据插入到bindhost_2_group表中###
obj.bind_hosts = bind_hosts ###如果配置文件中有登录用户信息,则判断该用户是否存在###
if val.get('user_profiles'):
user_profiles = common_filters.user_profiles_filter(val)
###登录用户存在,则赋值,并将相关数据插入到group_2_userprofile表中###
obj.user_profiles = user_profiles
session.add(obj)
session.commit() ##################################################################
###创建远程主机函数###
def create_hosts(argvs):
'''
创建远程主机,将主机信息插入到数据库表host中
:param: argvs : 指定远程主机的配置文件
:return: 无返回值
'''
if '-f' in argvs:
hosts_file = argvs[argvs.index("-f") +1 ]
else:
print_err("invalid usage, should be:\ncreate_hosts -f <the new hosts file>",quit=True) ###读取yaml格式的远程主机配置文件,例:conf/new_hosts.yml###
source = yaml_parser(hosts_file)
if source:
for key,val in source.items():
print(key,val)
obj = models.Host(hostname=key,ip_addr=val.get('ip_addr'), port=val.get('port') or 22)
session.add(obj)
:
if source:
for key,val in source.items():
print(key,val)
obj = models.Group(name=key)
###如果配置文件中有bind_hosts信息,则判断绑定主机是否存在###
if val.get('bind_hosts'):
bind_hosts = common_filters.bind_hosts_filter(val)
###绑定主机存在,则赋值,并将相关数据插入到bindhost_2_group表中###
obj.bind_hosts = bind_hosts ###如果配置文件中有登录用户信息,则判断该用户是否存在###
if val.get('user_profiles'):
user_profiles = common_filters.user_profiles_filter(val)
###登录用户存在,则赋值,并将相关数据插入到group_2_userprofile表中###
obj.user_profiles = user_profiles
session.add(obj)
session.commit() ##################################################################
###创建远程主机函数###
def create_hosts(argvs):
'''
创建远程主机,将主机信息插入到数据库表host中
:param: argvs : 指定远程主机的配置文件
:return: 无返回值
'''
if '-f' in argvs:
hosts_file = argvs[argvs.index("-f") +1 ]
else:
print_err("invalid usage, should be:\ncreate_hosts -f <the new hosts file>",quit=True) ###读取yaml格式的远程主机配置文件,例:conf/new_hosts.yml###
source = yaml_parser(hosts_file)
if source:
for key,val in source.items():
print(key,val)
obj = models.Host(hostname=key,ip_addr=val.get('ip_addr'), port=val.get('port') or 22)
session.add(obj)
session.commit() ##################################################################
###创建远程主机的登录信息函数###
def create_remoteusers(argvs):
'''
创建远程主机的登录信息
:param: argvs : 指定远程用户帐号信息的配置文件
:return: 无返回值
'''
if '-f' in argvs:
remoteusers_file = argvs[argvs.index("-f") +1 ]
else:
print_err("invalid usage, should be:\ncreate_remoteusers -f <the new remoteusers file>",quit=True) ###读取yaml格式的远程主机帐号信息配置文件,例:conf/new_remoteusers.yml###
source = yaml_parser(remoteusers_file)
if source:
for key,val in source.items():
print(key,val)
obj = models.RemoteUser(username=val.get('username'),auth_type=val.get('auth_type'),password=val.get('password'))
session.add(obj)
session.commit() ##################################################################
###创建绑定主机函数###
def create_bindhosts(argvs):
'''
创建远程绑定主机,并将相关联的主机组和用户数据插入到相关联表中
:param: argvs : 指定远程绑定主机的配置文件
:return: 无返回值
'''
if '-f' in argvs:
bindhosts_file = argvs[argvs.index("-f") +1 ]
else:
print_err("invalid usage, should be:\ncreate_hosts -f <the new bindhosts file>",quit=True) ###读取yaml格式的远程绑定主机配置文件,例:conf/new_bindhosts.yml###
source = yaml_parser(bindhosts_file)
if source:
for key,val in source.items():
###根据配置文件中的主机名,并判断主机表host是否有此记录###
host_obj = session.query(models.Host).filter(models.Host.hostname==val.get('hostname')).first() ###assert断言是声明其布尔值必须为真的判定,如果发生异常就说明表达示为假###
assert host_obj
for item in val['remote_users']:
#print(item)
assert item.get('auth_type')
###根据ssh的认证方式,来验证配置文件中的remoteuser信息是否正确###
if item.get('auth_type') == 'ssh-passwd':
remoteuser_obj = session.query(models.RemoteUser).filter(
models.RemoteUser.username==item.get('username'),
models.RemoteUser.password==item.get('password')
).first()
else:
remoteuser_obj = session.query(models.RemoteUser).filter(
models.RemoteUser.username==item.get('username'),
models.RemoteUser.auth_type==item.get('auth_type'),
).first()
if not remoteuser_obj:
print_err("RemoteUser obj %s does not exist." % item,quit=True )
print(host_obj.id,remoteuser_obj.id) ###根据获取到的主机ID和远程用户ID,插入数据到表bind_host###
bindhost_obj = models.BindHost(host_id=host_obj.id,remoteuser_id=remoteuser_obj.id)
session.add(bindhost_obj) ###如果配置文件中有groups信息,则判断group是否存在###
if source[key].get('groups'):
group_objs = session.query(models.Group).filter(models.Group.name.in_(source[key].get('groups'))).all()
assert group_objs
print('groups:', group_objs)
###group存在,则赋值,并将相关数据插入到bindhost_2_group表中###
bindhost_obj.groups = group_objs
###如果配置文件中有登录用户信息,则判断该用户是否存在###
if source[key].get('user_profiles'):
userprofile_objs = session.query(models.UserProfile).filter(models.UserProfile.username.in_(source[key].get('user_profiles'))).all()
assert userprofile_objs
print("userprofiles:",userprofile_objs)
###登录用户存在,则赋值,并将相关数据插入到bindhost_2_userprofile表中###
bindhost_obj.user_profiles = userprofile_objs
session.commit() ##################################################################
###创建所有表结构函数###
def syncdb(argvs):
'''
创建所有表结构
:param: argvs : 未使用
:return: 无返回值
'''
print("Syncing DB....")
models.Base.metadata.create_all(engine)
views.py
14、share目录下的yaml格式文件:
<1> . host.yml:
HOST1:
ip_addr: 192.168.4.135
port: 22
<2> . user_profile.yml:
wang_kai:
password: xxxxxx
<3> . group.yml:
GROUP1:
user_profiles:
- wang_kai
<4> . remoteuser.yml:
key_ubuntu:
auth_type: ssh-key
username: ubuntu
password: 123456
passwd_ubuntu:
auth_type: ssh-passwd
username: ubuntu
password: 123456
<5> . bindhost.yml:
bind1:
hostname: HOST1
remote_users:
- user1:
username: ubuntu
auth_type: ssh-key
password: 123456
groups:
- GROUP1
python之堡垒机(第九天)的更多相关文章
- 基于python的堡垒机
一 堡垒机的架构 堡垒机的核心架构通常如下图所示: 二.堡垒机的一般执行流程 管理员为用户在服务器上创建账号(将公钥放置服务器,或者使用用户名密码) 用户登陆堡垒机,输入堡垒机用户名密码,显示当前用户 ...
- python作业堡垒机(第十三周)
作业需求: 1. 所有的用户操作日志要保留在数据库中 2. 每个用户登录堡垒机后,只需要选择具体要访问的设置,就连接上了,不需要再输入目标机器的访问密码 3. 允许用户对不同的目标设备有不同的访问权限 ...
- Python之堡垒机
本节内容 项目实战:运维堡垒机开发 前景介绍 到目前为止,很多公司对堡垒机依然不太感冒,其实是没有充分认识到堡垒机在IT管理中的重要作用的,很多人觉得,堡垒机就是跳板机,其实这个认识是不全面的,跳板功 ...
- (转)用Python写堡垒机项目
原文:https://blog.csdn.net/ywq935/article/details/78816860 前言 堡垒机是一种运维安全审计系统.主要的功能是对运维人员的运维操作进行审计和权限控制 ...
- python 有关堡垒机的那些事
堡垒机为了保证系统或服务器的安全性,防止运维和开发人员胡乱操作服务器,导致不必要的损失,使用堡垒机来完成对运维和开发人员的授权.用户统一登录堡垒机账号来操作系统或服务器.堡垒机等于成了生产系统的SSO ...
- Python开发【第九章】:堡垒机实例
一.堡垒机前戏 开发堡垒机之前,先来学习Python的paramiko模块,该模块基于SSH用于连接远程服务器并执行相关操作 模块安装 C:\Program Files\Python 3.5\Scri ...
- Python之路【第九篇】堡垒机基础&数据库操作
复习paramiko模块 Python的paramiko模块,是基于SSH用于连接远程服务器并执行相关操作. SSHClient #!/usr/bin/env python #-*- coding:u ...
- Python之路第一课Day9--随堂笔记之一(堡垒机实例以及数据库操作)未完待续....
一.堡垒机前戏 开发堡垒机之前,先来学习Python的paramiko模块,该模块机遇SSH用于连接远程服务器并执行相关操作 SSHClient 用于连接远程服务器并执行基本命令 基于用户名密码连接: ...
- Python之路:堡垒机实例
堡垒机前戏 开发堡垒机之前,先来学习Python的paramiko模块,该模块机遇SSH用于连接远程服务器并执行相关操作 SSHClient 用于连接远程服务器并执行基本命令 基于用户名密码连接: 1 ...
随机推荐
- ZAB协议与Paxos算法
ZooKeeper并没有直接采用Paxos算法,而是采用一种被称为ZAB(ZooKeeper Atomic Broadcast)的一致性协议 ZooKeeper是一个典型的分布式数据一致性的解决方案, ...
- 关于在虚拟机上安装ubuntu输入不了中文的问题
打开终端后,无法输入中文,按照网络上的教程 1.安装语言包 System Settings–>Language Support–>Install/Remove Languages 选中ch ...
- Manacher算法学习笔记 | LeetCode#5
Manacher算法学习笔记 DECLARATION 引用来源:https://www.cnblogs.com/grandyang/p/4475985.html CONTENT 用途:寻找一个字符串的 ...
- TextInputLayout 用法
<?xml version="1.0" encoding="utf-8"?> <LinearLayout xmlns:android=&quo ...
- php正则表达式 剔除字符串中 ,除了汉字的字符(只保留汉字) php 正则 只保留汉字,剔除所有符号
<?php //提取字符串中的汉字其余信息剔除 $str='f龙,真 .,.,.?!::·…~&@#,.?!:;.……-&@#“”‘’〝 "〞'´'>< ...
- 解决Tomcatt下连接数据库的classNoFount问题
在数据库连接单独使用的时候.即作为一个独立类建立在mian方法中,可以正确的使用.例:连接MySql数据库 import java.sql.*; public class SQLtest { // J ...
- Ehcache 3.7文档—基础篇—GettingStarted
为了使用Ehcache,你需要配置CacheManager和Cache,有两种方式可以配置java编程配置或者XML文件配置 一. 通过java编程配置 CacheManager cacheManag ...
- task CancellationTokenSource
使用CancellationTokenSource对象需要与Task对象进行配合使用,Task会对当前运行的状态进行控制(这个不用我们关心是如何控制的).而CancellationTokenSourc ...
- Netty入门(一):零基础“HelloWorld”详细图文步骤
因为接下来的项目要用到netty,所以就了解一下这个程序,奈何网上的教程都是稍微有点基础的,所以,就写一篇对于netty零基础的,顺便也记录一下. 先扔几个参考学习的网页: netty 官方API: ...
- python3 参数*args 、 **args 在函数定义和调用中的应用
一.函数调用时 说明:*args 表示解包(解包 列表.元组.字符串类型) #定义函数cn_musql def cn_musql(host,port,user,pwd,db): print(host) ...