Android (Notification)消息推送机制
从网上查询资料学习Android消息推送机制,效果图如下:
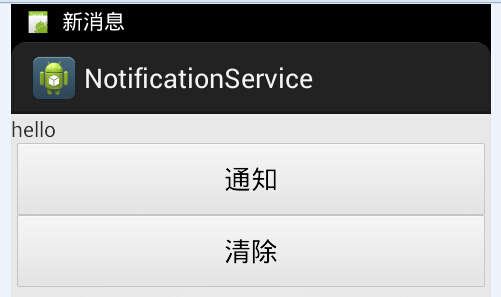
1.首先是布局文件代码 activity_main.xml
<?xml version="1.0" encoding="utf-8"?>

<LinearLayout xmlns:android="http://schemas.android.com/apk/res/android"

    android:layout_width="fill_parent"

    android:layout_height="fill_parent"

    android:orientation="vertical" >

    <TextView

        android:layout_width="fill_parent"

        android:layout_height="wrap_content"

        android:text="hello" />

    <Button

        android:id="@+id/btnStart"

        android:layout_width="fill_parent"

        android:layout_height="wrap_content"

        android:text="通知" />

    <Button

        android:id="@+id/btnStop"

        android:layout_width="fill_parent"

        android:layout_height="wrap_content"

        android:text="清除" />

</LinearLayout>
2.然后是java主界面代码MainActivity.java
package com.example.notificationservice;

import android.app.Activity;

import android.content.Intent;

import android.os.Bundle;

import android.view.View;

import android.view.View.OnClickListener;

import android.widget.Button;

public class MainActivity extends Activity implements OnClickListener {

    private Button btnStart;

    private Button btnStop;

    @Override

    protected void onCreate(Bundle savedInstanceState) {

        super.onCreate(savedInstanceState);

        setContentView(R.layout.activity_main);

        initView();

    }

    private void initView() {

        btnStart = (Button) findViewById(R.id.btnStart);

        btnStop = (Button) findViewById(R.id.btnStop);

        btnStart.setOnClickListener(this);

        btnStop.setOnClickListener(this);

    }

    @Override

    public void onClick(View v) {

        int id = v.getId();

        if (id == R.id.btnStart) {

            // 启动Service

            Intent intent = new Intent();

            intent.setAction("ymw.MY_SERVICE");

            startService(intent);

        }

        if (id == R.id.btnStop) {

            // 关闭Service

            Intent intent = new Intent();

            intent.setAction("ymw.MY_SERVICE");

            stopService(intent);

        }

    }

    @Override

    public void onBackPressed() {

        System.exit(0);

        super.onBackPressed();

    }

}
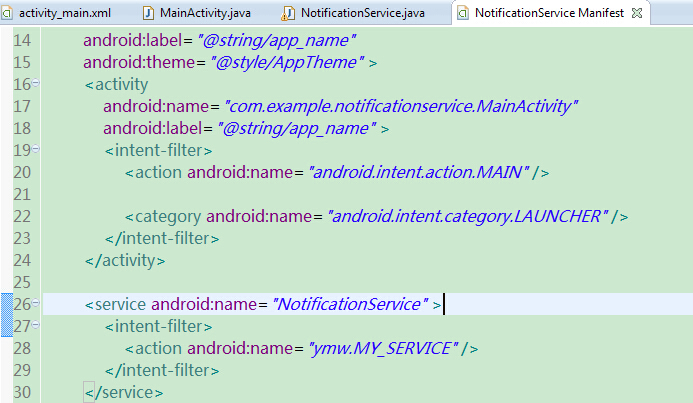
3.然后是消息推送服务文件 NotificationService.java
package com.example.notificationservice;

import android.app.Notification;

import android.app.NotificationManager;

import android.app.PendingIntent;

import android.app.Service;

import android.content.Context;

import android.content.Intent;

import android.os.IBinder;

public class NotificationService extends Service {

    // 获取消息线程

    private MessageThread messageThread = null;

    // 点击查看

    private Intent messageIntent = null;

    private PendingIntent messagePendingIntent = null;

    // 通知栏消息

    private int messageNotificationID = 1000;

    private Notification messageNotification = null;

    private NotificationManager messageNotificatioManager = null;

    public IBinder onBind(Intent intent) {

        return null;

    }

    @Override

    public int onStartCommand(Intent intent, int flags, int startId) {

        // 初始化

        messageNotification = new Notification();

        messageNotification.icon = R.drawable.ic_launcher;

        messageNotification.tickerText = "新消息";

        messageNotification.defaults = Notification.DEFAULT_SOUND;

        messageNotificatioManager = (NotificationManager) getSystemService(Context.NOTIFICATION_SERVICE);

        messageIntent = new Intent(this, MainActivity.class);

        messagePendingIntent = PendingIntent.getActivity(this, 0,

                messageIntent, 0);

        // 开启线程

        messageThread = new MessageThread();

        messageThread.isRunning = true;

        messageThread.start();

        return super.onStartCommand(intent, flags, startId);

    }

    /**

     * 从服务器端获取消息

     *

     */

    class MessageThread extends Thread {

        // 设置是否循环推送

        public boolean isRunning = true;

        public void run() {

            // while (isRunning) {

            try {

                // 间隔时间

                Thread.sleep(1000);

                // 获取服务器消息

                String serverMessage = getServerMessage();

                if (serverMessage != null && !"".equals(serverMessage)) {

                    // 更新通知栏

                    messageNotification.setLatestEventInfo(

                            getApplicationContext(), "新消息", "您有新消息。"

                                    + serverMessage, messagePendingIntent);

                    messageNotificatioManager.notify(messageNotificationID,

                            messageNotification);

                    // 每次通知完,通知ID递增一下,避免消息覆盖掉

                    messageNotificationID++;

                }

            } catch (InterruptedException e) {

                e.printStackTrace();

            }

            // }

        }

    }

    @Override

    public void onDestroy() {

        // System.exit(0);

        messageThread.isRunning = false;

        super.onDestroy();

    }

    /**

     * 模拟发送消息

     *

     * @return 返回服务器要推送的消息,否则如果为空的话,不推送

     */

    public String getServerMessage() {

        return "NEWS!";

    }

}
4.最后别忘了在mainfeast.xml文件中配置Service
项目代码如下链接:
http://files.cnblogs.com/_ymw/NotificationService_%E5%8D%9A%E5%AE%A2%E9%99%84%E4%BB%B6.rar
Android (Notification)消息推送机制的更多相关文章
- (转)iOS消息推送机制的实现
原:http://www.cnblogs.com/qq78292959/archive/2012/07/16/2593651.html iOS消息推送机制的实现 iOS消息推送的工作机制可以简单的用下 ...
- Android开发学习笔记-关于Android的消息推送以及前后台切换
下面是最简单的Android的消息推送的实现方法 package com.example.shownotic; import java.util.Random; import android.supp ...
- APP消息推送机制的实现(PUSH)
出于好奇,想了解一下消息推送机制,在网上搜索到了几篇文章,感觉还不错,粘贴下来,等真正用到的时候再仔细研究 以下两篇是关于ios的 1.http://blog.csdn.net/xyxjn/artic ...
- ios消息推送机制原理与实现
本文转载至 http://hi.baidu.com/yang_qi168/item/480304c542fd246489ad9e91 Push的原理: Push 的工作机制可以简单的概括为下图 图中, ...
- MVC异步消息推送机制
在MVC里面,有异步控制器,可以实现模拟消息推送机制功能 1.控制器要继承至AsyncController,如 public class RealTimeController : AsyncContr ...
- android系统下消息推送机制
一.推送方式简介: 当前随着移动互联网的不断加速,消息推送的功能越来越普遍,不仅仅是应用在邮件推送上了,更多的体现在手机的APP上.当我们开发需要和服务器交互的应用程序时,基本上都需要获取服务器端的数 ...
- 5.Android消息推送机制简单例子
1.首先布局文件xml代码: <?xml version="1.0" encoding="utf-8"?> <RelativeLayout x ...
- android基于XMPP的消息推送机制
关于服务器端向Android客户端的推送,主要有三种方式:1.客户端定时去服务端取或者保持一个长Socket,从本质讲这个不叫推送,这是去服务端拽数据.但是实现简单,主要缺点:耗电等2.Google的 ...
- Android本地消息推送
项目介绍:cocos2dx跨平台游戏 项目需求:实现本地消息推送,需求①:定点推送:需求②:根据游戏内逻辑实现推送(比如玩家体力满时,需要计算后到点推送):需求③:清理后台程序或重启后依然能够实现本地 ...
随机推荐
- CodeForces 778D Parquet Re-laying 构造
题意: 有两个\(n \times m\)的矩阵\(A,B\),都是由\(1 \times 2\)的砖块铺成,代表初始状态和结束状态 有一种操作可以把两个砖块拼成的\(2 \times 2\)的矩形旋 ...
- mutable c++
The keyword mutable is used to allow a particular data member of const object to be modified. This i ...
- DbVisualizer 解决中文乱码问题
在SQL Commander中,sql语句中如果有中文,显示是‘口口口’. 解决办法如下: 在Tools->tool Properties->General->Appearance- ...
- 自动化测试学习之路--HTML常见元素、属性的简单学习
如何创建html文件: 使用工具:VSCode 1.双击文件名显示区,可快速新建文件. 2.保存文件,文件名.html 3.输入!(必须是英文的!),按 Tab键,可自动生成html格式的文件,如下: ...
- (原)DirectX11 深度测试(有点另类)
(问到自己清楚就可) @Author: 白袍小道 @说明:转载随缘,评论随缘,询问建议看书和源码会得到更准确的答案 深度测试的来源.目的.做法 一.问题询问 我们带着一些问题去浏览一番 1.深度测试发 ...
- 团队项目-第一次Scrum 会议
时间:10.23 时长:30分钟 地点:F楼2层沙发休息处 工作情况 团队成员 已完成任务 待完成任务 解小锐 学习使用cocos creator 学习官方样例 陈鑫 学习JavaScript 学习c ...
- 201621123034 《Java程序设计》第10周学习总结
作业10-异常 1. 本周学习总结 1.1 以你喜欢的方式(思维导图或其他)归纳总结异常相关内容. 2. 书面作业 本次PTA作业题集异常 1. 常用异常 结合题集题目7-1回答 1.1 自己以前编写 ...
- JS XMLHttpRequest.upload.addEventListener 传参,回调
JS 回调函数,传参的办法. function uploadFile(t) { var fd = new FormData(); fd.append("_netLogo", doc ...
- Strassen优化矩阵乘法(复杂度O(n^lg7))
按照算法导论写的 还没有测试复杂度到底怎么样 不过这个真的很卡内存,挖个坑,以后写空间优化 还有Matthew Anderson, Siddharth Barman写了一个关于矩阵乘法的论文 < ...
- [bzoj3218] a+b problem [最小割+数据结构优化建图]
题面 传送门 思路 最小割 我们首先忽略掉那个奇♂怪的限制,就有一个比较显然的最小割模型: 建立源点$S$和汇点$T$ 对于每个元素$i$建立一个点$i$,连边$<S,i,w[i]>$和$ ...