iOS深入学习(UITableView系列4:使用xib自定义cell)
可以通过继承UITableViewCell重新自定义cell,可以像下面一样通过代码来自定义cell,但是手写代码总是很浪费时间,
|
1
2
3
4
5
6
7
8
9
10
11
12
13
14
15
16
17
18
19
20
21
22
23
24
25
26
27
28
29
30
31
32
33
34
|
//CustomTableViewCell.h文件@interface CustomTableViewCell:UITableViewCell@property (nonatomic, strong) UIImageView *headImageView;@property (nonatomic, strong) UILabel *nameLabel;@property (nonatomic, strong) UILabel *textLabel;@end//CustomTableViewCell.m文件@implementation CustomTableViewCell- (id)initWithStyle:(UITableViewCellStyle)style reuseIdentifier:(NSString *)reuseIdentifier{ self = [super initWithStyle:style reuseIdentifier:reuseIdentifier]; if (self) { // Initialization code _headImageView = [[UIImageView alloc] init]; [self.contentView addSubView:_headImageView]; _nameLabel = [[UILabel alloc] init]; /*省略Label的属性设置*/ [self.contentView addSubView:_nameLabel]; _textLabel = [[UILable alloc] init]; /*省略Label的属性设置*/ [self.contentView addSubView:_textLabel]; } return self;}- (void)layoutSubviews{ //省略布局代码 self.headImageView.frame = CGRectMake(.....); self.nameLabel.frame = CGRectMake(.....); self.textLabel.frame = CGRectMake(....); [super layoutSubviews];}@end |
上面CustomTableViewCell的.h/.m文件中,我用了大段的代码来给自定义的cell布局,真的挺麻烦。然后在ViewController中使用的时候是这样的,
|
1
2
3
4
5
6
7
8
9
10
11
12
13
14
15
16
|
- (UITableViewCell *)tableView:(UITableView *)tableView cellForRowAtIndexPath:(NSIndexPath *)indexPath{ static NSString *simpleIdentify = @"SimpleIdentify"; CustomTableViewCell *cell = [tableView dequeueReusableCellWithIdentifier:simpleIdentify]; if(cell == nil) { cell = [[CustomTableViewCell alloc] initWithStyle:UITableViewCellStyleDefault reuseIdentifier:simpleIdentify]; } //_person就是UITableView的数据源,它里面存放的是Person数据模型, //Person包括头像headStr、name、speechText等属性 Person *person = [_persons objectAtIndex:indexPath.row]; cell.headImage.image = [UIImage imageNamed:person.headStr]; cell.nameLabel.text = person.name; cell.textLabel.text = person.speechText; return cell;} |
上面就是使用代码自定义cell所要做的工作,我们当cell显示没有达到预期的时候我们还要回头改变其中UI控件的坐标,或者更改控件属性,当然这只是要多花点时间,最终还是可以实现的。
但是。。。我们还是要试着提高自己的开发效率,使用越来越成熟的xib技术,可以很大地提高开发效率,当然也是要勤加练习,熟能生巧。
开始阅读下面的内容之前,我假设你已经看过我之前的博客-UITableView系列1,那篇博客是本篇博客的基础;如果你没有看过,那就看看吧,然后接着看本篇博客。
所以下面开始学习吧!Come on!
按照下面的步骤开始操作,
(1)新建一个空的(Empty)xib文件,File->New,在面板中选择User Interface->Empty,如下图,

将文件命名为CustomTableViewCell,表示自定义的cell意思。
(2)拖动一个TableViewCell到空的(Empty)xib文件中,如下图,

(3)修改CustomTableViewCell的高度为90,通过属性面板来设置,如下图,

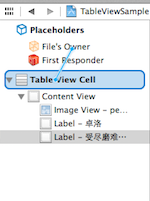
(4)拖一个UIIMageView到CustomTableViewCell的xib文件,设置该UIImageView控件的tag值为10;再拖两个UILabel到xib文件,设置tag分别为1和2,其布局方式如下图,

上面的几个步骤就进行了CustomTableViewCell的自定义,下面的步骤就是使用这个通过xib文件进行自定义的cell。
(5)选中CustomTableViewCell,点击左上角的File's Owner,如下图,

选中这个xib文件中的File's Owner是为了设置CustomTableViewCell的文件所有者,接着看下一步。
(6)在右侧的面板,选择“Show the Identify Inpector”选项,如下图

这时候我们发现CustomTableViewCell的File's Owner为NSObject,因为我要在我的RootViewController中使用,所以我将"NSObject"替换为"RootViewController",表明这个cell的所有者是RootViewController。(PS:你需要将此处的NSObject改为你使用该CustomTableViewCell的ViewController文件名。)
(7)在使用该CustomTableViewCell的ViewController的头文件中写下如下代码,
|
1
2
3
4
5
6
|
@interface RootViewController:UIViewController{}@property (nonatomic, strong) IBOutlet UITableViewCell *customCell;@end |
有人会奇怪这段话是什么意思,接着下面的步骤,你就会明白。
(8)在CustomTableViewCell.xib文件中,拖动File's Owner指向TableViewCell,如下图,
(9)在弹出的界面中选择customCell选项,如下图,

这就是为什么第(7)步骤要在RootViewController.h文件中声明一个IBOutlet关键字修饰的customCell变量的原因了。
(10)新建一个数据模型文件Person,继承自NSObject,其代码如下,
|
1
2
3
4
5
6
7
8
9
10
11
12
|
//Person.h文件@interface Person : NSObject@property (nonatomic, strong) NSString *name;@property (nonatomic, strong) NSString *headStr;@property (nonatomic, strong) NSString *speechText;@end//Person.m文件#import "Person.h"@implementation Person@end |
之所以叫它模型文件,是因为该文件中的属性与CustomTableViewCell上面的控件所需的内容一致,以MVC的视角来看Person就是M(Model),CustomTableViewCell就是V(View),而RootViewController就是C(Controller)。
(11)在RootViewController中初始化TableView数据源_persons,代码如下,
|
1
2
3
4
5
6
7
8
9
10
11
12
13
14
15
16
17
18
19
20
21
22
23
24
25
26
27
28
29
30
31
32
33
34
35
|
@interface RootViewController ()<UITableViewDelegate,UITableViewDataSource>{ NSArray *_persons;}@end@implementation RootViewController- (void)viewDidLoad{ [super viewDidLoad]; // Do any additional setup after loading the view from its nib. Person *p0 = [[Person alloc] init]; p0.name = @"路飞"; p0.headStr = @"person0"; p0.speechText = @"我要当海贼王!"; Person *p1 = [[Person alloc] init]; p1.name = @"卓洛"; p1.headStr = @"person1"; p1.speechText = @"受尽磨难而不折,此乃修罗之道!"; Person *p2 = [[Person alloc] init]; p2.name = @"罗宾"; p2.headStr = @"person2"; p2.speechText = @"我要活下去,把我带向大海吧!"; Person *p3 = [[Person alloc] init]; p3.name = @"娜美"; p3.headStr = @"person3"; p3.speechText = @"帮帮我,路飞!"; _persons = [NSArray arrayWithObjects:p0,p1,p2,p3, nil];}@end |
因为我是海贼迷,所以找了路飞、卓洛、娜美、罗宾的图片当做头像,你可以到网上down几张,改名为person0.png、person1.png、person2.png、person3.png。
(12)在-tableView:cellForRowAtIndexPath:中使用CustomTableViewCell.xib创建cell,代码如下,
|
1
2
3
4
5
6
7
8
9
10
11
12
13
14
15
16
17
18
19
20
21
22
23
24
25
26
27
28
|
#pragma mark - UITableView methods- (NSInteger)tableView:(UITableView *)tableView numberOfRowsInSection:(NSInteger)section{ return [_persons count];}- (UITableViewCell *)tableView:(UITableView *)tableView cellForRowAtIndexPath:(NSIndexPath *)indexPath{ static NSString *simpleIdentify = @"SimpleIdentify"; UITableViewCell *cell = [tableView dequeueReusableCellWithIdentifier:simpleIdentify]; NSArray *nib = [[NSBundle mainBundle] loadNibNamed:@"CustomTableViewCell" owner:self options:nil]; if ([nib count]>0) { self.customCell = [nib objectAtIndex:0]; cell = self.customCell; } //获取数据源中_person数组中的元素,对应每一个cell Person *person = [_persons objectAtIndex:indexPath.row]; //通过tag值来获取UIImageView和UILabel UIImageView *headImageView = (UIImageView *)[cell.contentView viewWithTag:0]; UILabel *nameLabel = (UILabel *)[cell.contentView viewWithTag:1]; UILabel *textLabel = (UILabel *)[cell.contentView viewWithTag:2]; headImageView.image = [UIImage imageNamed:person.headStr]; nameLabel.text = person.name; textLabel.text = person.speechText; return cell;} |
最终的效果图如下,

总结:上面的步骤看起来复杂,但是当你习惯xib来编程的时候,使用鼠标拖拉空间,微调界面,那种感觉就像自己不是纯粹的程序员,还是一个设计师。
我把源代码放到了Github上面,有兴趣的朋友可以去下载看看。或者在Mac终端,输入git clone https://github.com/pythonhater/TableViewSamples.git,即可获得源代码。
iOS深入学习(UITableView系列4:使用xib自定义cell)的更多相关文章
- IOS xib在tableview上的简单应用(通过xib自定义cell)
UITableView是一种常用的UI控件,在实际开发中,由于原生api的局限,自定义UITableViewCell十分重要,自定义cell可以通过代码,也可以通过xib. 这篇随笔介绍的是通过xib ...
- 【swift学习笔记】三.使用xib自定义UITableViewCell
使用xib自定义tableviewCell看一下效果图 1.自定义列 新建一个xib文件 carTblCell,拖放一个UITableViewCell,再拖放一个图片和一个文本框到tableviewc ...
- AJ学IOS(16)UI之XIB自定义Cell实现团购UI
AJ分享,必须精品 先看效果图 自定义Cell 本次主要是自定义Cell的学习 实现自定义Cell主要有三种方法:按照使用的频繁度排序: XIB > 纯代码 > StoryBoard XI ...
- iOS 中使用 XIB 自定义cell 的两种方法 以及 编译出现常见 的错误 ++++(xcode6.0之后)
一. 注册cell 1.创建自定义cell并勾选 xib :(勾选xib就会自动生成与cell文件关联的xib) 2.在 tableViewController里注册自定义Cell (或者遵守tabl ...
- iOS 中使用 XIB 自定义cell的两种方法以及编译出现常见 的错误 (xcode6.0之后)
一. 注册cell 1.创建自定义cell并勾选 xib :(勾选xib就会自动生成与cell文件关联的xib) 2.在 tableViewController里注册自定义Cell (或者遵守tabl ...
- AJ学IOS(17)UI之纯代码自定义Cell实现新浪微博UI
AJ分享,必须精品 先看效果图 编程思路 代码创建Cell的步骤 1> 创建自定义Cell,继承自UITableViewCell 2> 根据需求,确定控件,并定义属性 3> 用get ...
- IOS 表视图(UITableVIew)的使用方法(4)自定义表视图单元
UITableViewCell的自定义往往需要自建一个UITableViewCell的子类后进行作业.开发者可以选择通过xib或者直接在UITableViewCell的布局中进行UITableView ...
- 应用程序之Xib自定义Cell
效果展示 结构分析 代码实现 一.效果展示 二.结构分析 1⃣️首先我们让我们的控制器不再继承UIViewController,而是继承UITableViewController.这样就直接遵守了de ...
- xib自定义cell代码规范
// // MJTgCell.m // 01-团购 // // Created by apple on 14-4-1. // Copyright (c) 2014年 itcast. All r ...
随机推荐
- fnd_profile.value('AFLOG_ENABLED')的取值 和配置文件相关SQL
SELECT * FROM FND_PROFILE_OPTIONS_VL TT WHERE TT.PROFILE_OPTION_NAME LIKE '%AFLOG%' FND:启用调试日志 详细的参考 ...
- error CS0007: Unexpected common language runtime initialization error -- '没有注册类别 '
Windows Registry Editor Version 5.00 [HKEY_LOCAL_MACHINE\SOFTWARE\Microsoft\.NETFramework]"Inst ...
- android 项目学习随笔十二(ListView加脚布局)
1.ListView加脚布局 头布局initHeaderView,在onTouchEvent事件中进行显示隐藏头布局切换 脚布局initFooterView,实现接口OnScrollListener, ...
- Gson将参数放入实体类中进行包装之后再传递
package com.sinoservices.dms.orderinfo.entity; public class OrderDetailKeyCondition { //工单主键 private ...
- javaWeb 使用 jsp 和 javaBean 实现计算器功能
<%@ page language="java" import="java.util.*" pageEncoding="UTF-8"% ...
- Linux系统调用---同步IO: sync、fsync与fdatasync【转】
转自:http://blog.csdn.net/cywosp/article/details/8767327 [-] 1 write不够需要fsync 2 fsync的性能问题与fdatasync ...
- 使用PowerDesigner生成Access数据库
PowerDesigner生成Access数据库 自从使用PD以来一直知道可以支持access但一直没有搞明白如何通过脚本来创建access数据表.在PD的tools里终于找到的答案,具体 文件都在C ...
- PHP最原始的上传文件函数
<?php $upload_file=$_FILES['upload_file']['tmp_name']; $upload_file_name=$_FILES['upload_file'][' ...
- PyChram使用技巧总结
1.1 下载 官网1.2 汉化 1.3 添加或者修改文件模板 File->settings->Editor->File and Code Templates->Python S ...
- php连接函数implode()和分割explode()
php可以将字符串分割成数组,同时翻过了也可以将数组连接成字符串,确切的说是可以将数组元素连接成字符串,有了这两个函数我们就可以在数组与字符串之间进行自由转换了,下面看正文的例子吧. implode( ...