
Linux 18.04 搭建lamp环境
Linux 18.04 下搭建lamp环境
一、 安装服务器
a) 在配置好sources.list文件后,apt-get updata&upgrade更新软件;

二、 安装apache2
a) Apt install apache2
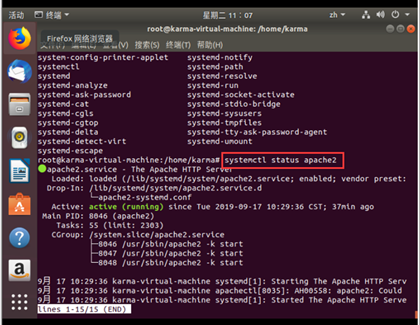
b) systemctl status apache2 开启apache2服务 如图:
c) # 开启 、关闭和重启Apache服务器
i. systemctl start apache2 # 开启
ii. systemctl stop apache2 # 关闭
iii. systemctl restart apache2 # 重启
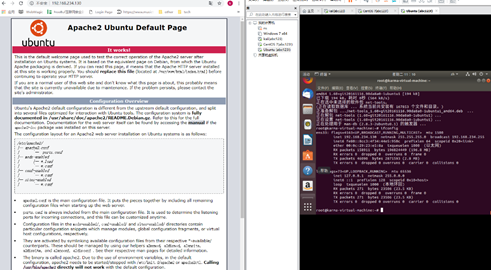
d)测试访问你的 Web 服务器,打开浏览器并输入Ubuntu18.04的IP地址
三、 数据库的安装:
a) 安装mysql:
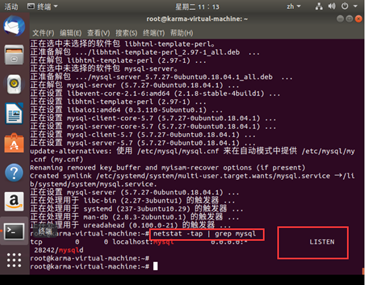
i. apt install mysql-server
ii. 安装成功
iii. 登陆mysql设置:mysql -u root -p
root@ubuntu-virtual-machine:~# mysql_secure_installation
Securing the MySQL server deployment.
Connecting to MySQL using a blank password.
VALIDATE PASSWORD PLUGIN can be used to test passwords
and improve security. It checks the strength of password
and allows the users to set only those passwords which are
secure enough. Would you like to setup VALIDATE PASSWORD plugin? # 要安装验证密码插件吗?
Press y|Y for Yes, any other key for No: N # 这里我选择N
Please set the password for root here.
New password: # 输入要为root管理员设置的数据库密码
Re-enter new password: # 再次输入密码
By default, a MySQL installation has an anonymous user,
allowing anyone to log into MySQL without having to have
a user account created for them. This is intended only for
testing, and to make the installation go a bit smoother.
You should remove them before moving into a production
environment.
Remove anonymous users? (Press y|Y for Yes, any other key for No) : y # 删除匿名账户
Success.
Normally, root should only be allowed to connect from
'localhost'. This ensures that someone cannot guess at
the root password from the network.
Disallow root login remotely? (Press y|Y for Yes, any other key for No) : N # 禁止root管理员从远程登录,这里我没有禁止
... skipping.
By default, MySQL comes with a database named 'test' that
anyone can access. This is also intended only for testing,
and should be removed before moving into a production
environment.
Remove test database and access to it? (Press y|Y for Yes, any other key for No) : y # 删除test数据库并取消对它的访问权限
- Dropping test database...
Success.
- Removing privileges on test database...
Success.
Reloading the privilege tables will ensure that all changes
made so far will take effect immediately.
Reload privilege tables now? (Press y|Y for Yes, any other key for No) : y # 刷新授权表,让初始化后的设定立即生效
Success.
All done!
iv. 配置mysql允许远程访问,首先编辑 /etc/mysql/mysql.conf.d/mysqld.cnf 配置文件:
vim /etc/mysql/mysql.conf.d/mysqld.cnf
注释掉bind-address = 127.0.0.1

v. 保存退出,然后进入mysql数据库,执行授权命令:
mysql -u root -p
mysql> grant all on *.* to root@'%' identified by '你的密码' with grant option;
mysql> flush privileges; # 刷新权限
mysql> exit
然后执行exit命令退出mysql服务,再执行如下命令重启mysql:
systemctl restart mysql
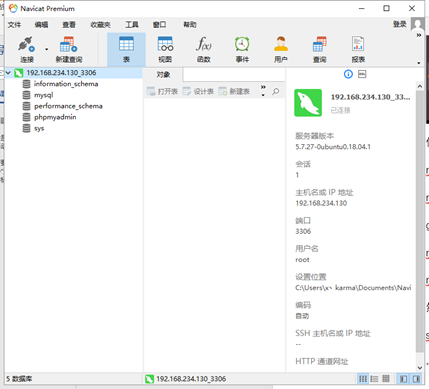
成功连接
四、 PHP的安装
a) apt install php
b) 让apache首先提供php界面
打开 /etc/apache2/mods-enabled/dir.conf 文件并将其更改为首先列出index.php
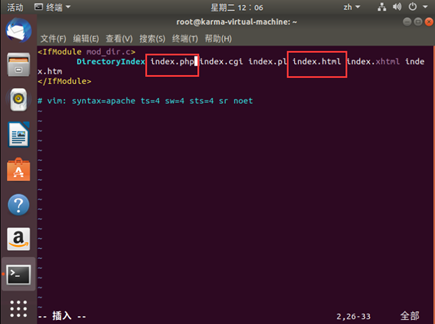
systemctl restart apache2 重启一下apache2
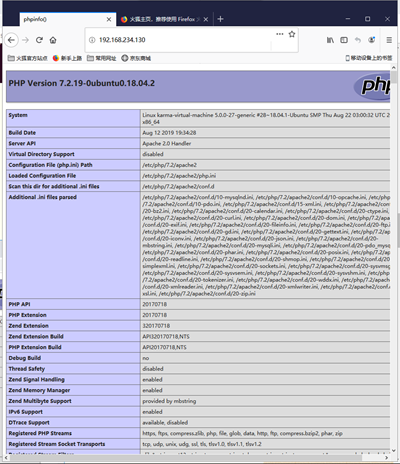
在/var/www/html中创建一个名为index.php的新文件。
vim /var/www/html/index.php
输入以下内容
<?php
phpinfo();
?>
保存并退出该文件
c) 测试,访问ubuntu的ip,可通过ipconfig查到,IP地址后面输入/index.html也能访问到Apache的默认信息页面
五、 Php模块安装:
a) apt install php-curl
六、 Phpmyadmin安装:
a) apt install phpmyadmin
b) 安装完成后,创建phpMyAdmin的软链接到Apache的根目录下(我的是/var/www/html/)
ln -s /usr/share/phpmyadmin /var/www/html/phpmyadmin
现在开始尝试访问phpMyAdmin,打开浏览器并输入:IP地址/phpmyadmin
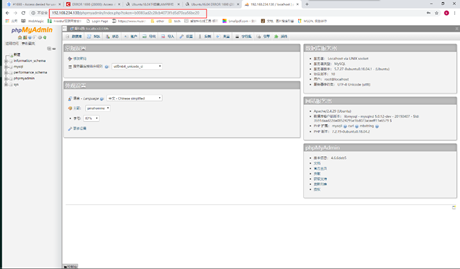
至此,成功在Linux 18.04中搭建lamp环境。
总结:
遇到三个问题:
第一个是在mysql授权的时候,没有敲‘;’,导致命令无效,花了不少时间找问题。
第二个是第二次访问192.168.234.130时,浏览器始终停在apache的index.html界面,并未跳转到php的界面,折腾了一会儿才发现是浏览器缓存没清理,清理后就访问成功;
第三个是#1698 - Access denied for user 'root'@'localhost'(phpmyadmin的登陆界面报错),查看mysql的user表,发现root的plugin并不是本地密码,因此需要修改它,update mysql.user set authentication_string=PASSWORD('你的密码'), plugin='mysql_native_password' where user='root';再刷新一下flush privileges;重启终端就可以登陆了。
参考资料:
https://blog.csdn.net/qq_35846773/article/details/80992155
https://www.cnblogs.com/opsprobe/p/9126411.html
https://www.cnblogs.com/opsprobe/p/9126864.html

Linux 18.04 搭建lamp环境的更多相关文章
- Ubuntu-server14.04搭建LAMP环境
转自:http://www.cnblogs.com/myzhibie/p/4330327.html 对于很多PHP初学开发者来讲,搭建一个可用于生产的LAMP环境是一件费时费力的事情,本文以 ubun ...
- Ubuntu 20.04 搭建 LAMP 环境
LAMP环境即Linux下配置Apache.Mysql.Php,话不多说 GO ! 0.下载之前先更新一波: 更新源 sudo apt-get update 更新软件 sudo apt-get upg ...
- ubuntu-kylin16.04搭建lamp环境。
首先下载安装apache2 输入:sudo apt-get install apache2 安装完毕后,在浏览器中输入:localhost 显示如下图,说明安装正确. 紧接着安装php7.0 输入:s ...
- ubuntu14.04搭建LAMP环境(nginx,php,mysql,linux)详解
最近更换开发环境至ubuntu,整理开发环境和常用软件的安装配置(更新排版) 以下安装过程经过多次操作得出,参照步骤进行操作即可 一.LAMP基本环境搭建 1 切换root账号 sudo su 2,安 ...
- Linux操作系统下搭建LAMP环境
准备:先在目录home/csy/下建website代码目录,然后新建php文件,命名为test.php. 在test.php编写代码如下: <? php phpinfo(); ?> 保存并 ...
- Ubuntu14.04搭建LAMP环境
安装Apache2 sudo apt-get install apache2 ...
- 阿里云ubantu16.04 搭建LAMP环境
1.登录服务器 2.sudo apt-get update 更新软件列表 3.sudo apt-get install lamp-server^ (注意右上角的' ^ '这个不能少) 输入apach ...
- linux下搭建lamp环境以及安装swoole扩展
linux下搭建lamp环境以及安装swoole扩展 一.CentOS 6.5使用yum快速搭建LAMP环境 准备工作:先更新一下yum源 我安装的环境是:apache2.2.15+mysql5 ...
- Ubuntu18.04下搭建LAMP环境
一.Apache2 web 服务器的安装 : 可以先更新一下服务器 1.sudo apt-get update # 获取最新资源包 2.sudo apt-get upgrade ...
随机推荐
- 2018web前端面试题总结
web面试题 css面试 一.css盒模型 css中的盒子模型包括IE盒子模型和标准的W3C盒子模型.border-sizing: border-box, inherit, content-box ...
- 为什么size_t重要?(Why size_t matters)
之前在<内存拷贝的注意事项>一文中提到过size_t,可能许多人对这个类型不太熟悉没有用过或者根本不敢去用,最近看到一篇文章对这个类型讲的比较详细,便翻译过来让不熟悉的同学可以知道它产生的 ...
- C#中'??'符的使用
?? 用于判断当前对象是否为null. 语法: 对象 ?? "当前对象为null时赋的默认值". string nullString = null; string Kong = ...
- 9、组件注册-@Import-使用ImportSelector
9.组件注册-@Import-使用ImportSelector 9.1 @Import 源码: @Target(ElementType.TYPE) @Retention(RetentionPolicy ...
- FOR XML PATH 函数用法
一.FOR XML PATH 简单介绍 那么还是首先来介绍一下FOR XML PATH ,假设现在有一张兴趣爱好表(hobby)用来存放兴趣爱好,表结构如下: 接下来我们来看 ...
- VSCode 插件和快捷键(MAC)
1. 插件 1. JSON 格式优化--- JSON Tools 快捷键: 1). 格式化json字符串 Mac: Cmd+Option+M win: Ctrl+Alt+M 2).压缩json Ma ...
- ckeditor粘贴word图片自动上传功能
由于工作需要必须将word文档内容粘贴到编辑器中使用 但发现word中的图片粘贴后变成了file:///xxxx.jpg这种内容,如果上传到服务器后其他人也访问不了,网上找了很多编辑器发现没有一个能直 ...
- windows下注册表脚本编写
Reg文件就是我今天所说的注册表脚本文件,双击可将其中的数据写入注册表.利用注册表脚本文件可以对注册表进行关于键值的任何操作,而且还不受注册表被禁用的限制. 我们平常对注册表的修改大体上可以分 ...
- Win内核原理与实现学习笔记3-windows系统结构
1.概述 1.1windows采用了双模式(dual mode)结构来保护操作系统本身,以避免被应用程序的错误而波及.操作系统核心运行在内核模式(kernel mode)下,应用程序的代码运行在用户模 ...
- Python学习日记(八)—— 模块一(sys、os、hashlib、random、time、RE)
模块,用一砣代码实现了某个功能的代码集合. 类似于函数式编程和面向过程编程,函数式编程则完成一个功能,其他代码用来调用即可,提供了代码的重用性和代码间的耦合.而对于一个复杂的功能来,可能需要多个函数才 ...