STM32F4 LTDC
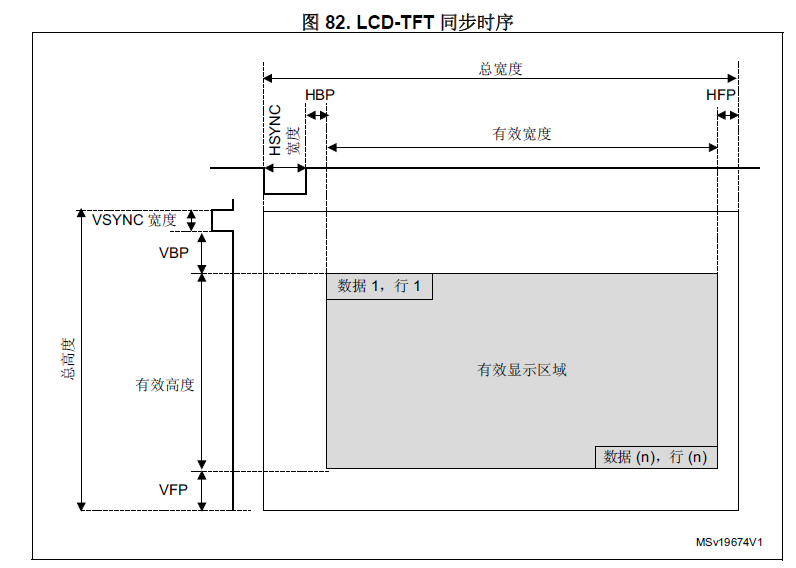
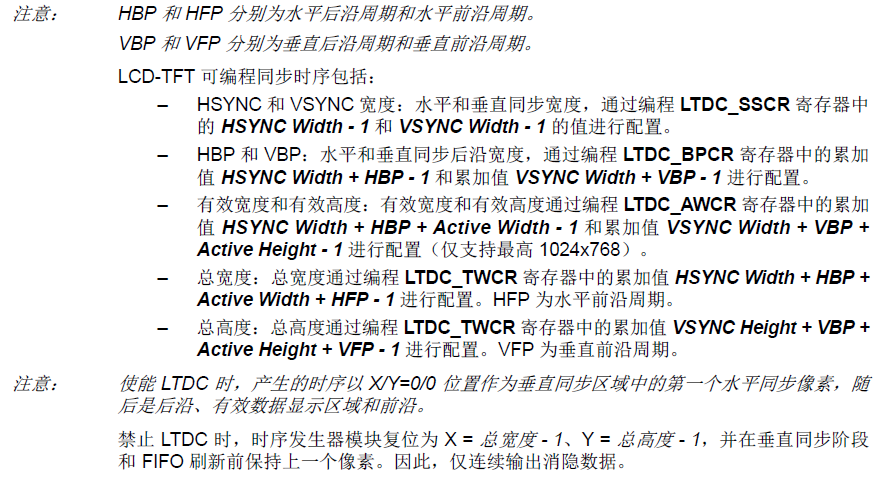
首先配置同步时序先看参考手册
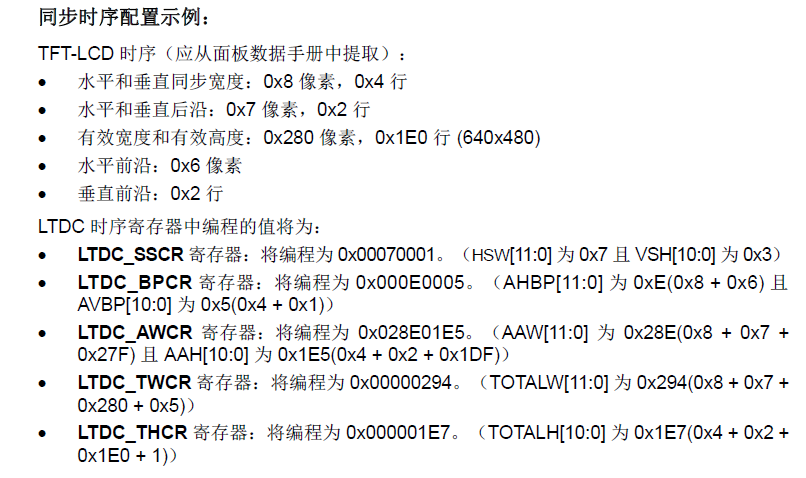
下面看一个实际例子,一块439的开发板
设置:
配置时序
LTDC_InitStruct.LTDC_HorizontalSync = ;
/* */
LTDC_InitStruct.LTDC_VerticalSync = ;
/* */
LTDC_InitStruct.LTDC_AccumulatedHBP = ;
/* */
LTDC_InitStruct.LTDC_AccumulatedVBP = ;
/* */
LTDC_InitStruct.LTDC_AccumulatedActiveW = ;
/* */
LTDC_InitStruct.LTDC_AccumulatedActiveH = ;
/* */
LTDC_InitStruct.LTDC_TotalWidth = ;
/* */
LTDC_InitStruct.LTDC_TotalHeigh = ; LTDC_Init(<DC_InitStruct);
注意每个参数定义,之前是累加
看下完整的初始化代码
void LCD_Init(void)
{
LTDC_InitTypeDef LTDC_InitStruct;
LTDC_Layer_InitTypeDef LTDC_Layer_InitStruct;
LTDC_Layer_TypeDef LTDC_Layerx; /* IO¿Ú³õʼ»¯ */
LCD_GPIOInit(); LCD_DisplayOff();
/* ʹÄÜLCDʱÖÓ */
RCC_APB2PeriphClockCmd(RCC_APB2Periph_LTDC, ENABLE);
/* ʹÄÜDMAʧ×Ù*/
RCC_AHB1PeriphClockCmd(RCC_AHB1Periph_DMA2D, ENABLE); /* ˮƽͬ²½ÐźÅ---µÍµçƽÓÐЧ */
LTDC_InitStruct.LTDC_HSPolarity = LTDC_HSPolarity_AL;
/* ´¹Ö±Í¬²½ÐźÅ---µÍµçƽÓÐЧ */
LTDC_InitStruct.LTDC_VSPolarity = LTDC_VSPolarity_AL;
/* Êý¾ÝʹÄÜÐźÅ---µÍµçƽÓÐЧ */
LTDC_InitStruct.LTDC_DEPolarity = LTDC_DEPolarity_AL;
/* ÏñËØʱÖÓÅäÖÃ--- */
LTDC_InitStruct.LTDC_PCPolarity = LTDC_DEPolarity_AL;
/* LCD±³¹âÉèÖà */
LTDC_InitStruct.LTDC_BackgroundRedValue = ;
LTDC_InitStruct.LTDC_BackgroundGreenValue = ;
LTDC_InitStruct.LTDC_BackgroundBlueValue = ;
/*
****************************************************************************
*PLLSAI_VCO = HSE*PLLSAI_N / PLL_M = 8 * 192 / 8 = 192MHz
*PLLLCDCLK = PLLSAI_VCO / PLLSAI_R = 192 / 3 = 64 Mhz
*LTDC clock frequency = PLLLCDCLK / RCC_PLLSAIDivR = 64 / 8 = 8 Mhz
****************************************************************************
*/
RCC_PLLSAIConfig(, , );
RCC_LTDCCLKDivConfig(RCC_PLLSAIDivR_Div4);
/* ʹÄÜPLLSAIʱÖÓ */
RCC_PLLSAICmd(ENABLE);
/* µÈ´ýPLLSAIʱÖÓ */
while(RCC_GetFlagStatus(RCC_FLAG_PLLSAIRDY) == RESET){}
/* */
LTDC_InitStruct.LTDC_HorizontalSync = ;
/* */
LTDC_InitStruct.LTDC_VerticalSync = ;
/* */
LTDC_InitStruct.LTDC_AccumulatedHBP = ;
/* */
LTDC_InitStruct.LTDC_AccumulatedVBP = ;
/* */
LTDC_InitStruct.LTDC_AccumulatedActiveW = ;
/* */
LTDC_InitStruct.LTDC_AccumulatedActiveH = ;
/* */
LTDC_InitStruct.LTDC_TotalWidth = ;
/* */
LTDC_InitStruct.LTDC_TotalHeigh = ; LTDC_Init(<DC_InitStruct); LTDC_Layer_InitStruct.LTDC_HorizontalStart = ;
LTDC_Layer_InitStruct.LTDC_HorizontalStop = ( + - );
LTDC_Layer_InitStruct.LTDC_VarticalStart = ;
LTDC_Layer_InitStruct.LTDC_VerticalStop = ( + - ); /* Pixel Format configuration*/
LTDC_Layer_InitStruct.LTDC_PixelFormat = LTDC_Pixelformat_RGB565;
/* Alpha constant (255 totally opaque) */
LTDC_Layer_InitStruct.LTDC_ConstantAlpha = ;
/* Default Color configuration (configure A,R,G,B component values) */
LTDC_Layer_InitStruct.LTDC_DefaultColorBlue = ;
LTDC_Layer_InitStruct.LTDC_DefaultColorGreen = ;
LTDC_Layer_InitStruct.LTDC_DefaultColorRed = ;
LTDC_Layer_InitStruct.LTDC_DefaultColorAlpha = ;
/* Configure blending factors */
LTDC_Layer_InitStruct.LTDC_BlendingFactor_1 = LTDC_BlendingFactor1_CA;
LTDC_Layer_InitStruct.LTDC_BlendingFactor_2 = LTDC_BlendingFactor2_CA;
/* the length of one line of pixels in bytes + 3 then :
Line Lenth = Active high width x number of bytes per pixel + 3
Active high width = LCD_PIXEL_WIDTH
number of bytes per pixel = 2 (pixel_format : RGB565)
*/
LTDC_Layer_InitStruct.LTDC_CFBLineLength = (( * ) + );
/* the pitch is the increment from the start of one line of pixels to the
start of the next line in bytes, then :
Pitch = Active high width x number of bytes per pixel
*/
LTDC_Layer_InitStruct.LTDC_CFBPitch = ( * );
/* configure the number of lines */
LTDC_Layer_InitStruct.LTDC_CFBLineNumber = ; /* Input Address configuration */
LTDC_Layer_InitStruct.LTDC_CFBStartAdress = LCD_FRAME_BUFFER; LTDC_LayerInit(LTDC_Layer1, <DC_Layer_InitStruct); /* Configure Layer2 */
LTDC_Layer_InitStruct.LTDC_CFBStartAdress = LCD_FRAME_BUFFER + BUFFER_OFFSET;
LTDC_Layer_InitStruct.LTDC_BlendingFactor_1 = LTDC_BlendingFactor1_PAxCA;
LTDC_Layer_InitStruct.LTDC_BlendingFactor_2 = LTDC_BlendingFactor2_PAxCA;
LTDC_LayerInit(LTDC_Layer2, <DC_Layer_InitStruct); LTDC_ReloadConfig(LTDC_IMReload); /* Enable foreground & background Layers */
LTDC_LayerCmd(LTDC_Layer1, ENABLE);
// LTDC_LayerCmd(LTDC_Layer2, ENABLE);
LTDC_ReloadConfig(LTDC_IMReload); LCD_DisplayOn();
} LCD_Init
LTDC_DefaultColorBlue就是背景色
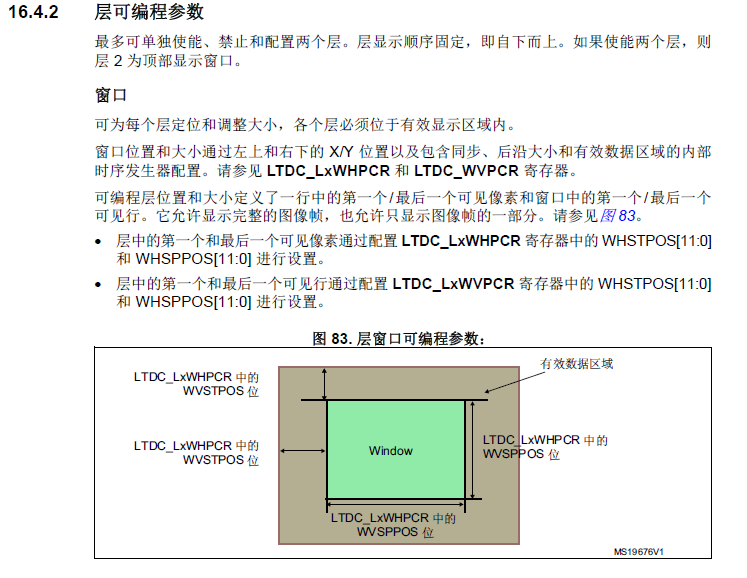
每个Layer支持窗口(Window)操作,所谓Window,就是指该层的图像只有在Window区域内有效,而Window区域外则用该层的DefaultColor填充。如下图:

填色直接写内存
int main (void)

{

  uint32_t i, j;

  uint16_t *addr = (uint16_t *)LCD_FRAME_BUFFER;

  SDRAM_Init();

  LCD_Init();

    j = ;

  while () {

    for (i = ; i < 0x2000000;i++);

    for (i = ; i <  * ; i++)

    {

      addr[i] =  << j;

    }

    j++;

    if (j > )j = ;

  }

}
STM32F4 LTDC的更多相关文章
- STM32F4 LTDC学习
很久没有写东西了,也很久没看文档了吼吼,觉得有点无聊,找来F4看看,主要看F429.督促自己多看多记录. 首先配置同步时序先看参考手册 下面看一个实际例子,一块439的开发板 设置: LTDC_Ini ...
- 使用STM32F4的CCM内存
使用STM32F4的CCM内存http://www.stmcu.org/module/forum/forum.php?mod=viewthread&tid=604814&fromuid ...
- STM32F4读写内部FLASH【使用库函数】
STM32F4Discovery开发帮使用的STM32F407VGT6芯片,内部FLASH有1M之多.平时写的代码,烧写完之后还有大量的剩余.有效利用这剩余的FLASH能存储不少数据.因此研究了一下S ...
- STM32F1和STM32F4 区别
STM32F4相对于STM32F1的改进不只一点点,为了便于初学者了解,我们比对相关资料将改进点进行了汇总. STM32F1和STM32F4 区别 (安富莱整理)u F1采用Crotex M3内 ...
- STM32F4 SPI2初始化及收发数据【使用库函数】
我的STM32F4 Discovery上边有一个加速度传感器LIS302DL.在演示工程中,ST的工程师使用这个传感器做了个很令人羡慕的东西:解算开发板的姿态.当开发板倾斜时候,处于最上边的LED点亮 ...
- 使用固件库操作STM32F4时的必要配置(转)
源:使用固件库操作STM32F4时的必要配置 使用STM32F4的固件库时,默认的晶振为25Mhz晶振,因此需要做一定的修改.之前因为一直没有注意这个问题,我捣腾了许久,发现工作时钟总是不对,查阅了一 ...
- STM32F4系统时钟配置及描述
STM32F4系统时钟配置及描述 stm32f407时钟配置方法(感觉很好,分享一下) STM32F4_RCC系统时钟配置及描述 STM32F4时钟设置分析 stm32f4 - 时钟树分析配置
- STM32F4时钟配置分析
//学习STM32F4的过程中关于时钟上面讲的比较好 特地转发与大家分享 STM32F4时钟设置分析 原文博客链接:http://blog.csdn.net/jdh99,作者:jdh,转载请注明. 环 ...
- STM32F4的FPU单元讲解
搞STM32F407单片机的时候 看见的关于STM32F4系列的FPU 单元讲解 比较精彩的博客 于是特意转载 和大家分享 转自:http://blog.renren.com/blog/256814 ...
随机推荐
- node.js 微信开发2-消息回复、token获取、自定义菜单
项目结构 >config/wechat.json 微信公众号的配置文件 >controllers/oauth.js 微信网页授权接口(下一篇再细讲讲) >controllers/we ...
- 在浏览器中输入www.taobao.com后执行的全部过程
>>>点击网址后,应用层的DNS协议会将网址解析为IP地址: DNS查找过程: 1. 浏览器会检查缓存中有没有这个域名对应的解析过的IP地址,如果缓存中有,这个解析过程 ...
- Hive调优笔记
Hive调优 先记录了这么多,日后如果有遇到,再补充. fetch模式 <property> <name>hive.fetch.task.conversion</name ...
- Python标准库3.4.3-random
9.6. random — Generate pseudo-random numbers Source code: Lib/random.py 翻译:Z.F. This module impleme ...
- es6 class extends
Class和普通构造函数有何区别 JS构造函数 function MathHandle(x, y){ this.x = x; this.y = y; } MathHandle.prototype. ...
- 0019SpringBoot使用异步任务(多线程)与定时任务
SpringBoot开启异步任务只需要两步配置: 1.在主类上加上注解@EnableAsync开启异步功能 2.在service层的方法上加上注解@Async指定调用方法时是异步的 SpringBoo ...
- 包,logging日志模块,copy深浅拷贝
一 包 package 包就是一个包含了 __init__.py文件的文件夹 包是模块的一种表现形式,包即模块 首次导入包: 先创建一个执行文件的名称空间 1.创建包下面的__init__.py文件的 ...
- Z+F激光扫描仪
链接:https://zhuanlan.zhihu.com/p/48589754 三维扫描仪有三个误差来源: ● 线性误差(激光雷达部分/LARA) ● 测距噪声(激光雷达部分/LARA) ● 测角误 ...
- 后端token认证模板
1.创建一个视图 from rest_framework import exceptions from app01 import models from rest_framework.authenti ...
- pyharm 上运行 npm 配置方法
问题解决.