nginx设置导航&安装showdoc&创建文件服务&zabbix&grafana
安装环境:
[root@nginx showdoc]# cat /etc/centos-release  #系统版本

CentOS Linux release 7.5.1804 (Core)

[root@nginx showdoc]# /usr/local/nginx/sbin/nginx -v  #nginx版本

nginx version: nginx/1.10.2

 php 5.5.30  #php版本
当前包: grafana-5.3.4-1.x86_64.rpm
网卡配置
[root@nginx nginx]# cat /etc/sysconfig/network-scripts/ifcfg-ens33
TYPE=Ethernet
PROXY_METHOD=none
BROWSER_ONLY=no
BOOTPROTO=none
DEFROUTE=yes
IPV4_FAILURE_FATAL=no
IPV6INIT=yes
IPV6_AUTOCONF=yes
IPV6_DEFROUTE=yes
IPV6_FAILURE_FATAL=no
IPV6_ADDR_GEN_MODE=stable-privacy
NAME=ens33
UUID=9d933367-ed49-4b19-a2a5-e8dabdf4ac26
DEVICE=ens33
ONBOOT=yes
IPADDR=192.168.1.12
PREFIX=24
IPADDR1=192.168.1.13
PREFIX1=24
GATEWAY=192.168.1.1
IPV6_PRIVACY=no
ZONE=public
需要安装php依赖:
sudo apt-get install -y php7.1 php7.1-fpm php7.1-gd php7.1-mcrypt php7.1-mbstring php7.1-mysql php7.1-pdo php7.1-sqlite
下载代码
git clone https://github.com/star7th/showdoc.git  #showdoc下载
当前包: grafana-5.3.4-1.x86_64.rpm
sudo yum localinstall grafana-5.2.4-1.x86_64.rpm   #安装
systemctl daemon-reload
systemctl enable grafana-server.service #设置开机启动
systemctl start grafana-server.service
systemctl status grafana-server.service #启动grafana
账号密码均为:admin #grafana
ps -ef | grep grafana
netstat -lntp | grep grafana #端口号3000
把克隆下来的文件夹移动到nginx的访问目录下:
mv showdoc /usr/local/nginx/html/
然后赋予权限:
chmod -R 777 showdoc
修改nginx配置文件:
vim /usr/local/nginx/nginx.conf #编译时选择的安装目录
nginx关联php来启动
重新验证配置和重启nginx:
/usr/local/nginx/sbin/nginx -t

/usr/local/nginx/sbin/nginx -s reload
访问本地ip安装即可:
http://192.168.1.12/install
nginx所有配置
html主页面设置
[root@nginx html]# cat index.html

<html>

<head><meta charset="utf-8">

<meta http-equiv="X-UA-Compatible" content="IE=edge">

<link rel="stylesheet" href="css/varbar.css"/> <!-- 调用css -->

<!--<link rel="stylesheet" href="css/style.default.css" id="theme-stylesheet">-->

<title>运维</title>

<base target="iframe"/>

</head>

<body>

    <div class="menu">  <!-- class选择器 -->

        <div class="nav">

          <ul><li><a href="http://192.168.1.12/welcome.html"><h5 align="center">首页<h5></a><li></ul>

         <ul><li><a href="http://192.168.1.12:81"><h5 align="center">信息管理业<h5></a></li></ul>

         <ul><li><a href="http://192.168.1.12:84"><h5 align="center">zabbix<h5></a></li></ul>

          <ul><li><a href="http://192.168.1.12:82"><h5 align="center">资源共享<h5></a></li></ul>
      <ul><li><a href="http://192.168.1.12:3000"><h5 align="center">Grafana<h5></a></li></ul>

        </div>

        </nav>

    <div id="content">

             <!-- 右侧 -->

            <iframe frameboder="0" border="0" scrolling="yes" name="iframe" src="welcome.html" style="width:98%;height:98%"></iframe>

    </div>

    </div>

</body>

</html>
css样式配置
[root@nginx html]# cat css/varbar.css
body
{
text-align:center; /* 文字居中 */
}
ul
{
list-style-type:none; /* ul前面的点 */
}
* {
margin:0px 0px; /* 到边框的距离 */
}
.menu
{
background:#F8F8FF; /* 导航条背景的颜色 */
}
.nav
{
margin:0 auto; /* 导航栏文字的位置 */
width:700px; /* 和文字宽度有关,不能小于文字宽度的总和 */
height:50px; /* 导航栏的宽度 */
}
.nav a
{
float:left; /* 导航栏的位置配置 */
width:120px; /* 选中的文字块的长度 */
line-height:50px; /* 选中的文字块的宽度 */
text-decoration: none; /* 去掉连接下划线 */
font-size:25px; /* 字体大小 */
color: #FF1493; /* 字体颜色 */
}
.nav li a:hover
{
background-color: #D8D8D8; /* 选中的文字块的颜色 */
text-decoration:none; /* 选中时去掉连接下划线 */
}
.nav li a:link{
text-decoration:none; /* 连接被点之后没有下划线 */
导航首页(欢迎页)配置
[root@nginx html]# cat welcome.html

<html>

 <head>

   <title>运维</title>

   <meta charset="UTF-8">

   <div style="text-align:center;">

        <style type="text/css">

               a:link,a:visited{

               text-decoration:none;  /*超链接无下划线*/

        }

               a:hover{

               text-decoration:underline;  /*鼠标放上去有下划线*/

        }

        </style>

               <h1>嘉配运维</h1>

   </div>

</head>

</html>
cat /usr/local/nginx/nginx.conf
user  root;

#worker_processes  1;

error_log  /usr/local/nginx/logs/error.log;

pid        /usr/local/nginx/nginx.pid;

## Events Module ##

worker_processes  8;

worker_rlimit_nofile 65536;

events {

    use epoll;

    worker_connections  10240;

}

## End of Events Module ##

## Http ##

http {

    include       mime.types;

    default_type  application/octet-stream;

    charset utf-8;

#    log_format  main  '$remote_addr - $remote_user [$time_local] "$request" '

#        '$status $body_bytes_sent "$http_referer" '

#        '"$http_user_agent" "$http_x_forwarded_for"';

#

    log_format main '$remote_addr "$time_iso8601" "$request" '

                    '$status $body_bytes_sent "$http_user_agent" "$http_referer" "$http_x_forwarded_for" '

                    '"$request_time" "$upstream_response_time" "$http_cookie" "$http_Authorization" "$http_token"';

    access_log  /usr/local/nginx/logs/access.log;

    server_tokens           off;

    sendfile                on;

    tcp_nopush              on;

    tcp_nodelay             on;

    keepalive_timeout       65;

    keepalive_requests      150;

#    server_names_hash_bucket_size 128;

#    client_header_buffer_size 32k;

#    large_client_header_buffers 4 32k;

#    client_max_body_size 8m;

    fastcgi_connect_timeout 180;

    fastcgi_send_timeout 180;

    fastcgi_read_timeout 180;

    fastcgi_buffer_size 64k;

    fastcgi_buffers 4 64k;

    fastcgi_busy_buffers_size 128k;

    fastcgi_temp_file_write_size 128k;

    gzip                    on;

    gzip_min_length         1k;

    gzip_buffers            4 256k;

    gzip_http_version       1.1;

    gzip_comp_level         9;

    gzip_types              text/plain application/x-javascript text/css application/xml;

    ## Virtual Hosts Include ##

    include /usr/local/nginx/conf.d/*.conf;

    ## End of Virtual Hosts Include ##

}

## End of Http ##
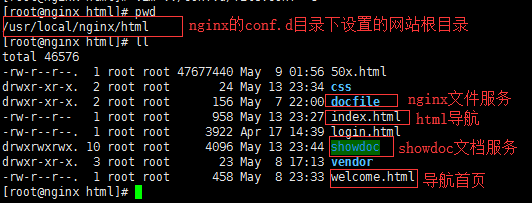
cd /usr/local/nginx/conf.d

nginx网站根目录配置
[root@nginx conf.d]# cat root.conf
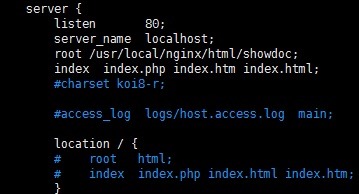
## VirtualHost for showdoc ## server {
listen 80;
server_name localhost; location / {
root /usr/local/nginx/html;
index index.php index.html index.htm;
} error_page 500 502 503 504 /50x.html;
location = /50x.html {
root html;
} # pass the PHP scripts to FastCGI server listening on 127.0.0.1:9000
#
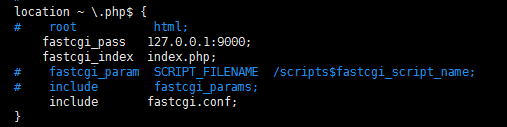
location ~ \.php$ {
root /usr/local/nginx/html;
fastcgi_pass 127.0.0.1:9000;
fastcgi_index index.php;
fastcgi_param SCRIPT_FILENAME $document_root$fastcgi_script_name;
include fastcgi_params;
} }
nginx 文件服务配置
[root@nginx conf.d]# cat docfile.conf

    server {

        listen       82;

        charset   utf-8;

        server_name  localhost;

            root   /usr/local/nginx/html/docfile;

        location / {

             autoindex on;             #开启索引功能

             autoindex_exact_size off; # 关闭计算文件确切大小(单位bytes),只显示大概大小(单位kb、mb、gb)

             autoindex_localtime on;   # 显示本机时间而非 GMT 时间

        }

        error_page   500 502 503 504  /50x.html;

        location = /50x.html {

            root   html;

        }

    }
zabbix配置
    server {

        listen       84;

        charset   utf-8;

        server_name  192.168.1.12;

        location / {

            root   /usr/local/nginx/html/zabbix;

            index  index.html index.htm index.php;

        }

        error_page   500 502 503 504  /50x.html;

        location = /50x.html {

            root   html;

        }

        # pass the PHP scripts to FastCGI server listening on 127.0.0.1:9000

        #

        location ~ \.php$ {

            root           /usr/local/nginx/html/zabbix;

            fastcgi_pass   127.0.0.1:9000;

            fastcgi_index  index.php;

            fastcgi_param  SCRIPT_FILENAME  $document_root$fastcgi_script_name;

            include        fastcgi_params;

        }

    }
grafana配置
vim /usr/local/nginx/conf.d/grafana.conf
## VirtualHost for grafana ##
server {
listen 3001;
charset utf-8;
server_name 192.168.1.12;
location / {
root /usr/share/grafana/public/views/;
index index.html index.htm index.php;
}
error_page 500 502 503 504 /50x.html;
location = /50x.html {
root html;
}
# pass the PHP scripts to FastCGI server listening on 127.0.0.1:9000
#
location ~ \.php$ {
root /usr/share/grafana/public/views/;
fastcgi_pass 127.0.0.1:9000;
fastcgi_index index.php;
fastcgi_param SCRIPT_FILENAME $document_root$fastcgi_script_name;
include fastcgi_params;
}
}
showdoc文档配置
[root@nginx conf.d]# cat showdoc.conf

## VirtualHost for showdoc ##

    server {

        listen       81;

        server_name    localhost;

        location / {

            root   /usr/local/nginx/html/showdoc;

            index  index.php index.html index.htm;

        }

        error_page   500 502 503 504  /50x.html;

        location = /50x.html {

            root   html;

        }

        # pass the PHP scripts to FastCGI server listening on 127.0.0.1:9000

        #

        location ~ \.php$ {

            root           /usr/local/nginx/html/showdoc;

            fastcgi_pass   127.0.0.1:9000;

            fastcgi_index  index.php;

            fastcgi_param  SCRIPT_FILENAME  $document_root$fastcgi_script_name;

            include        fastcgi_params;

        }

    }
/usr/lcoal/nginx/sbin/nginx -t #重写配置
/usr/lcoal/nginx/sbin/nginx -s reload #重启nginx
ps -ef | grep nginx #查看nginx进程
nginx设置导航&安装showdoc&创建文件服务&zabbix&grafana的更多相关文章
- Mysql数据库一:安装与创建windows服务
Mysql数据库安装与创建windows服务 1.先下载压缩包(mysql-5.7.18-winx64.zip)移动到对应目录(如D:\software)后解压. 2.安装服务端: mysqld:带d ...
- Linux CentOS安装搭建FTP文件服务
本文环境:centos7,IP=192.168.1.11 1.安装vsftpd和默认配置启动 1.1 安装vsftpd yum install -y vsftpd 1.2 启动vsftpd syste ...
- 基于commons-net实现ftp创建文件夹、上传、下载功能
原文:http://www.open-open.com/code/view/1420774470187 package com.demo.ftp; import java.io.FileInputSt ...
- Linux centosVMware 自动化运维Ansible介绍、Ansible安装、远程执行命令、拷贝文件或者目录、远程执行脚本、管理任务计划、安装rpm包/管理服务、 playbook的使用、 playbook中的循环、 playbook中的条件判断、 playbook中的handlers、playbook实战-nginx安装、管理配置文件
一.Ansible介绍 不需要安装客户端,通过sshd去通信 基于模块工作,模块可以由任何语言开发 不仅支持命令行使用模块,也支持编写yaml格式的playbook,易于编写和阅读 安装十分简单,ce ...
- ubuntu环境下nginx的编译安装以及相关设置
一.基本的编译与安装 1.安装依赖项 sudo apt-get update sudo apt-get install build-essential zlib1g-dev libpcre3 libp ...
- nginx设置成开机自动启动服务
1.nginx的安装目录 /usr/local/nginx 启动nginx cd /usr/local/nginx/sbin./nginx 更改配置重启nginxcd /usr/local/nginx ...
- Centos7 设置自定义安装nginx的systemctl启动方式
一.systemctl方式启动设置过程 1.首先创建服务配置文件(名字和路径就是这个) vim /usr/lib/systemd/system/nginx.service 2.添加配置内容 [Unit ...
- 安装自创建的windows服务。
安装自创建的windows服务. 使用工具InstallUtil.exe进行安装和卸载创建的windows服务 安装:C:/WINDOWS/Microsoft.NET/Framework/v2.0.5 ...
- nginx tar.gz安装方法+简单静态文件配置
1.首先安装依赖包(依赖包有点多,我们采用yum的方式来安装) yum -y install zlib zlib-devel openssl openssl-devel pcre pcre-devel ...
随机推荐
- Java学习日记基础篇(八) —— 二进制、位运算、位移运算
二进制 二进制是逢2进位的进位置,0,1是基本算符 原码反码补码 在基本数据类型那里,有详细解释 二进制的最高位数是符号位:0表示整数,1表示负数 正数的原码,反码,补码都一样 负数的反码 = 它的原 ...
- git前期准备
git小结 设置用户名 git config –global user.name 'itcast' 设置用户名邮箱 git config –global user.email 'itcast' 查看设 ...
- 咏南中间件新增MORMOT插件功能
咏南中间件新增MORMOT插件功能 咏南中间件支持DATASNAP和MORMOT两种通讯框架. 原来已经支持DATASNAP插件,现在又增加了MORMOT插件,已经支持DATASNAP和MORMOT两 ...
- python -- 安装 django
django-admin startproject 创建的文件名python3/python manage.py startapp 子项目名称python3/python manage.py runs ...
- 【Oracle/Java】多表插删数据单多线程比较
源码下载:https://files.cnblogs.com/files/xiandedanteng/OracleAccessComparison20191117.rar 做这个比较工程初衷是:我在单 ...
- How can I get a Netty server to reload a TLS certificate when it is renewed?
java - How can I get a Netty server to reload a TLS certificate when it is renewed? - Stack Overflow ...
- 编译grub时报告"grub_script.yy.c:19:22: error: statement with no effect [-Werror=unused-value]"怎么处理?
答: 在configure时加--disable-werror选项,如下: ./configure --target=aarch64-linux-gnu --disable-werror
- osg::NodeVisitor example
[0]osg::Group [1]osg::MatrixTransform [1] osg::MatrixTransform [1]osg::MatrixTransform [2] osg::Geod ...
- Qt编写自定义控件46-树状导航栏
一.前言 树状导航栏控件是所有控件中最牛逼最经典最厉害的一个,在很多购买者中,使用频率也是最高,因为该导航控件集合了非常多的展示效果,比如左侧图标+右侧箭头+元素前面的图标设置+各种颜色设置等,全部涵 ...
- OpenStack社区中的GO语言之争
1 背景介绍 Swift之前几乎所有的代码都是用Python实现的,但是性能一直不理想, 社区为了解决性能问题,尝试过很多方法,后来发现用Golang语言进行一部分代码重写, 性能得到了一定的提升,社 ...