
【python3】window下 vscode 配置 python3开发环境
本文以python3.7 为例
一 下载python3
url : https://www.python.org/downloads/windows/

提示: 安装过程中。记得勾选 添加环境变量

二 、 vscode 安装所需插件
1 插件名称: python , 插件功能: 这个是vscode提供的python 官方插件,提供了python代码的调试,自动补全,代码格式化等功能

2 插件名称: vscode-icons , 插件功能: 这个也是vscode官方提供的插件,作用是给vscode编辑的文件增加图标。

3 插件名称:Path Intellisense , 插件功能:这个插件的作用是当代码中读入文件名或者文件路径时,提供文件名或者文件路径的自动补全

4 插件名称:Guides , 插件功能: 这个插件的作用是增加 .py 中的指示线,用这个插件能让代码的层次结构更加清晰。

5 插件名称: Bracket Pair Colorizer , 插件功能: 这个插件的作用是给代码中的括号增加颜色,同一对括号是相同的颜色,尤其是在括号中还包着括号的时候,看起来更加的清晰。

6 插件名称: topper , 插件功能: 这个插件的作用是在.py文件的开头添加一些说明header

三 、 配置
1 创建python文件夹
vscode 是基于文件夹的编辑器,我们可以首先建立一个文件夹叫做python,作为我们的Python编程工作空间,只要一次配置好了这个工作空间,以后这个工作空间的配置就会对它之下的所有的.py 文件都起作用。
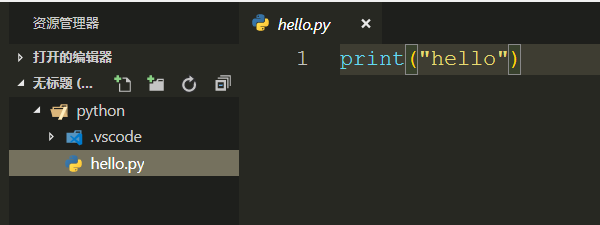
打开vscode,点击左上角文件 —> 打开文件夹,然后打开刚刚建立的PYTHON 文件夹。新建一个 hello.py 文件
2 配置 launch.json 文件
点击菜单栏调试 —> 打开配置,就会弹出一个选择框,我们在这里要选择Python,然后就打开了launch.json 文件:

我们看到的launch.json 文件中的内容如上图所示。同时我们还发现,在python工作区PYTHON下面还多了一个文件夹.vscode, 而且launch.json 就在这个文件夹中。
对launch.json 文件的配置如下: 这是我配置的全部内容。可以参考一下
{

    // 使用 IntelliSense 了解相关属性。

    // 悬停以查看现有属性的描述。

    // 欲了解更多信息,请访问: https://go.microsoft.com/fwlink/?linkid=830387

    "version": "0.2.0",

    "configurations": [

        {

            "name": "Python3",

            "type": "python",

            "request": "launch",

            "stopOnEntry": false,

            "pythonPath": "C:/Users/Administrator/AppData/Local/Programs/Python/Python37", //python3的安装路径

            "program": "${file}",

            "cwd": "${workspaceFolder}",

            "env": {},

            "envFile": "${workspaceFolder}/.env",

            "debugOptions": [

                "RedirectOutput"

            ]

        },

        {

            "name": "Python: Attach",

            "type": "python",

            "request": "attach",

            "localRoot": "${workspaceFolder}",

            "remoteRoot": "${workspaceFolder}",

            "port": 3000,

            "secret": "my_secret",

            "host": "localhost"

        },

        {

            "name": "Python: Terminal (integrated)",

            "type": "python",

            "request": "launch",

            "stopOnEntry": false,

            "pythonPath": "C:/Users/Administrator/AppData/Local/Programs/Python/Python37",

            "program": "${file}",

            "cwd": "",

            "console": "integratedTerminal",

            "env": {},

            "envFile": "${workspaceFolder}/.env",

            "debugOptions": []

        },

        {

            "name": "Python: Terminal (external)",

            "type": "python",

            "request": "launch",

            "stopOnEntry": false,

            "pythonPath": "C:/Users/Administrator/AppData/Local/Programs/Python/Python37",

            "program": "${file}",

            "cwd": "",

            "console": "externalTerminal",

            "env": {},

            "envFile": "${workspaceFolder}/.env",

            "debugOptions": []

        },

        {

            "name": "Python: Django",

            "type": "python",

            "request": "launch",

            "stopOnEntry": true,

            "pythonPath": "C:/Users/Administrator/AppData/Local/Programs/Python/Python37",

            "program": "${workspaceFolder}/manage.py",

            "cwd": "${workspaceFolder}",

            "args": [

                "runserver",

                "--noreload",

                "--nothreading"

            ],

            "env": {},

            "envFile": "${workspaceFolder}/.env",

            "debugOptions": [

                "RedirectOutput",

                "Django"

            ]

        },

        {

            "name": "Python: Flask (0.11.x or later)",

            "type": "python",

            "request": "launch",

            "module": "flask",

            "env": {

                "FLASK_APP": "app.py"

            },

            "args": [

                "run",

                "--no-debugger",

                "--no-reload"

            ]

        },

        {

            "name": "Python: Module",

            "type": "python",

            "request": "launch",

            "module": "module.name"

        },

        {

            "name": "Python: Pyramid",

            "type": "python",

            "request": "launch",

            "args": [

                "${workspaceFolder}/development.ini"

            ],

            "debugOptions": [

                "RedirectOutput",

                "Pyramid"

            ]

        },

        {

            "name": "Python: Watson",

            "type": "python",

            "request": "launch",

            "program": "${workspaceFolder}/console.py",

            "args": [

                "dev",

                "runserver",

                "--noreload=True"

            ]

        },

        {

            "name": "Python: All debug Options",

            "type": "python",

            "request": "launch",

            "pythonPath": "${config:python.pythonPath}",

            "program": "${file}",

            "module": "module.name",

            "env": {

                "VAR1": "",

                "VAR2": ""

            },

            "envFile": "${workspaceFolder}/.env",

            "args": [

                "arg1",

                "arg2"

            ],

            "debugOptions": [

                "RedirectOutput"

            ]

        }

    ]

}
3 配置 tasks.json 文件
点击菜单栏 终端 —> 配置任务,就会弹出一个选择框,我们在这里要选择使用模板创建tasks.json文件,然后又弹出一个选择框,这里选择Others,就打开了tasks.json 文件:
配置修改如下:
{

    // See https://go.microsoft.com/fwlink/?LinkId=733558

    // for the documentation about the tasks.json format

    "version": "2.0.0",

    "tasks": [

        {

            "label": "python3",

            "type": "shell",

            "command": "C:/Users/Administrator/AppData/Local/Programs/Python/Python37",

            "args": [

                "${file}"

            ]

        }

    ]

}
4 用户设置:
点击菜单栏文件 —> 首选项—> 设置,然后打开用户设置:
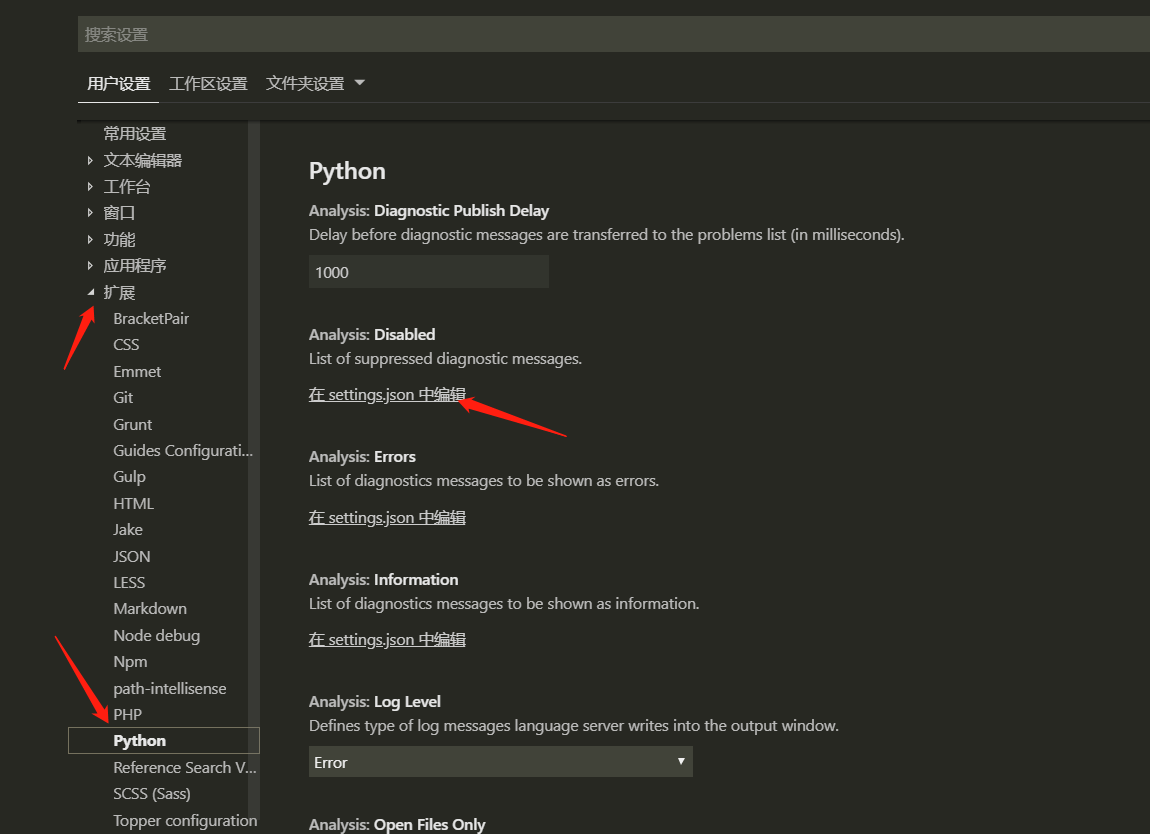
在扩展里找到 python 打开,在 settings.json 编辑。
{

    "window.zoomLevel": 1,

    "files.autoSave": "afterDelay",

    "explorer.confirmDragAndDrop": false,"editor.renderIndentGuides": false,

    "git.ignoreLegacyWarning": true,

    "workbench.iconTheme": "vscode-icons", //启用vscode图标

    "python.pythonPath": "/usr/bin/python3", // python3路径

    "editor.lineHeight": 26, // 编辑器中的行高

    "editor.fontSize": 18, // 编辑器中的字体

    "editor.wordWrap": "on",

    "editor.formatOnSave": true, //编辑器自动保存

    "python.linting.flake8Enabled": true,

    "python.linting.enabled": false,

    //启用flake8,首先需要pip3 install falke8

    "python.formatting.provider": "yapf", ///启用yapf,首先需要pip3 install yapf

    "path-intellisense.autoSlashAfterDirectory": true,

    "path-intellisense.extensionOnImport": true,

    "workbench.colorTheme": "Monokai", // 配色方案

    "python.linting.pylintArgs": [

        "--load-plugins",

        "pylint_django",

        "--disable-msg=C0111"

    ], // 忽略的警告信息

    // 下面是topper的插入header配置

    "topper.customTemplateParameters": [

        {

            "personalProfile": {

                "author": "你的名字",

                "website": "bulbasaur.github.bitbucket.yababbdadado.com",

                "copyright": "None \n None",

                "license": "None",

                "email": "你的邮箱"

            }

        },

        {

            "officeProfile": {

                "author": "John Doe",

                "department": "Product Development",

                "email": "john.doe@doejohn.com"

            }

        }

    ],

    "topper.headerTemplates": [

        {

            "defaultCStyled": {

                "headerBegin": "/**",

                "headerPrefix": "*",

                "headerEnd": "*/",

                "template": [

                    "${headerBegin}",

                    "${headerPrefix} ${fileName}",

                    "${headerPrefix} @author ${author}",

                    "${headerPrefix} @description ${description}",

                    "${headerPrefix} @created ${createdDate}",

                    "${headerPrefix} @copyright ${copyright}",

                    "${headerPrefix} @last-modified ${lastModifiedDate}",

                    "${headerEnd}"

                ]

            }

        },

        {

            "python": {

                "headerBegin": "# -*- coding: utf-8 -*-",

                "headerPrefix": "#",

                "headerEnd": "#",

                "template": [

                    "${headerBegin}",

                    "${headerPrefix} ${fileName}",

                    "${headerPrefix} @author ${author}",

                    "${headerPrefix} @description ${description}",

                    "${headerPrefix} @created ${createdDate}",

                    "${headerPrefix} @last-modified ${lastModifiedDate}",

                    "${headerEnd}"

                ]

            }

        }

    ],

    "editor.fontFamily": "monospace",

    "terminal.integrated.fontFamily": "monospace",

    "editor.fontWeight": "",

}
四 、 其他
1 需要更新一下pip
cmd 下 执行命令:
python -m pip install --upgrade pip
2 安装 flake 8
cmd 下 执行命令:
pip install flake8
3 查看python 安装路径
>>> import sys

>>> sys.path

['', 'C:\\Users\\Administrator\\AppData\\Local\\Programs\\Python\\Python37\\pyth

on37.zip', 'C:\\Users\\Administrator\\AppData\\Local\\Programs\\Python\\Python37

\\DLLs', 'C:\\Users\\Administrator\\AppData\\Local\\Programs\\Python\\Python37\\

lib', 'C:\\Users\\Administrator\\AppData\\Local\\Programs\\Python\\Python37', 'C

:\\Users\\Administrator\\AppData\\Local\\Programs\\Python\\Python37\\lib\\site-p

ackages']
最终结果: C:\Users\Administrator\AppData\Local\Programs\Python\Python37
配置到此结束,可以愉快玩耍了
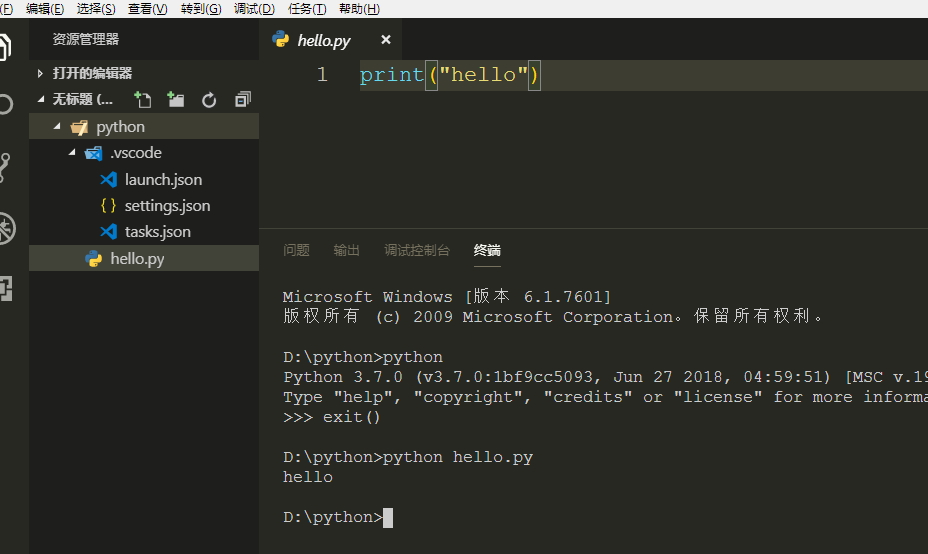
快速调试。可以参看这篇文章: https://www.cnblogs.com/richerdyoung/p/12001508.html
【python3】window下 vscode 配置 python3开发环境的更多相关文章
- 2016年最新mac下vscode配置golang开发环境支持debug
网上目前还找不到完整的mac下golang环境配置支持,本人配置成功,现在整理分享出来. mac最好装下xcode,好像有依赖关系安装Homebrew打开终端窗口, 粘贴脚本执行/usr/bin/ru ...
- VSCode配置JAVA开发环境
VSCode配置JAVA开发环境 1:给机器安装JDK.MAVEN 下载JDK 下载路径:https://www.oracle.com/technetwork/java/javase/download ...
- Ubuntu Linux下如何配置Android开发环境
下载和安装Win7系统Android开发环境中讲了怎样在Win7系统中安装Android开发环境,那么怎样在Linux系统中配置Android开发环境呢?本篇文章就将演示如何使用Eclipse.And ...
- Vscode配置springboot开发环境变量
先安装必要的插件 然后在左下角setting 打开setting 配置setting.json文件 ,主要是配置了用户设置 这里面主要配置jdk环境和maven,建议下载vscode推荐的openjd ...
- python_在windows下安装配置python开发环境及Ulipad开发工具
最近开始学习Python,在网上寻找一下比较好的IDE.因为以前用C#做开发的,用Visual Studio作为IDE,鉴于用惯了VS这么强大的IDE,所以对IDE有一定的依赖性. Python的ID ...
- 在windows下安装配置python开发环境及Ulipad开发工具(转)
最近开始学习Python,在网上寻找一下比较好的IDE.因为以前用C#做开发的,用Visual Studio作为IDE,鉴于用惯了VS这么强大的IDE,所以对IDE有一定的依赖性. Python的ID ...
- vscode 配置 golang开发环境
如果你使用golang,那么强烈建议你采用vscode作为IDE. 1. 首先在vscode 当中安装go插件,如上图 2. 配置 %AppData%\Code\User\settings.json ...
- vscode配置golang开发环境手把手描述篇
1.下载安装Golang https://golang.google.cn/dl/ 一路下一步即可 2.下载安装Vscode https://visualstudio.microsoft.com/zh ...
- Fedora Linux 下安装配置C开发环境Code::Blocks
一.提前的话要说C语言和Linux的关系大家应该都不会陌生,Linux系统内核就是用C语言开发的,所以所有的Linux系统下面 都会有C的编译调试工具,不过这些工具都是命令式的,正式开发的话会很不方便 ...
随机推荐
- SpringMVC系列(六)处理模型数据
Spring MVC 提供了以下几种途径输出模型数据: ModelAndView: 处理方法返回值类型为 ModelAndView时, 方法体即可通过该对象添加模型数据 Map 及 Model: ...
- unity------------------------------transform.forward与Vector.forward的区别
在unity3d中有2个forward,一个是vector3.forward和transform.forward,这两个forward其实完全不一样.他们之间的区别主要体现在在不同坐标系时的反映上. ...
- git 在命令行与图形状态下使用详情
http://blog.csdn.net/risky78125/article/details/50850545 http://blog.csdn.net/risky78125/article/det ...
- Activiti5.16.4部署小记
版本说明 OS:Win7 JDK:jdk1.6.0_45 Tomcat:apache-tomcat-7.0.62(解压缩版) 部署过程 1.安装JDK,配置环境变量,so easy,具体过程就不写了, ...
- sqoop定时增量导入导出
sqoop定时增量导入 2013-11-06 14:23 4553人阅读 评论(0) 收藏 举报 sqoop使用hsql来存储job信息,开启metastor service将job信息共享,所有no ...
- make screenshot at Eclipse
In Eclipse, from the Window menu, select Open Perspective > Other... > DDMS. Select the Kindle ...
- Android App Crash, send email to author
http://www.iriphon.com/2011/06/23/how-do-i-get-android-crash-logs/
- [原]unity3d 纹理旋转
纹理旋转实现思路:纹理坐标*平移矩阵*旋转矩阵(类似顶点旋转): 矩阵一般要求中心点为(0,0) 而纹理中心点默认(0.5,0.5);所以先得平移到(0,0):可以考虑乘以平移矩阵[1,0,0,0,1 ...
- ECharts 3 -- gauge表盘的配置项
绘制一个简单的表盘图表 在绘图前我们需要为 ECharts 准备一个具备高宽的 DOM 容器. <body> <!-- 为 ECharts 准备一个具备大小(宽高)的 DOM --& ...
- MySQL---insert into select from
INSERT INTO perf_week(node_id,perf_time,pm25,pm10,temp,humi) SELECT node_id,'2016-12-22 11:55:00' AS ...