
LINUX centos 7.2/7.3 搭建LAMP环境
首先我们先查看下centos的版本信息
#适用于所有的linux

lsb_release -a

#或者

cat /etc/redhat-release

#又或者

rpm -q centos-release
接下来我们先安装一台web服务器,因为是lanp,所以我们选用的是apache
yum install httpd
然后我们手动启动apache
#centos7 启动httpd

apachectl start

#centos6. 启动httpd

/etc/init.d/httpd start 或者 service httpd start
既然web服务器搭好了是不是就代表着可以通过web进行访问了呢?是的,浏览器直接访问你的服务器ip地址,就会打开apache的默认页面。
接下来我们设置开机启动httpd服务
#centos7

systemctl enable httpd.service
接着我们安装php5,同样很简单,一条命令即可
(因为我这边有需要,所以我安装的是php5.,如果没有特殊需求的话,直接去掉数字就好)

yum install php55

#centos7 安装好后重启apache

apachectl restart
#下面是安装php5.5的组件例如GD库等
yum install php55w.x86_64 php55w-cli.x86_64 php55w-common.x86_64 php55w-gd.x86_64 php55w-ldap.x86_64 php55w-mbstring.x86_64 php55w-mcrypt.x86_64 php55w-mysql.x86_64 php55w-pdo.x86_64
如果php安装出错,我们更换掉rpm源就好,然后重新执行上面的代码
#CentOs .X rpm源(任选其一):

    rpm -Uvh https://mirror.webtatic.com/yum/el7/epel-release.rpm

    rpm -Uvh https://mirror.webtatic.com/yum/el7/webtatic-release.rpm
mysql安装
一般网上给出的资料都是
#yum install mysql

#yum install mysql-server

#yum install mysql-devel
安装mysql和mysql-devel都成功,但是安装mysql-server失败,如下:

[root@yl-web yl]# yum install mysql-server

Loaded plugins: fastestmirror

Loading mirror speeds from cached hostfile

 * base: mirrors.sina.cn

 * extras: mirrors.sina.cn

 * updates: mirrors.sina.cn

No package mysql-server available.

Error: Nothing to do
查资料发现是CentOS 7 版本将MySQL数据库软件从默认的程序列表中移除,用mariadb代替了。
方法一:安装mariadb
MariaDB数据库管理系统是MySQL的一个分支,主要由开源社区在维护,采用GPL授权许可。开发这个分支的原因之一是:甲骨文公司收购了MySQL后,有将MySQL闭源的潜在风险,因此社区采用分支的方式来避开这个风险。MariaDB的目的是完全兼容MySQL,包括API和命令行,使之能轻松成为MySQL的代替品。
安装mariadb,大小59 M。
[root@yl-web yl]# yum install mariadb-server mariadb
mariadb数据库的相关命令是:
systemctl start mariadb #启动MariaDB
systemctl stop mariadb #停止MariaDB
systemctl restart mariadb #重启MariaDB
systemctl enable mariadb #设置开机启动
所以先启动数据库
[root@yl-web yl]# systemctl start mariadb
然后就可以正常使用mysql了
[root@yl-web yl]# mysql -u root -p

Enter password:

Welcome to the MariaDB monitor.  Commands end with ; or \g.

Your MariaDB connection id is 3

Server version: 5.5.41-MariaDB MariaDB Server

Copyright (c) 2000, 2014, Oracle, MariaDB Corporation Ab and others.

Type 'help;' or '\h' for help. Type '\c' to clear the current input statement.

MariaDB [(none)]> show databases;

+--------------------+

| Database           |

+--------------------+

| information_schema |

| mysql              |

| performance_schema |

| test               |

+--------------------+

4 rows in set (0.00 sec)

MariaDB [(none)]>
安装mariadb后显示的也是 MariaDB [(none)]> ,可能看起来有点不习惯。下面是第二种方法。
方法二:官网下载安装mysql-server
# wget http://dev.mysql.com/get/mysql-community-release-el7-5.noarch.rpm

# rpm -ivh mysql-community-release-el7-5.noarch.rpm

# yum install mysql-community-server
安装成功后重启mysql服务。
# service mysqld restart
初次安装mysql,root账户没有密码。
[root@yl-web yl]# mysql -u root

Welcome to the MySQL monitor.  Commands end with ; or \g.

Your MySQL connection id is 3

Server version: 5.6.26 MySQL Community Server (GPL)

Copyright (c) 2000, 2015, Oracle and/or its affiliates. All rights reserved.

Oracle is a registered trademark of Oracle Corporation and/or its

affiliates. Other names may be trademarks of their respective

owners.

Type 'help;' or '\h' for help. Type '\c' to clear the current input statement.

mysql> show databases;

+--------------------+

| Database           |

+--------------------+

| information_schema |

| mysql              |

| performance_schema |

| test               |

+--------------------+

4 rows in set (0.01 sec)

mysql>
设置密码
mysql> set password for 'root'@'localhost' =password('password');

Query OK, 0 rows affected (0.00 sec)

mysql>
不需要重启数据库即可生效。
在mysql安装过程中如下内容:
Installed:
  mysql-community-client.x86_64 0:5.6.26-2.el7                mysql-community-devel.x86_64 0:5.6.26-2.el7
  mysql-community-libs.x86_64 0:5.6.26-2.el7                  mysql-community-server.x86_64 0:5.6.26-2.el7

Dependency Installed:
  mysql-community-common.x86_64 0:5.6.26-2.el7

Replaced:
  mariadb.x86_64 1:5.5.41-2.el7_0          mariadb-devel.x86_64 1:5.5.41-2.el7_0   mariadb-libs.x86_64 1:5.5.41-2.el7_0
  mariadb-server.x86_64 1:5.5.41-2.el7_0
所以安装完以后mariadb自动就被替换了,将不再生效。
[root@yl-web yl]# rpm -qa |grep mariadb

[root@yl-web yl]#
配置mysql
1、编码
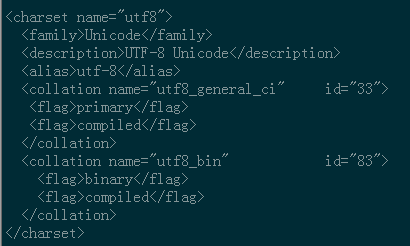
mysql配置文件为/etc/my.cnf
最后加上编码配置
[mysql]

default-character-set =utf8
这里的字符编码必须和/usr/share/mysql/charsets/Index.xml中一致。
2、远程连接设置
把在所有数据库的所有表的所有权限赋值给位于所有IP地址的root用户。
mysql> grant all privileges on *.* to root@'%'identified by 'password';
如果是新用户而不是root,则要先新建用户
mysql>create user 'username'@'%' identified by 'password';
此时就可以进行远程连接了。
最后我们介绍下相关文件的默认安装路径
#apache主配置文件

/etc/httpd/conf/httpd.conf

#相关配置 比如vhost文件就可以创建在该目录下

/etc/httpd/conf.d/

#模块配置文件 比如你要开启rewrite模块,可能你就需要到这个目录下面做一些配置了

/etc/httpd/conf.modules.d/

#web可访问目录 网站根目录

/var/www/html

#apache日志文件目录

/var/log/httpd/
LINUX centos 7.2/7.3 搭建LAMP环境的更多相关文章
- 阿里云 CentOS 6.5 使用XAMPP 搭建LAMP环境
LAMP环境是常见的服务器环境,也是PHP网站常用的服务器环境,很多人喜欢手动配置,但是手动配置LAMP复杂.麻烦,简单一点的话可以使用集成环境.试了下LNMP的集成环境,用不习惯,另外由于本地一直使 ...
- CentOS 与 Ubuntu 使用命令搭建 LAMP 环境
LAMP指的Linux操作系统 + Apache服务器 + MariaDB/MySQL数据库软件 + PHP开发语言的第一个字母. ==================CentOS LAMP===== ...
- LINUX centos 7.2/7.3 搭建LANP环境
首先我们先查看下centos的版本信息 #适用于所有的linux lsb_release -a #或者 cat /etc/redhat-release #又或者 rpm -q centos-relea ...
- CentOS 7使用yum快速搭建LAMP环境
1.安装Apache [root@localhost ~]# yum -y install httpd # 开机自启动 [root@localhost ~]# chkconfig httpd on # ...
- CentOS下搭建LAMP环境详解
前言:在这里将介绍如何在CentOS下搭建LAMP环境(全部使用源码编译安装),用于web服务器开发. •LAMP: Linux + Apache + PHP + Mysql. •系统: CentOS ...
- Linux手动搭建LAMP环境
当你看到标题里的“手动搭建”,你是不是会想,难不成还有“自动搭建”?当然......不是,这里的“手动搭建”是指按部就班的搭建Apache.MySQL.PHP环境,是相对于集成软件包而言的.所以你是不 ...
- CentOS 7搭建LAMP环境(一)
CentOS是Linux发行版之一,它是来自于Red Hat Enterprise Linux依照开放源代码规定释出的源代码所编译而成.由于出自同样的源代码,因此有些要求高度稳定性的服务器以CentO ...
- linux下搭建lamp环境以及安装swoole扩展
linux下搭建lamp环境以及安装swoole扩展 一.CentOS 6.5使用yum快速搭建LAMP环境 准备工作:先更新一下yum源 我安装的环境是:apache2.2.15+mysql5 ...
- CentOS下编译搭建LAMP环境
搭建LAMP环境须知 搭建LAMP环境时,需要安装的所有软件都要按照一定的顺序安装,我们按照Apache->MySQL->PHP的顺序安装.但是在安装PHP之前,应先安装PHP5需要的最新 ...
随机推荐
- 2019杭电多校第三场hdu6608 Fansblog(威尔逊定理)
Fansblog 题目传送门 解题思路 Q! % P = (P-1)!/(P-1)...(Q-1) % P. 因为P是质数,根据威尔逊定理,(P-1)!%P=P-1.所以答案就是(P-1)((P-1) ...
- VIM查找空格
匹配1到多个空格 /\s\+ 或者开启very magic模式 /\v\s+
- splay模版
//splay模版 #include<iostream> #include<cstdio> #include<cstdlib> #include<cstrin ...
- python中 try、except、finally执行顺序
我们虽然经常用到try...except 作为异常补货,但是其实很少去研究try源码和机制,也许点进去看过,也是看不出个所以然来 class Exception(BaseException): &qu ...
- 使用PHP如何去除字符串结尾的字符
前言 在工作中遇到一个需求:一串字符串,如"迅雷官方下载"."快播5.0下载",需要去掉他们结尾的"官方下载"和"下载" ...
- pxe装机试验 2019.8.21
部署FTP服务 1.安装FTP服务,并将安装源复制到/var/ftp/centos7目录下: [root@pxe ~]# yum -y install vsftpd [root@pxe ~]# mkd ...
- 笔记56 Mybatis快速入门(七)
相关概念介绍(二) 6.一级缓存 <1>在一个session里查询相同id的数据 package mybatis.annotation; import java.io.IOExceptio ...
- 笔记43 Spring Web Flow——订购披萨应用详解
一.项目的目录结构 二.订购流程总体设计 三.订购流程的详细设计 1.定义基本流程pizza-flow.xml <?xml version="1.0" encoding=&q ...
- java.sql.Date和java.util.Date的联系和区别
1) java.sql.Date是java.util.Date的子类,是一个包装了毫秒值的瘦包装器,允许 JDBC 将毫秒值标识为 SQL DATE 值.毫秒值表示自 1970 年 1 月 1 日 0 ...
- 自定义实现系统max方法
function MyMath(){ //添加了一个方法 this.getMax=function(){ //所有数字中的最大值 var max=arguments[0]; for(var i=0;i ...