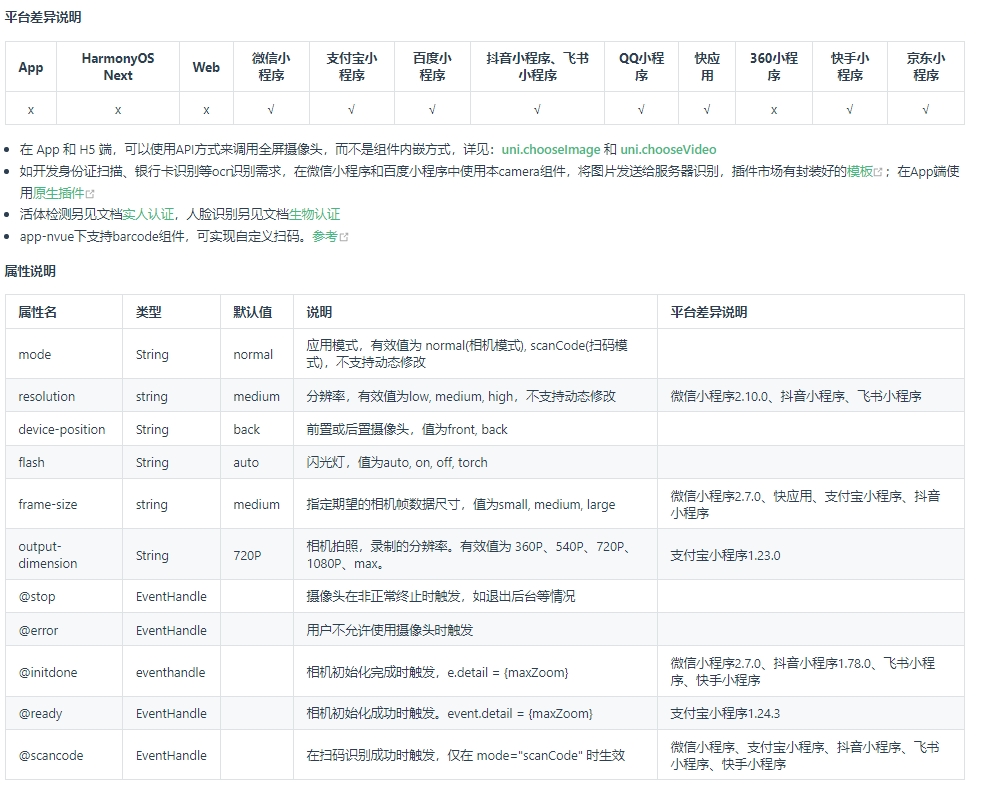
uni-app之camera组件-人脸拍摄
小程序录制视频;10-30秒;需要拍摄人脸,大声朗读数字(123456)这种。
1.camera组件
camera页面内嵌的区域相机组件。注意这不是点击后全屏打开的相机
camera只支持小程序使用;官网链接
1.2 效果图
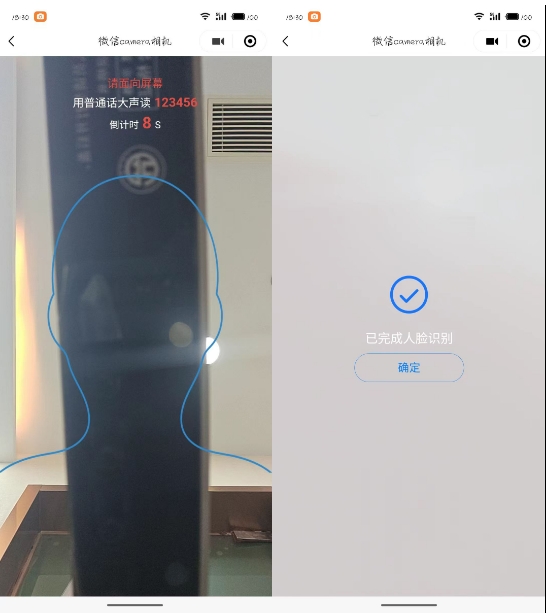
1.3 页面布局
camera 设置宽100%,高度通过uni.getSystemInfo获取,全屏展示。在通过定位把提示文字等信息放上去;
录制完毕,遮罩提示,完成录制,确认返回;


<template>

    <view class="camera-position">

        <camera device-position="front" flash="auto" @error="onCameraError"

            :style="'width: 100%; height: '+ screenHeight +'px;'">

            <!-- 人脸轮廓-图片 -->

            <image src="../../static/face/face-avater.png" style="width: 100%; height: 55vh; margin:22vh 0 0 0;"

                v-if="!achieveShow"></image>

        </camera>

        <!-- 顶部提示信息 -->

        <view class="camera-top text-center" v-show="!achieveShow">

            <view class="text-lg text-red">

                请面向屏幕

            </view>

            <view class="text-xl text-white margin-tb-xs">

                <text class="text-lg">用普通话大声读</text>

                <text class="text-red text-bold margin-left-xs">123456</text>

            </view>

            <view class="text-xxl text-red">

                <text class="text-df text-white">倒计时</text>

                <text class="text-red text-bold margin-lr-xs">{{totalSeconds}}</text>

                <text class="text-df text-white">S</text>

            </view>

        </view>

        <!-- 完成拍摄 -->

        <view class="achieve-shade" :style="'width: 100%; height: '+ screenHeight +'px;'" v-if="achieveShow">

            <view class="" style="font-size: 120rpx;color: #1977FF;">

                <text class="cuIcon-roundcheck"></text>

            </view>

            <view class="text-xl text-white margin-tb-sm">

                已完成人脸识别

            </view>

            <button class="cu-btn line-blue round lg" @click="confirmBut">确定</button>

        </view>

    </view>

</template>
View
css样式
<style lang="scss" scoped>

    .camera-position {

        position: relative;

        .camera-top {

            position: absolute;

            left: 0;

            top: 50rpx;

            width: 100%;

        }

        .camera-bottom {

            position: absolute;

            left: 0;

            bottom: 0;

            width: 100%;

        }

        .achieve-shade {

            position: absolute;

            left: 0;

            top: 0;

            background-color: rgba(222, 222, 222, 0.9);

            display: flex;

            flex-direction: column;

            align-items: center;

            justify-content: center;

            button {

                width: 300rpx;

            }

        }

    }

</style>
css
js代码
<script>

    export default {

        data() {

            return {

                cameraContext: null,

                //计时器

                timer: null,

                //录制时长

                totalSeconds: 10,

                //屏幕高度

                screenHeight: "",

                //是否显示-完成遮罩

                achieveShow: false

            }

        },

        onLoad() {

            let that = this

            uni.getSystemInfo({

                success: (res) => {

                    console.log('屏幕宽度,单位为px:', res.windowWidth);

                    console.log('屏幕高度,单位为px:', res.windowHeight);

                    that.screenHeight = res.windowHeight;

                },

            });

            setTimeout(() => {

                this.startShoot()

            }, 500)

        },

        onReady() {

            // 创建 camera 上下文 CameraContext 对象

            this.cameraContext = uni.createCameraContext()

        },

        methods: {

            // 开始拍摄

            startShoot() {

                this.cameraContext.startRecord({

                    timeoutCallback: () => {

                        console.error('超出限制时长', this.totalSecond);

                    },

                    timeout: this.totalSeconds,

                    success: (res) => {

                        //开启计时器

                        this.timer = setInterval(() => {

                            this.totalSeconds--

                        }, 1000)

                        console.log(res, '开始拍摄');

                    },

                    fail: (err) => {

                        this.errToast('摄像头启动失败,请重新打开')

                    }

                })

            },

            // 结束拍摄

            stopShoot() {

                // 接触 计时器

                if (this.timer) clearInterval(this.timer)

                this.cameraContext.stopRecord({

                    compressed: true,

                    success: (res) => {

                        //显示遮罩

                        this.achieveShow = true

                        // TODO 获取数据帧

                        console.log(res, '结束拍摄');

                    },

                    fail: (err) => {

                        this.errToast('视频保存失败,请重新录制')

                    },

                })

            },

            // 摄像头错误

            onCameraError(error) {

                console.error('摄像头错误: ', error.detail);

            },

            //摄像头-失败操作

            errToast(e) {

                this.$operate.toast({

                    title: e

                })

                setTimeout(() => {

                    this.confirmBut()

                }, 500)

            },

            //确定-返回上一页

            confirmBut() {

                uni.navigateBack()

            },

        },

        watch: {

            //监听倒计时

            totalSeconds: {

                handler(newVal) {

                    // console.log(newVal, '倒计时');

                    //倒计时 = 1 的时候结束拍摄

                    if (newVal == 1) {

                        //结束拍摄

                        this.stopShoot()

                    }

                }

            }

        }

    }

</script>
js
注:第一次进入页面,有时候摄像头会启动失败,需要重新点击打开;
2.微信官方api
微信小程序中需要使用手机拍摄照片以及视频;使用wx.chooseMediaAPI来实现;
该API用于拍摄或从手机相册中选择图片或视频,官网链接为:wx.chooseMedia-微信开放文档
wx.chooseMedia({

	//数量 1-9

	count: 1,

	//时长

	maxDuration: '10',

	// 文件类型  image 图片  video视频   mix同时选择图片和视频

	mediaType: ['video'],

	// 图片和视频选择的来源: album 相册  camera相机拍摄

	sourceType: ['camera'],

	//摄像头: back 前置  front 后置摄像头

	camera: 'back',

	success(res) {

		console.log(res)

		console.log(res.tempFiles[0].tempFilePath)

	},

	fail(err) {

		console.log(err)

	}

})
uni-app之camera组件-人脸拍摄的更多相关文章
- Hierarchy视图里的Transform和Camera组件
Hierarchy视图里的Transform和Camera组件 在Hierarchy视图里,选中Camera,然后在Inspector视图里查看其各组件,如图1-8所示.对于Transform和Cam ...
- ionic3+angular4开发混合app 之自定义组件
这里主要是记录ionic3+angular4开发混合app时自定义组件,我想自定义组件的方法和angular4应该类似,具体在纯angular4中自定义组件,暂时没有实践,个人觉得差别不大,之后实践了 ...
- Top Android App使用的组件(应用)
Top Android App使用的组件 唱吧_462 smack:de.measite.smack:??? ???:org.apache:??? smack:org.jivesoftware.s ...
- uni app中使用自定义图标库
项目中难免会用到自定义图标,那在uni app中应该怎么使用呢? 首先, 将图标目录放在static资源目录下: 在main.js中引入就可以全局使用了 import '@/static/icon-o ...
- uni app 零基础小白到项目实战-1
uni-app是一个使用vue.js开发跨平台应用的前端框架. 开发者通过编写vue.js代码,uni-app将其编译到Ios,android,微信小程序等多个平台,保证其正确并达到优秀体验. Uni ...
- MUI开发APP,scroll组件,运用到区域滚动
最近在开发APP的过程中,遇到一个问题,就是内容有一个固定的头部和底部. 头部就是我们常用的header了,底部的话,就放置一个button,用来提交页面数据或者进入下一个页面等,效果 ...
- 新闻类App使用的组件
UI SlidingMenu:com.jeremyfeinstein.slidingmenu:滑动菜单 ActionBarSherlock:com.actionbarsherlock:Action B ...
- Top Android App使用的组件 2
微信_355 SQLCipher:info.guardianproject.database:Android数据库加密 微博_650 点信传媒:cn.dx:广告平台 Apache HttpClient ...
- 外卖app的header组件开发
1.webpack框架创建 # 全局安装 vue-cli $ npm install --global vue-cli # 创建一个基于 webpack 模板的新项目 $ vue init webpa ...
- [Learn AF3]第五章 App Framework 3组件之Drawer——Side Menu
Drawer——Side menu 组件名称:Drawer 说明:af3中的side menu和af2中有很大变化,af3中的side menu实际上是通过插件$.afui.drawer来实现 ...
随机推荐
- CF1862G 题解
首先这个查询操作很迷,考虑先化简查询操作. 不难发现由于每次是加上一个逆的等差序列,因此一次操作完每个数与它的前驱之差一定会减少,因此加上等差序列的次数就等于全局每个数与它的前驱之差最大值. 又因为会 ...
- vulnhub - hackme2
vulnhub - hackme2 信息收集 还是跟1一样,目录扫描之类的没啥利用点,sql注入先打一遍 SQL注入 sqlmap -u 'http://192.168.157.163/welcome ...
- Java核心基础之数据类型
Java内置数据类型 计算机基础知识 bit 位 ,即0或者1, 0101010110 byte字节,8位作为⼀个字节,字节是处理数据的基本单位 1 byte = 8bits 1KB = 1024 b ...
- HOOK别人的dylib(HOOK cydia里面的插件)
以下仅做我在hook 中的记录, 环境 VM PRO 15 MAC OS 15 Xcode 11.2 工具 monkeydev install_name_tool otool 思路:将要hook 的d ...
- axios和AJAX的区别
axios和ajax的区别 Axios和Ajax都是用于处理网络请求和与服务器进行通信的技术,但它们之间存在一些关键的区别:12 一.技术基础:Ajax(Asynchronous JavaScript ...
- SQL Server 帐号权限管理及C#编程应用(图解)
昨晚在群里讲解这部分内容,因为好久没操作过了,差点翻车...今天把它整理一下发出来,方便没听明白的小伙伴学习和理解. 我们平时学习数据库时,要么使用sa帐号,要么用windows默认帐号登录,总之都拥 ...
- spring boot 快速入门(一)创建一个简单的Spring Boot项目
1.什么是Spring Boot Spring Boot makes it easy to create stand-alone, production-grade Spring based Appl ...
- C# 通过反射(Reflection)调用不同名泛型方法
概述 由于工作需要,需要通过数据类型和方法名控制方法走向 用到的数据类型有8种(string,Int16,Int32,Int64,Boolean,Byte,Single,Double) 读取的方法(参 ...
- web3 产品介绍 etherscan 区块链浏览器 将抽象的数据和理论可视化,小白也能看懂区块链
Etherscan是一个广泛使用的以太坊区块链浏览器和分析平台,它为用户提供了全面的区块链数据查询和交易分析功能.在本文中,我们将介绍Etherscan的主要特点和功能,以及如何使用它来浏览以太坊区块 ...
- 【Zookeeper】Re02 CuratorAPI
Curator,提供给Java操作ZK的API组件: 需要的组件依赖: <!-- https://mvnrepository.com/artifact/org.apache.curator/cu ...