xHook 源码解析
xHook 是爱奇艺开源的一个PLT Hook 框架
项目地址:
https://github.com/iqiyi/xHook
该项目实现了 PTL/GOT Hook
PTL hook 的本质是修改内存中,PLT表对应的值,来实现跳转到自定义函数的
.got和.plt它们的具体含义。

The Global Offset Table (GOT)。简单来说就是在数据段的地址表,假定我们有一些代码段的指令引用一些地址变量,编译器会引用 GOT 表来替代直接引用绝对地址,因为绝对地址在编译期是无法知道的,只有重定位后才会得到 ,GOT 自己本身将会包含函数引用的绝对地址。

The Procedure Linkage Table (PLT)。PLT 不同于 GOT,它位于代码段,动态库的每一个外部函数都会在 PLT 中有一条记录,每一条 PLT 记录都是一小段可执行代码。一般来说,外部代码都是在调用 PLT 表里的记录,然后 PLT 的相应记录会负责调用实际的函数。我们一般把这种设定叫作“蹦床”(Trampoline)。

PLT 和 GOT 记录是一一对应的,并且 GOT 表第一次解析后会包含调用函数的实际地址。既然这样,那 PLT 的意义究竟是什么呢?PLT 从某种意义上赋予我们一种懒加载的能力。当动态库首次被加载时,所有的函数地址并没有被解析
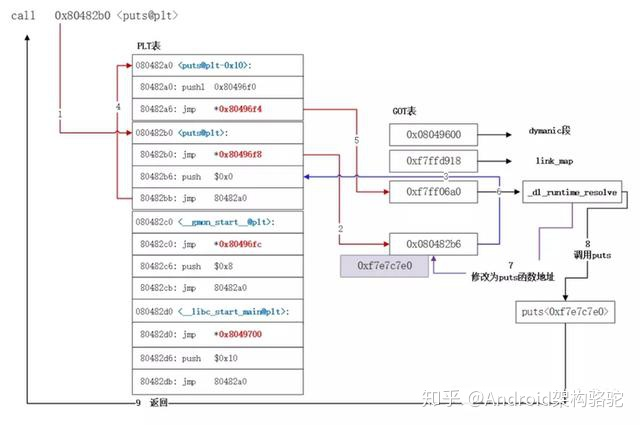
此图介绍了 导入函数被调用时的流程:
也就是说第一次调用时,实际走的时dl_runtime_resolve,去寻找函数真正的地址,找到后,会覆盖函数对应GOT表中的位置,将地址设置为函数实际地址,对应第七步(第一次调用完成之前,这里的值都是PLT中的第二行,实现跳转到PTL[0],即使用dl_runtime_resolve去访问)
那么也就是说, 如果我们主动填充GOT表,就可以使用我们自己也的函数来取代真正的函数,实现hook
那么一起看一下源码,看一下xhook使如何实现这一过程的
官网用法
// 先注册

xhook_register(".*\\.so$", "malloc",  my_malloc,  NULL);

// 再同步(0,异步1也支持)刷新

xhook_refresh(0);
1. 先看一下注册逻辑
xhook.c
int xhook_register(const char *pathname_regex_str, const char *symbol,

                   void *new_func, void **old_func)

{

    return xh_core_register(pathname_regex_str, symbol, new_func, old_func);

}
xh_core.c
int xh_core_register(const char *pathname_regex_str, const char *symbol,
void *new_func, void **old_func)
{
xh_core_hook_info_t *hi;
regex_t regex;
if(NULL == pathname_regex_str || NULL == symbol || NULL == new_func) return XH_ERRNO_INVAL;
if(xh_core_inited)
{
XH_LOG_ERROR("do not register hook after refresh(): %s, %s", pathname_regex_str, symbol);
return XH_ERRNO_INVAL;
}
if(0 != regcomp(®ex, pathname_regex_str, REG_NOSUB)) return XH_ERRNO_INVAL;
if(NULL == (hi = malloc(sizeof(xh_core_hook_info_t)))) return XH_ERRNO_NOMEM;
//1. hi 保存符号
if(NULL == (hi->symbol = strdup(symbol)))
{
free(hi);
return XH_ERRNO_NOMEM;
}
#if XH_CORE_DEBUG
if(NULL == (hi->pathname_regex_str = strdup(pathname_regex_str)))
{
free(hi->symbol);
free(hi);
return XH_ERRNO_NOMEM;
}
#endif
// 2. hi 保存path 表达式
hi->pathname_regex = regex;
// 3. hi 保存新函数指针
hi->new_func = new_func;
// 4. hi 保存旧函数指针
hi->old_func = old_func;
pthread_mutex_lock(&xh_core_mutex);
TAILQ_INSERT_TAIL(&xh_core_hook_info, hi, link);
pthread_mutex_unlock(&xh_core_mutex);
return 0;
}
主要就是最后一句TAILQ_INSERT_TAIL(&xh_core_hook_info, hi, link);,把hi 添加到xh_core_hook_info的末尾
static xh_core_hook_info_queue_t xh_core_hook_info = TAILQ_HEAD_INITIALIZER(xh_core_hook_info);
xh_core_hook_info是个queue,里面保存着xh_core_hook_info_t
2. 再看xhook_refresh 函数
xhook.c
int xhook_refresh(int async)

{

    return xh_core_refresh(async);

}
xh_core.c
int xh_core_refresh(int async)

{

    //init

    xh_core_init_once();

    if(!xh_core_init_ok) return XH_ERRNO_UNKNOWN;

    if(async)

    {

        //init for async

        xh_core_init_async_once();

        if(!xh_core_async_init_ok) return XH_ERRNO_UNKNOWN;

        //refresh async

        pthread_mutex_lock(&xh_core_mutex);

        xh_core_refresh_thread_do = 1;

        pthread_cond_signal(&xh_core_cond);

        pthread_mutex_unlock(&xh_core_mutex);

    }

    else

    {

        //refresh sync

        pthread_mutex_lock(&xh_core_refresh_mutex);

        xh_core_refresh_impl();

        pthread_mutex_unlock(&xh_core_refresh_mutex);

    }

    return 0;

}
核心是 xh_core_refresh_impl
这个方法比较大,下面仅保留核心的部分逻辑
static void xh_core_refresh_impl()

{

......

//读取/proc/self/maps,获取内存映射信息

    if(NULL == (fp = fopen("/proc/self/maps", "r")))

    {

        XH_LOG_ERROR("fopen /proc/self/maps failed");

        return;

    }

    while(fgets(line, sizeof(line), fp))

    {

        // 从一行数据从分别获取addr offset 等信息

        if(sscanf(line, "%"PRIxPTR"-%*lx %4s %lx %*x:%*x %*d%n", &base_addr, perm, &offset, &pathname_pos) != 3) continue;

        ...

        //获取pathname 指针位置

        pathname = line + pathname_pos;

        pathname_len = strlen(pathname);

        ....

		// 这里是检查 pathname 是否再要hook的queue里,如果是就继续走下面

		TAILQ_FOREACH(hi, &xh_core_hook_info, link) //find hook info

        {

            if(0 == regexec(&(hi->pathname_regex), pathname, 0, NULL, 0))

            {

                TAILQ_FOREACH(ii, &xh_core_ignore_info, link) //find ignore info

                {

                    if(0 == regexec(&(ii->pathname_regex), pathname, 0, NULL, 0))

                    {

                        if(NULL == ii->symbol)

                            goto check_finished;

                        if(0 == strcmp(ii->symbol, hi->symbol))

                            goto check_continue;

                    }

                }

                match = 1;

            check_continue:

                break;

            }

        }

       // 假设我们就hook 一个so的一个symbol,那么肯定是走到else,if就先略

       if(NULL != (mi = RB_FIND(xh_core_map_info_tree, &xh_core_map_info, &mi_key)))

       {

       ......

       }

       else

       {

       //not exist, create a new map info

            if(NULL == (mi = (xh_core_map_info_t *)malloc(sizeof(xh_core_map_info_t)))) continue;

            if(NULL == (mi->pathname = strdup(pathname)))

            {

                free(mi);

                continue;

            }

            mi->base_addr = base_addr;

            //repeated?

            //We only keep the first one, that is the real base address

            if(NULL != RB_INSERT(xh_core_map_info_tree, &map_info_refreshed, mi))

            {

#if XH_CORE_DEBUG

                XH_LOG_DEBUG("repeated map info when create: %s", line);

#endif

                free(mi->pathname);

                free(mi);

                continue;

            }

            //hook

            xh_core_hook(mi); //hook

       }

    }

}
else中主要就是构建一个xh_core_map_info_t的对象,记录pathname,so基地址addr的信息,然后就调用到
xh_core_hook,然后就直接调用xh_core_hook_impl
static void xh_core_hook_impl(xh_core_map_info_t *mi)

{

    //init 根据基地址解析,获得一个elf对象

    if(0 != xh_elf_init(&(mi->elf), mi->base_addr, mi->pathname)) return;

    //hook

    xh_core_hook_info_t   *hi;

    xh_core_ignore_info_t *ii;

    int ignore;

	// 这里很简单就是看一下白名单,有没有要忽略的

    TAILQ_FOREACH(hi, &xh_core_hook_info, link) //find hook info

    {

        if(0 == regexec(&(hi->pathname_regex), mi->pathname, 0, NULL, 0))

        {

            ignore = 0;

            TAILQ_FOREACH(ii, &xh_core_ignore_info, link) //find ignore info

            {

                if(0 == regexec(&(ii->pathname_regex), mi->pathname, 0, NULL, 0))

                {

                    if(NULL == ii->symbol) //ignore all symbols

                        return;

                    if(0 == strcmp(ii->symbol, hi->symbol)) //ignore the current symbol

                    {

                        ignore = 1;

                        break;

                    }

                }

            }

			//不忽略就xh_elf_hook

            if(0 == ignore)

                xh_elf_hook(&(mi->elf), hi->symbol, hi->new_func, hi->old_func);

        }

    }

}
int xh_elf_hook(xh_elf_t *self, const char *symbol, void *new_func, void **old_func)

{

......

    XH_LOG_INFO("hooking %s in %s\n", symbol, self->pathname);

    //1. 去bucket 和chain 中找到symbol对应的id

    //find symbol index by symbol name

    if(0 != (r = xh_elf_find_symidx_by_name(self, symbol, &symidx))) return 0;

    // 2. 对plt数组对应的got位置的数据进行替换

    //replace for .rel(a).plt

    if(0 != self->relplt)

    {

        xh_elf_plain_reloc_iterator_init(&plain_iter, self->relplt, self->relplt_sz, self->is_use_rela);

        while(NULL != (rel_common = xh_elf_plain_reloc_iterator_next(&plain_iter)))

        {

            if(0 != (r = xh_elf_find_and_replace_func(self,

                                                      (self->is_use_rela ? ".rela.plt" : ".rel.plt"), 1,

                                                      symbol, new_func, old_func,

                                                      symidx, rel_common, &found))) return r;

            if(found) break;

        }

    }

    //replace for .rel(a).dyn

    if(0 != self->reldyn)

    {

        xh_elf_plain_reloc_iterator_init(&plain_iter, self->reldyn, self->reldyn_sz, self->is_use_rela);

        while(NULL != (rel_common = xh_elf_plain_reloc_iterator_next(&plain_iter)))

        {

            if(0 != (r = xh_elf_find_and_replace_func(self,

                                                      (self->is_use_rela ? ".rela.dyn" : ".rel.dyn"), 0,

                                                      symbol, new_func, old_func,

                                                      symidx, rel_common, NULL))) return r;

        }

    }

    //replace for .rel(a).android

    if(0 != self->relandroid)

    {

        xh_elf_packed_reloc_iterator_init(&packed_iter, self->relandroid, self->relandroid_sz, self->is_use_rela);

        while(NULL != (rel_common = xh_elf_packed_reloc_iterator_next(&packed_iter)))

        {

            if(0 != (r = xh_elf_find_and_replace_func(self,

                                                      (self->is_use_rela ? ".rela.android" : ".rel.android"), 0,

                                                      symbol, new_func, old_func,

                                                      symidx, rel_common, NULL))) return r;

        }

    }

    return 0;

}
几个if 对应的套路是一模一样的,这里分析一下replace for .rel(a).plt 的套路
即
xh_elf_find_and_replace_func(self,(self->is_use_rela ? ".rela.plt" : ".rel.plt"), 1,

                                                      symbol, new_func, old_func,

                                                      symidx, rel_common, &found)
static int xh_elf_find_and_replace_func(xh_elf_t *self, const char *section,

                                        int is_plt, const char *symbol,

                                        void *new_func, void **old_func,

                                        uint32_t symidx, void *rel_common,

                                        int *found)

{

    ElfW(Rela)    *rela;

    ElfW(Rel)     *rel;

    ElfW(Addr)     r_offset;

    size_t         r_info;

    size_t         r_sym;

    size_t         r_type;

    ElfW(Addr)     addr;

    int            r;

    if(NULL != found) *found = 0;

    if(self->is_use_rela)

    {

        rela = (ElfW(Rela) *)rel_common;

        r_info = rela->r_info;

        r_offset = rela->r_offset;

    }

    else

    {

        rel = (ElfW(Rel) *)rel_common;

        r_info = rel->r_info;

        r_offset = rel->r_offset;

    }

    //check sym

    r_sym = XH_ELF_R_SYM(r_info);

    if(r_sym != symidx) return 0;

    //check type

    r_type = XH_ELF_R_TYPE(r_info);

    if(is_plt && r_type != XH_ELF_R_GENERIC_JUMP_SLOT) return 0;

    if(!is_plt && (r_type != XH_ELF_R_GENERIC_GLOB_DAT && r_type != XH_ELF_R_GENERIC_ABS)) return 0;

    //we found it

    XH_LOG_INFO("found %s at %s offset: %p\n", symbol, section, (void *)r_offset);

    if(NULL != found) *found = 1;

    //do replace

    addr = self->bias_addr + r_offset;

    if(addr < self->base_addr) return XH_ERRNO_FORMAT;

    if(0 != (r = xh_elf_replace_function(self, symbol, addr, new_func, old_func)))

    {

        XH_LOG_ERROR("replace function failed: %s at %s\n", symbol, section);

        return r;

    }

    return 0;

}
这里主要就是两步
一 再遍历过程中渠道plt数组的一个元素rel_common,拿到r_offset,r_offset记录着的是对应got的偏移地址
        rel = (ElfW(Rel) *)rel_common;

        r_info = rel->r_info;

        r_offset = rel->r_offset;
二, 找到got对应的地址addr,并进行指针替换,addr 为so的基地址+ r_offset
    //do replace

    addr = self->bias_addr + r_offset;

    if(addr < self->base_addr) return XH_ERRNO_FORMAT;

    if(0 != (r = xh_elf_replace_function(self, symbol, addr, new_func, old_func)))

    {

        XH_LOG_ERROR("replace function failed: %s at %s\n", symbol, section);

        return r;

    }
static int xh_elf_replace_function(xh_elf_t *self, const char *symbol, ElfW(Addr) addr, void *new_func, void **old_func)

{

    void         *old_addr;

    unsigned int  old_prot = 0;

    unsigned int  need_prot = PROT_READ | PROT_WRITE;

    int           r;

    //already replaced?

    //here we assume that we always have read permission, is this a problem?

    if(*(void **)addr == new_func) return 0;

    //get old prot

    if(0 != (r = xh_util_get_addr_protect(addr, self->pathname, &old_prot)))

    {

        XH_LOG_ERROR("get addr prot failed. ret: %d", r);

        return r;

    }

    if(old_prot != need_prot)

    {

        //set new prot

        if(0 != (r = xh_util_set_addr_protect(addr, need_prot)))

        {

            XH_LOG_ERROR("set addr prot failed. ret: %d", r);

            return r;

        }

    }

    //save old func

    old_addr = *(void **)addr;

    if(NULL != old_func) *old_func = old_addr;

    //指令替换

    *(void **)addr = new_func; //segmentation fault sometimes

    if(old_prot != need_prot)

    {

        //restore the old prot

        if(0 != (r = xh_util_set_addr_protect(addr, old_prot)))

        {

            XH_LOG_WARN("restore addr prot failed. ret: %d", r);

        }

    }

    //清除cpu 指令缓存

    xh_util_flush_instruction_cache(addr);

    XH_LOG_INFO("XH_HK_OK %p: %p -> %p %s %s\n", (void *)addr, old_addr, new_func, symbol, self->pathname);

    return 0;

}
参考:
https://juejin.cn/post/6844903601198858248#heading-1
xHook 源码解析的更多相关文章
- 【原】Android热更新开源项目Tinker源码解析系列之三:so热更新
本系列将从以下三个方面对Tinker进行源码解析: Android热更新开源项目Tinker源码解析系列之一:Dex热更新 Android热更新开源项目Tinker源码解析系列之二:资源文件热更新 A ...
- 【原】Android热更新开源项目Tinker源码解析系列之一:Dex热更新
[原]Android热更新开源项目Tinker源码解析系列之一:Dex热更新 Tinker是微信的第一个开源项目,主要用于安卓应用bug的热修复和功能的迭代. Tinker github地址:http ...
- 【原】Android热更新开源项目Tinker源码解析系列之二:资源文件热更新
上一篇文章介绍了Dex文件的热更新流程,本文将会分析Tinker中对资源文件的热更新流程. 同Dex,资源文件的热更新同样包括三个部分:资源补丁生成,资源补丁合成及资源补丁加载. 本系列将从以下三个方 ...
- 多线程爬坑之路-Thread和Runable源码解析之基本方法的运用实例
前面的文章:多线程爬坑之路-学习多线程需要来了解哪些东西?(concurrent并发包的数据结构和线程池,Locks锁,Atomic原子类) 多线程爬坑之路-Thread和Runable源码解析 前面 ...
- jQuery2.x源码解析(缓存篇)
jQuery2.x源码解析(构建篇) jQuery2.x源码解析(设计篇) jQuery2.x源码解析(回调篇) jQuery2.x源码解析(缓存篇) 缓存是jQuery中的又一核心设计,jQuery ...
- Spring IoC源码解析——Bean的创建和初始化
Spring介绍 Spring(http://spring.io/)是一个轻量级的Java 开发框架,同时也是轻量级的IoC和AOP的容器框架,主要是针对JavaBean的生命周期进行管理的轻量级容器 ...
- jQuery2.x源码解析(构建篇)
jQuery2.x源码解析(构建篇) jQuery2.x源码解析(设计篇) jQuery2.x源码解析(回调篇) jQuery2.x源码解析(缓存篇) 笔者阅读了园友艾伦 Aaron的系列博客< ...
- jQuery2.x源码解析(设计篇)
jQuery2.x源码解析(构建篇) jQuery2.x源码解析(设计篇) jQuery2.x源码解析(回调篇) jQuery2.x源码解析(缓存篇) 这一篇笔者主要以设计的角度探索jQuery的源代 ...
- jQuery2.x源码解析(回调篇)
jQuery2.x源码解析(构建篇) jQuery2.x源码解析(设计篇) jQuery2.x源码解析(回调篇) jQuery2.x源码解析(缓存篇) 通过艾伦的博客,我们能看出,jQuery的pro ...
- HashMap 源码解析
HashMap简介: HashMap在日常的开发中应用的非常之广泛,它是基于Hash表,实现了Map接口,以键值对(key-value)形式进行数据存储,HashMap在数据结构上使用的是数组+链表. ...
随机推荐
- 【转帖】linux 内核分析工具 Dtrace、SystemTap、火焰图、crash等
<< System语言详解 >> 关于 SystemTap 的书. 我们在分析各种系统异常和故障的时候,通常会用到 pstack(jstack) /pldd/ lsof/ tc ...
- [转帖]History of Web Browser Engines from 1990 until today
https://eylenburg.github.io/browser_engines.htm Many tried, few remain... Last updated: January 2023 ...
- [转帖]SPECjvm测试工具详解
ARM服务器测试大纲中指定了要使用specjvm测试Java虚拟机性能,所以就上网找开源的测试套. 简介 SPECjvm2008(java虚拟机基准测试)是用来测试java运行环境(JRE)性能的基准 ...
- fiddler如何抓取https请求
pc端browse 1.打开下载好的fiddler,点击tools选择options后进入https tab下,勾选Decrypt HTTPS CONNECTS 和Ignore server cer ...
- 模块化Common.js与ES6
为什么要模块化开发 1. 依赖关系(a文件依赖b文件中的方法,b文件必须在a文件之前引入) 2. 命名问题 (多个文件变量名,方法名相同会出现覆盖) 3. 代码组织(后期不好维护) 模块化规范有 1. ...
- express学会CRUD
使用express 搭建项目 1==> express 项目名 -e 2==> 然后按照提示就可以了 cd 项目名 3==>进入项目 下载依赖 cnpm i 4==>启动项目 ...
- 如何在centos7中完全卸载Python3
如何在centos7中完全卸载Python3?根据查到的资料,主要就是卸载,然后删除一些软连接删除干净,逻辑很简单,贴一些具体的操作代码,记录下来 . 卸载Python3的步骤 #卸载python3 ...
- github 2fa中国认证及TOTP App
Because of your contributions on GitHub, two-factor authentication will be required for your account ...
- 人工智能的新篇章:深入了解大型语言模型(LLM)的应用与前景
人工智能的新篇章:深入了解大型语言模型(LLM)的应用与前景 LLM(Large Language Model)技术是一种基于深度学习的自然语言处理技术,旨在训练能够处理和生成自然语言文本的大型模型. ...
- 基于无监督训练SimCSE+In-batch Negatives策略有监督训练的语义索引召回
基于无监督训练SimCSE+In-batch Negatives策略有监督训练的语义索引召回 语义索引(可通俗理解为向量索引)技术是搜索引擎.推荐系统.广告系统在召回阶段的核心技术之一.语义索引模型的 ...