
android--------自定义控件 之 属性篇
上篇介绍了自定义控件的一个简单案例,本篇文章主要介绍如何给自定义控件自定义一些属性。
Android 中使用自定义属性的一般步骤:
- 定义declare-styleable,添加attr
- 使用TypedArray获取自定义属性
- 设置到View上
自定义属性都存在于/value/attr.xml文件中,以如下格式存在
<resource>

<declare-styleable name="自定义属性名称">

<attr name="属性名称" format="属性种类"/>

......

</declare-styleable>

</resource>
format属性值:
reference:引用资源
string:字符串
Color:颜色
boolean:布尔值
dimension:尺寸值
float:浮点型
integer:整型
fraction:百分数
enum:枚举类型
flag:位或运算
代码说话:
<?xml version="1.0" encoding="utf-8"?>

<resources>

    <declare-styleable name="CircularAttrsView">

        <!--圆形绘制的位置-->

        <attr name="circular_circle_gravity">

            <flag name="left" value="0"/>

            <flag name="top" value="1"/>

            <flag name="center" value="2"/>

            <flag name="right" value="3"/>

            <flag name="bottom" value="4"/>

        </attr>

        <attr name="circular_circle_radius" format="dimension"/><!--圆形半径-->

        <attr name="circular_circle_progress" format="integer"/><!--当前进度值-->

        <attr name="circular_progress_color" format="color"/><!--进度显示颜色-->

        <attr name="circular_background_color" format="color"/><!--圆形背景色-->

    </declare-styleable>

</resources>
使用属性
<com.zhangqie.customcontrol.demo2.CircularAttrsView

        android:layout_width="300dp"

        android:layout_height="300dp"

        android:background="#e4e4e4"

        zq:circular_background_color="@color/colorAccent"

        zq:circular_circle_gravity="center"

        zq:circular_circle_progress="30"

        zq:circular_progress_color="@color/colorPrimary"

        zq:circular_circle_radius="50dp"

        android:layout_margin="5dp"

        android:padding="10dp"

        />
上面zq:这个可以随便去,只有相同就行
接下来就是获取属性,并使用或设置属性
public class CircularAttrsView extends View {

    /****

     * 有三个参数的构造函数中第三个参数是默认的Style,

     * 这里的默认的Style是指它在当前Application或Activity所用的Theme中的默认Style,且只有在明确调用的时候才会生效,

     */

    private final static String TAG = CircularAttrsView.class.getName();

    private Paint mPaint;

    private int backgroundColor = Color.GRAY;

    private int progressColor = Color.BLUE;

    private float radius;

    private float progress;

    private float centerX = 0;

    private float centerY = 0;

    public static final int LEFT = 0;

    public static final int TOP = 1;

    public static final int CENTER = 2;

    public static final int RIGHT = 3;

    public static final int BOTTOM = 4;

    private int gravity = CENTER;

    private RectF rectF;

    public CircularAttrsView(Context context) {

        super(context);

        init();

    }

    public CircularAttrsView(Context context, AttributeSet attrs) {

        super(context, attrs);

        initParams(context,attrs);

    }

    public CircularAttrsView(Context context, AttributeSet attrs, int defStyleAttr) {

        super(context, attrs, defStyleAttr);

        initParams(context,attrs);

    }

    private void init(){

        mPaint = new Paint();

        mPaint.setAntiAlias(true);

    }

    private void initParams(Context context,AttributeSet attrs){

        mPaint = new Paint();

        mPaint.setAntiAlias(true);

        rectF = new RectF();

        /***

         * 每一个属性集合编译之后都会对应一个styleable对象,通过styleable对象获取TypedArray typedArray,

         * 然后通过键值对获取属性值,这点有点类似SharedPreference的取法。

         */

        TypedArray typedArray = context.obtainStyledAttributes(attrs, R.styleable.CircularAttrsView);

        if (typedArray != null){

            backgroundColor = typedArray.getColor(R.styleable.CircularAttrsView_circular_background_color,Color.GRAY);

            progressColor = typedArray.getColor(R.styleable.CircularAttrsView_circular_progress_color,Color.BLUE);

            radius = typedArray.getDimension(R.styleable.CircularAttrsView_circular_circle_radius,0);

            progress = typedArray.getInt(R.styleable.CircularAttrsView_circular_circle_progress,0);

            gravity = typedArray.getInt(R.styleable.CircularAttrsView_circular_circle_gravity,CENTER);

            Log.e(TAG,backgroundColor+"--"+progressColor+"--"+radius+"--"+progress+"--"+gravity);

            typedArray.recycle();

        }

    }

    /****

     * 测量-Measure过程是计算视图大小

     *

     * @param widthMeasureSpec

     * @param heightMeasureSpec

     */

    @Override

    protected void onMeasure(int widthMeasureSpec, int heightMeasureSpec) {

        super.onMeasure(widthMeasureSpec, heightMeasureSpec);

        //根据提供的测量值(格式)提取模式(三个模式之一)

        //MeasureSpec有3种模式分别是UNSPECIFIED, EXACTLY和AT_MOST,

        int widthMode = MeasureSpec.getMode(widthMeasureSpec);  //取出宽度的测量模式

        int widthSize = MeasureSpec.getSize(widthMeasureSpec);//获取View的大小(宽度的确切数值)

        int heightMode = MeasureSpec.getMode(heightMeasureSpec);

        int heightSize = MeasureSpec.getSize(heightMeasureSpec);

        Log.i(TAG,"onMeasure---widthMode--->"+widthMode);

        switch (widthMode){

            case MeasureSpec.EXACTLY:

                break;

            case MeasureSpec.AT_MOST:

                break;

            case MeasureSpec.UNSPECIFIED:

              break;

        }

        Log.i(TAG,"onMeasure--widthSize--->"+ widthSize);

        Log.i(TAG,"onMeasure--heightMode-->"+ heightMode);

        Log.i(TAG,"onMeasure--heightSize-->"+heightSize);

        int width = getWidth();

        int height = getHeight();

        Log.e(TAG, "onDraw---->" + width + "*" + height);

        centerX = width / 2;

        centerY = width / 2;

        switch (gravity){

            case LEFT:

                centerX = radius + getPaddingLeft();

                break;

            case TOP:

                centerY = radius + getPaddingTop();

                break;

            case CENTER:

                break;

            case RIGHT:

                centerX = width - radius - getPaddingRight();

                break;

            case BOTTOM:

                centerY = height - radius - getPaddingBottom();

                break;

        }

        float left = centerX - radius;

        float top = centerY - radius;

        float right = centerX + radius;

        float bottom = centerY + radius;

        rectF.set(left,top,right,bottom);

    }

    /***

     * 确定View的大小(这个函数在视图大小发生改变时调用。)

     *

     * 宽度,高度,上一次宽度,上一次高度。

     * 只需关注 宽度(w), 高度(h) 即可,这两个参数就是View最终的大小。

     * @param w

     * @param h

     * @param oldw

     * @param oldh

     */

    @Override

    protected void onSizeChanged(int w, int h, int oldw, int oldh) {

        super.onSizeChanged(w, h, oldw, oldh);

        Log.i(TAG,"onSizeChanged");

    }

    /****

     * 布局-Layout过程用于设置视图在屏幕中显示的位置,onLayout一般只会在自定义ViewGroup中才会使用

     *

     * 确定布局的函数是onLayout,它用于确定子View的位置,在自定义ViewGroup中会用到,他调用的是子View的layout函数。

     *

     * @param changed

     * @param left

     * @param top

     * @param right

     * @param bottom

     */

    @Override

    protected void onLayout(boolean changed, int left, int top, int right, int bottom) {

        super.onLayout(changed, left, top, right, bottom);

        Log.i(TAG,"onLayout");

    }

    /***

     * 绘制-draw过程主要用于利用前两步得到的参数,将视图显示在屏幕上,到这里也就完成了整个的视图绘制工作

     * @param canvas

     */

    @Override

    protected void onDraw(Canvas canvas) {

        super.onDraw(canvas);

        mPaint.setColor(backgroundColor);

        // FILL填充, STROKE描边,FILL_AND_STROKE填充和描边

        mPaint.setStyle(Paint.Style.FILL_AND_STROKE);

        canvas.drawCircle(centerX,centerY,radius,mPaint);//画圆

        mPaint.setColor(progressColor);

        double percent = progress * 1.0 / 100;

        int angle = (int)(percent * 360);

        //根据进度画圆弧

        canvas.drawArc(rectF,270,angle,true,mPaint);

    }

}
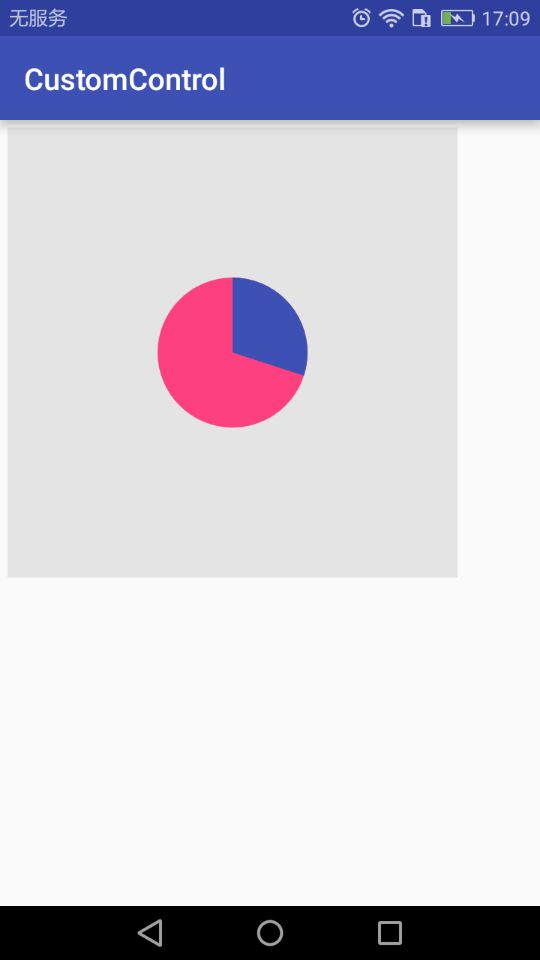
效果图:(居中的,可以通过 zq:circular_circle_gravity="center" 来设置显示的位置)
源码地址:https://github.com/DickyQie/android-custom-control
android--------自定义控件 之 属性篇的更多相关文章
- Android - 自定义控件和属性(attr和TypedArray)
http://blog.csdn.net/zjh_1110120/article/details/50976027 1.attr format 取值类型 以ShapeView 为例 <decla ...
- Android自定义控件(36篇)
http://blog.csdn.net/lmj623565791/article/details/44278417 http://download.csdn.net/user/lmj62356579 ...
- Android自定义控件系列之应用篇——圆形进度条
一.概述 在上一篇博文中,我们给大家介绍了Android自定义控件系列的基础篇.链接:http://www.cnblogs.com/jerehedu/p/4360066.html 这一篇博文中,我们将 ...
- android 自定义控件(初篇)
android 自定义控件 在写UI当中很多时候会用到自定义的控件,其实自定义控件就像是定义一个类进行调用就OK了.有些相关的感念可以查看API 下面就用个简单的例子来说明自定义控件: public ...
- Android自定义控件之自定义组合控件
前言: 前两篇介绍了自定义控件的基础原理Android自定义控件之基本原理(一).自定义属性Android自定义控件之自定义属性(二).今天重点介绍一下如何通过自定义组合控件来提高布局的复用,降低开发 ...
- Android自定义控件之自定义属性
前言: 上篇介绍了自定义控件的基本要求以及绘制的基本原理,本篇文章主要介绍如何给自定义控件自定义一些属性.本篇文章将继续以上篇文章自定义圆形百分比为例进行讲解.有关原理知识请参考Android自定义控 ...
- Android自定义控件之基本原理
前言: 在日常的Android开发中会经常和控件打交道,有时Android提供的控件未必能满足业务的需求,这个时候就需要我们实现自定义一些控件,今天先大致了解一下自定义控件的要求和实现的基本原理. 自 ...
- Android自定义控件1
概述 Android已经为我们提供了大量的View供我们使用,但是可能有时候这些组件不能满足我们的需求,这时候就需要自定义控件了.自定义控件对于初学者总是感觉是一种复杂的技术.因为里面涉及到的知识点会 ...
- 一起来学习Android自定义控件1
概述 Android已经为我们提供了大量的View供我们使用,但是可能有时候这些组件不能满足我们的需求,这时候就需要自定义控件了.自定义控件对于初学者总是感觉是一种复杂的技术.因为里面涉及到的知识点会 ...
- [Xamarin.Android] 自定义控件
[Xamarin.Android] 自定义控件 前言 软件项目开发的过程中,免不了遇到一些无法使用内建控件就能满足的客户需求,例如:时速表.折线图...等等.这时开发人员可以透过自定义控件的方式,为项 ...
随机推荐
- topcoder srm 415 div1
problem1 link 每次贪心地从crans由大到小地找到一个能搬得动地尽量大地box即可. problem2 link 首先,$hava$可以全部换成钱,然后就是找到一个最小的钱减去自己已有的 ...
- Django创建超级用户出现错误
如果运行python manage.py createsuperuser出现一大堆错误代码 解决方案: 1.检查settings.py中的DATABASE配置确定正确性 2.执行python mana ...
- Flask学习【第2篇】:Flask基础
知识点回顾 flask依赖wsgi,实现wsgi的模块:wsgiref,werkzeug,uwsgi 实例化Flask对象,里面是有参数的 app = Flask(__name__,template_ ...
- js字符串方法、数组方法整理
push 向数组末尾添加一项 返回值为数组的长度: pop 删除数组最后一项: unshift 向数组开头增加一项: shift 删除数组第一项: splice 删除数组中的值:1 splice(n, ...
- [RabbitMQ学习笔记] - 初识RabbitMQ
RabbitMQ是一个由erlang开发的AMQP的开源实现. 核心概念 Message 消息,消息是不具名的,它由消息头和消息体组成,消息体是不透明的,而消息头则由 一系列的可选属性组成,这些属性包 ...
- Docker:Containers
Prerequisites Install Docker version 1.13 or higher. Read the orientation in Part 1. Give your envir ...
- geoserver源码学习与扩展——自动发布shapefile图层
geoserver通过工作空间Workspace-数据源DataStore-图层Layer管理地理数据,这些信息都通过Catalog进行组织和管理,要完成自动发布只需要在Catalog中增加相应的信息 ...
- 把一个List拆分为几个大小一样的List
static void Main(string[] args) { List<String> tarArr = new List<String>(); tarArr.Add(& ...
- 用Github做一个静态网页(GithubPages)
一.新建一个仓库(new). 二.命名Repository name为:(名字).github.io(一定要有.github.io). 三.勾选Initialize this repository w ...
- ImgNoGoodWindow
using System;using System.Collections.Generic;using System.Linq;using System.Text;using UnityEditor; ...