如何使用keras加载下载好的数据集
https://blog.csdn.net/houchaoqun_xmu/article/details/78492718
【keras】解决 example 案例中 MNIST 数据集下载不了的问题
前言:
keras 源码中下载MNIST的方式是 path = get_file(path, origin='https://s3.amazonaws.com/img-datasets/mnist.npz'),数据源是通过 url = https://s3.amazonaws.com/img-datasets/mnist.npz 进行下载的。访问该 url 地址被墙了,导致 MNIST 相关的案例都卡在数据下载的环节。本文主要提供解决方案,让需要的读者可以跑案例的代码感受一下。
本文的贡献主要包括如下:
1)提供 mnist_npz 数据集;
2)分析了关于 mnist 几个相关的源代码;
3)提供了一种能够顺利运行 keras 源码中 example 下 mnist 的相关案例;
4)找到了另外几种解决方案,提供了相关的链接。
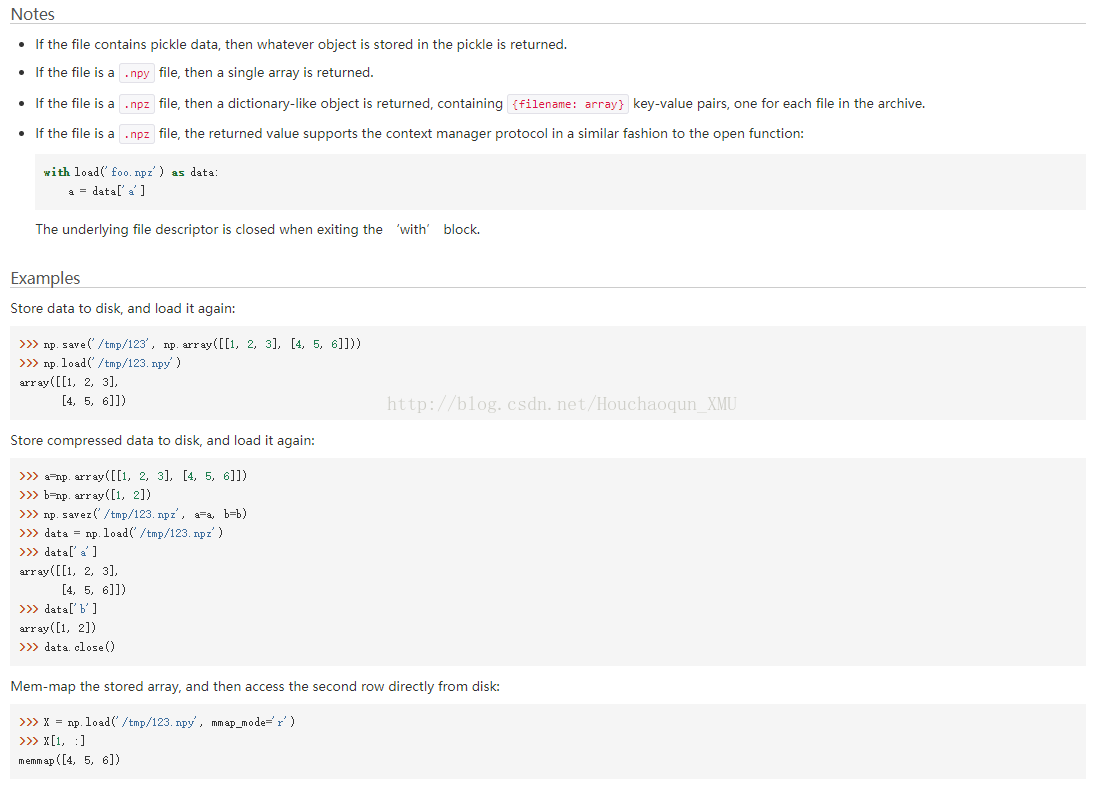
numpy.load(path)
numpy.load() 函数起到很重要的作用。它可以读取 .npy .npz 等文件类型,并返回对应的数据类型。
1)如果文件类型是 .pny 则返回一个1维数组。
2)如果文件类型是 .npz 则返回一个类似字典的数据类型,包含 {filename: array} 键值对。如,本例中的键值对如下所示:
- f = np.load(path)
- x_train, y_train = f['x_train'], f['y_train']
- x_test, y_test = f['x_test'], f['y_test']
- f.close()
详情请参考:https://docs.scipy.org/doc/numpy/reference/generated/numpy.load.html
原始 .\keras\examples\mnist_mlp.py
- # -*- coding: utf-8 -*-
- '''Trains a simple deep NN on the MNIST dataset.
- Gets to 98.40% test accuracy after 20 epochs
- (there is *a lot* of margin for parameter tuning).
- 2 seconds per epoch on a K520 GPU.
- '''
- from __future__ import print_function
- import keras
- from keras.datasets import mnist
- from keras.models import Sequential
- from keras.layers import Dense, Dropout
- from keras.optimizers import RMSprop
- batch_size = 128
- num_classes = 10
- epochs = 20
- # the data, shuffled and split between train and test sets
- (x_train, y_train), (x_test, y_test) = mnist.load_data()
- x_train = x_train.reshape(60000, 784)
- x_test = x_test.reshape(10000, 784)
- x_train = x_train.astype('float32')
- x_test = x_test.astype('float32')
- x_train /= 255
- x_test /= 255
- print(x_train.shape[0], 'train samples')
- print(x_test.shape[0], 'test samples')
- # convert class vectors to binary class matrices
- y_train = keras.utils.to_categorical(y_train, num_classes)
- y_test = keras.utils.to_categorical(y_test, num_classes)
- model = Sequential()
- model.add(Dense(512, activation='relu', input_shape=(784,)))
- model.add(Dropout(0.2))
- model.add(Dense(512, activation='relu'))
- model.add(Dropout(0.2))
- model.add(Dense(10, activation='softmax'))
- model.summary()
- ###
- # 1)categorical_crossentropy(output, target, from_logits=False):
- # 计算输出张量和目标张量的Categorical crossentropy(类别交叉熵),目标张量与输出张量必须shape相同。
- # 多分类的对数损失函数,与softmax分类器相对应的。
- #
- # 2)RMSprop()
- # AdaGrad算法的改进。鉴于神经网络都是非凸条件下的,RMSProp在非凸条件下结果更好,改变梯度累积为指数衰减的移动平均以丢弃遥远的过去历史。
- # reference:http://blog.csdn.net/bvl10101111/article/details/72616378
- #
- model.compile(loss='categorical_crossentropy',
- optimizer=RMSprop(),
- metrics=['accuracy'])
- history = model.fit(x_train, y_train,
- batch_size=batch_size,
- epochs=epochs,
- verbose=1,
- validation_data=(x_test, y_test))
- score = model.evaluate(x_test, y_test, verbose=0)
- print('Test loss:', score[0])
- print('Test accuracy:', score[1])
.\keras\keras\datasets\mnist.py - load_data()
- # -*- coding: utf-8 -*-
- from ..utils.data_utils import get_file
- import numpy as np
- def load_data(path='mnist.npz'):
- """Loads the MNIST dataset.
- # Arguments
- path: path where to cache the dataset locally
- (relative to ~/.keras/datasets).
- # Returns
- Tuple of Numpy arrays: `(x_train, y_train), (x_test, y_test)`.
- # numpy.load()
- # numpy.load(file, mmap_mode=None, allow_pickle=True, fix_imports=True, encoding='ASCII')
- # 1) Load arrays or pickled objects from .npy, .npz or pickled files
- # 2)
- # reference: https://docs.scipy.org/doc/numpy/reference/generated/numpy.load.html
- """
- path = get_file(path, origin='https://s3.amazonaws.com/img-datasets/mnist.npz')
- f = np.load(path)
- x_train, y_train = f['x_train'], f['y_train']
- x_test, y_test = f['x_test'], f['y_test']
- f.close()
- return (x_train, y_train), (x_test, y_test)
下载 mnist.npz 数据集
本文使用的 mnist.npz 数据集是通过一个 japan 的服务器下载得到的,在此免费分享给大家。如果下载有问题的话,可以留言哈。
下载链接:https://pan.baidu.com/s/1jH6uFFC 密码: dw3d
改造 mnist_mlp.py
方法1:
mnist_mlp.py 源码是使用如下命令获取数据集:
- # the data, shuffled and split between train and test sets
- (x_train, y_train), (x_test, y_test) = mnist.load_data()
调用的是 .\keras\keras\datasets\mnist.py 脚本中的 def load_data(path='mnist.npz') 函数,也就是因为网址被墙了导致不能正常运行的原因。本文事先下好了 mnist.npz 数据集,然后改动了一些代码使之正常运行。换句话说,本文使用的是“读取本地数据集”的方法,步骤如下:
1)下载好 mnist_npz 数据集,并将其放于 .\keras\examples 目录下。
2)改动后的 mnist_mlp.py 代码如下:
- # -*- coding: utf-8 -*-
- '''Trains a simple deep NN on the MNIST dataset.
- Gets to 98.40% test accuracy after 20 epochs
- (there is *a lot* of margin for parameter tuning).
- 2 seconds per epoch on a K520 GPU.
- '''
- from __future__ import print_function
- import keras
- from keras.datasets import mnist
- from keras.models import Sequential
- from keras.layers import Dense, Dropout
- from keras.optimizers import RMSprop
- batch_size = 128
- num_classes = 10
- epochs = 20
- # the data, shuffled and split between train and test sets
- # (x_train, y_train), (x_test, y_test) = mnist.load_data()
- import numpy as np
- path='./mnist.npz'
- f = np.load(path)
- x_train, y_train = f['x_train'], f['y_train']
- x_test, y_test = f['x_test'], f['y_test']
- f.close()
- x_train = x_train.reshape(60000, 784).astype('float32')
- x_test = x_test.reshape(10000, 784).astype('float32')
- x_train /= 255
- x_test /= 255
- print(x_train.shape[0], 'train samples')
- print(x_test.shape[0], 'test samples')
- # convert class vectors to binary class matrices
- # label为0~9共10个类别,keras要求格式为binary class matrices
- y_train = keras.utils.to_categorical(y_train, num_classes)
- y_test = keras.utils.to_categorical(y_test, num_classes)
- # add by hcq-20171106
- # Dense of keras is full-connection.
- model = Sequential()
- model.add(Dense(512, activation='relu', input_shape=(784,)))
- model.add(Dropout(0.2))
- model.add(Dense(512, activation='relu'))
- model.add(Dropout(0.2))
- model.add(Dense(num_classes, activation='softmax'))
- model.summary()
- model.compile(loss='categorical_crossentropy',
- optimizer=RMSprop(),
- metrics=['accuracy'])
- history = model.fit(x_train, y_train,
- batch_size=batch_size,
- epochs=epochs,
- verbose=1,
- validation_data=(x_test, y_test))
- score = model.evaluate(x_test, y_test, verbose=0)
- print('Test loss:', score[0])
- print('Test accuracy:', score[1])
运行效果如下所示:
- 60000 train samples
- 10000 test samples
- _________________________________________________________________
- Layer (type) Output Shape Param #
- =================================================================
- dense_1 (Dense) (None, 512) 401920
- _________________________________________________________________
- dropout_1 (Dropout) (None, 512) 0
- _________________________________________________________________
- dense_2 (Dense) (None, 512) 262656
- _________________________________________________________________
- dropout_2 (Dropout) (None, 512) 0
- _________________________________________________________________
- dense_3 (Dense) (None, 10) 5130
- =================================================================
- Total params: 669,706
- Trainable params: 669,706
- Non-trainable params: 0
- _________________________________________________________________
- Train on 60000 samples, validate on 10000 samples
- Epoch 1/20
- 2017-11-09 23:06:16.881800: I tensorflow/core/common_runtime/gpu/gpu_device.cc:977] Creating TensorFlow device (/gpu:0) -> (device: 0, name: GeForce GTX 1080 Ti, pci bus id: 0000:01:00.0)
- ... ...
- 60000/60000 [==============================] - 1s 23us/step - loss: 0.0387 - acc: 0.9888 - val_loss: 0.0706 - val_acc: 0.9814
- Epoch 8/20
- 60000/60000 [==============================] - 1s 23us/step - loss: 0.0341 - acc: 0.9899 - val_loss: 0.0789 - val_acc: 0.9827
- Epoch 9/20
- 60000/60000 [==============================] - 1s 23us/step - loss: 0.0304 - acc: 0.9911 - val_loss: 0.0851 - val_acc: 0.9833
- Epoch 10/20
- 60000/60000 [==============================] - 1s 23us/step - loss: 0.0290 - acc: 0.9918 - val_loss: 0.0867 - val_acc: 0.9818
- Epoch 11/20
- 60000/60000 [==============================] - 1s 23us/step - loss: 0.0264 - acc: 0.9924 - val_loss: 0.0881 - val_acc: 0.9833
- Epoch 12/20
- 60000/60000 [==============================] - 1s 23us/step - loss: 0.0261 - acc: 0.9928 - val_loss: 0.1095 - val_acc: 0.9801
- Epoch 13/20
- 60000/60000 [==============================] - 1s 23us/step - loss: 0.0246 - acc: 0.9931 - val_loss: 0.1012 - val_acc: 0.9830
- Epoch 14/20
- 60000/60000 [==============================] - 1s 23us/step - loss: 0.0233 - acc: 0.9935 - val_loss: 0.1116 - val_acc: 0.9812
- Epoch 15/20
- 60000/60000 [==============================] - 1s 23us/step - loss: 0.0223 - acc: 0.9942 - val_loss: 0.1016 - val_acc: 0.9832
- Epoch 16/20
- 60000/60000 [==============================] - 1s 23us/step - loss: 0.0214 - acc: 0.9943 - val_loss: 0.1053 - val_acc: 0.9832
- Epoch 17/20
- 60000/60000 [==============================] - 1s 23us/step - loss: 0.0178 - acc: 0.9950 - val_loss: 0.1095 - val_acc: 0.9838
- Epoch 18/20
- 60000/60000 [==============================] - 1s 23us/step - loss: 0.0212 - acc: 0.9949 - val_loss: 0.1158 - val_acc: 0.9822
- Epoch 19/20
- 60000/60000 [==============================] - 1s 23us/step - loss: 0.0197 - acc: 0.9951 - val_loss: 0.1112 - val_acc: 0.9831
- Epoch 20/20
- 60000/60000 [==============================] - 1s 23us/step - loss: 0.0203 - acc: 0.9951 - val_loss: 0.1097 - val_acc: 0.9833
- Test loss: 0.109655842465
- Test accuracy: 0.9833
方法2:参考该【博文】
(x_train, y_train), (x_test, y_test) = mnist.load_data(path='/home/duchao/下载/mnist.npz')
Reference:
keras 中文文档:http://keras-cn.readthedocs.io/en/latest/
阅读源码遇到的一些TF、keras函数及问题:http://blog.csdn.net/jsliuqun/article/details/64444302
python读取mnist数据集:https://blog.mythsman.com/2016/01/25/1/
如何使用keras加载下载好的数据集的更多相关文章
- 【tf.keras】tf.keras加载AlexNet预训练模型
目录 从 PyTorch 中导出模型参数 第 0 步:配置环境 第 1 步:安装 MMdnn 第 2 步:得到 PyTorch 保存完整结构和参数的模型(pth 文件) 第 3 步:导出 PyTorc ...
- 使用Huggingface在矩池云快速加载预训练模型和数据集
作为NLP领域的著名框架,Huggingface(HF)为社区提供了众多好用的预训练模型和数据集.本文介绍了如何在矩池云使用Huggingface快速加载预训练模型和数据集. 1.环境 HF支持Pyt ...
- pytorch加载语音类自定义数据集
pytorch对一下常用的公开数据集有很方便的API接口,但是当我们需要使用自己的数据集训练神经网络时,就需要自定义数据集,在pytorch中,提供了一些类,方便我们定义自己的数据集合 torch.u ...
- ubuntu wubi.exe 直接加载下载好的 amd64.tar.xz
玩了这么久的LINUX,一直都是直机装UBUNTU,虚一下XP的,后来不得不直机用WIN7,只能WUBI装一下UBUNTU了.不得不说,在WIN7下虚一个UBUNTU真是相当麻烦.网络那块很是难搞,而 ...
- keras RAdam优化器使用教程, keras加载模型包含自定义优化器报错 如何解决?
本文首发于个人博客https://kezunlin.me/post/c691f02b/,欢迎阅读最新内容! python keras RAdam tutorial and load custom op ...
- [Tensorflow] 使用 tf.keras.utils.get_file() 下载 MS-COCO 2014 数据集
import argparse import tensorflow as tf tf.enable_eager_execution() def main(args): ""&quo ...
- Keras.applications.models权重:存储路径及加载
网络中断原因导致keras加载vgg16等模型权重失败, 直接解决方法是:删掉下载文件,再重新下载 Windows-weights路径: C:\Users\你的用户名\.keras\models Li ...
- Python 动态加载并下载"梨视频"短视频
下载链接:http://www.pearvideo.com/category_1 import requests from lxml import etree import re from urlli ...
- TensorFlow2.0(10):加载自定义图片数据集到Dataset
.caret, .dropup > .btn > .caret { border-top-color: #000 !important; } .label { border: 1px so ...
随机推荐
- 错误:selenium.common.exceptions.SessionNotCreatedException: Message: Unable to find a matching set of capabilities
错误再现 原因:firefox浏览器版本和浏览器驱动版本不匹配 解决办法:卸载高版本浏览器,安装低版本浏览器
- 第七篇:Python3连接MySQL
第七篇:Python3连接MySQL 连接数据库 注意事项 在进行本文以下内容之前需要注意: 你有一个MySQL数据库,并且已经启动. 你有可以连接该数据库的用户名和密码 你有一个有权限操作的data ...
- 【剑指Offer】面试题13. 机器人的运动范围
题目 地上有一个m行n列的方格,从坐标 [0,0] 到坐标 [m-1,n-1] .一个机器人从坐标 [0, 0] 的格子开始移动,它每次可以向左.右.上.下移动一格(不能移动到方格外),也不能进入行坐 ...
- python_re正则表达
re模块就本质而言,正则表达式(或RE)是一种小型的.高度专业化的编程语言,(在python中)它内嵌在Python中,并通过re模块实现,正则表达式模块被编译成一系列的字节码,然后由用C编写的匹配引 ...
- SQL中的LEFT/RIGHT/SUBSTRING函数
语法: LEFT(field,length) RIGHT(field,length)SUBSTRING(field,start,length) LEFT/RIGHT函数返回field最左边/最右边的l ...
- 干货分享|Law Essay写作高分攻略
很多法学院的留学生对于Law Essay写作不是特别擅长,理论知识都了解,但是写出来的essay分数就是不高.同学们要从哪些方面入手呢?Law Essay写作要怎么拿高分?具体就跟小编一起来看看吧! ...
- 实验吧Web-难-貌似有点难(http头欺骗)
有关一些http头,参考:https://blog.csdn.net/zz_Caleb/article/details/84147066 打开链接:点击view source看到一段代码 <?p ...
- Day 5 :ArrayList原理、LinkedList原理和方法和迭代器注意事项
迭代器在变量元素的时候要注意事项: 在迭代器迭代元素 的过程中,不允许使用集合对象改变集合中的元素个数,如果需要添加或者删除只能使用迭代器的方法进行操作. 如果使用过了集合对象改变集合中元素个数那 ...
- 「黑科技」智能消毒防疫机器人 技术方案介绍-disinfection robot
消毒机器人 小新防疫消杀机器人 - 自主导航全方位360°臭氧杀菌消毒机器人,采用臭氧无阻碍.无死角.遍布整个空间除菌:强力涡轮风机,30㎡室内空气循环6次/h,10分钟速效杀菌.除异味.自动转化为氧 ...
- UVA - 1630 Folding(串折叠)(dp---记忆化搜索)
题意:给出一个由大写字母组成的长度为n(1<=n<=100)的串,“折叠”成一个尽量短的串.折叠可以嵌套.多解时可输出任意解. 分析: 1.dp[l][r]为l~r区间可折叠成的最短串的长 ...