
SprintBoot学习(三)
Thymeleaf模板引擎
1、thymeleaf是一个Java类库,,他是xml/xhtml/html5的模板引擎可以作为view层
2、themeleaf基本语法
- 引入thymeleaf
<!--引入Thymeleaf-->

<html xmlns:th="http://www.thymeleaf.org">
将镜头页面转换成动态的视图,要进行动态处理的元素将使用“th:”为前缀
- 访问model中的数据
<div class="panel-body">

        <!--通过${}访问model中的属性-->

        <span th:text="${singlePerson.name}"></span>

    </div>
需要处理的动态内容需要加上“th:”前缀
- model中的数据迭代
<div class="panel-body">

    <ul class="list-group">

        <!--通过th:each 来迭代数据-->

        <li class="list-grop-item" th:each="person:${people}">

            <span th:text="${person.name}"></span>

            <span th:text="${person.age}"></span>

        </li>

    </ul>

</div>
person做为迭代元素来使用,然后像上面一样访问迭代元素中的属性
- 数据判断
<!--通过${not #lists.isEmpty(people)} 来判断数据。Thymeleaf 支持> 、<、>=、<=、  == 、!= 作为比较条件,同时也支持将Spring EL表达式语言用于条件中-->

<div th:if="${not #lists.isEmpty(people)}">
Thymeleaf 支持> 、<、>=、<=、 == 、!= 作为比较条件,同时也支持将Spring EL表达式语言用于条件中
3、测试案例:
- 新建spring-boot项目

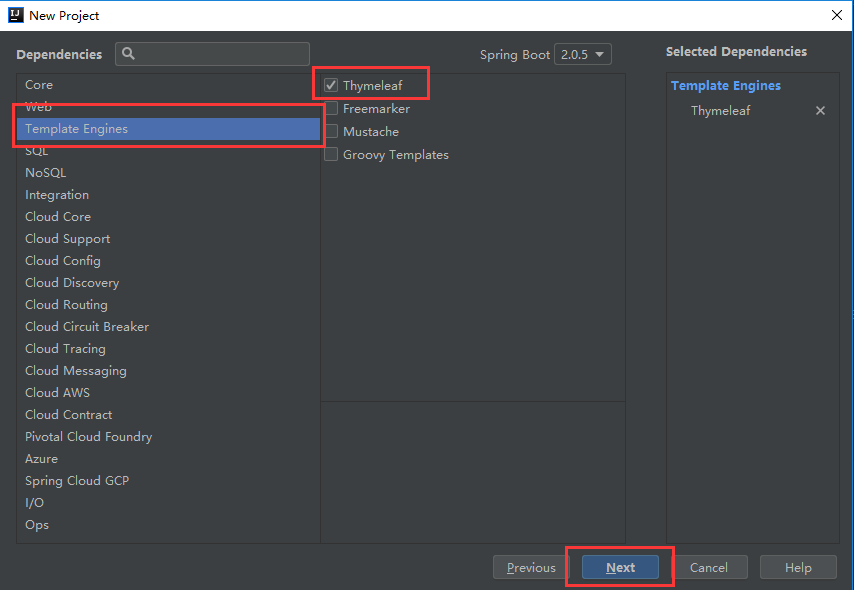
- 新建一个JavaBean
package com.example.spring_boot_thymeleaf_test.entity;

/**

 * @Author: Amy

 * @Date: 2018/10/16

 * @Time: 17:23

 * Description:

 */

public class Person {

    private  String name ;

    private  Integer age;

    public Person(){

        super();

    }

    public Person(String name , Integer age ){

        super();

        this.age=age;

        this.name=name;

    }

    public String getName() {

        return name;

    }

    public void setName(String name) {

        this.name = name;

    }

    public Integer getAge() {

        return age;

    }

    public void setAge(Integer age) {

        this.age = age;

    }

} - 启动类(controller和启动类在同一个类中)
package com.example.spring_boot_thymeleaf_test;

import com.example.spring_boot_thymeleaf_test.entity.Person;

import org.springframework.boot.SpringApplication;

import org.springframework.boot.autoconfigure.SpringBootApplication;

import org.springframework.stereotype.Controller;

import org.springframework.ui.Model;

import org.springframework.web.bind.annotation.RequestMapping;

import java.util.ArrayList;

import java.util.List;

@Controller

@SpringBootApplication

public class SpringBootThymeleafTestApplication {

    public static void main(String[] args) {

        SpringApplication.run(SpringBootThymeleafTestApplication.class, args);

    }

    @RequestMapping("/")

    public String index(Model model){

        Person single = new Person("Amy",21);

        List<Person> people = new ArrayList<Person>();

        Person p1 = new Person("旋涡鸣人",12);

        Person p2 = new Person("佐助",12);

        people.add(p1);

        people.add(p2);

        model.addAttribute("singlePerson",single);

        model.addAttribute("people",people);

        return  "index";

    }

}
当启动类和controller在同一个类的时候,要使用@controller注解
- controller类(controller和启动类不在同一个类中)
package com.example.spring_boot_thymeleaf_test;

import com.example.spring_boot_thymeleaf_test.entity.Person;

import org.springframework.stereotype.Controller;

import org.springframework.ui.Model;

import org.springframework.web.bind.annotation.RequestMapping;

import org.springframework.web.servlet.ModelAndView;

import java.util.ArrayList;

import java.util.List;

/**

 * @Author: Amy

 * @Date: 2018/10/17

 * @Time: 17:12

 * Description:

 */

@Controller

@RequestMapping("/test")

public class TestController {

   /* @RequestMapping("/index")

    public String index(Model model){

        Person single = new Person("Amy",21);

        List<Person> people = new ArrayList<Person>();

        Person p1 = new Person("旋涡鸣人",12);

        Person p2 = new Person("佐助",12);

        people.add(p1);

        people.add(p2);

        model.addAttribute("singlePerson",single);

        model.addAttribute("people",people);

        return  "index";

    }*/

    @RequestMapping("/index")

    public ModelAndView index(){

        ModelAndView model = new ModelAndView("/index");

        Person single = new Person("Amy",21);

        List<Person> people = new ArrayList<Person>();

        Person p1 = new Person("旋涡鸣人",12);

        Person p2 = new Person("佐助",12);

        people.add(p1);

        people.add(p2);

        model.addObject("singlePerson",single);

        model.addObject("people",people);

        return model;

    }

}
当启动类和controller不在同一个类的时候,启动类要放在根目录下,启动类上使用了注解@SpringBootApplication会默认扫描启动类的所在的包和子包下面所有的注解;如果controller和启动类不在同一个包需要使用注解@ComponentScan来指定扫描的包
- index页面
<!DOCTYPE html>

<!--将镜头页面转换成动态的视图,要进行动态处理的元素将使用“th:”为前缀-->

<!--引入Thymeleaf-->

<html xmlns:th="http://www.thymeleaf.org">

<head>

    <meta charset="UTF-8">

    <title>Title</title>

    <!--引入Bootstrap-->

    <link rel="stylesheet" href="//cdn.bootcss.com/bootstrap/3.3.5/css/bootstrap.min.css">

    <link rel="stylesheet" href="//cdn.bootcss.com/bootstrap/3.3.5/css/bootstrap-theme.min.css">

</head>

<!--通过@{}引用web静态资源,引入jQuery-->

<script th:src="@{jquery-3.3.1.min.js}" type="text/javascript"></script>

<body>

<div class="panel panel-primary">

    <div class="panel-heading">

        <h3 class="panel-title">访问model</h3>

    </div>

    <div class="panel-body">

        <!--通过${}访问model中的属性-->

        <span th:text="${singlePerson.name}"></span>

    </div>

</div>

<!--通过${not #lists.isEmpty(people)} 来判断数据。Thymeleaf 支持> 、<、>=、<=、  == 、!= 作为比较条件,同时也支持将Spring EL表达式语言用于条件中-->

<div th:if="${not #lists.isEmpty(people)}">

    <div class="panel panel-primary">

        <div class="panel-heading">

            <h3 class="panel-title">列表</h3>

        </div>

        <div class="panel-body">

            <ul class="list-group">

                <!--通过th:each 来迭代数据-->

                <li class="list-grop-item" th:each="person:${people}">

                    <span th:text="${person.name}"></span>

                    <span th:text="${person.age}"></span>

                </li>

            </ul>

        </div>

    </div>

</div>

</body>

</html> - 运行结果,浏览器访问http://localhost:8080/test/index 或者http://localhost:8080/ 页面如下
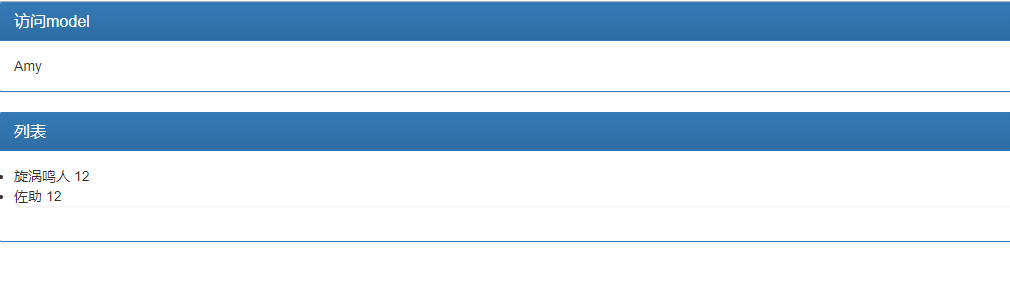
Servlet、Filter、Listener的注册
1、直接注册Bean
- Servlet注册测试
package com.example.spring_boot_thymeleaf_test.servlet;

import javax.servlet.ServletException;

import javax.servlet.http.HttpServlet;

import javax.servlet.http.HttpServletRequest;

import javax.servlet.http.HttpServletResponse;

import java.io.IOException;

import java.io.PrintWriter;

/**

 * @Author: Amy

 * @Date: 2018/12/5

 * @Time: 17:10

 * Description:

 */public class HelloServlet extends HttpServlet {

    @Override

    protected void doGet(HttpServletRequest request, HttpServletResponse response) throws ServletException, IOException {

        System.out.println("GET");

        request.setCharacterEncoding("UTF-8");

        response.setCharacterEncoding("UTF-8");

        // 向客户端生成响应数据

        response.setContentType("text/html;charset=UTF-8");

        PrintWriter w = response.getWriter();

        w.println("<h1 style='text-align:center;color:blue;'>Hello, Servlet!</h1>");

    }

}
配置类
@Configuration
public class WebCofig {
@Bean
public HelloServlet helloServlet(){
return new HelloServlet();
} } - Filter注册测试
package com.example.spring_boot_thymeleaf_test.filter;

import javax.servlet.*;

import java.io.IOException;

/**

 * @Author:Amy

 * @Date: 2018/12/5

 * @Time: 17:32

 * Description:

 */public class HelloFilter implements Filter {

    @Override

    public void init(FilterConfig filterConfig) throws ServletException {

        System.out.println( "Filter Init" );

    }

    @Override

    public void doFilter(ServletRequest servletRequest, ServletResponse servletResponse, FilterChain filterChain) throws IOException, ServletException {

        System.out.println( "Hello" );

        filterChain.doFilter( servletRequest, servletResponse );

        System.out.println( "Filter" );

    }

    @Override

    public void destroy() {

        System.out.println("Filter Destroy");

    }

}
配置类
 @Bean

    public HelloFilter helloFilter(){

        return new HelloFilter();

} - Listener注册测试
package com.example.spring_boot_thymeleaf_test.listener;

import javax.servlet.DispatcherType;

import javax.servlet.ServletRequest;

import javax.servlet.ServletRequestEvent;

import javax.servlet.ServletRequestListener;

import javax.servlet.http.HttpServletRequest;

/**

 * @Author: Amy

 * @Date: 2018/12/5

 * @Time: 17:38

 * Description:

 */

public class RequestLifecycleListener implements ServletRequestListener {

    @Override

    public void requestDestroyed(ServletRequestEvent event) {

        ServletRequest req = event.getServletRequest();

        HttpServletRequest request = (HttpServletRequest) req ;

        String uri = request.getRequestURI();

        DispatcherType type = request.getDispatcherType();

        String name = req.getLocalName();

        System.out.println(  "来自"+name+"请求类型为"+type + " ,请求路径是 " + uri +"的请求结束");

    }

    @Override

    public void requestInitialized(ServletRequestEvent event) {

        ServletRequest req = event.getServletRequest();

        HttpServletRequest request = (HttpServletRequest) req ;

        String uri = request.getRequestURI();

        DispatcherType type = request.getDispatcherType();

        String name = req.getLocalName();

        System.out.println( "接收到请求:来自" +name+"的请求,请求类型为"+type + " ,请求路径是 " + uri );

    }

}
配置类
@Bean

    public RequestLifecycleListener requestLifecycleListener(){

        return  new RequestLifecycleListener();

    }
2、通过RegistrationBean
- Servlet注册配置文件
@Bean

    public ServletRegistrationBean servletRegistrationBean(){

        return  new ServletRegistrationBean(new HelloServlet(),"/hello/*");

} - Filter注册配置文件
  @Bean

    public FilterRegistrationBean filterRegistrationBean(){

        FilterRegistrationBean filterRegistrationBean = new FilterRegistrationBean();

        filterRegistrationBean.addUrlPatterns("/hello");

        filterRegistrationBean.setFilter(new HelloFilter());

        return  filterRegistrationBean;

} - Listener注册配置文件
  @Bean

    public ServletListenerRegistrationBean servletListenerRegistrationBean(){

        return new ServletListenerRegistrationBean(new RequestLifecycleListener());

    }
3、使用注解
- Servlet注册
@WebServlet("/hello/*")启动类增加@ServletComponentScan注解,会扫描到相关组件
- Filter注册
@WebFilter("/hello") - Listener注册
@WebListener
配置Tomcat
1、使用配置文件进行配置
####配置servlet容器

#修改端口号

server.port=8080

#修改访问路径,默认是/

server.servlet.context-path=/springboot

####配置Tomcat

#配置Tomcat的编码

server.tomcat.uri-encoding=utf-8
2、使用配置类进行配置
package com.example.spring_boot_thymeleaf_test;

import org.apache.catalina.connector.Connector;

import org.apache.coyote.http11.Http11NioProtocol;

import org.springframework.boot.web.embedded.tomcat.TomcatConnectorCustomizer;

import org.springframework.boot.web.embedded.tomcat.TomcatServletWebServerFactory;

import org.springframework.boot.web.server.WebServerFactory;

import org.springframework.boot.web.server.WebServerFactoryCustomizer;

/**

 * @Author: Amy

 * @Date: 2018/12/5

 * @Time: 19:01

 * Description:

 */

public class ServletContainerConfig implements WebServerFactoryCustomizer {

    @Override

    public void customize(WebServerFactory factory) {

        ((TomcatServletWebServerFactory)factory).addConnectorCustomizers(new TomcatConnectorCustomizer() {

            @Override

            public void customize(Connector connector) {

                Http11NioProtocol protocol = (Http11NioProtocol) connector.getProtocolHandler();

                protocol.setPort(8081);

            }

        });

    }

}
Spring Boot2.0以上使用WebServerFactoryCustomizer接口替换EmbeddedServletContainerCustomizer组件完成对嵌入式Servlet容器的配置。
替换Tomcat
1、替换为jetty
     <dependency>

            <groupId>org.springframework.boot</groupId>

            <artifactId>spring-boot-starter-web</artifactId>

            <exclusions>

                <exclusion>

                    <groupId>org.springframework.boot</groupId>

                    <artifactId>spring-boot-starter-tomcat</artifactId>

                </exclusion>

            </exclusions>

        </dependency>

        <dependency>

            <groupId>org.springframework.boot</groupId>

            <artifactId>spring-boot-starter-jetty</artifactId>

            <version>2.0.6.RELEASE</version>

        </dependency>
2、替换为Undertow
       <dependency>

            <groupId>org.springframework.boot</groupId>

            <artifactId>spring-boot-starter-web</artifactId>

            <exclusions>

                <exclusion>

                    <groupId>org.springframework.boot</groupId>

                    <artifactId>spring-boot-starter-tomcat</artifactId>

                </exclusion>

            </exclusions>

        </dependency>

        <dependency>

            <groupId>org.springframework.boot</groupId>

            <artifactId>spring-boot-starter-undertow</artifactId>

            <version>2.0.6.RELEASE</version>

        </dependency>
推荐博客
https://blog.csdn.net/pml18710973036/article/details/60764496
https://blog.csdn.net/caychen/article/details/80351936
https://blog.csdn.net/Hard__ball/article/details/81281898
转载请于明显处标明出处
https://www.cnblogs.com/AmyZheng/p/9799262.html
SprintBoot学习(三)的更多相关文章
- HTTP学习三:HTTPS
HTTP学习三:HTTPS 1 HTTP安全问题 HTTP1.0/1.1在网络中是明文传输的,因此会被黑客进行攻击. 1.1 窃取数据 因为HTTP1.0/1.1是明文的,黑客很容易获得用户的重要数据 ...
- TweenMax动画库学习(三)
目录 TweenMax动画库学习(一) TweenMax动画库学习(二) TweenMax动画库学习(三) ...
- Struts2框架学习(三) 数据处理
Struts2框架学习(三) 数据处理 Struts2框架框架使用OGNL语言和值栈技术实现数据的流转处理. 值栈就相当于一个容器,用来存放数据,而OGNL是一种快速查询数据的语言. 值栈:Value ...
- 4.机器学习——统计学习三要素与最大似然估计、最大后验概率估计及L1、L2正则化
1.前言 之前我一直对于“最大似然估计”犯迷糊,今天在看了陶轻松.忆臻.nebulaf91等人的博客以及李航老师的<统计学习方法>后,豁然开朗,于是在此记下一些心得体会. “最大似然估计” ...
- DjangoRestFramework学习三之认证组件、权限组件、频率组件、url注册器、响应器、分页组件
DjangoRestFramework学习三之认证组件.权限组件.频率组件.url注册器.响应器.分页组件 本节目录 一 认证组件 二 权限组件 三 频率组件 四 URL注册器 五 响应器 六 分 ...
- [ZZ] 深度学习三巨头之一来清华演讲了,你只需要知道这7点
深度学习三巨头之一来清华演讲了,你只需要知道这7点 http://wemedia.ifeng.com/10939074/wemedia.shtml Yann LeCun还提到了一项FAIR开发的,用于 ...
- SVG 学习<三>渐变
目录 SVG 学习<一>基础图形及线段 SVG 学习<二>进阶 SVG世界,视野,视窗 stroke属性 svg分组 SVG 学习<三>渐变 SVG 学习<四 ...
- Android JNI学习(三)——Java与Native相互调用
本系列文章如下: Android JNI(一)——NDK与JNI基础 Android JNI学习(二)——实战JNI之“hello world” Android JNI学习(三)——Java与Nati ...
- day91 DjangoRestFramework学习三之认证组件、权限组件、频率组件、url注册器、响应器、分页组件
DjangoRestFramework学习三之认证组件.权限组件.频率组件.url注册器.响应器.分页组件 本节目录 一 认证组件 二 权限组件 三 频率组件 四 URL注册器 五 响应器 六 分 ...
- Django基础学习三_路由系统
今天主要来学习一下Django的路由系统,视频中只学了一些皮毛,但是也做下总结,主要分为静态路由.动态路由.二级路由 一.先来看下静态路由 1.需要在project中的urls文件中做配置,然后将匹配 ...
随机推荐
- python修改文件后缀名
修改文件后缀名 # -*- coding: utf-8 -*- import os # # 列出当前目录下所有的文件 # filedir = 'C:\\Users\\WT\\Desktop\\test ...
- ASCII编码,将英文存储到计算机
前面我们已经讲到,计算机是以二进制的形式来存储数据的,它只认识 0 和 1 两个数字,我们在屏幕上看到的文字,在存储之前都被转换成了二进制(0和1序列),在显示时也要根据二进制找到对应的字符. 可想而 ...
- 每天进步一点点------ORCAD Capture CIS
ORCAD Capture CIS 一.建工程及设置 1.选主菜单 file->new->project ;弹出 project wizard 对话框,取名Myproject : Mypr ...
- grep Or And 操作
grep or 操作符 使用 \| 如果不使用grep命令的任何选项,可以通过使用 '|' 来分割多个pattern,以此实现OR的操作. grep 'pattern1\|pattern2' file ...
- docker容器 - 宿主机和容器之间复制文件(cp)
实验环境 CentOS 7.5 容器 容器是镜像的运行实例.不同的是,镜像是静态的只读文件,而容器带有运行时需要的可写文件层:同时,容器中的应用进程处于运行状态. 主机和容器之间复制文件 要想实现在主 ...
- C#应用程序部署到集群若干问题
1. MemoryCache中的缓存在集群中的每个节点不能同步 解决方案: A. 将缓存内容迁移到系统外部的Redis缓存 B. 在使用MemoryCache的时候设置过期时间(当对数据同步要求不是那 ...
- AcWing 854. Floyd求最短路 多源 邻接矩阵
//不存在负权回路 //边权可能为负数 #include <cstring> #include <iostream> #include <algorithm> us ...
- springboot @ComponentScan注解
@ComponentScan 告诉Spring从哪里找到bean. 如果你的其他包都在@SpringBootApplication注解的启动类所在的包及其下级包,则你什么都不用做,SpringBoot ...
- 吴裕雄 python 机器学习——局部线性嵌入LLE降维模型
# -*- coding: utf-8 -*- import numpy as np import matplotlib.pyplot as plt from sklearn import datas ...
- 题解【洛谷P3385】【模板】负环
题目描述 暴力枚举/\(SPFA\)/\(Bellman-ford\)/奇怪的贪心/超神搜索 寻找一个从顶点1所能到达的负环,负环定义为:一个边权之和为负的环. 输入输出格式 输入格式 第一行一个正整 ...