redux、react-redux、redux-thunk、redux-saga使用及dva对比
一、redux使用
1、src下新建store文件夹,新建index.js作为store的输出文件
2、store文件夹下新建index.js文件
3、新建reducer.js ,actionTypes.js文件
4、组件引入store
import React, { Component } from 'react';

import { Input ,Button,List } from 'antd';

import store from './store';

import {CHANGE_INPUT_VALUE,ADD_TODO_ITEM,DELETE_TODO_ITEM} from  './store/actionTypes'

class TodoList extends Component {

    constructor(props) {

        super(props);

        this.state = store.getState();

        this.handleStoreChange = this.handleStoreChange.bind(this);

        this.handleBtnClick = this.handleBtnClick.bind(this);

        this.handleInputChange = this.handleInputChange.bind(this);

        store.subscribe(this.handleStoreChange)

    }

    handleInputChange(e) {

        const action = {

            type: CHANGE_INPUT_VALUE,

            value: e.target.value

        }

        store.dispatch(action)

    }

    handleBtnClick() {

        const action = {

            type: ADD_TODO_ITEM

        }

        store.dispatch(action)

    }

    render() {

        return (

            <div style={{marginTop:'20px',marginLeft:'15px'}}>

                <div>

                    <Input

                        value={this.state.inputValue}

                        placeholder="input"

                        style={{width:'300px'}}

                        onChange={this.handleInputChange}

                    />

                    <Button onClick={this.handleBtnClick} type="primary">Primary</Button>

                </div>

                <List

                    style={{marginTop:'15px',width:'300px'}}

                    bordered

                    dataSource={this.state.list}

                    renderItem={(item,index) => <List.Item onClick={this.handleItemDelete.bind(this,index)}>{item}</List.Item>}

                    />

            </div>

        )

    }

    handleStoreChange() {

        this.setState(store.getState())

    }

    handleItemDelete(index) {

        const action = {

            type: DELETE_TODO_ITEM,

            index

        }

        store.dispatch(action)

    }

}

export default TodoList;
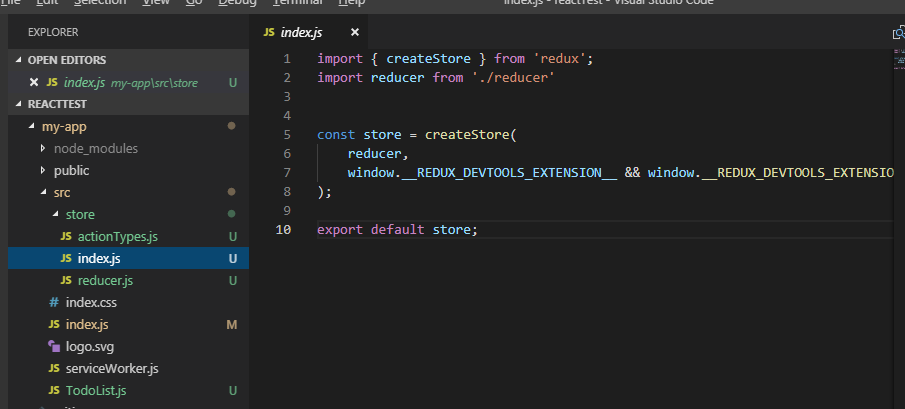
5、使用redux-devtool
import { createStore } from 'redux';

import reducer from './reducer'

const store = createStore(

    reducer,

    window.__REDUX_DEVTOOLS_EXTENSION__ && window.__REDUX_DEVTOOLS_EXTENSION__()

);

export default store;
6、actionTypes.js代码如下
export const  CHANGE_INPUT_VALUE = 'change_input_value';

export const  ADD_TODO_ITEM = 'add_todo_item';

export const  DELETE_TODO_ITEM = 'delete_todo_item';
7、reducer.js代码如下
import {CHANGE_INPUT_VALUE,ADD_TODO_ITEM,DELETE_TODO_ITEM} from  './actionTypes'

const defaultState = {

    inputValue:'aaa',

    list:['1','2']

}

export default (state = defaultState,action) => {

    if(action.type === CHANGE_INPUT_VALUE) {

        const newState = JSON.parse(JSON.stringify(state));

        newState.inputValue = action.value;

        return newState;

    }

    if(action.type === ADD_TODO_ITEM) {

        const newState = JSON.parse(JSON.stringify(state));

        newState.list.push(newState.inputValue);

        newState.inputValue = '';

        return newState;

    }

    if(action.type === DELETE_TODO_ITEM) {

        const newState = JSON.parse(JSON.stringify(state));

        newState.list.splice(action.index,1);

        return newState;

    }

    return state;

}
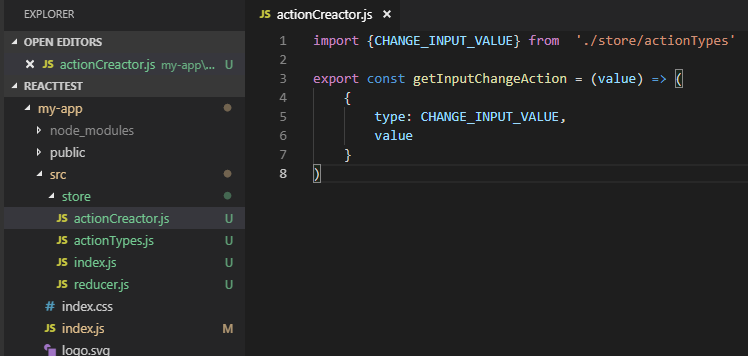
8、优化:使用actionCreactor.js来统一管理action
二、引入react-redux
1.在index.js里引入react-redux及store
import React from 'react';

import ReactDOM from 'react-dom';

import 'antd/dist/antd.css';

import './index.css';

import App from './TodoList';

import * as serviceWorker from './serviceWorker';

import store from './store'

import { Provider } from 'react-redux';

const ProviderApp = (

    <Provider store={store}>

        <App></App>

    </Provider>

)

ReactDOM.render(ProviderApp, document.getElementById('root'));

serviceWorker.unregister();
2.在组件里做connect
import React, { Component } from 'react';

import { Input ,Button,List } from 'antd';

import {CHANGE_INPUT_VALUE,ADD_TODO_ITEM} from  './store/actionTypes'

import {connect} from 'react-redux';

class TodoList extends Component {

    render() {

        const {handleInputChange,handleBtnClick} = this.props

        return (

            <div style={{marginTop:'20px',marginLeft:'15px'}}>

                <div>

                    <Input

                        value={this.props.inputValue}

                        placeholder="input"

                        style={{width:'300px'}}

                        onChange={handleInputChange}

                    />

                    <Button onClick={handleBtnClick} type="primary">Primary</Button>

                </div>

                <List

                    style={{marginTop:'15px',width:'300px'}}

                    bordered

                    dataSource={this.props.list}

                    renderItem={(item,index) => <List.Item>{item}</List.Item>}

                    />

            </div>

        )

    }

}

const mapStateToProps = (state) => {

    return {

        inputValue: state.inputValue,

        list : state.list

    }

}

const mapDispatchToProps = (dispatch) => {

    return {

        handleInputChange(e) {

            const action = {

                type: CHANGE_INPUT_VALUE,

                value: e.target.value

            }

            dispatch(action)

        },

        handleBtnClick() {

            const action = {

                type: ADD_TODO_ITEM

            }

            dispatch(action)

        },

    }

}

export default connect(mapStateToProps,mapDispatchToProps)(TodoList);
三、redux-thunk使用
1.中间件的概念
dispatch一个action之后,到达reducer之前,进行一些额外的操作,就需要用到middleware。你可以利用 Redux middleware 来进行日志记录、创建崩溃报告、调用异步接口或者路由等等。
换言之,中间件都是对store.dispatch()的增强。redux-thunk就是用来异步操作,比如接口请求等。
2.引入redux-thunk
import { applyMiddleware, createStore } from 'redux';

import thunk from 'redux-thunk';

 const store = createStore(

  reducers,

  applyMiddleware(thunk)

);
3.这样就可以再actionCreactor中创建一个带异步函数的方法了
export const getTodoList = () => {

    return () => {

        axios.get('./list').then((res)=>{

            const data = res.data;

            const action  = initListAction(data);

            StorageEvent.dispatch(action);

        })

    }

}
四、redux-saga使用
redux-saga是一个用于管理redux应用异步操作的中间件,redux-saga通过创建sagas将所有异步操作逻辑收集在一个地方集中处理,可以用来代替redux-thunk中间件。
1.在store.js里引入redux-saga
import { createStore, applyMiddleware } from 'redux'

import createSagaMiddleware from 'redux-saga'

import reducer from './reducers'

import mySaga from './sagas'

// create the saga middleware

const sagaMiddleware = createSagaMiddleware()

// mount it on the Store

const store = createStore(

  reducer,

  applyMiddleware(sagaMiddleware)

)

// then run the saga

sagaMiddleware.run(mySaga);

export default store;
2.新建 saga.js
import { call, put, takeEvery, takeLatest } from 'redux-saga/effects'

import Api from '...'

// worker Saga: will be fired on USER_FETCH_REQUESTED actions

function* fetchUser(action) {

   try {

      const user = yield call(Api.fetchUser, action.payload.userId);

      yield put({type: "USER_FETCH_SUCCEEDED", user: user});

   } catch (e) {

      yield put({type: "USER_FETCH_FAILED", message: e.message});

   }

}

function* mySaga() {

  yield takeEvery("USER_FETCH_REQUESTED", fetchUser);

}

export default mySaga;
五、dva对比
dva使用可以参考这个博客:https://www.cnblogs.com/superSmile/p/9972344.html
redux、react-redux、redux-thunk、redux-saga使用及dva对比的更多相关文章
- Redux React & Online Video Tutorials
Redux React & Online Video Tutorials https://scrimba.com/@xgqfrms https://scrimba.com/c/cEwvKNud ...
- 如何优雅地在React项目中使用Redux
前言 或许你当前的项目还没有到应用Redux的程度,但提前了解一下也没有坏处,本文不会安利大家使用Redux 概念 首先我们会用到哪些框架和工具呢? React UI框架 Redux 状态管理工具,与 ...
- 在 React Native 中使用 Redux 架构
前言 Redux 架构是 Flux 架构的一个变形,相对于 Flux,Redux 的复杂性相对较低,而且最为巧妙的是 React 应用可以看成由一个根组件连接着许多大大小小的组件的应用,Redux 也 ...
- React深入 - 手写redux api
简介: 手写实现redux基础api createStore( )和store相关方法 api回顾: createStore(reducer, [preloadedState], enhancer) ...
- 优雅的在React项目中使用Redux
概念 首先我们会用到哪些框架和工具呢? React UI框架 Redux 状态管理工具,与React没有任何关系,其他UI框架也可以使用Redux react-redux React插件,作用:方便在 ...
- RxJS + Redux + React = Amazing!(译一)
今天,我将Youtube上的<RxJS + Redux + React = Amazing!>翻译(+机译)了下来,以供国内的同学学习,英文听力好的同学可以直接看原版视频: https:/ ...
- RxJS + Redux + React = Amazing!(译二)
今天,我将Youtube上的<RxJS + Redux + React = Amazing!>的后半部分翻译(+机译)了下来,以供国内的同学学习,英文听力好的同学可以直接看原版视频: ht ...
- react+redux教程(二)redux的单一状态树完全替代了react的状态机?
上篇react+redux教程,我们讲解了官方计数器的代码实现,react+redux教程(一).我们发现我们没有用到react组件本身的state,而是通过props来导入数据和操作的. 我们知道r ...
- [Redux] React Todo List Example (Toggling a Todo)
/** * A reducer for a single todo * @param state * @param action * @returns {*} */ const todo = ( st ...
随机推荐
- 零元学Expression Blend 4 - Chapter 37 看如何使用Clip修出想要的完美曲线(上)
原文:零元学Expression Blend 4 - Chapter 37 看如何使用Clip修出想要的完美曲线(上) 几何外部的 UIElement 会在呈现的配置中以视觉化方式裁剪. 几何不一定要 ...
- SQLite Expert Professional 打开加密SQLite数据库
原文 SQLite Expert Professional 打开加密数据库 (已修改) 版本:sqlite expert professional 4.2.0.739 (x86) 目的:用SQLite ...
- Android零基础入门第84节:引入Fragment原来是这么回事
随着大众生活水平的提高,再加上移动互联网的迅速发展,几乎每个人都至少拥有一台搭载Android系统的移动设备.Android设备的多样性给我们带来了很大的便捷,各Android设备拥有不同分辨率和不同 ...
- 快速搭建多线程Windows服务解决方案
一.引言 在软件开发过程中windows服务有的时候非常有用,用于同步数据,发送邮件,宿主WF引擎服务等,但是快速搭建一个好用多线程进行多任务处理的程序往往是一个项目必须考虑的问题.自己在项目中也经常 ...
- Docker Explanation and Apache Image
https://blog.sajjan.com.np/2017/02/05/docker-getting-started-containers-ubuntu/ https://blog.sajjan. ...
- Nginx 部署 Ant Design pro
利用Ant Design pro开发的项目,如何用Nginx部署呢? 第一步:把项目打包,打包命令如下: npm run build 运行完毕会在项目目录下生成dist文件夹. 第二步:想要测试打包好 ...
- “真正的工作不是说的天花乱坠”,Torvalds 说, “而是在于细节”(Torvalds 认为成功的项目都是99%的汗水和1%的创新)
在刚刚结束的加利福尼亚州的开源领袖峰会(2月14日-16日)上,Linus Torvalds 接受了外媒的采访,分享了他如何管理 Linux kernel 的开发以及他对工作的态度. “真正的工作不是 ...
- Cookie概述与应用
一.概述 Cookie是Web服务器保存在客户端的一系列文本信息 典型应用一:判断注册用户是否已经登录网站. 典型应用二:"购物车"的处理. Cookie的作用: 对特定对 ...
- Rails.cache相关知识
可能里面的一些知识已经不被大家使用了,但是作为学习,我想和大家分享一下个人关于Rails.cache的浅显的认识,望大家指教. 1.Rails.cache是什么 它是Rails中的缓存,拥有所有缓存的 ...
- Django多对多表的三种创建方式,MTV与MVC概念
MTV与MVC MTV模型(django): M:模型层(models.py) T:templates V:views MVC模型: M:模型层(models.py) V:视图层(views.py) ...