
Maven搭建SpringMvc
Maven搭建SpringMvc,只需跟着一步步操作
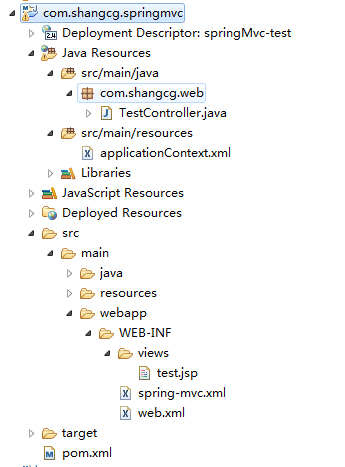
项目结构
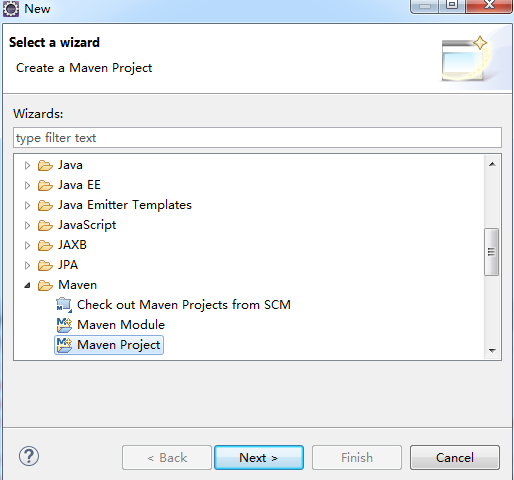
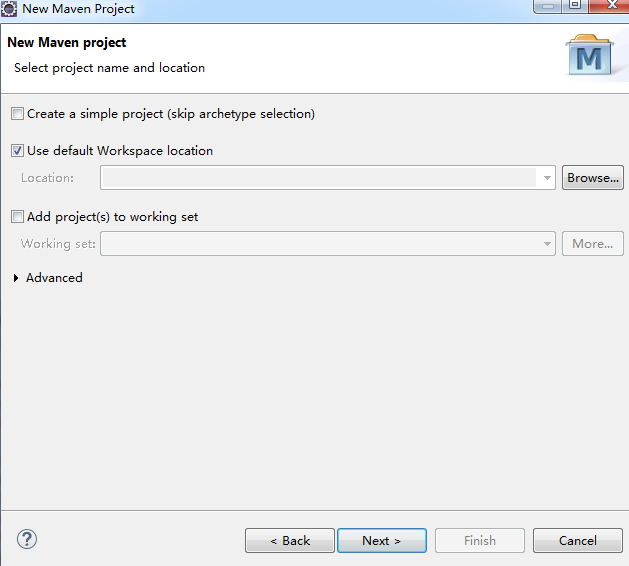
1 创建Maven项目

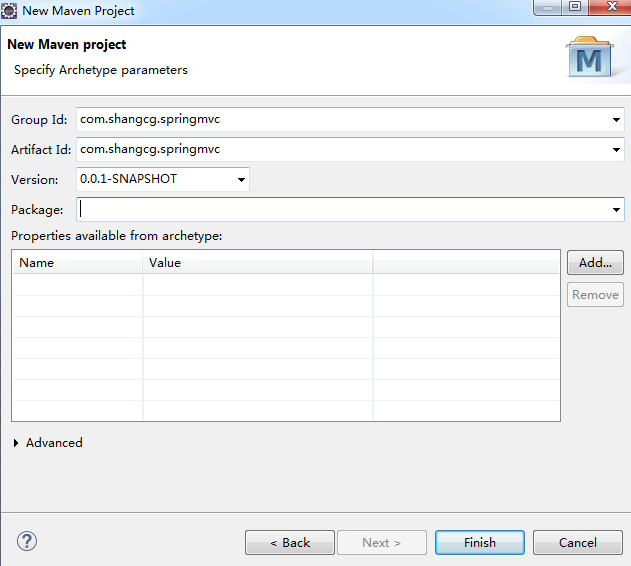
index,jsp报错不用管,配置完pom就好了,也可以直接删除掉
2 pom.xml添加依赖
   <dependency>

       <groupId>org.springframework</groupId>

    <artifactId>spring-webmvc</artifactId>

     <version>${spring.version}</version>

    </dependency>

    <dependency>

        <groupId>org.springframework</groupId>

        <artifactId>spring-web</artifactId>

        <version>${spring.version}</version>

    </dependency>

    <dependency>

        <groupId>javax.servlet</groupId>

        <artifactId>javax.servlet-api</artifactId>

        <version>3.1.0</version>

   </dependency>
完整pom.xml
<project xmlns="http://maven.apache.org/POM/4.0.0" xmlns:xsi="http://www.w3.org/2001/XMLSchema-instance"

  xsi:schemaLocation="http://maven.apache.org/POM/4.0.0 http://maven.apache.org/maven-v4_0_0.xsd">

  <modelVersion>4.0.0</modelVersion>

  <groupId>com.shangcg.springmvc</groupId>

  <artifactId>com.shangcg.springmvc</artifactId>

  <packaging>war</packaging>

  <version>0.0.1-SNAPSHOT</version>

  <name>com.shangcg.springmvc Maven Webapp</name>

  <url>http://maven.apache.org</url>

  <properties>

      <spring.version>4.0.5.RELEASE</spring.version>

  </properties>

  <dependencies>

    <dependency>

      <groupId>junit</groupId>

      <artifactId>junit</artifactId>

      <version>3.8.1</version>

      <scope>test</scope>

    </dependency>

    <dependency>

        <groupId>org.springframework</groupId>

        <artifactId>spring-webmvc</artifactId>

        <version>${spring.version}</version>

    </dependency>

    <dependency>

        <groupId>org.springframework</groupId>

        <artifactId>spring-web</artifactId>

        <version>${spring.version}</version>

    </dependency>

    <dependency>

        <groupId>javax.servlet</groupId>

        <artifactId>javax.servlet-api</artifactId>

        <version>3.1.0</version>

    </dependency>

  </dependencies>

  <build>

    <finalName>com.shangcg.springmvc</finalName>

  </build>

</project>
3配置web.xml
<?xml version="1.0" encoding="UTF-8"?>

<web-app xmlns:xsi="http://www.w3.org/2001/XMLSchema-instance"

    xmlns="http://java.sun.com/xml/ns/javaee"

    xsi:schemaLocation="http://java.sun.com/xml/ns/javaee http://java.sun.com/xml/ns/javaee/web-app_3_0.xsd"

    id="WebApp_ID" version="3.0">

    <display-name>springMvc-test</display-name>

    <!-- 指定Spring Bean的配置文件所在目录。默认配置在WEB-INF目录下 -->

    <context-param>

        <param-name>contextConfigLocation</param-name>

        <param-value>classpath*:/applicationContext.xml</param-value>

    </context-param>

    <!-- Spring配置 -->

    <listener>

        <listener-class>org.springframework.web.context.ContextLoaderListener</listener-class>

    </listener>

    <!-- Spring MVC配置 -->

    <servlet>

        <servlet-name>spring</servlet-name>

        <servlet-class>org.springframework.web.servlet.DispatcherServlet</servlet-class>

        <!-- 可以自定义servlet.xml配置文件的位置和名称,默认为WEB-INF目录下,名称为[<servlet-name>]-servlet.xml,如spring-servlet.xml -->

        <init-param>

            <param-name>contextConfigLocation</param-name>

            <param-value>/WEB-INF/spring-mvc.xml</param-value>

        </init-param>

        <load-on-startup>1</load-on-startup>

    </servlet>

    <servlet-mapping>

        <servlet-name>spring</servlet-name>

        <url-pattern>/</url-pattern>

    </servlet-mapping>

    <!-- 中文过滤器 -->

    <filter>

        <filter-name>CharacterEncodingFilter</filter-name>

        <filter-class>org.springframework.web.filter.CharacterEncodingFilter</filter-class>

        <init-param>

            <param-name>encoding</param-name>

            <param-value>UTF-8</param-value>

        </init-param>

        <init-param>

            <param-name>forceEncoding</param-name>

            <param-value>true</param-value>

        </init-param>

    </filter>

    <filter-mapping>

        <filter-name>CharacterEncodingFilter</filter-name>

        <url-pattern>/*</url-pattern>

    </filter-mapping>

    <welcome-file-list>

        <welcome-file>index.jsp</welcome-file>

    </welcome-file-list>

</web-app>
4 新建spring-mvc.xml(具体位置请看项目结构图)
<?xml version="1.0" encoding="UTF-8" standalone="no"?>

<beans xmlns="http://www.springframework.org/schema/beans"

    xmlns:context="http://www.springframework.org/schema/context"

    xmlns:aop="http://www.springframework.org/schema/aop" xmlns:mvc="http://www.springframework.org/schema/mvc"

    xmlns:p="http://www.springframework.org/schema/p" xmlns:xsi="http://www.w3.org/2001/XMLSchema-instance"

    xsi:schemaLocation="http://www.springframework.org/schema/beans  http://www.springframework.org/schema/beans/spring-beans-4.0.xsd

        http://www.springframework.org/schema/context http://www.springframework.org/schema/context/spring-context-4.0.xsd

        http://www.springframework.org/schema/mvc http://www.springframework.org/schema/mvc/spring-mvc-4.0.xsd

        http://www.springframework.org/schema/aop http://www.springframework.org/schema/aop/spring-aop-4.0.xsd">

    <!-- 自动扫描的包名 -->

    <context:component-scan base-package="com.shangcg.web" />

    <!-- 默认的注解映射的支持 -->

    <mvc:annotation-driven>

        <mvc:message-converters>

            <bean class="org.springframework.http.converter.StringHttpMessageConverter" />

            <bean

                class="org.springframework.http.converter.ResourceHttpMessageConverter" />

        </mvc:message-converters>

    </mvc:annotation-driven>

    <!-- 视图解释类,定义跳转的文件的前后缀 -->

    <bean class="org.springframework.web.servlet.view.InternalResourceViewResolver">

        <property name="prefix" value="/WEB-INF/views/"/>

        <property name="suffix" value=".jsp"/>

    </bean>

    <!-- 对静态资源文件的访问  -->

    <mvc:default-servlet-handler />

</beans>
5 新建applicationContext.xml
<?xml version="1.0" encoding="UTF-8"?>

<beans xmlns="http://www.springframework.org/schema/beans" xmlns:xsi="http://www.w3.org/2001/XMLSchema-instance" xmlns:mvc="http://www.springframework.org/schema/mvc"

    xmlns:context="http://www.springframework.org/schema/context" xmlns:tx="http://www.springframework.org/schema/tx" xmlns:util="http://www.springframework.org/schema/util"

    xmlns:aop="http://www.springframework.org/schema/aop"

    xsi:schemaLocation="http://www.springframework.org/schema/beans http://www.springframework.org/schema/beans/spring-beans-4.0.xsd

        http://www.springframework.org/schema/mvc http://www.springframework.org/schema/mvc/spring-mvc-4.0.xsd

        http://www.springframework.org/schema/context http://www.springframework.org/schema/context/spring-context-4.0.xsd

        http://www.springframework.org/schema/util http://www.springframework.org/schema/util/spring-util-4.0.xsd

        http://www.springframework.org/schema/tx http://www.springframework.org/schema/tx/spring-tx.xsd

        http://www.springframework.org/schema/aop http://www.springframework.org/schema/aop/spring-aop-4.0.xsd">

    <!-- 注解注册 -->

    <context:annotation-config />

    <context:component-scan base-package="com.test" />

</beans>
6 新建TestController
package com.shangcg.web;

import javax.servlet.http.HttpServletRequest;

import org.springframework.stereotype.Controller;

import org.springframework.web.bind.annotation.RequestMapping;

import org.springframework.web.bind.annotation.ResponseBody;

import org.springframework.web.servlet.ModelAndView;

@Controller

@RequestMapping("/testController")

public class TestController {

    @RequestMapping(value="/getView")

    @ResponseBody

    public ModelAndView getTest(HttpServletRequest request){

        ModelAndView modelAndView = new ModelAndView("test");

        return modelAndView;

    }

}
7新建test.jsp
<%@ page language="java" contentType="text/html; charset=UTF-8"

    pageEncoding="UTF-8"%>

<!DOCTYPE html PUBLIC "-//W3C//DTD HTML 4.01 Transitional//EN" "http://www.w3.org/TR/html4/loose.dtd">

<html>

<head>

<meta http-equiv="Content-Type" content="text/html; charset=UTF-8">

<title>I AM TITLE</title>

</head>

<body>

    Hello World!!!

</body>

</html>
8发布tomact服务,添加到tomact后start
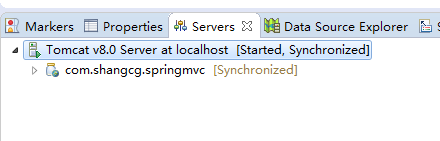

9 访问http://localhost:8080/com.shangcg.springmvc/testController/getView

项目已上传https://github.com/shangcg/mavenSpringMvc
如果导入Eclipse之后启动不起来,需要手动添加一下依赖:
选中项目右键---properties--deployment assembly--add-java build path entries--maven denpencies双击 ,如下图
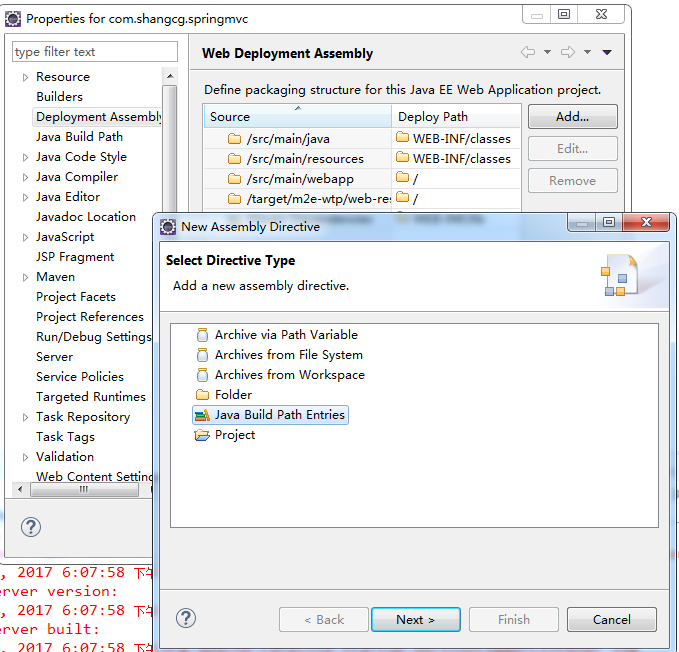
之后重启即可,报错不影响启动
Maven搭建SpringMvc的更多相关文章
- 手把手Maven搭建SpringMVC+Spring+MyBatis框架(超级详细版)
手把手Maven搭建SpringMVC+Spring+MyBatis框架(超级详细版) SSM(Spring+SpringMVC+Mybatis),目前较为主流的企业级架构方案.标准的MVC设计模式, ...
- Maven搭建SpringMVC+Hibernate项目详解 【转】
前言 今天复习一下SpringMVC+Hibernate的搭建,本来想着将Spring-Security权限控制框架也映入其中的,但是发现内容太多了,Spring-Security的就留在下一篇吧,这 ...
- idea使用maven搭建springmvc
最近学着搭建springmvc,写此博客记录一下 idea版本:2016.3.1maven: apache-maven-3.3.9tomcat:apache-tomcat-8.5.8 1.New Pr ...
- Maven搭建SpringMVC+Hibernate项目详解
前言 今天复习一下SpringMVC+Hibernate的搭建,本来想着将Spring-Security权限控制框架也映入其中的,但是发现内容太多了,Spring-Security的就留在下一篇吧,这 ...
- Maven搭建SpringMVC+Hibernate项目详解(转)
前言 今天复习一下SpringMVC+Hibernate的搭建,本来想着将Spring-Security权限控制框架也映入其中的,但是发现内容太多了,Spring-Security的就留在下一篇吧,这 ...
- Maven 搭建SpringMvc+Spring+Mybatis详细记录
总觉得,看比人写的总是那么好,每次搭建框架时都会找博客,找教程来跟着一步一步走,虽然很快搭建成功了,但是经常情况是我并不知道我干了什么,也不记得具体步骤,到底为什么要这么做,今天我详细记录了一下自己搭 ...
- 从头开始基于Maven搭建SpringMVC+Mybatis项目(1)
技术发展日新月异,许多曾经拥有霸主地位的流行技术短短几年间已被新兴技术所取代. 在Java的世界中,框架之争可能比语言本身的改变更让人关注.近几年,SpringMVC凭借简单轻便.开发效率高.与spr ...
- maven搭建springmvc+mybatis项目
上一篇中已经成功使用maven搭建了一个web项目,本篇描述在此基础上怎么搭建一个基于springmvc+mybatis环境的项目. 说了这么久,为什么那么多人都喜欢用maven搭建项目?我们都知道m ...
- Maven搭建SpringMVC + SpringJDBC项目详解
前言 上一次复习搭建了SpringMVC+Mybatis,这次搭建一下SpringMVC,采用的是SpringJDBC,没有采用任何其他的ORM框架,SpringMVC提供了一整套的WEB框架,所以如 ...
随机推荐
- 2019.NET Conf,我们在共同期待
(一)回顾一个小社区红过的五分钟 不知不觉,距离中国.net社区组织的.net conf只有不到一周的时间,还记得年初在叶伟民老师,潘淳老师和张善友老师的号召下,我们长沙的十几位开发者自发组织起来,拉 ...
- Nginx专题(1):Nginx之反向代理及配置
摘要:本文从Nginx的概念出发,分别从反向代理的概念.优势.配置代码3个方面介绍了Nginx的特性之一反向代理. 文章来源:宜信技术学院 & 宜信支付结算团队技术分享第一期-宜信支付结算八方 ...
- 使用asp.net core 3.0 搭建智能小车2
上一篇中我们把基本的运行环境搭建完成了,这一篇中,我们实战通过树莓派B+连接HC-SR04超声波测距传感器,用c# GPIO控制传感器完成距离测定,并将距离显示在网页上. 1.HC-SR04接线 传感 ...
- SQL 中更新一个表的数据是从另外的表(或者自己本身的表)查询出来的
模板1: update 表1 set 表1.字段1 = ( select 表1字段或者表2字段 from 表2 where 表1主键 = 表2外键 及其他条件 ) where 表1.字段 = ...
- TCP/IP协议第一卷第二章
环回接口: 127全网段均被作为环回地址. 传给广播地址或多播地址的数据报复制一份给环回接口,然后传送到以太网上.这是因为广播传送和多播传送的定义包含自己本身. 任何传给该主机IP地址的数据均送到环回 ...
- [BZOJ4310] 跳蚤 SAM || SA
没有代码的. 传送门 先二分出第 \(mid\) 大的字串 \(s\),然后从后往前切割,每次大于 \(s\) 了就不行. 涉及到的操作:求第 \(mid\) 大子串:比较两个字串(求 \(lcp\) ...
- [考试反思]0815NOIP模拟测试22
40分,15名. 1-4:120 75 70 70 35分20名...总之差距极小不想说了 昨天教练说:以后的考试还是联赛知识点,但是难度比联赛高. 没听进去,以为是对于所有人而言的,也就是T1难度变 ...
- NOIP模拟 28
果然昨天和别人合照丢的脸今天都加进RP里了 T3是用了dp快速幂(???),T1,T2考试的时候把想法都写注释了. T1: #include<cstdio> using namespace ...
- 微信小程序云开发获取文件夹下所有文件
上周一个高中同学让我帮他做个图片展示的公众号,因为一直在加班的原因,所以一时忘了,昨晚想起来就赶紧加班加点的帮他弄了下,遇到了个问题,记录一下. 他的需求是要有个后台给他上传图片并且将图片归类,前端公 ...
- javascript关于box2djs和matterjs之间的选择
javascript关于box2djs和matterjs之间的选择box2djs资料少很多时候需要看c++版本资料 然后转化成js 还有转化成像素坐标不准确 matterjs文档丰富 上手容易 建议用 ...