SpringBoot - 自定义starter
一、什么是SpringBoot starter机制
SpringBoot中的starter是一种非常重要的机制(自动化配置),能够抛弃以前繁杂的配置,将其统一集成进starter,应用者只需要在maven中引入starter依赖,SpringBoot就能自动扫描到要加载的信息并启动相应的默认配置。
starter让我们摆脱了各种依赖库的处理,需要配置各种信息的困扰。SpringBoot会自动通过classpath路径下的类发现需要的Bean,并注册进IOC容器。SpringBoot提供了针对日常企业应用研发各种场景的spring-boot-starter依赖模块。
所有这些依赖模块都遵循着约定成俗的默认配置,并允许我们调整这些配置,即遵循“约定大于配置”的理念。
二、为什么要自定义starter
在我们的日常开发工作中,经常会有一些独立于业务之外的配置模块,我们经常将其放到一个特定的包下,然后如果另一个工程需要复用这块功能的时候,需要将代码硬拷贝到另一个工程,重新集成一遍,麻烦至极。
如果我们将这些可独立于业务代码之外的功配置模块封装成一个个starter,复用的时候只需要将其在pom中引用依赖即可,SpringBoot为我们完成自动装配,简直不要太爽
三、什么时候需要创建自定义starter
在我们的日常开发工作中,可能会需要开发一个通用模块,以供其它工程复用。SpringBoot就为我们提供这样的功能机制,我们可以把我们的通用模块封装成一个个starter,这样其它工程复用的时候只需要在pom中引用依赖即可,由SpringBoot为我们完成自动装配。
常见场景:
1.通用模块-短信发送模块
2.基于AOP技术实现日志切面
3.分布式雪花ID,Long--string,解决精度问题jackson2/fastjson
4.微服务项目的数据库连接池配置
5.微服务项目的每个模块都要访问redis数据库,每个模块都要配置redisTemplate,也可以通过starter解决
四、自动加载核心注解说明
starter 组件开发,核心是自动注解类的注解顺序,即根据条件进行注解

关于自动加载核心注解,详情可见:https://blog.csdn.net/qq_19782697/article/details/100727302
五、自定义starter的开发流程
那么前面对自定义 starter 机制简单介绍了一下,接下来就进入正题!
自定义starter的开发流程:
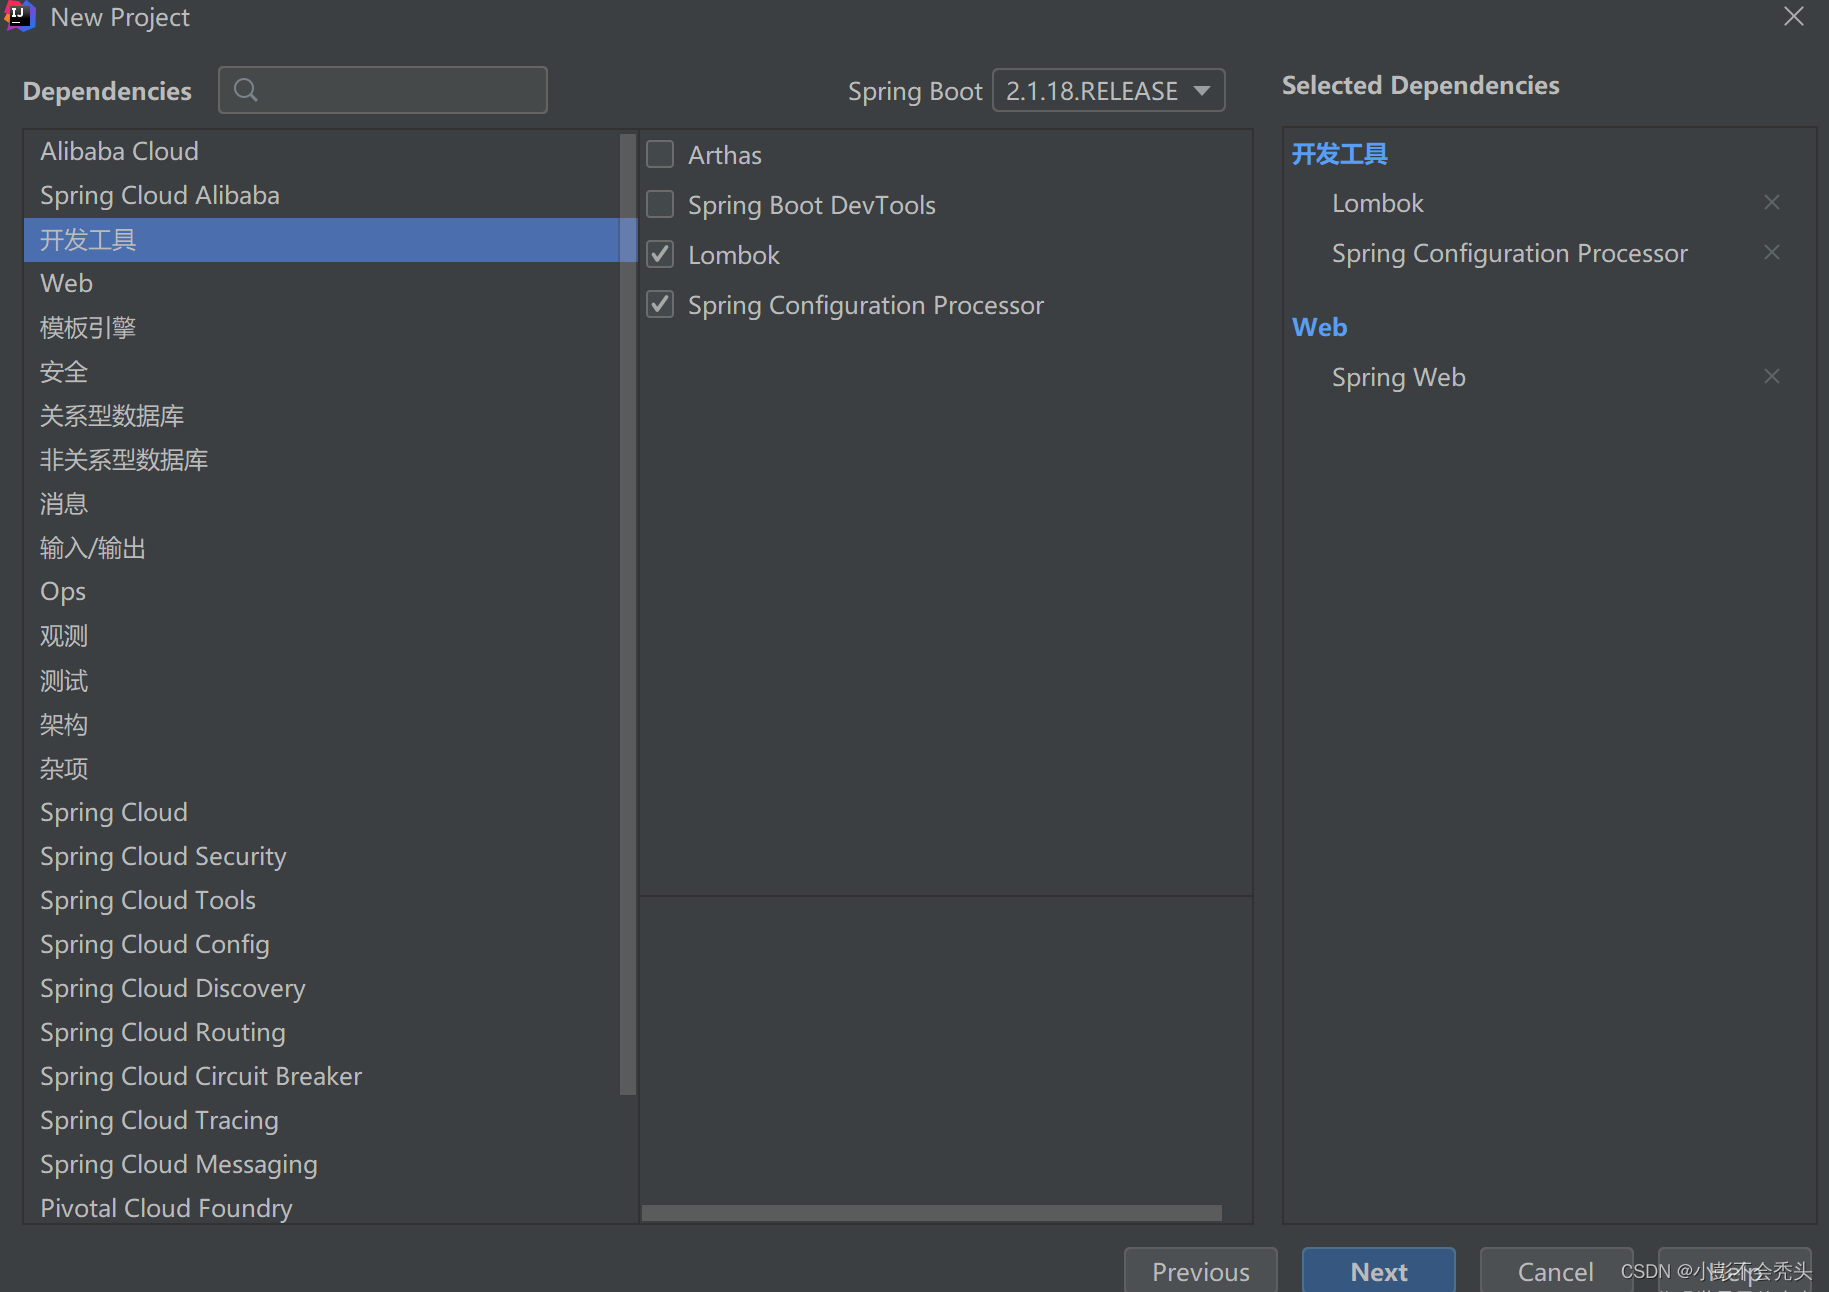
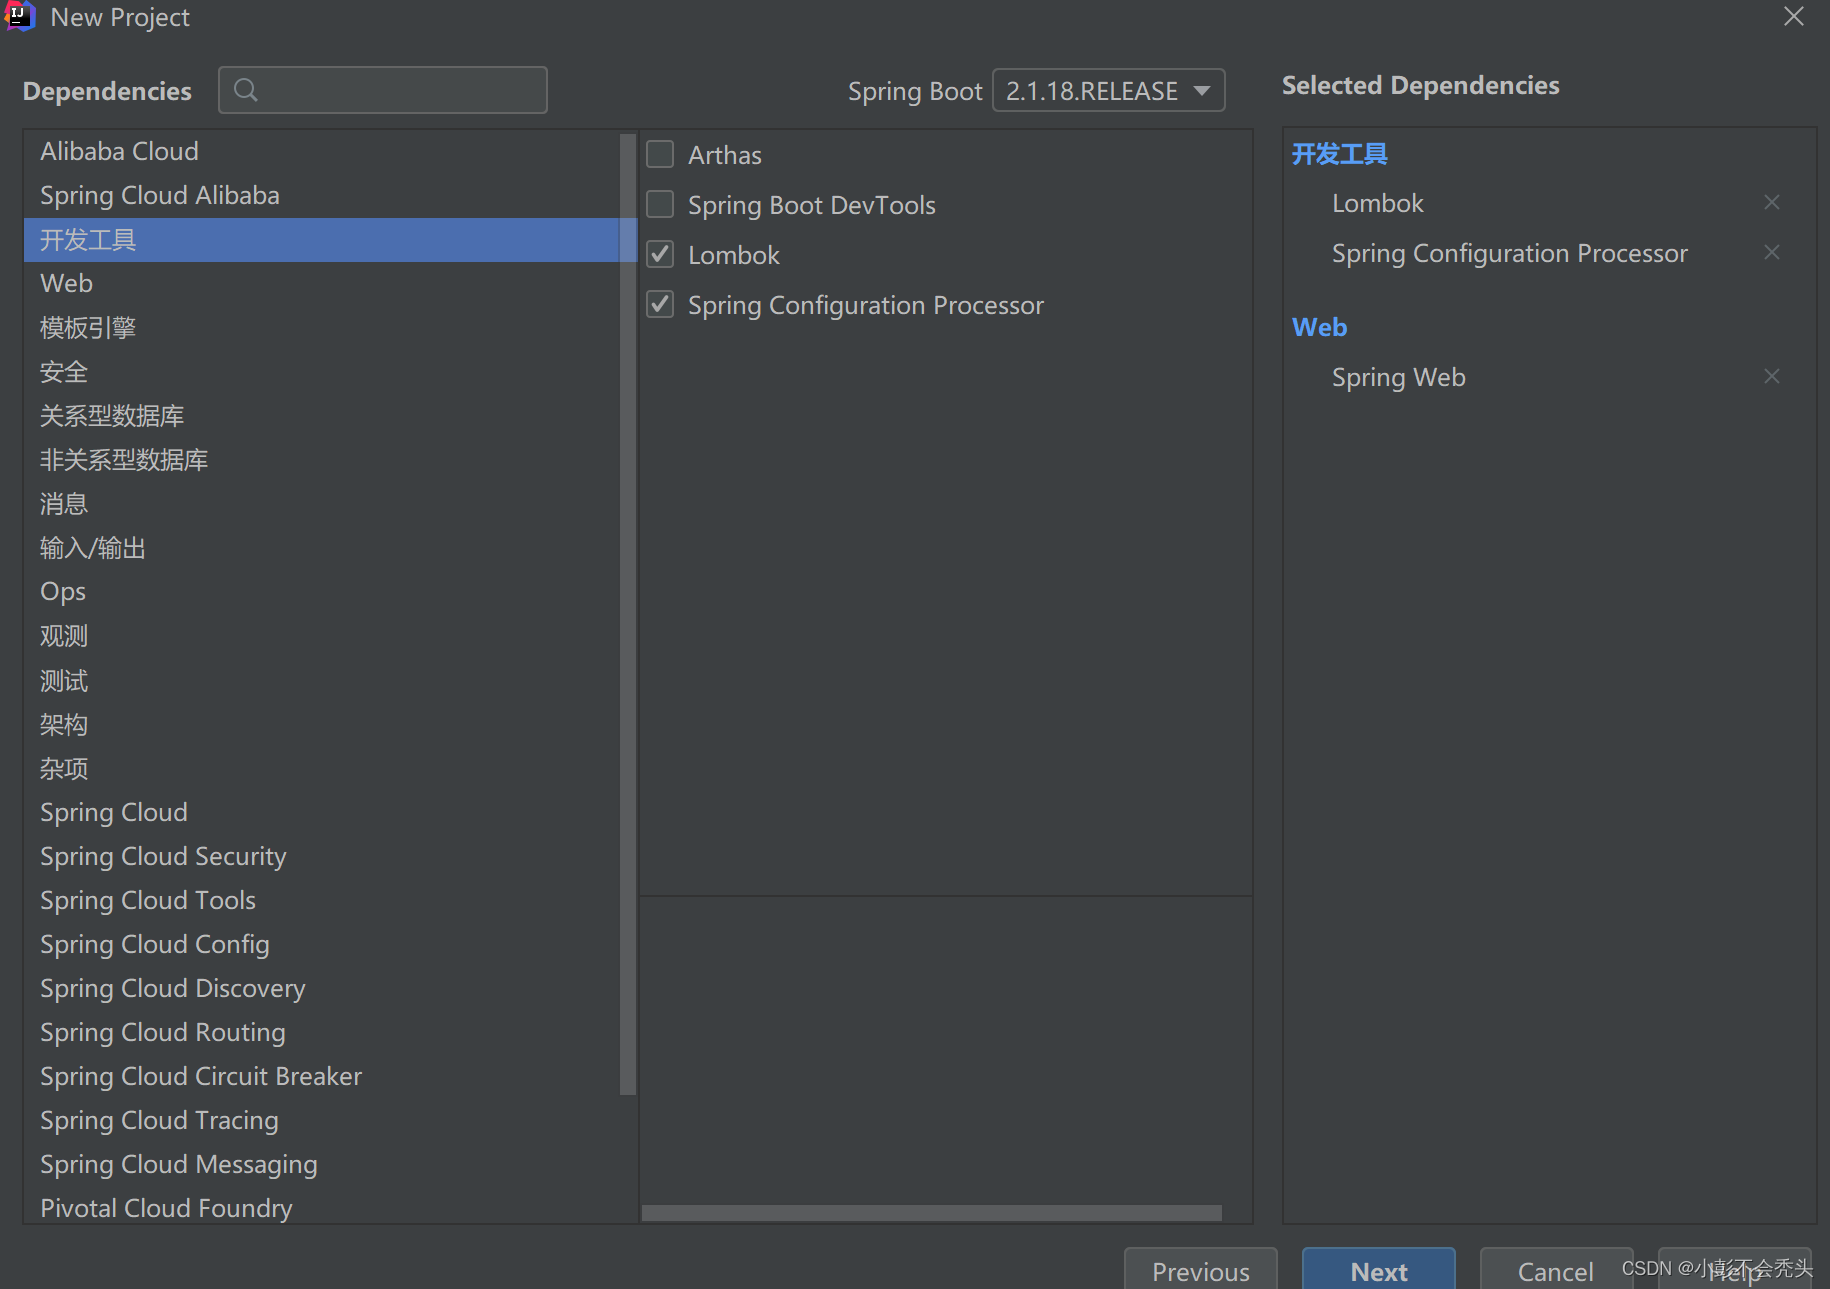
1.创建Starter项目(spring-initl 2.1.14)
2.定义Starter需要的配置类(Properties)
3.编写Starter项目的业务功能
4.编写自动配置类
5.编写spring.factories文件加载自动配置类
6.打包安装
7.其它项目引用
案例一:为短信发送功能创建一个starter
1.创建Starter项目
starter项目和SpringBoot工程结构没有什么区别,下面就把一些特殊的要求罗列一下
1.1.命名规范
SpringBoot官方命名方式

格式:spring-boot-starter-{模块名}

举例:spring-boot-starter-web

自定义命名方式

格式:{模块名}-spring-boot-starter

举例:mystarter-spring-boot-starter
1.2.必须引入的依赖
<!--表示两个项目之间依赖不传递;不设置optional或者optional是false,表示传递依赖-->

       <!--例如:project1依赖a.jar(optional=true),project2依赖project1,则project2不依赖a.jar-->

       <dependency>

           <groupId>org.springframework.boot</groupId>

           <artifactId>spring-boot-configuration-processor</artifactId>

           <optional>true</optional>

       </dependency
如果我们刚刚创建项目时选择了Spring Configuration Processor,在pom.xml文件中就会有上面的依赖
2.编写相关属性类
(XxxProperties):SmsProperties.java
--@ConfigurationProperties注解基本用法
前缀定义了哪些外部属性将绑定到类的字段上
根据 Spring Boot 宽松的绑定规则,类的属性名称必须与外部属性的名称匹配
我们可以简单地用一个值初始化一个字段来定义一个默认值
类本身可以是包私有的
类的字段必须有公共 setter 方法
注意:SmsProperties代码写完后会报如下错误,这是正常的,因为
还有配置类AutoConfig和一个注解@EnableConfigurationProperties没有加
(Not registered via @EnableConfigurationProperties or marked as Spring component)
package com.zking.zzcloudspringbootstarter.sms;

import org.springframework.boot.context.properties.ConfigurationProperties;

import java.io.Serializable;

@ConfigurationProperties("zzcloud.sms")

public class SmsProperties implements Serializable {

	private String accessKeyId;

	//访问ID、即帐号

	private String accessKeySecret;

	//访问凭证,即密码

	public String getAccessKeyId() {

		return accessKeyId;

	}

	public void setAccessKeyId(String accessKeyId) {

		this.accessKeyId = accessKeyId;

	}

	public String getAccessKeySecret() {

		return accessKeySecret;

	}

	public void setAccessKeySecret(String accessKeySecret) {

		this.accessKeySecret = accessKeySecret;

	}

}
3.编写Starter项目的业务功能
ISmsService和SmsServiceImpl相关代码如下:
package com.zking.zzcloudspringbootstarter.sms;

public interface ISmsService {

	/**

     * 发送短信

     *

     * @param phone        要发送的手机号

     * @param signName     短信签名-在短信控制台中找

     * @param templateCode 短信模板-在短信控制台中找

     * @param data         要发送的内容

     */

	void send(String phone, String signName, String templateCode, String data);

}
package com.zking.zzcloudspringbootstarter.sms;

import com.zking.zzcloudspringbootstarter.sms.ISmsService;

public class SmsServiceImpl implements ISmsService {

	private String accessKeyId;

	//访问ID、即帐号

	private String accessKeySecret;

	//访问凭证,即密码

	public SmsServiceImpl(String accessKeyId, String accessKeySecret) {

		this.accessKeyId = accessKeyId;

		this.accessKeySecret = accessKeySecret;

	}

	@Override

	    public void send(String phone, String signName, String templateCode, String data) {

		System.out.println("接入短信系统,accessKeyId=" + accessKeyId + ",accessKeySecret=" + accessKeySecret);

		System.out.println("短信发送,phone=" + phone + ",signName=" + signName + ",templateCode=" + templateCode + ",data=" + data);

	}

}
4.编写自动配置类AutoConfig
4.1. @Configuration:
定义一个配置类
4.2. @EnableConfigurationProperties:
@EnableConfigurationProperties注解的作用是@ConfigurationProperties注解生效。

如果只配置@ConfigurationProperties注解,在IOC容器中是获取不到properties配置文      件转化的bean的
package com.zking.zzcloudspringbootstarter.config;

import com.zking.zzcloudspringbootstarter.sms.SmsProperties;

import com.zking.zzcloudspringbootstarter.sms.SmsServiceImpl;

import org.springframework.boot.context.properties.EnableConfigurationProperties;

import org.springframework.context.annotation.Bean;

import org.springframework.context.annotation.Configuration;

import javax.annotation.Resource;

@Configuration //表示这个类为配置类

@EnableConfigurationProperties({

	SmsProperties.class

}

)

public class SmsAutoConfig {

	@Resource

	    private SmsProperties smsProperties;

	@Bean

	    public SmsServiceImpl smsServiceImpl(){

		return new SmsServiceImpl(smsProperties.getAccessKeyId(),smsProperties.getAccessKeySecret());

	}

}
5.编写spring.factories文件加载自动配置类
5.1.在resources下新建META-INF文件夹,然后创建spring.factories文件
5.2.在该文件中加入如下配置,该配置指定上步骤中定义的配置类为自动装配的配置
org.springframework.boot.autoconfigure.EnableAutoConfiguration=\

  com.zking.zzcloudspringbootstarter.config.SmsAutoConfig
注1:其中AutoConfig是starter配置文件的类限定名,多个之间逗号分割,还可以\进行转义即相当于去掉后面换行和空格符号,如下所示
 # Auto Configure

org.springframework.boot.autoconfigure.EnableAutoConfiguration=\

  com.baomidou.mybatisplus.autoconfigure.MybatisPlusLanguageDriverAutoConfiguration,\

  com.baomidou.mybatisplus.autoconfigure.MybatisPlusAutoConfiguration
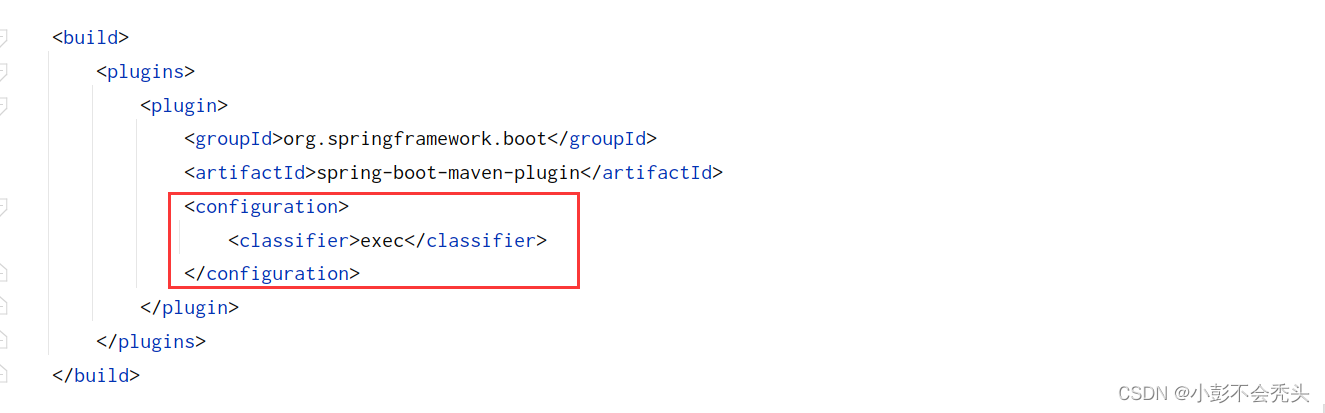
6.打包安装
打包时需要注意一下,SpringBoot项目打包的JAR是可执行JAR,它的类放在BOOT-INF目录下,如果直接作为其他项目的依赖,会找不到类。可以通过修改pom文件来解决,代码如下:
<plugin>

   <groupId>org.springframework.boot</groupId>

   <artifactId>spring-boot-maven-plugin</artifactId>

   <configuration>

      <classifier>exec</classifier>

   </configuration>

</plugin>
打包前,先查看我们maven仓库的位置,并设置到自己本地仓库位置中去,再打包。过程如下:
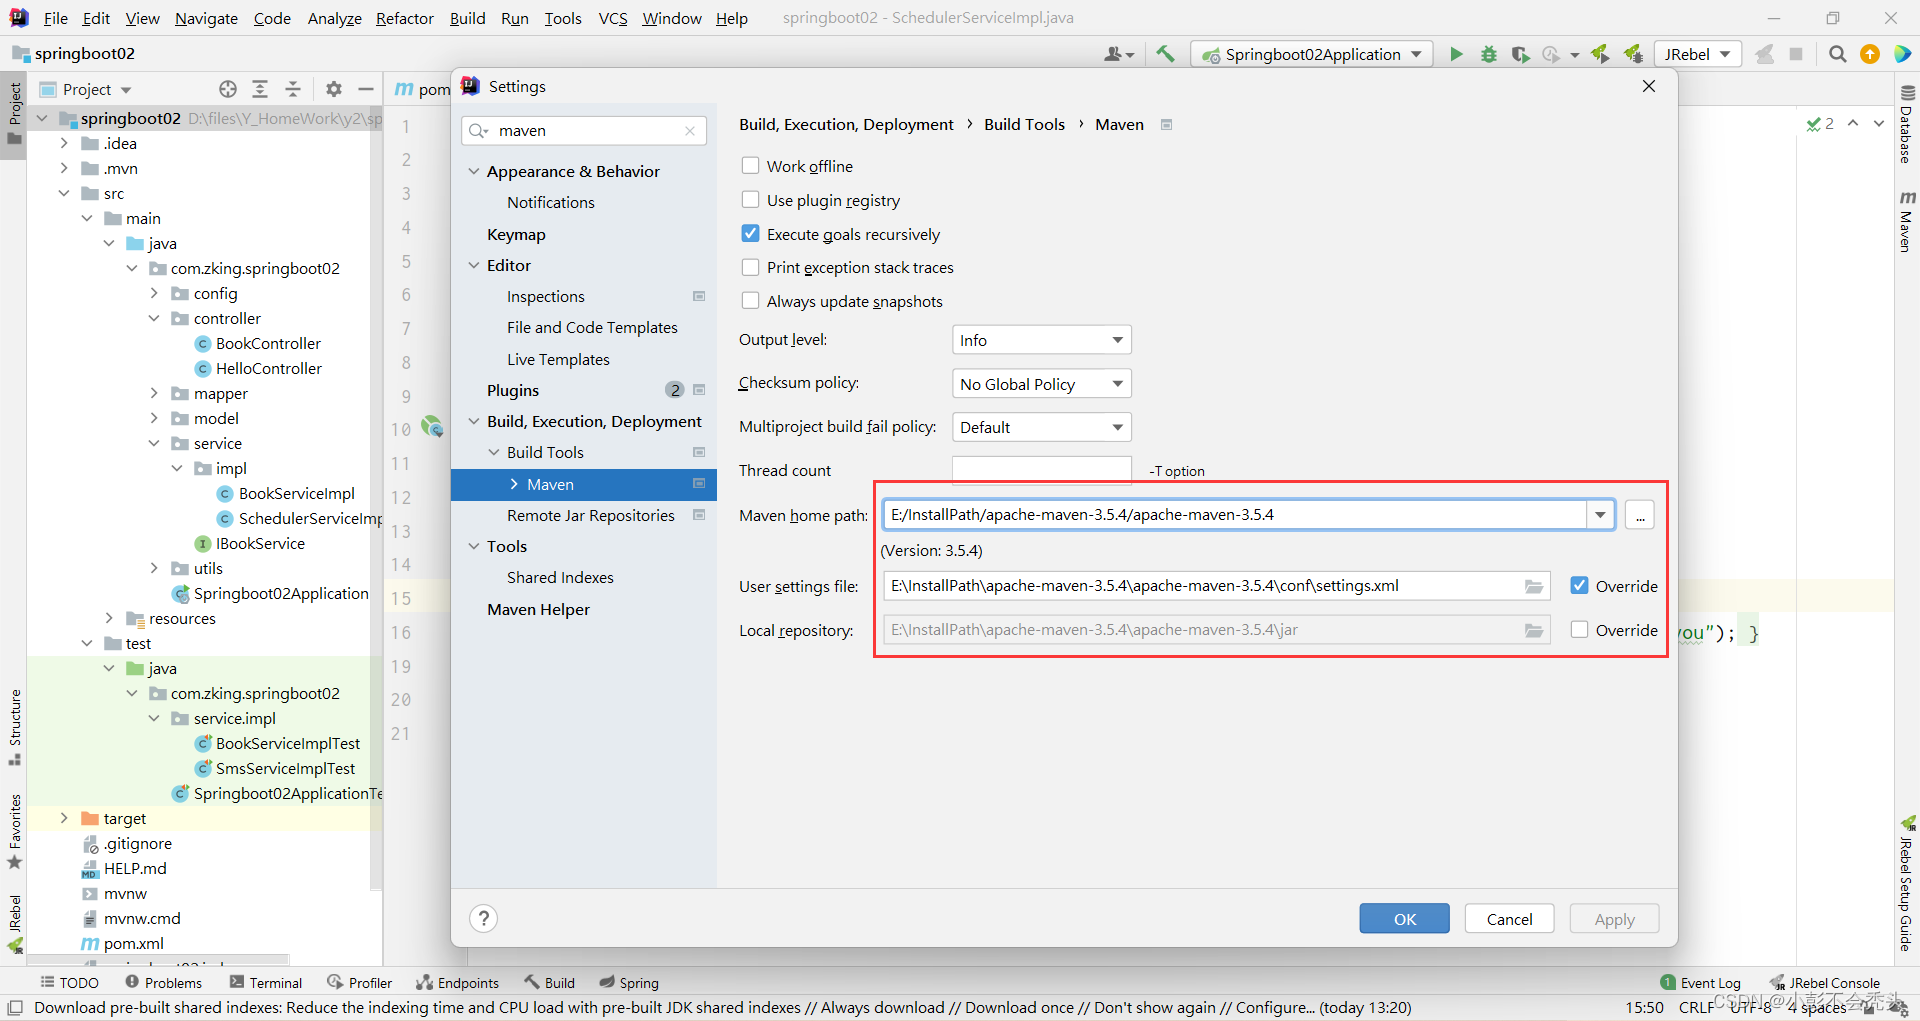
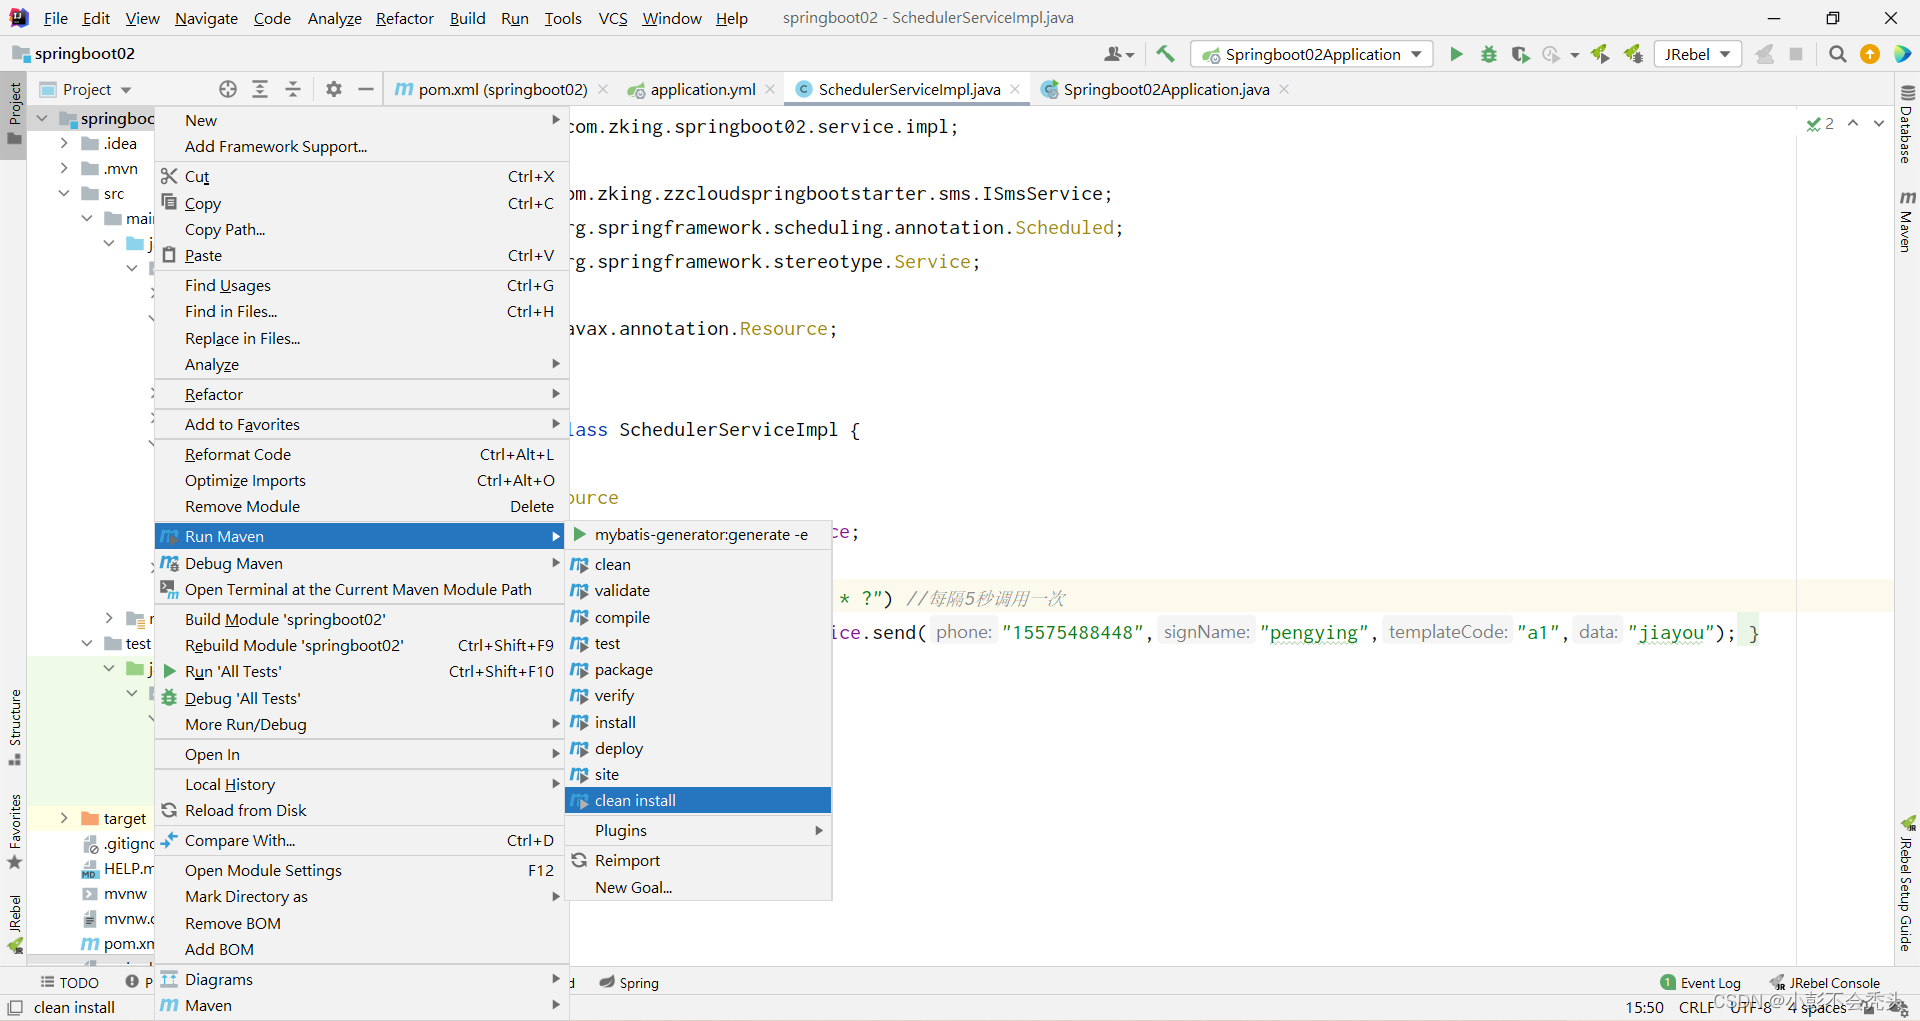
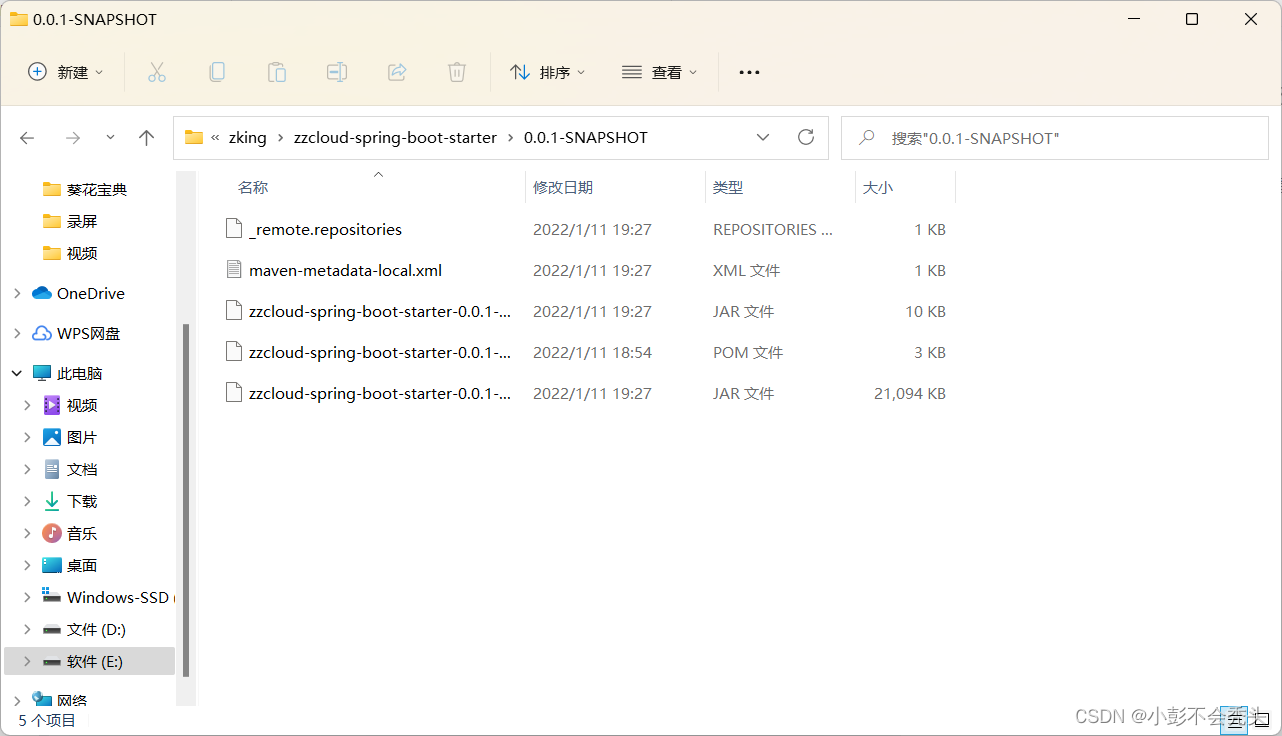
成功后,我们可以发现我们本地仓库就会有刚刚我们打包完的项目:
到这里为止,我们的整个自定义starter的准备工作就做完了,如下是我的整个自定义starter文件的结构: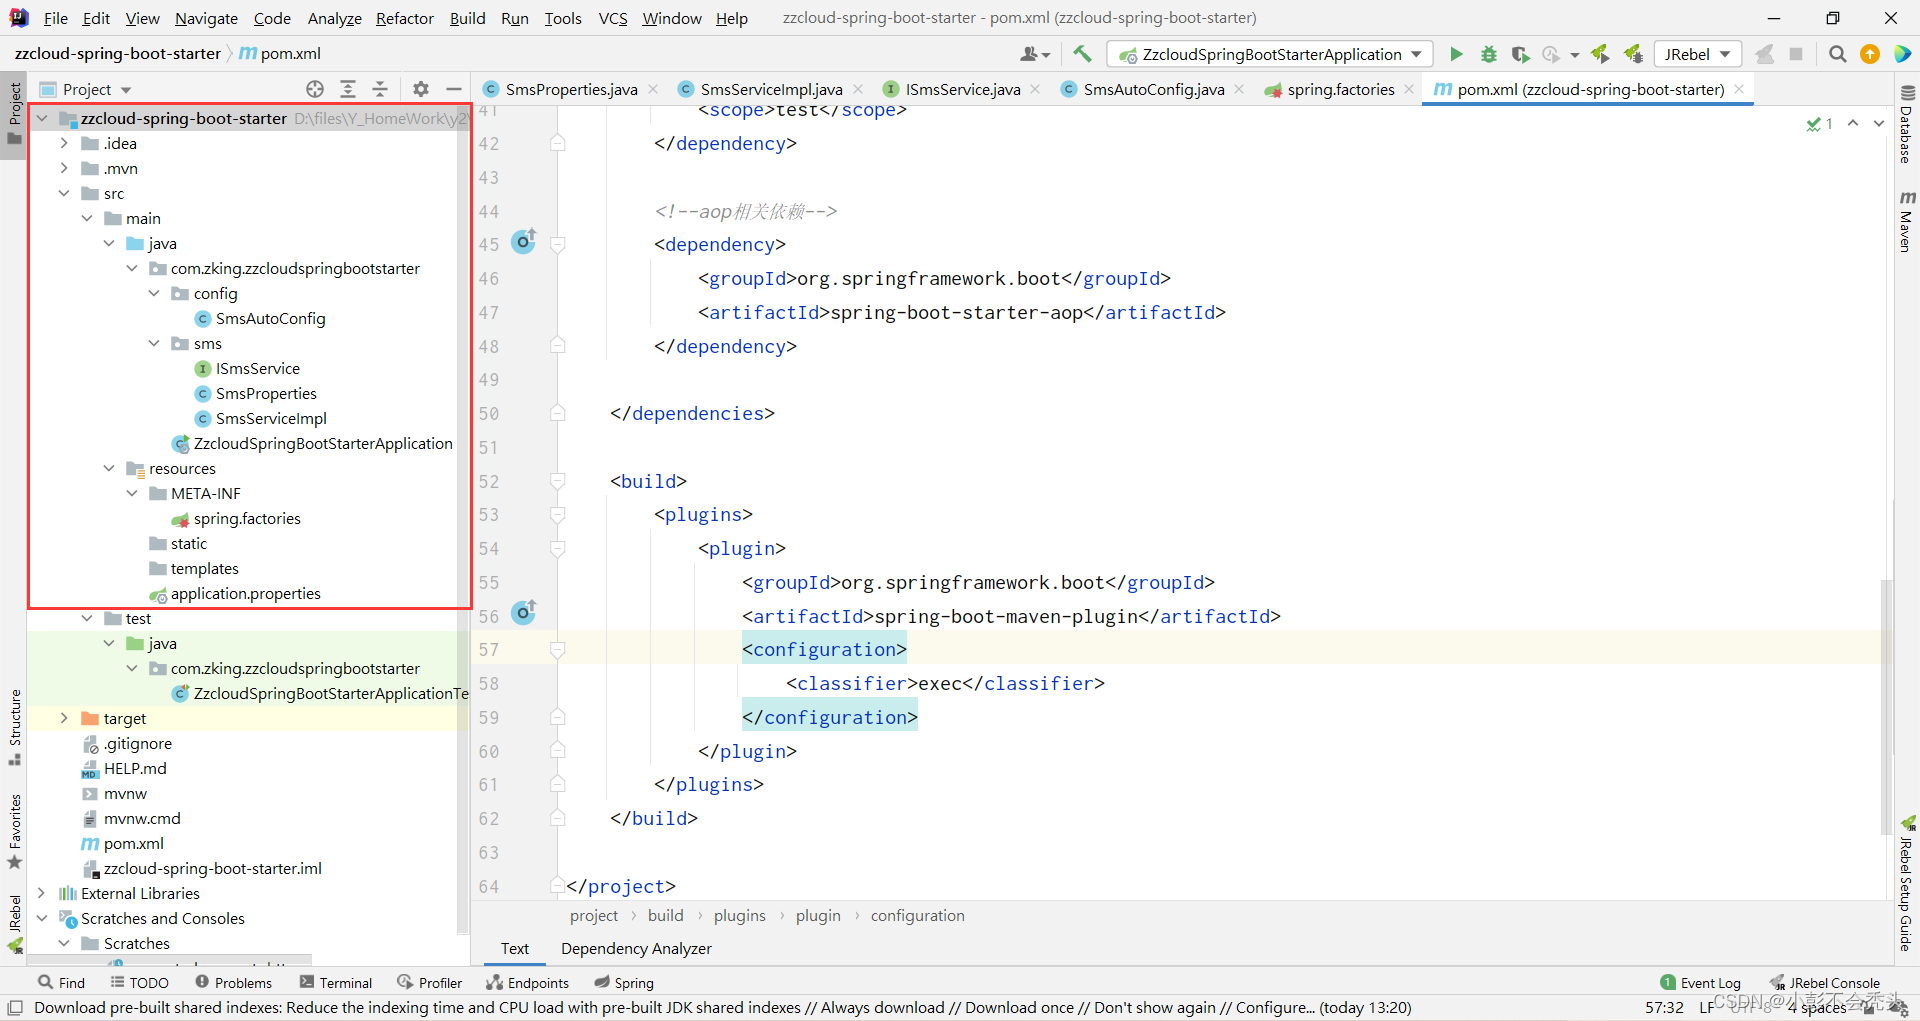
7.在其他项目中的应用
7.1.首先在其他项目的pom.xml中引入相关依赖:

7.2.在application.yml文件中添加配置

为了展示效果,我们写一个测试类,看能否看到我们想要的效果,测试代码如下:
package com.zking.springboot02.service.impl;

import com.zking.springboot02.Springboot02Application;

import com.zking.springboot02.model.Book;

import com.zking.springboot02.service.IBookService;

import com.zking.springboot02.utils.PageBean;

import com.zking.zzcloudspringbootstarter.sms.ISmsService;

import org.junit.jupiter.api.AfterEach;

import org.junit.jupiter.api.BeforeEach;

import org.junit.jupiter.api.Test;

import org.springframework.boot.test.context.SpringBootTest;

import org.springframework.data.redis.core.RedisTemplate;

import javax.annotation.Resource;

import java.util.List;

@SpringBootTest(classes = Springboot02Application.class)

class SmsServiceImplTest {

	@Resource

	    private ISmsService smsService;

	@BeforeEach

	    void setUp() {

	}

	@AfterEach

	    void tearDown() {

	}

	@Test

	    void testRedis() {

		smsService.send("15575488448","pengying","1","小彭不会秃头加油干!");

	}

}
控制台效果如下:

如果控制台有如上效果,说明我们整个自定义starter的过程就成功了!
案例二:AOP方式统一服务日志
原先实现统一日志都是放到每个工程中以AOP方式实现,现在有了starter方式,就可以将公司的日志规范集中到这里来统一管理。
这里我们使用之前创建好的项目进行案例二的编写,步骤与上同理:
1.导入aop相关依赖
<!--aop相关依赖-->

<dependency>

    <groupId>org.springframework.boot</groupId>

    <artifactId>spring-boot-starter-aop</artifactId>

</dependency>
2.编写相关属性类
(XxxProperties):WebLogProperties.java
package com.zking.zzcloudspringbootstarter.sms;

import org.springframework.boot.context.properties.ConfigurationProperties;

import java.io.Serializable;

@ConfigurationProperties("zzcloud.weblog")

public class WebLogProperties implements Serializable {

	public Boolean enabled;

	//Boolean封装类,默认为null

	public Boolean getEnabled() {

		return enabled;

	}

	public void setEnabled(Boolean enabled) {

		this.enabled = enabled;

	}

}
3.编写Starter项目的业务功能
package com.zking.zzcloudspringbootstarter.weblog;

import lombok.extern.slf4j.Slf4j;

import org.aspectj.lang.JoinPoint;

import org.aspectj.lang.annotation.AfterReturning;

import org.aspectj.lang.annotation.Aspect;

import org.aspectj.lang.annotation.Before;

import org.aspectj.lang.annotation.Pointcut;

import org.springframework.stereotype.Component;

import org.springframework.web.context.request.RequestContextHolder;

import org.springframework.web.context.request.ServletRequestAttributes;

import javax.servlet.http.HttpServletRequest;

import java.util.Arrays;

@Aspect

@Component

@Slf4j

public class WebLogAspect {

    //@Pointcut("execution(public * com.zking..controller.*.*(..))")

    @Pointcut("execution(* *..*Controller.*(..))")

    public void webLog(){}

    @Before("webLog()")

    public void doBefore(JoinPoint joinPoint) throws Throwable {

        // 接收到请求,记录请求内容

        ServletRequestAttributes attributes = (ServletRequestAttributes) RequestContextHolder.getRequestAttributes();

        HttpServletRequest request = attributes.getRequest();

        // 记录下请求内容

        log.info("开始服务:{}", request.getRequestURL().toString());

        log.info("客户端IP :{}" , request.getRemoteAddr());

        log.info("参数值 :{}", Arrays.toString(joinPoint.getArgs()));

    }

    @AfterReturning(returning = "ret", pointcut = "webLog()")

    public void doAfterReturning(Object ret) throws Throwable {

        // 处理完请求,返回内容

        log.info("返回值 : {}" , ret);

    }

}
4.编写自动配置类AutoConfig
4.1.@ConditionalOnProperty(prefix = "zzcloud.weblog",value = "enabled", matchIfMissing = true):
matchIfMissing属性:默认情况下matchIfMissing为false,也就是说如果未进行属性配置,则自动配置不生效。如果matchIfMissing为true,则表示如果没有对应的属性配置,则自动配置默认生效
4.2.@ConditionalOnMissingBean:
在@bean定义上,它的作用就是在容器加载它作用的bean时,检查容器中是否存在目标类型(ConditionalOnMissingBean注解的value值)的bean了,如果存在这跳过原始bean的BeanDefinition加载动作。
package com.zking.zzcloudspringbootstarter.config;

import com.zking.zzcloudspringbootstarter.sms.SmsProperties;

import com.zking.zzcloudspringbootstarter.sms.SmsServiceImpl;

import com.zking.zzcloudspringbootstarter.sms.WebLogProperties;

import com.zking.zzcloudspringbootstarter.weblog.WebLogAspect;

import org.springframework.boot.autoconfigure.condition.ConditionalOnMissingBean;

import org.springframework.boot.autoconfigure.condition.ConditionalOnProperty;

import org.springframework.boot.context.properties.EnableConfigurationProperties;

import org.springframework.context.annotation.Bean;

import org.springframework.context.annotation.Configuration;

import javax.annotation.Resource;

@Configuration //表示这个类为配置类

@EnableConfigurationProperties({WebLogProperties.class})

@ConditionalOnProperty(prefix = "zzcloud.weblog",value = "enabled",matchIfMissing = true)

public class WebLogAutoConfig {

    @Bean

    @ConditionalOnMissingBean

    public WebLogAspect webLogAspect(){

        return new WebLogAspect();

    }

}
5.编写spring.factories文件加载自动配置类
org.springframework.boot.autoconfigure.EnableAutoConfiguration=\

  com.zking.zzcloudspringbootstarter.config.SmsAutoConfig,\

  com.zking.zzcloudspringbootstarter.config.WebLogAutoConfig
6.打包,操作同上
7.在其他项目中引用
7.1.导入依赖
由于这里我们使用的是之前的那个项目,这里就不需要重复导入依赖了
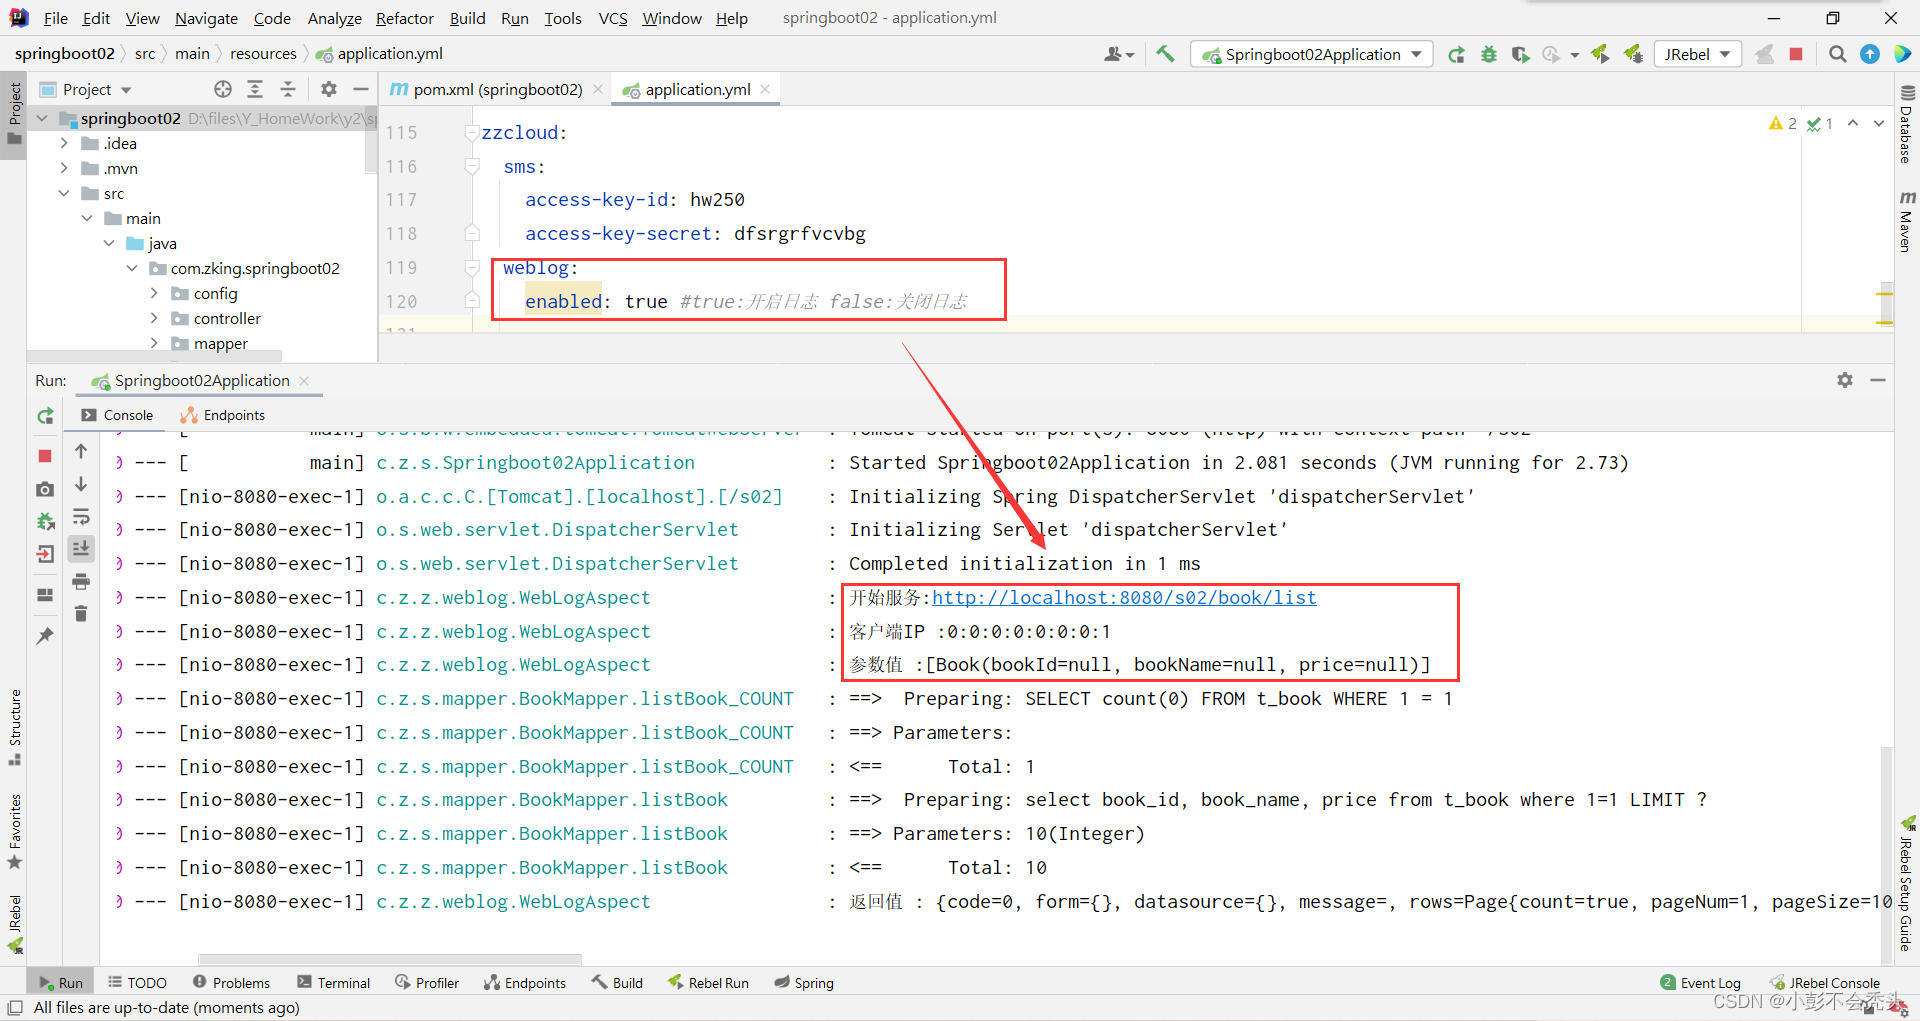
7.2.在application.yml文件中添加配置

测试如下:这里我用该项目里的方法进行测试

如果我不使用日志,效果如下:
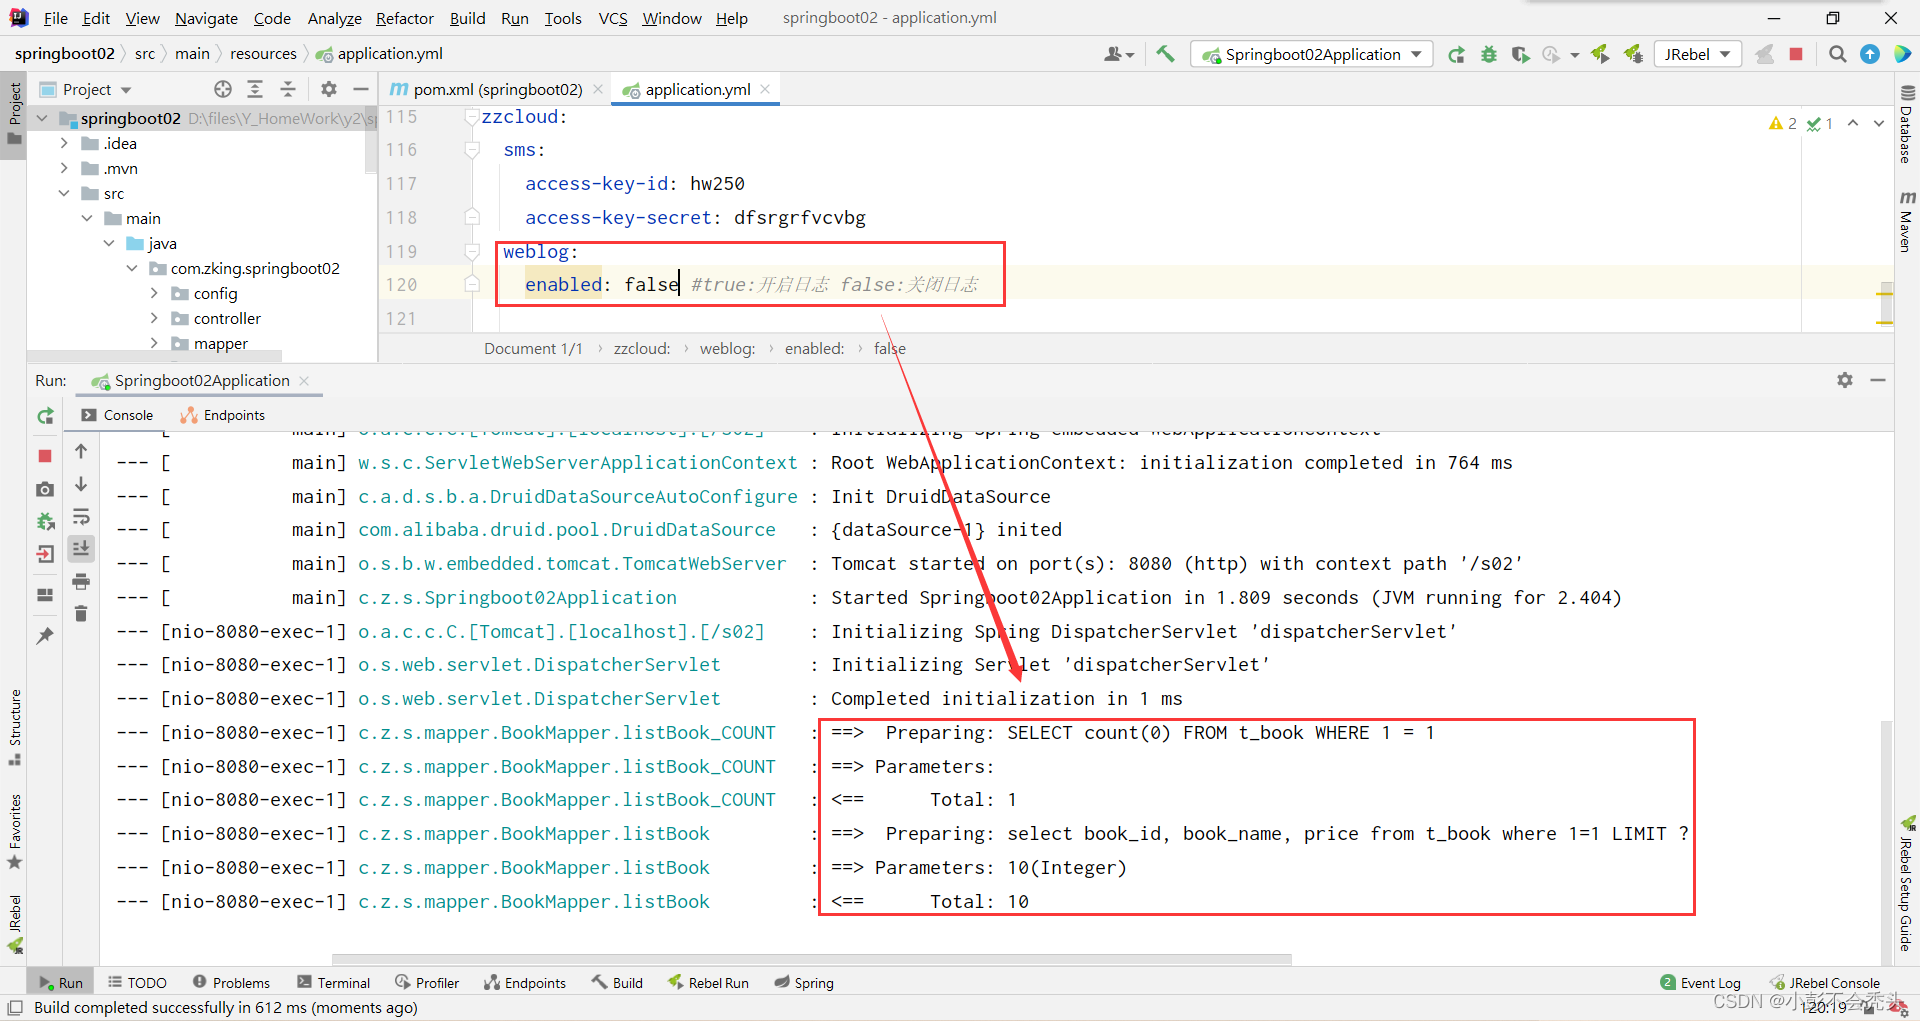
反之如果我使用日志,就会拿到我请求的路径、我的客户端以及我的参数值,效果如下:
 如果由以上效果,说明我的案例二:AOP方式统一服务日志就成功了!
SpringBoot - 自定义starter的更多相关文章
- SpringBoot --- 自定义 Starter
SpringBoot --- 自定义 Starter 创建 1.需要创建一个新的空工程 2.新的工程需要引入两个模块 一个Maven 模块 作为启动器 一个SpringBoot 模块 作为自动配置模块 ...
- SpringBoot自定义starter及自动配置
SpringBoot的核心就是自动配置,而支持自动配置的是一个个starter项目.除了官方已有的starter,用户自己也可以根据规则自定义自己的starter项目. 自定义starter条件 自动 ...
- SpringBoot自定义Starter实现
自定义Starter: Starter会把所有用到的依赖都给包含进来,避免了开发者自己去引入依赖所带来的麻烦.Starter 提供了一种开箱即用的理念,其中核心就是springboot的自动配置原理相 ...
- springboot 自定义starter之AutoConfiguration【原】
八.自定义starter AutoConfiguration: 1.这个场景需要使用到的依赖是什么? 没有特别依赖的配置 2.如何编写自动配置 @Configuration //指定这个类是一个配置类 ...
- SpringBoot自定义starter开发分布式任务调度实践
概述 需求 在前面的博客<Java定时器演进过程和生产级分布式任务调度ElasticJob代码实战>中,我们已经熟悉ElasticJob分布式任务的应用,其核心实现为elasticjob- ...
- SpringBoot系列三:SpringBoot自定义Starter
在前面两章 SpringBoot入门 .SpringBoot自动配置原理 的学习后,我们对如何创建一个 SpringBoot 项目.SpringBoot 的运行原理以及自动配置等都有了一定的了解.如果 ...
- springboot自定义starter
1,创建一个空工程 2,new一个Modules ---------------- maven (启动器) : springboottest-spring-boot-starter 3,new一个M ...
- Springboot自定义starter打印sql及其执行时间
前面写到了通过实现mybatis提供的org.apache.ibatis.plugin.Interceptor接口实现了打印SQL执行时间,并格式化SQL及其参数,如果我们使用的是ssm还得再配置文件 ...
- Spring-Boot自定义Starter实践
此文已由作者王慎为授权网易云社区发布. 欢迎访问网易云社区,了解更多网易技术产品运营经验. disconf-spring-boot-starter 使用方法: 引入maven依赖: <depen ...
- SpringBoot之旅第六篇-启动原理及自定义starter
一.引言 SpringBoot的一大优势就是Starter,由于SpringBoot有很多开箱即用的Starter依赖,使得我们开发变得简单,我们不需要过多的关注框架的配置. 在日常开发中,我们也会自 ...
随机推荐
- Qt+QtWebApp开发笔记(一):QtWebApp介绍、下载和搭建基础封装http轻量级服务器Demo
前言 在arm上做了Qt的应用程序,为了在局域网实现web页的访问方式来配置arm上Qt的程序,局域网轻量级http服务器是很好的实现方式之一,有机会做国产麒麟上Qt的http服务器,正好接触到了 ...
- Error: webpack.optimize.CommonsChunkPlugin has been removed
最近使用webpack 进行react 依赖抽离时发现原本的webpack.optimize.CommonsChunkPlugin已经不能使用了 打包时提示 Error: webpack.optimi ...
- SQL基础知识扫盲
@ 目录 SQL & 数据库基础知识扫盲 SQL是什么? 数据库是什么? 挺身入局,实践出真知 DBMS初体验 MySQL:初体验 Oracle:初体验 PostgreSQL:初体验 Demo ...
- Request类源码分析、序列化组件介绍、序列化类的基本使用、常用字段类和参数、反序列化之校验、反序列化之保存、APIVIew+序列化类+Response写的五个接口代码、序列化高级用法之source、序列化高级用法之定制字段的两种方式、多表关联反序列化保存、反序列化字段校验其他、ModelSerializer使用
目录 一.Request类源码分析 二.序列化组件介绍 三.序列化类的基本使用 查询所有和查询单条 四.常用字段类和参数(了解) 常用字段类 字段参数(校验数据来用的) 五.反序列化之校验 六.反序列 ...
- 从零玩转系列之微信支付实战PC端接口搭建
一.前言 halo各位大佬很久没更新了最近在搞微信支付,因商户号审核了我半个月和小程序认证也找了资料并且将商户号和小程序进行关联,至此微信支付Native支付完成.此篇文章过长我将分几个阶段的文章发布 ...
- 【LGR-142-Div.4】洛谷入门赛 #13 赛后总结
A.魔方 目测入门 -,就是需要开long long //1 #include<bits/stdc++.h> typedef long long valueType; int main() ...
- Java Websocket 01: 原生模式 Websocket 基础通信
目录 Java Websocket 01: 原生模式 Websocket 基础通信 Java Websocket 02: 原生模式通过 Websocket 传输文件 Websocket 原生模式 原生 ...
- CF1608F MEX counting
题意 给定 \(n, k\) 和序列 \(b_{1\dots n}\),计数序列 \(a_{1\dots n}\) 使得 \(\forall i \in [1, n], \operatorname{m ...
- 在命令行按下tab键之后, 发生了生么?
1. 引言 2. complete命令 3. 自定义补全列表 4. 动态补全列表 5. compgen命令 6. 别名的自动补全 7. 补全规则永久生效 8. 自动加载 9. 参考 1. 引言 当我们 ...
- Solon 也是 SSE(Server Send Events)后端开发的优选
Solon 2.3.6 在开发异步接口时,顺带也为 Solon Web 提供了 SSE (Server-Sent Events) 协议的支持插件: <dependency> <gro ...