
在Python中使用OpenCV(CV2)对图像进行边缘检测
转载:https://blog.csdn.net/cumtb2002/article/details/107798767
Modules used:
使用的模块:
For this, we will use the opencv-python module which provides us various functions to work on images.
为此,我们将使用opencv-python模块,该模块为我们提供了处理图像的各种功能。
Download opencv-python
下载opencv-python
- General Way:
- pip install opencv-python
- Pycharm Users:
- Go to the project Interpreter and install this module from there.
opencv-python Module:
opencv-python模块:
opencv-python is a python library that will solve the Computer Vision Problems and provides us various functions to edit the Images.
opencv-python是一个python库,它将解决计算机视觉问题并为我们提供编辑图像的各种功能。
Note: The edge Detection is possible only in grayscale Image.
注意:只能在灰度图像中进行边缘检测。
What we will do in this script?
我们将在此脚本中做什么?
To detect the edges of the images we will use opencv-python various Functions and Provide thresholds.
为了检测图像的边缘,我们将使用opencv-python的各种功能并提供阈值。
In this article we will detect the edge of the Image with the help of various functions and the accuracy of edge increases as we go down,
在本文中,我们将借助各种功能来检测图像的边缘,并且当我们下降时边缘的精度会提高,
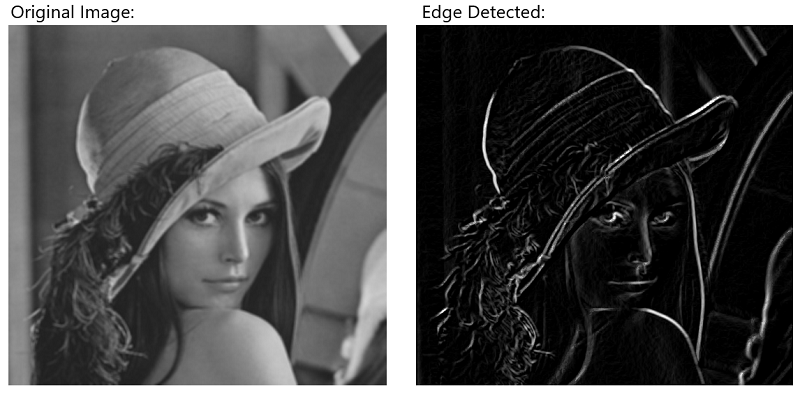
Sobel Function: This Function will create the Horizontal and vertical edges and after that, we will use the Bitwise or operator to combine them
Sobel函数 :此函数将创建水平边缘和垂直边缘,然后,我们将使用按位或运算符将它们组合
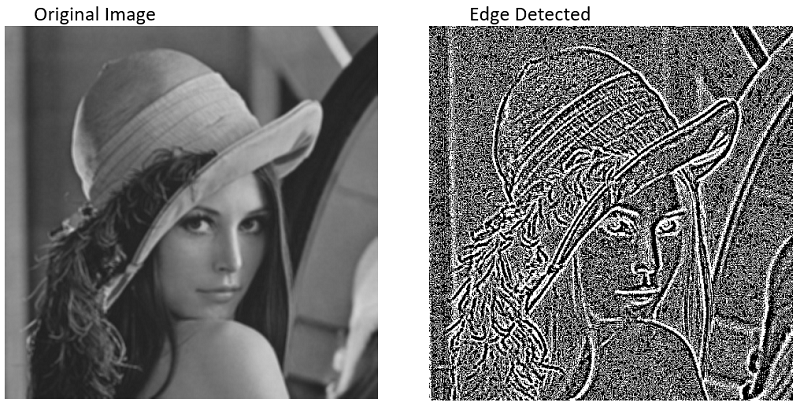
Laplacian Function: This Function is the simplest Function in which we just have to put the Grayscale Variable into it, and we will get the edge detected image.
拉普拉斯函数 :此函数是最简单的函数,只需要将灰度变量放入其中,就可以得到边缘检测到的图像。
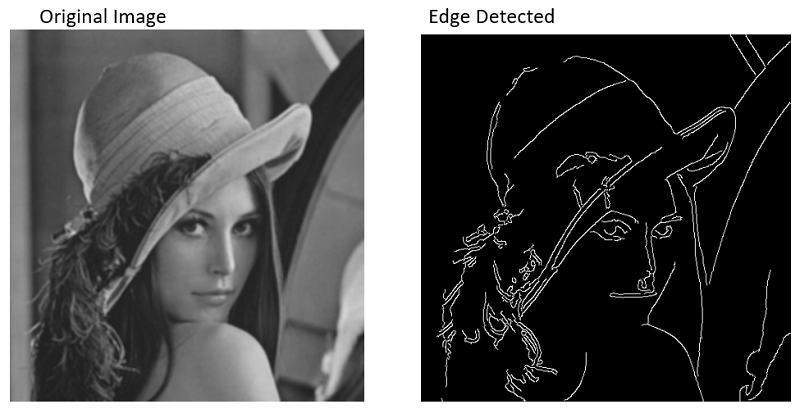
Canny Function: This is the most powerful function for edge detection and most accurate.
Canny功能 :这是边缘检测功能最强大且最准确的功能。
Let's see the code:
让我们看一下代码:
1)使用Sobel函数 (1) Using Sobel Function)
- # importing the module
- import cv2
- # read the image and store the data in a variable
- image=cv2.imread("/home/abhinav/PycharmProjects/untitled1/b.jpg")
- # make it grayscale
- Gray=cv2.cvtColor(image,cv2.COLOR_BGR2GRAY)
- # Make it with the help of sobel
- # make the sobel_horizontal
- # For horizontal x axis=1 and yaxis=0
- # for vertical x axis=0 and y axis=1
- Horizontal=cv2.Sobel(Gray,0,1,0,cv2.CV_64F)
- # the thresholds are like
- # (variable,0,<x axis>,<y axis>,cv2.CV_64F)
- Vertical=cv2.Sobel(Gray,0,0,1,cv2.CV_64F)
- # DO the Bitwise operation
- Bitwise_Or=cv2.bitwise_or(Horizontal,Vertical)
- # Show the Edged Image
- cv2.imshow("Sobel Image",Bitwise_Or)
- cv2.imshow("Original Image",Gray)
- cv2.waitKey(0)
- cv2.destroyAllWindows()
Output:
输出:
2)拉普拉斯函数 (2) Laplacian Function)
- # importing the module
- import cv2
- # read the image and store the data in a variable
- image=cv2.imread("/home/abhinav/PycharmProjects/untitled1/b.jpg")
- # make it grayscale
- Gray=cv2.cvtColor(image,cv2.COLOR_BGR2GRAY)
- # Make Laplacian Function
- Lappy=cv2.Laplacian(Gray,cv2.CV_64F)
- cv2.imshow("Laplacian",Lappy)
- cv2.imshow("Original",Gray)
- cv2.waitKey(0)
- cv2.destroyAllWindows()
Output:
输出:
3)使用Canny函数 (3) Using Canny Function)
- # importing the module
- import cv2
- # read the image and store the data in a variable
- image=cv2.imread("/home/abhinav/PycharmProjects/untitled1/b.jpg")
- # make it grayscale
- Gray=cv2.cvtColor(image,cv2.COLOR_BGR2GRAY)
- # Make canny Function
- canny=cv2.Canny(Gray,40,140)
- # the threshold is varies bw 0 and 255
- cv2.imshow("Canny",canny)
- cv2.imshow("Original",Gray)
- cv2.waitKey(0)
- cv2.destroyAllWindows()
Output:
输出:
翻译自: https://www.includehelp.com/python/edge-detection-of-image-using-opencv-cv2.aspx
在Python中使用OpenCV(CV2)对图像进行边缘检测的更多相关文章
- OpenCV-Python(1)在Python中使用OpenCV进行人脸检测
OpenCV是如今最流行的计算机视觉库,而我们今天就是要学习如何安装使用OpenCV,以及如何去访问我们的摄像头.然后我们一起来看看写一个人脸检测程序是如何地简单,简单到只需要几行代码. 在开始之前, ...
- Python下的OpenCV学习 02 —— 图像的读取与保存
OpenCV提供了众多对图片操作的函数,其中最基本的就是图片的读取与输出了. 一.读取图片 利用OpenCV读取一张图片是非常容易的,只需要用到 imread() 函数,打开shell或者cmd,进入 ...
- python中使用Opencv进行车牌号检测——2018.10.24
初学Python.Opencv,想用它做个实例解决车牌号检测. 车牌号检测需要分为四个部分:1.车辆图像获取.2.车牌定位.3.车牌字符分割和4.车牌字符识别 在百度查到了车牌识别部分车牌定位和车牌字 ...
- python中使用Opencv进行人脸识别
上一节讲到人脸检测,现在讲一下人脸识别.具体是通过程序采集图像并进行训练,并且基于这些训练的图像对人脸进行动态识别. 人脸识别前所需要的人脸库可以通过两种方式获得:1.自己从视频获取图像 2.从人 ...
- python中使用Opencv进行人脸检测
这两天学习了人脸识别,看了学长写的代码,边看边码边理解搞完了一边,再又是自己靠着理解和记忆硬码了一边,感觉还是很生疏,就只能来写个随笔加深一下印象了. 关于人脸识别,首先需要了解的是级联分类器Casc ...
- python中使用OpenCV处理图片
1.导入OpenCV包 import cv2 2.读取图片 cv2.imread(image_path, mode) 读入函数,包含两个参数,第一个为图片路径及图片名,第二个为读取图片方 ...
- Python中cv2库和matplotlib库色彩空间排布不一致
今天在python中读如图片时发现以下问题: 1.在from matplotlib import pyplot as plt之后,再import cv2 cv2.imshow()不能正常使用,还不知道 ...
- Python开发:OpenCV版本差异所引发的cv2.findContours()函数传参问题
一.问题如下: cv2.findContours()这个方法是用来找出轮廓值的: # cv2.findContours找出轮廓值,cv2.RETR_EXTERNAL表示图像的外轮廓 binary, c ...
- 使用python开启你的opencv之旅---图像的读入,存储
python的便捷是如此的引人着迷,而opencv给python提供的接口使我们能够使用python来快速验证我们的想法,或者与别的模块快速结合,在这个系列文章我会通过jupyter notebook ...
随机推荐
- .Net ImageSharp给图片添加文字
开始之前需要Nuget安装的包 ##这三个包是一定要安装的,不然库的有些方法用不了 一.导入字体 var fonts = new FontCollection(); var fontFamily = ...
- Typescript | Vue3源码系列
TypeScript 是开源的,TypeScript 是 JavaScript 的类型的超集,它可以编译成纯 JavaScript.编译出来的 JavaScript 可以运行在任何浏览器上.TypeS ...
- Photon Server伺服务器在LoadBalancing的基础上扩展登陆服务
一,如何创建一个Photon Server服务 参见此博客 快速了解和使用Photon Server 二, 让LoadBalancing与自己的服务一起启动 原Photonserver.config文 ...
- 【平台开发】— 4.mysql建库建表
本想着把前端脚手架run起来了,然后就可以借着登录来捋一下前后端交互的过程.但是后端导入JPA的时候就发现了,还没有数据库. 既然是本着学习的目的,那咱也不想只在后端写死返回的数据,要做就做全套. 一 ...
- CentOS 7/8修改系统运行级别
CentOS 7/8修改系统运行级别 CentOS 5. CentOS 6可以通过修改配置文件/etc/inittab 参数,从而修改系统运行级别,切换系统的runlevel,但是从CentOS ...
- Spring源码学习(六)-spring初始化回调方法源码学习
1.spring官方指定了三种初始化回调方法 1.1.@PostConstruct.@PreDestory 1.2.实现 InitializingBean DisposableBean 接口 1.3. ...
- Zookeeper源码解读
1.1. 客户端源码 1.1.1. 总体流程 启动客户端 zkCli.sh文件里面的配置 实际运行 public static void main(String args[]) throws Keep ...
- 原生JDK网络编程- Buffer
Buffer用于和NIO通道进行交互.数据是从通道读入缓冲区,从缓冲区写入到通道中的.以写为例,应用程序都是将数据写入缓冲,再通过通道把缓冲的数据发送出去,读也是一样,数据总是先从通道读到缓冲,应用程 ...
- Oracle数据库添加约束
主键约束(两个特性)1:主键必须写2:主键不可重复 create table stu01( sid varchar(100), sname varchar2(100) --constraint PK_ ...
- .NET委托,事件和Lambda表达式
委托 委托是什么? 委托是一种引用类型(其实就是一个类,继承MulticastDelegate特殊的类.),表示对具有特定参数列表和返回类型的方法的引用. 每个委托提供Invoke方法, BeginI ...