使用TransferLearning实现环视图像的角点检测——Tensorflow+MobileNetv2_SSD
环境说明
- 依赖环境安装eIQ官方指南:
name: eiq_auto

channels:

  - conda-forge

  - defaults

dependencies:

  - numpy=1.18.1=py36h4f9e942_0

  - onnx==1.6.0

  - opencv==4.2.0

  - pandas=0.24.2=py36he6710b0_0

  - pillow=7.0.0=py36hb39fc2d_0

  - protobuf=3.9.2=py36he6710b0_0

  - pytest=5.3.0=py36_0

  - python=3.6.10=h0371630_0

  - tensorflow=1.14.0=mkl_py36h2526735_0

pip:

   - onnxruntime==1.0.0
==================================================================================
1.安装tensorflow object detection API
- 参考链接 [https://github.com/tensorflow/models/blob/master/research/object_detection/g3doc/installation.md]
- ubuntu16.04使用如下命令安装依赖库:
sudo apt-get install protobuf-compiler python-pil python-lxml python-tk

pip install --user Cython

pip install --user contextlib2

pip install --user jupyter

pip install --user matplotlib
- 下载models
git clone https://github.com/tensorflow/models.git
- 安装cocoAPI
pip install --user pycocotools
- 使用Protobuf Compilation
protoc object_detection/protos/*.proto --python_out=.
- 添加到PYTHONPATH
# From tensorflow/models/research/

export PYTHONPATH=$PYTHONPATH:/mnt/d/0-WORK/models/models-master/research:/mnt/d/0-WORK/models/models-master/research/slim

source ~/.bashrc
- 注意以上绝对路径填正确
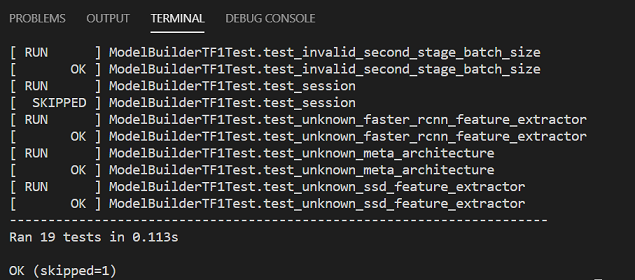
- 测试是否完成
python object_detection/builders/model_builder_tf1_test.py
- 如果出现以下结果表示API已成功安装:
2.使用mobilenetV2_SSD进行训练和预测
官方使用的版本(ssd_mobilenet_v2_coco_2018_03_29)
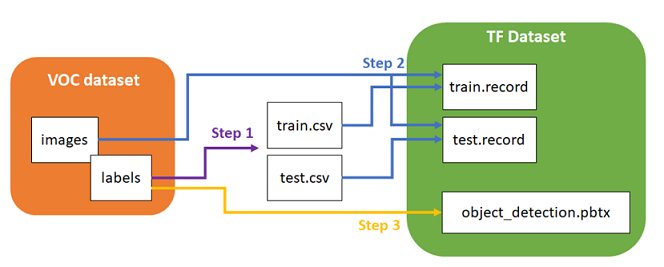
- 首先使用以下flowchart帮助理解transferLearning
- step1:进入Model目录,执行如下命令:
cd models/research/

python setup.py build

python setup.py install
- step2:配置model并进行训练,首先在object_detection/目录下创建目录ssd_model:
将下载好的model解压后放在自定义路径下(如object_detection/ssd_model/),下载链接[http://download.tensorflow.org/models/object_detection/ssd_mobilenet_v2_coco_2018_03_29.tar.gz]
mobileNetv2_SSD使用tfrecord格式的数据进行训练,数据集是使用labelImg工具进行标注的xml格式,需要完成xml转csv再转为record文件。数据集转换工具详见datitran:[https://github.com/datitran/raccoon_dataset]
把制作好的数据集tfrecords放在路径下(制作步骤详见文末)。复制训练数据用到的文件,我们在这个基础上修改配置,训练我们的数据.coco数据集共有90个class。我们在APA数据标注中使用了3个class,因此打开配置文件ssd_mobilenet_v2_coco.config.需要修改的内容如下:
./object_detection/ssd_model/data

cp object_detection/data/mscoco_label_map.pbtxt object_detection/ssd_model/ cp object_detection/samples/configs/ssd_mobilenet_v2_coco.config object_detection/ssd_model/

# 修改ssd_mobilenet_v2_coco.config

num_classes: 3 # 自定义的class数目

num_steps: 200000 # 设置多少个step后停止,可以mark此行不使用,loss值没有持续下降,可以CTRL-C停止

batch_size: 8 # 根据算力设置

fine_tune_checkpoint:/mnt/.../ssd_model/mobilenet_v2_1.4_224/model.ckpt # 上述step中下载的 pre-trained model path,最后固定接上mode.ckpt

train_input_reader: {

  tf_record_input_reader {

    input_path: "/mnt/.../ssd_model/data/train.record"

        # 之前dataset产生的TFRecord train.record路径

eval_input_reader: {

  tf_record_input_reader {

    input_path: "/mnt/.../ssd_model/data/test.record"

        # 之前dataset产生的TFRecord test.record路径

label_map_path:"/mnt/.../ssd_model/data/mscoco_label_map.pbtxt" # 注意train和eval两处都需要更改.
- step3:训练开始,新版的API中train.py在legacy目录下,先把它copy到research下。
回到research目录下 执行
python train.py --logtostderr --train_dir=training/ --pipeline_config_path=ssd_model/data/ssd_mobilenet_v2_coco.config
训练过程如下 (没有GPU时间会比较长,可以在观察到loss不再下降的时候CTRL+C停止训练)
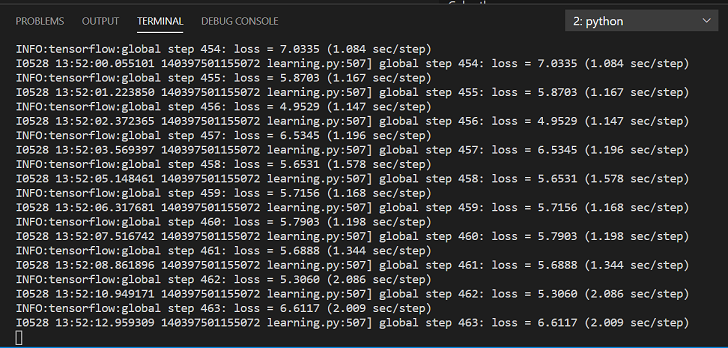
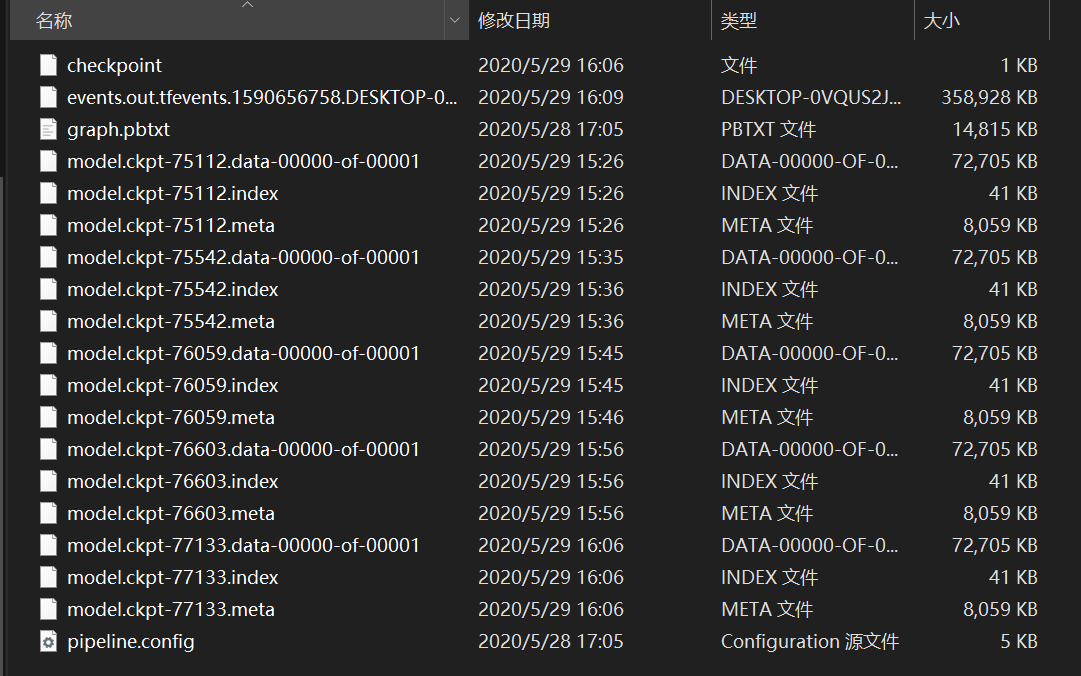
训练完成后,结果会在-–train_dir指定的path下:
- step4:模型效果评估:
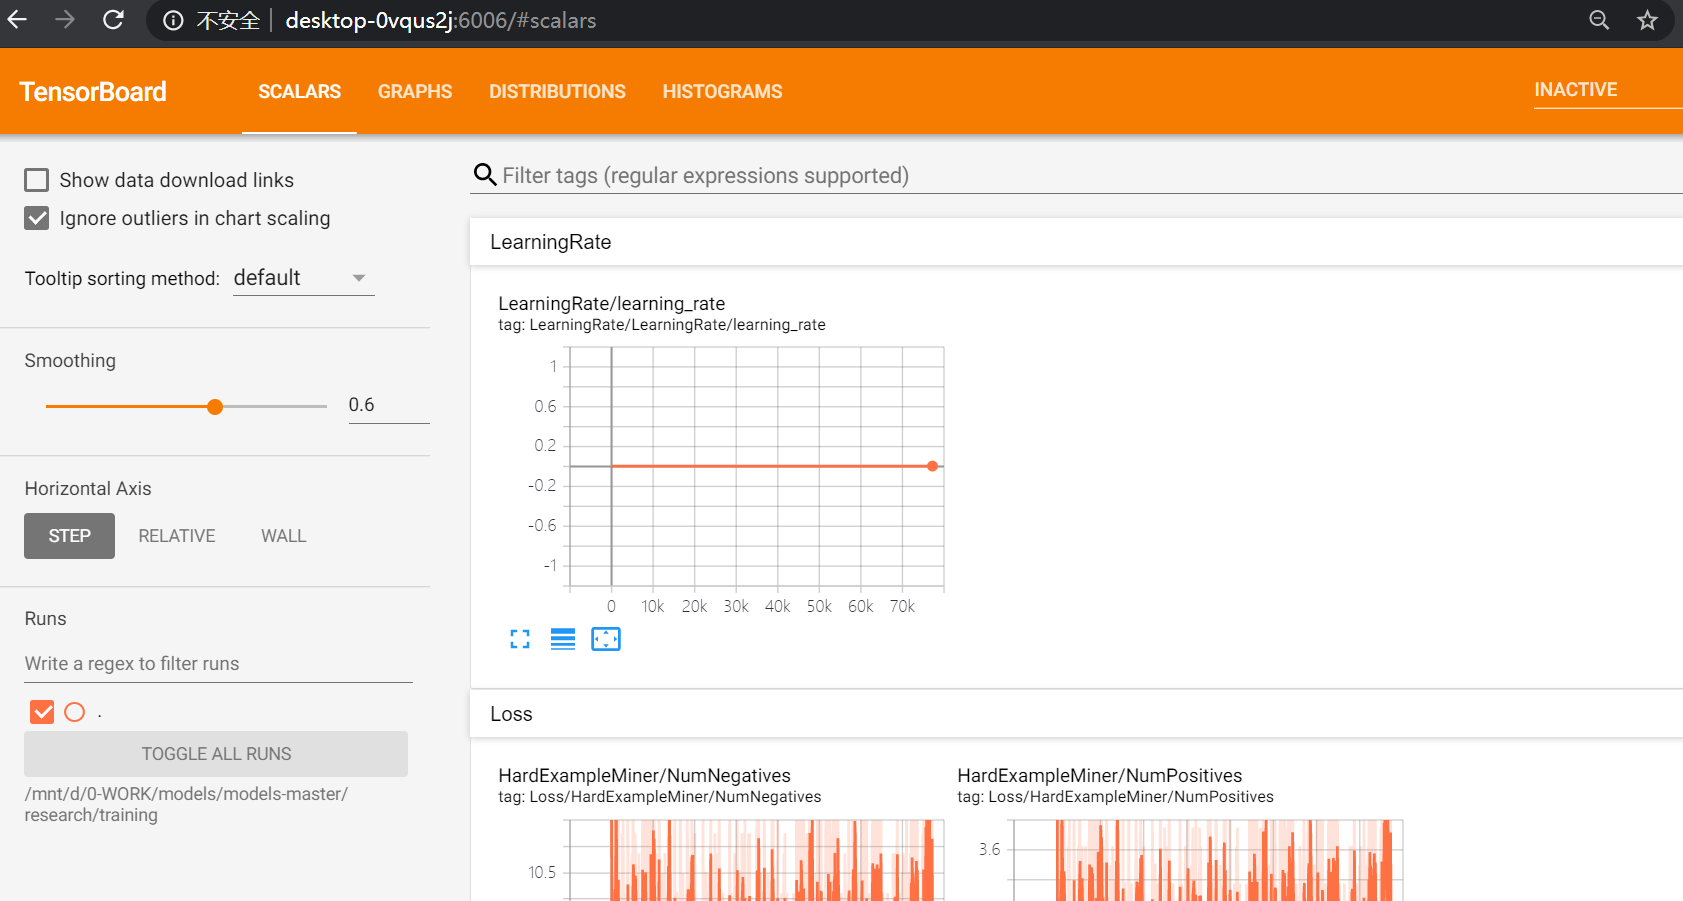
我们使用tensorboard工具查看训练效果。首先browser打开tensorbord的address,即可看到training及validate的信息:
执行以下命令(=后添加刚刚训练的路径)
tensorboard --logdir=/mnt/d/0-WORK/models/models-master/research/training
成功打开会出现以下地址:

将地址复制粘贴到浏览器中即可看到训练可视化结果:http://desktop-0vqus2j:6006/#scalars
- step5: 使用eavl.py查看在验证集上的效果
- step6:保存模型:
python object_detection/export_inference_graph.py --pipeline_config_path=/mnt/d/0-WORK/models/models-master/research/object_detection/ssd_model/data/ssd_mobilenet_v2_coco.config --trained_checkpoint_prefix=/mnt/d/0-WORK/models/models-master/research/training/model.ckpt-77133 --output_directory /mnt/d/0-WORK/models/models-master/research/training/
执行完毕后出现:

OK,得到pb模型啦。
Model_output

- saved_model

  - saved_model.pb

- checkpoint

- frozen_inference_graph.pb     # Main model

- model.ckpt.data-00000-of-00001

- model.ckpt.index

- model.ckpt.meta

- pipeline.config
保存前述data中的mscoco_label_map.pbtxt和本步骤中的frozen_inference_graph.pb,后续使用。
- step7:使用训练好的模型进行预测:
使用如下脚本进行单帧图片检测:
# test.py

import numpy as np

import tensorflow as tf

import cv2 as cv

model_path = "/mnt/d/0-WORK/models/models-master/research/training/frozen_inference_graph.pb"

pbtxt_path = "/mnt/d/0-WORKmodels/models-master/research/object_detection/ssd_model/data/mscoco_label_map.pbtxt"

testimg = "/mnt/d/0-WORK/models/models-master/research/testing/114.jpg"

# Read the graph.

#with tf.compat.v1.gfile.FastGFile(model_path, 'rb') as f:

#    graph_def = tf.compat.v1.GraphDef()

#    graph_def.ParseFromString(f.read())

with tf.gfile.FastGFile(model_path, 'rb') as f:

    graph_def = tf.GraphDef()

    graph_def.ParseFromString(f.read())

with tf.Session() as sess:

    # Restore session

    sess.graph.as_default()

    tf.import_graph_def(graph_def, name='')

    # Read and preprocess an image.

    img = cv.imread(testimg)

    rows = img.shape[0]

    cols = img.shape[1]

    inp = cv.resize(img, (450, 450))

    inp = inp[:, :, [2, 1, 0]]  # BGR2RGB

    # Run the model

    out = sess.run([sess.graph.get_tensor_by_name('num_detections:0'),

                    sess.graph.get_tensor_by_name('detection_scores:0'),

                    sess.graph.get_tensor_by_name('detection_boxes:0'),

                    sess.graph.get_tensor_by_name('detection_classes:0')],

                   feed_dict={'image_tensor:0': inp.reshape(1, inp.shape[0], inp.shape[1], 3)})

    # Visualize detected bounding boxes.

    num_detections = int(out[0][0])

    for i in range(num_detections):

        classId = int(out[3][0][i])

        score = float(out[1][0][i])

        bbox = [float(v) for v in out[2][0][i]]

        if score > 0.5:

            x = bbox[1] * cols

            y = bbox[0] * rows

            right = bbox[3] * cols

            bottom = bbox[2] * rows

            cv.rectangle(img, (int(x), int(y)), (int(right), int(bottom)), (125, 255, 51), thickness=2)

            print(classId, "-->", score, x, y)

cv.imwrite('/mnt/d/0-WORK/models/models-master/research/testing/result_114.jpg', img)

cv.waitKey()
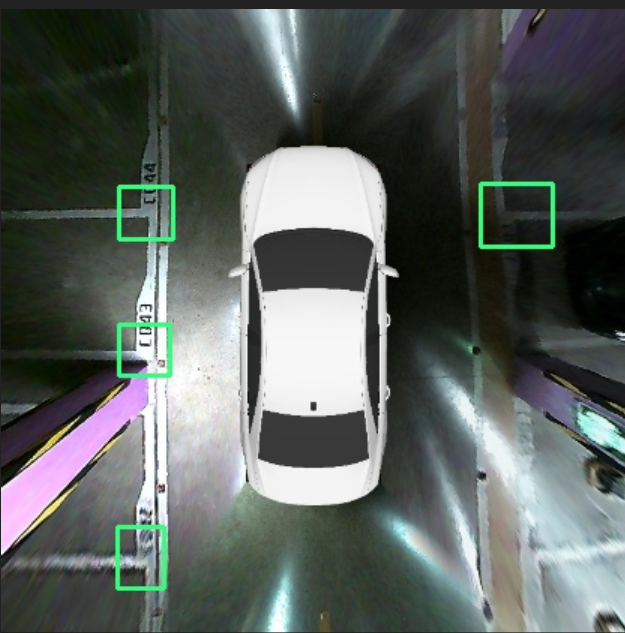
效果如下:
- step7: 模型评测
附:voc转tfrecord
参考博文
使用TransferLearning实现环视图像的角点检测——Tensorflow+MobileNetv2_SSD的更多相关文章
- 使用TransferLearning实现环视图像的角点检测——yolo_v3_tiny
本文选取yolov3-tiny,使用pretrained weights,实现环视图像中的角点等关键目标检测. 大神镇楼: https://pjreddie.com/darknet/yolo/ 配置参 ...
- 机器学习进阶-图像特征harris-角点检测 1.cv2.cornerHarris(进行角点检测)
1.cv2.cornerHarris(gray, 2, 3, 0.04) # 找出图像中的角点 参数说明:gray表示输入的灰度图,2表示进行角点移动的卷积框,3表示后续进行梯度计算的sobel算子 ...
- 图像金字塔、高斯金字塔、差分金字塔(DOG金字塔)、尺度空间、DoG (Difference of Gaussian)角点检测
[图像金字塔] 图像金字塔是一种以多分辨率来解释图像的结构,通过对原始图像进行多尺度像素采样的方式,生成N个不同分辨率的图像.把具有最高级别分辨率的图像放在底部,以金字塔形状排列,往上是一系列像素(尺 ...
- OpenCV计算机视觉学习(13)——图像特征点检测(Harris角点检测,sift算法)
如果需要处理的原图及代码,请移步小编的GitHub地址 传送门:请点击我 如果点击有误:https://github.com/LeBron-Jian/ComputerVisionPractice 前言 ...
- harris角点检测的学习
Harris通过运用微分运算和自相关矩阵改进了Moravec角点检测算法.用微分算子重新定义灰度强度变化的公式,其灰度强度变化表示为: 式中的wu,v为高斯窗口在(u,v)处的系数.X,Y它们是像素点 ...
- Harris角点检测算法优化
Harris角点检测算法优化 一.综述 用 Harris 算法进行检测,有三点不足:(1 )该算法不具有尺度不变性:(2 )该算法提取的角点是像素级的:(3 )该算法检测时间不是很令人满意. 基于以上 ...
- Harris角点检测
代码示例一: #include<opencv2/opencv.hpp> using namespace cv; int main(){ Mat src = imread(); imshow ...
- opencv笔记6:角点检测
time:2015年10月09日 星期五 23时11分58秒 # opencv笔记6:角点检测 update:从角点检测,学习图像的特征,这是后续图像跟踪.图像匹配的基础. 角点检测是什么鬼?前面一篇 ...
- Harris 角点检测
一 .Motivation 对于做图像处理的人来说,Harris角点检测肯定听过,1988年发表的文章"A combined corner and edge detector"描述 ...
随机推荐
- Java实现蓝桥杯VIP 算法训练 找公倍数
问题描述 这里写问题描述. 打印出1-1000所有11和17的公倍数. 样例输入 一个满足题目要求的输入范例. 样例输出 与上面的样例输入对应的输出. 这道题其实没有什么可写的,但是为了让读者更方便的 ...
- java实现第四届蓝桥杯猜灯谜
猜灯谜 题目描述 A 村的元宵节灯会上有一迷题: 请猜谜 * 请猜谜 = 请边赏灯边猜 小明想,一定是每个汉字代表一个数字,不同的汉字代表不同的数字. 请你用计算机按小明的思路算一下,然后提交&quo ...
- centos 7 源码安装openssh
环境:centos 7.1.1503 最小化安装 依赖包下载: yum -y install lrzsz zlib-devel perl gcc pam-devel 1.安装openssl ,选用最 ...
- 并发编程之sun.misc.Unsafe类
1.Unsafe知识点整理 2.代码: package com.javabasic.unsafe; import java.lang.reflect.Field; import sun.misc.Un ...
- 关于GatewayClient 介绍和使用
GatewayClient ## 源码 https://github.com/walkor/GatewayClient 根据GatewayWorker版本,选择合适的GatewayClient版本,请 ...
- IAT表
0X0 0 DLL介绍 DLL翻译器为动态链接库,原来不存在DLL的概念只有,库的概念,编译器会把从库中获取的二进制代码插入到应用程序中.在现在windows操作系统使用了数量庞大的库函数(进程,内存 ...
- C#数据结构与算法系列(四):链表——单链表(Single-LinkedList)
1.介绍: 链表是有序的列表,但是它在内存的存储如下: 链表是以节点的方式来存储,链式存储 每一个节点包含data域,next域:指向下一个节点 链表的各个节点不一定是连续存储 链表分带头节点的链表 ...
- [每日一题2020.06.17] leetcode周赛T3 5438 制作m束花所需的最少天数 二分搜索
题目链接 这题我开始一直在想如何在数组上dp操作搜索区间, 很蠢, 实际上用二分查找的方法可以很快的解决 首先我们通过一个函数判断第x天是否符合题意, 如果x天可以做出m束花, 那么大于m的天数必然可 ...
- Arduino+sim800C家居安防火灾报警 拨打电话 发送短信例程程序
家居安防报警器,参考程序. 火灾报警 涉及用sim800c发短信,拨打电话通知. 接线: Sim800c 3.3V -> Arduino 3.3V Sim800c GND -> Ardui ...
- 手写简易版Promise
实现一个简易版 Promise 在完成符合 Promise/A+ 规范的代码之前,我们可以先来实现一个简易版 Promise,因为在面试中,如果你能实现出一个简易版的 Promise 基本可以过关了. ...