
centos7 安装 mysql5.6(mysql-5.6.44-linux-glibc2.12-x86_64.tar.gz)
1、到mysql官网下载安装包
下载地址:https://dev.mysql.com/downloads/mysql/5.6.html#downloads
选择以下截图中的版本
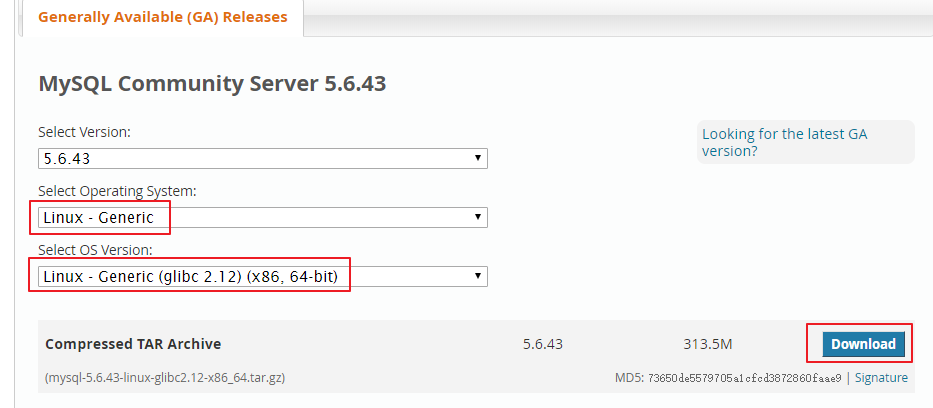
2、下载后上传到linux中
3、安装
卸载系统自带的mariadb
[root@localhost soft]# rpm -qa | grep mariadb

mariadb-libs-5.5.-.el7.x86_64

[root@localhost soft]#

[root@localhost soft]#

[root@localhost soft]# rpm -e --nodeps mariadb-libs-5.5.-.el7.x86_64
删除/etc目录下的my.cnf
[root@localhost soft]# rm /etc/my.cnf

rm: 无法删除"/etc/my.cnf": 没有那个文件或目录

[root@localhost soft]#
有可能本身就不存在这个文件。
创建mysql用户组
[root@localhost soft]# groupadd mysql
创建一个用户名为mysql的用户并加入mysql用户组
[root@localhost soft]# useradd -g mysql mysql
解压安装包到/usr/local/目录下
tar -xvf mysql-5.6.-linux-glibc2.-x86_64.tar.gz -C /usr/local/
切换到/usr/local目录下,并查看
[root@localhost soft]# cd /usr/local/

[root@localhost local]# ls

bin  etc  games  include  java  lib  lib64  libexec  mysql-5.6.-linux-glibc2.-x86_64  redis  sbin  share  src

[root@localhost local]#

[root@localhost local]#
将解压好的文件夹重命名为mysql
[root@localhost local]# mv mysql-5.6.-linux-glibc2.-x86_64/ mysql

[root@localhost local]# ls

bin  etc  games  include  java  lib  lib64  libexec  mysql  redis  sbin  share  src

[root@localhost local]#
copy一份/usr/local/mysql/support-files/下的my-default.cnf文件到/etc下
cp /usr/local/mysql/support-files/my-default.cnf /etc/my.cnf
配置/etc目录下的my.cnf文件
通过vi编辑器,编辑my.cnf的代码如下
[mysql]

# 设置mysql客户端默认字符集

default-character-set=utf8

[mysqld]

skip-name-resolve

#设置3306端口

port =

# 设置mysql的安装目录

basedir=/usr/local/mysql

# 设置mysql数据库的数据的存放目录

datadir=/usr/local/mysql/data

# 允许最大连接数

max_connections=

# 服务端使用的字符集默认为8比特编码的latin1字符集

character-set-server=utf8

# 创建新表时将使用的默认存储引擎

default-storage-engine=INNODB

lower_case_table_name=

max_allowed_packet=16M
进入安装mysql软件目录,并执行以下命令
[root@localhost mysql]# cd /usr/local/mysql/

[root@localhost mysql]# chown -R mysql:mysql ./

[root@localhost mysql]# ./scripts/mysql_install_db --user=mysql --basedir=/usr/local/mysql/ --datadir=/usr/local/mysql/data/

-bash: ./scripts/mysql_install_db: /usr/bin/perl: 坏的解释器: 没有那个文件或目录

[root@localhost mysql]#

[root@localhost mysql]#
如果报上面的错误,那么需要安装perl
yum install perl
安装完成后,再次执行./scripts/mysql_install_db --user=mysql --basedir=/usr/local/mysql/ --datadir=/usr/local/mysql/data/
[root@localhost mysql]# ./scripts/mysql_install_db --user=mysql --basedir=/usr/local/mysql/ --datadir=/usr/local/mysql/data/

FATAL ERROR: please install the following Perl modules before executing ./scripts/mysql_install_db:

Data::Dumper

[root@localhost mysql]#

[root@localhost mysql]#
如果报上面的错误,那么需要安装autoconf
yum install autoconf
安装完成后,再次执行上面的那个命令。
安装完成后,修改当前data目录的拥有者为mysql用户
[root@localhost mysql]# chown -R mysql:mysql data
到此数据库安装完毕!
4、配置
授予my.cnf权限
chmod 644 /etc/my.cnf
设置开机自启动服务控制脚本
复制启动脚本到资源目录
[root@localhost mysql]# cp ./support-files/mysql.server /etc/rc.d/init.d/mysqld
增加mysqld服务控制脚本执行权限
chmod +x /etc/rc.d/init.d/mysqld
将mysqld服务加入到系统服务
chkconfig --add mysqld
检查mysqld服务是否已经生效
chkconfig --list mysqld
结果类似如下
[root@localhost mysql]#  chkconfig --list mysqld

注:该输出结果只显示 SysV 服务,并不包含

原生 systemd 服务。SysV 配置数据

可能被原生 systemd 配置覆盖。

      要列出 systemd 服务,请执行 'systemctl list-unit-files'。

      查看在具体 target 启用的服务请执行

      'systemctl list-dependencies [target]'。

mysqld             :关    :关    :开    :开    :开    :开    :关

[root@localhost mysql]#
表明mysqld服务已经生效,在2、3、4、5运行级别随系统启动而自动启动,以后可以使用service命令控制mysql的启动和停止
命令为:service mysqld start和service mysqld stop
启动mysqld
[root@localhost mysql]# service mysqld start

Warning: World-writable config file '/etc/my.cnf' is ignored

Starting MySQL.Warning: World-writable config file '/etc/my.cnf' is ignored

Warning: World-writable config file '/etc/my.cnf' is ignored

Logging to '/usr/local/mysql/data/localhost.localdomain.err'.

. SUCCESS!

[root@localhost mysql]#
将mysql的bin目录加入PATH环境变量,编辑 ~/.bash_profile文件
在文件最后添加如下信息:
export PATH=$PATH:/usr/local/mysql/bin
保存并退出。
使修改的内容立即生效
source ~/.bash_profile
以root账户登录mysql,默认是没有密码的
[root@localhost mysql]# mysql -uroot -p

Warning: World-writable config file '/etc/my.cnf' is ignored

Enter password:

Welcome to the MySQL monitor.  Commands end with ; or \g.

Your MySQL connection id is

Server version: 5.6. MySQL Community Server (GPL)

Copyright (c) , , Oracle and/or its affiliates. All rights reserved.

Oracle is a registered trademark of Oracle Corporation and/or its

affiliates. Other names may be trademarks of their respective

owners.

Type 'help;' or '\h' for help. Type '\c' to clear the current input statement.

mysql>
要求输入密码的时候,直接回车。
设置root账户的密码
mysql> use mysql;

Reading table information for completion of table and column names

You can turn off this feature to get a quicker startup with -A

Database changed

mysql> update user set password=password('root') where user='root' and host='localhost';

Query OK,  row affected (0.00 sec)

Rows matched:   Changed:   Warnings:

mysql> flush privileges;

Query OK,  rows affected (0.00 sec)

mysql>
设置远程主机登录
mysql> GRANT ALL PRIVILEGES ON *.* TO 'root'@'%' IDENTIFIED BY 'root' WITH GRANT OPTION;

Query OK,  rows affected (0.00 sec)

mysql>
开启3306端口
[root@localhost mysql]# systemctl start firewalld

[root@localhost mysql]# firewall-cmd --zone=public --add-port=/tcp --permanent

success

[root@localhost mysql]# firewall-cmd --reload

success
到此为止,在Centos 7上安装mysql5.6就完成了。
centos7 安装 mysql5.6(mysql-5.6.44-linux-glibc2.12-x86_64.tar.gz)的更多相关文章
- CentOS7安装MySQL5.7及Tomcat8.5
在CentOS7服务器上部署FR项目应用 一.安装CentOS-7_x86_64 1.CentOS7:带GUI的服务器(FTP服务器.JAVA平台.兼容性程序库.开发工具.安全性工具.系统管理工具): ...
- 搭建MHA环境【2】安装mysql-5.6 + mysql复制
本例中mysql的安装方式选用了二进制包安装方案.mysql复制用半同步复制方案 [1]安装mysql-5.6.31 要在所有的数据节点上都安装上mysql,安装方式大致相同,所以我这里就不重复写多次 ...
- Centos7 安装 MySQL5.7
Centos7 安装 MySQL5.7 一.环境介绍 1.安装包版本介绍 MySQL 有三种安装方式:RPM安装.二进制包安装.源码包安装.我们这篇文章以二进制方式安装MySQL 软件名称 版本 系统 ...
- linux centos7 安装mysql-5.7.17教程(图解)
1系统约定安装文件下载目录:/data/softwareMysql目录安装位置:/usr/local/mysql数据库保存位置:/data/mysql日志保存位置:/data/log/mysql 2下 ...
- 002. Centos7安装mysql5.5.37
下载cmake-2.8.12.2.tar.gz, 下载地址: https://pan.baidu.com/s/1qYtpX7m 下载mysql-5.5.37.tar.gz, 下载地址: http:// ...
- centos7安装mysql5.7.19及配置远程连接
centos7安装mysql5.7.19及配置远程连接------https://blog.csdn.net/Lh19931122/article/details/77996213
- centos7 安装mysql5.7(二进制安装)
一.卸载默认安装的mariadb [root@localhost ~]# yum remove mariadb* -y 二.添加mysql用户 [root@localhost ~]# useradd ...
- centos7 安装 mysql5.7.25
一.检查是否安装了mysql和mariadb,若已经安装就需要卸载. [root@localhost ~]# rpm -qa|grep mariadb // 查询出来已安装的mariadb [root ...
- centos7安装mysql5.5.62
mysql是我们最常用的开源的关系型数据库,mysql不同版本有时候安装的方式也不尽相同,下面梳理一下mysql5.5.62版本的安装 1.下载mysql5.5.62,URL:https://down ...
随机推荐
- C# 整型数和浮点型数的进制转换
1.十进制转二进制 /// <summary> /// 十进制转二进制 /// </summary> public class Convert10To2 { /// <s ...
- string类型常用函数
一个字符串就是一个string类型数据,此类型变量我们可以把它看作一个只读数组,其元素是char变量,在这里我们来说下string类型的常用命令. 1.TocharArray():将此实例中的字符复制 ...
- VS2019编译 当前最新版chromium
之前编译过webrtc和chromium, 由于长时间没用,被我删除了, 最近在最新版本的google浏览器上遇到了播放器兼容性问题,老版本的google浏览器是没问题,IE, 火狐浏览器也没问题, ...
- java中i=i++的问题
java中 i = i++ 的结果 昨天看到下面这段代码,分享出来给大家看看,大家也可以讨论讨论. int i = 0; i = i++; System.out.println("i的值是 ...
- C和指针--高级声明
1. int *f(); 分析:必须确定表达式*f()是如何进行求值的.首先执行的是函数调用操作符(),因为它的优先级高于间接访问操作符.因此,f是一个函数,它的返回值类型是一个指向整型的指针. 2. ...
- js中对new Date() 中转换字符串方法toLocaleString的使用
提供特定于区域设置的日期和时间格式. dateTimeFormatObj = new Intl.DateTimeFormat([locales][, options]) dateTimeFormatO ...
- Zabbix监控平台搭建部署与概述
zabbix 是一个基于 WEB 界面的提供分布式系统监视以及网络监视功能的企业级的开源解决方案.zabbix 能监视各种网络参数,保证服务器系统的安全运营:并提供灵活的通知机制以让系统管理员快速定位 ...
- MySQL-进阶7-子查询 - select后/where后/from后/ []where后/having后] / exists后面 的相关子查询
/*SQL-进阶7-子查询 含义:出现在其他语句中的select 语句,称为子查询或内查询 外部的查询语句,称为主查询 或者 外查询 分类1:按子查询出现的位置———— select 后面:仅仅支持标 ...
- linux实操_shell判断语句
常用判断条件: (1)两个数的比较 = 字符串的比较 -lt 小于 -le 小于等于 -eq 等于 -gt 大于 -ge 大于等于 -ne 不等于 (2)按照文件权限进行判断 -r 有读的权限 -w ...
- 6-修改虚拟机的SID(sysprep)
一.注意点 1.这种错误一般会出现在克隆的机器里,导致在加入域的时候,报SID一致,加入失败,如下图: 2.使用sysprep修改完之后,需要重启服务器,并且重新配置,重新配网络: 3.如果修改SID ...