Pyqt 打包资源文件
用打包工具将做好的Pyqt程序打包成exe后发现引用的资源图片都显示不了?
是否遇到了和我一样的问题呢。google之后找到了方法,一种方法是在程序中引用外部资源,另外一种方法是将资源文件转换为py文件,然后引用py。下面我们详细来实现后者方法实现的过程
一. 生成资源文件
要把资源文件转换为py文件首先要有资源文件,我们打开Qt Designer,添加资源文件
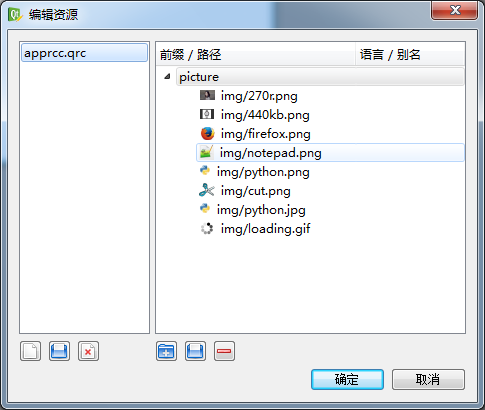

保存好资源文件后缀是以 .qrc 结尾的,用notepad++查看.qrc文件发现该文件其实为XML
 <RCC>

   <qresource prefix="picture">

     <file>img/270r.png</file>

     <file>img/440kb.png</file>

     <file>img/firefox.png</file>

     <file>img/notepad.png</file>

     <file>img/python.png</file>

     <file>img/cut.png</file>

     <file>img/python.jpg</file>

     <file>img/loading.gif</file>

   </qresource>

 </RCC>
二. 创建一个窗体
用Qt Designer 创建一个最简单的窗体
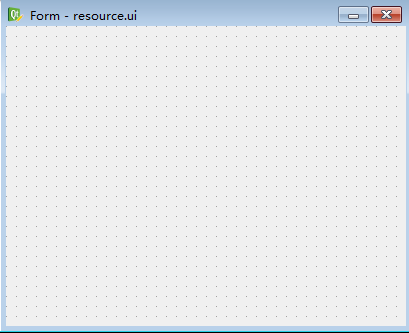
然后将.ui文件转换成 py文件
 # -*- coding: utf-8 -*-

 # Form implementation generated from reading ui file 'resource.ui'

 #

 # Created: Tue Jan 20 17:17:34 2015

 #      by: PyQt4 UI code generator 4.10.3

 #

 # WARNING! All changes made in this file will be lost!

 from PyQt4 import QtCore, QtGui

 try:

     _fromUtf8 = QtCore.QString.fromUtf8

 except AttributeError:

     def _fromUtf8(s):

         return s

 try:

     _encoding = QtGui.QApplication.UnicodeUTF8

     def _translate(context, text, disambig):

         return QtGui.QApplication.translate(context, text, disambig, _encoding)

 except AttributeError:

     def _translate(context, text, disambig):

         return QtGui.QApplication.translate(context, text, disambig)

 class Ui_resource(object):

     def setupUi(self, resource):

         resource.setObjectName(_fromUtf8("resource"))

         resource.resize(400, 300)

         self.retranslateUi(resource)

         QtCore.QMetaObject.connectSlotsByName(resource)

     def retranslateUi(self, resource):

         resource.setWindowTitle(_translate("resource", "Form", None))
三. 转换资源文件
转换资源文件用的是Pyqt的pyrcc4 命令
pyrcc4 qrcfile.qrc -o pyfile.py
1.Pycharm集成pyrcc4
我们使用Pycharm来集成pyrcc4,这样更利于我们高效开发
首先在菜单里面找到 File => settings => Tools => External Tools (外边工具设置)
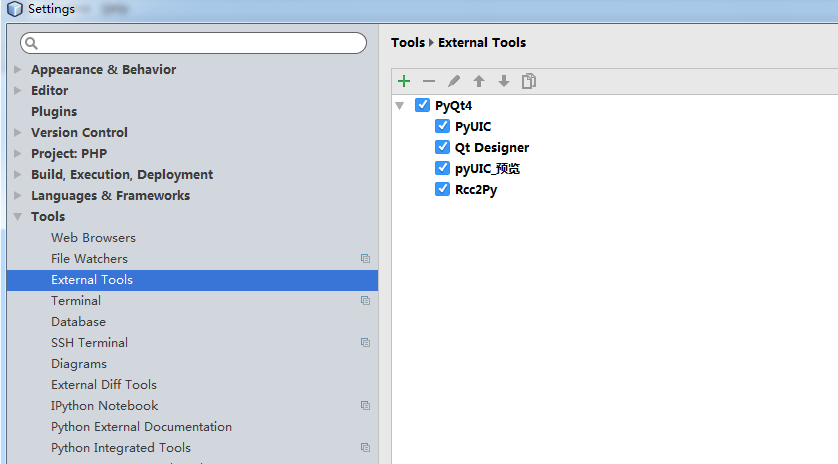
选择添加Add
Name 填写: Rcc2Py
Group: 自已任意填写,我填写的是PyQt4
下面的Options默认
在Tools settings 里面这样填写:
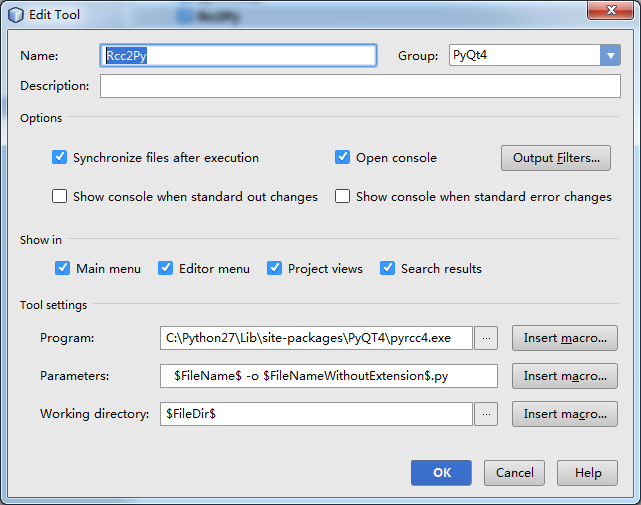
Program 就是你安装Pyqt4的路径
Parameters 是指转换的参数 $FileName$ -o $FileNameWithoutExtension$.py
Working directory 表示输出在当前的工作目录 $FileDir$
2.转换qrc为py
选择要转换的qrc文件,右键,找到group 为(PyQt4) 目录下的Rcc2Py
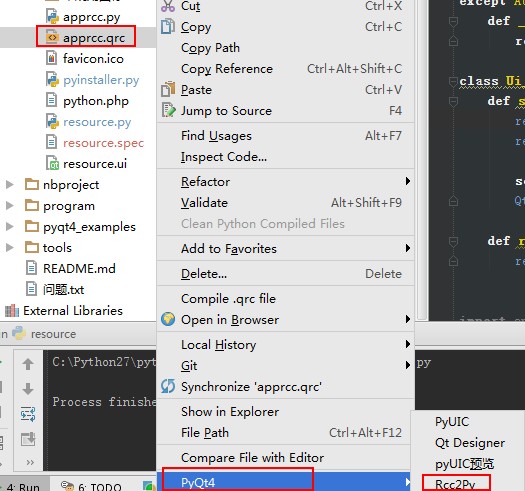
转换完成后,同级目录下就多出一个与qrc文件同命名的py文件,查看文件:
 # -*- coding: utf-8 -*-

 # Resource object code

 #

 # Created: 周二 一月 20 11:43:03 2015

 #      by: The Resource Compiler for PyQt (Qt v4.8.5)

 #

 # WARNING! All changes made in this file will be lost!

 from PyQt4 import QtCore

 qt_resource_data = "\

 \x00\x00\x05\x2b\

 \x89\

 \x50\x4e\x47\x0d\x0a\x1a\x0a\x00\x00\x00\x0d\x49\x48\x44\x52\x00\

 \x00\x00\x20\x00\x00\x00\x20\x08\x06\x00\x00\x00\x73\x7a\x7a\xf4\

 \x00\x00\x00\x04\x67\x41\x4d\x41\x00\x00\xd6\xd8\xd4\x4f\x58\x32\

 \x00\x00\x00\x19\x74\x45\x58\x74\x53\x6f\x66\x74\x77\x61\x72\x65\

 \x00\x41\x64\x6f\x62\x65\x20\x49\x6d\x61\x67\x65\x52\x65\x61\x64\

 \x79\x71\xc9\x65\x3c\x00\x00\x04\xbd\x49\x44\x41\x54\x58\xc3\xed\

 \x57\x6b\x4c\x93\x57\x18\x3e\x23\x71\xc9\x32\xe9\x16\x97\xa8\x54\

 \x65\x38\x9d\x02\x15\xf6\x03\x87\x32\x93\x01\x66\x2c\x5b\x70\xc4\

 \x30\xff\x60\xa2\x2e\x1a\x3a\x1d\x4e\x03\xba\x31\x89\x5b\xb3\x80\

 \xd9\x0c\x84\x02\x19\x58\x1c\x14\x8b\x85\xb2\x82\x95\x5e\xe4\x66\

 \x0b\x8e\x31\xf8\xc3\x46\xcb\x2d\x81\x15\xdc\xa8\xc2\x1c\x1b\xb7\

 \x6a\x69\x91\xf2\xee\xbc\x87\xaf\x0c\xdc\xb8\x0d\x61\xd9\xb2\x93\

 \x3c\xed\x97\xf3\x7d\xfd\xde\xe7\xbc\xef\xf3\x5e\x4a\x00\x80\xfc\

 \x93\x20\xff\x0a\x02\x74\x09\x28\x44\x14\xd9\x14\x71\x14\x01\x2b\

 \x46\x80\xae\xdd\x64\xdd\xc6\x66\x22\x4c\xf8\x95\xc4\x8b\x47\xc8\

 \xa1\xd3\xf7\xc8\x8e\x97\x3b\x38\x32\x61\x2b\x41\x20\x85\x9c\xbe\

 \x30\x48\x2e\xdd\x80\x19\x40\x32\xab\x79\x4d\xf4\xbe\xfb\x72\x13\

 \x68\x64\x06\x91\x04\x5e\xa3\x51\xf4\x06\xee\x85\x47\xf5\xd0\xbd\

 \x83\xcb\x4d\x20\x9b\x9d\xf6\x40\x74\x2f\xbd\x16\x32\x3d\x20\x89\

 \x3f\x48\xa5\x2c\x1b\x01\x8c\x31\x79\xc1\xbb\x9d\x88\x4b\xc6\xd7\

 \xc6\x26\x0e\xa0\x10\xb9\xfd\x42\xfe\xc5\x2b\x36\x46\x8c\x12\x5c\

 \x4e\x02\x93\xa7\xa7\xa7\x0d\xcc\xd3\x39\xb9\x98\x63\x36\x14\x0a\

 …………………………

 ………………………… # 此处省略1000行

 …………………………

 qt_resource_struct = "\

 \x00\x00\x00\x00\x00\x02\x00\x00\x00\x01\x00\x00\x00\x01\

 \x00\x00\x00\x00\x00\x02\x00\x00\x00\x01\x00\x00\x00\x02\

 \x00\x00\x00\x14\x00\x02\x00\x00\x00\x08\x00\x00\x00\x03\

 \x00\x00\x00\x4e\x00\x01\x00\x00\x00\x01\x00\x00\x3a\x1b\

 \x00\x00\x00\xce\x00\x00\x00\x00\x00\x01\x00\x09\x24\x4c\

 \x00\x00\x00\x9c\x00\x00\x00\x00\x00\x01\x00\x01\x90\xfe\

 \x00\x00\x00\x86\x00\x00\x00\x00\x00\x01\x00\x00\xa3\x09\

 \x00\x00\x00\x20\x00\x00\x00\x00\x00\x01\x00\x00\x00\x00\

 \x00\x00\x00\x6a\x00\x00\x00\x00\x00\x01\x00\x00\x79\x75\

 \x00\x00\x00\x34\x00\x00\x00\x00\x00\x01\x00\x00\x05\x2f\

 \x00\x00\x00\xb4\x00\x00\x00\x00\x00\x01\x00\x08\x72\xdb\

 "

 def qInitResources():

     QtCore.qRegisterResourceData(0x01, qt_resource_struct, qt_resource_name, qt_resource_data)

 def qCleanupResources():

     QtCore.qUnregisterResourceData(0x01, qt_resource_struct, qt_resource_name, qt_resource_data)

 qInitResources()
该文件已经使用QtCore.qRegisterResourceData 对文件初始化注册,所以我们可以直接引用该文件
四. 引用资源py文件
py文件生成好了如何来引用使用呢?
说对了,引用就这么简单
import apprcc
使用的时候 冒号 “ : ” 加 图片的路径, 如:
:/img/firefox.png
运行试试,发现图片不显示,为什么呢,因为qrc文件添加过程中,我加了一个 “前缀” prefix。 所以,如果在qrc文件中不添加前缀 使用 :/img/firefox.png 是可以的,但添加了前缀生成的qrc文件 qresource标签会多一个属性
qresource prefix="picture"
在这里,正确的使用是:
:picture/img/firefox.png
完整的代码如下:
# -*- coding: utf-8 -*- # Form implementation generated from reading ui file 'resource.ui'
#
# Created: Tue Jan 20 17:17:34 2015
# by: PyQt4 UI code generator 4.10.3
#
# WARNING! All changes made in this file will be lost! from PyQt4 import QtCore, QtGui try:
_fromUtf8 = QtCore.QString.fromUtf8
except AttributeError:
def _fromUtf8(s):
return s try:
_encoding = QtGui.QApplication.UnicodeUTF8
def _translate(context, text, disambig):
return QtGui.QApplication.translate(context, text, disambig, _encoding)
except AttributeError:
def _translate(context, text, disambig):
return QtGui.QApplication.translate(context, text, disambig) class Ui_resource(object):
def setupUi(self, resource):
resource.setObjectName(_fromUtf8("resource"))
resource.resize(400, 300) self.retranslateUi(resource)
QtCore.QMetaObject.connectSlotsByName(resource) def retranslateUi(self, resource):
resource.setWindowTitle(_translate("resource", "Form", None)) import apprcc
class showresource(QtGui.QWidget):
def __init__(self):
super(showresource, self).__init__()
self.ui_resource = Ui_resource()
self.ui_resource.setupUi(self)
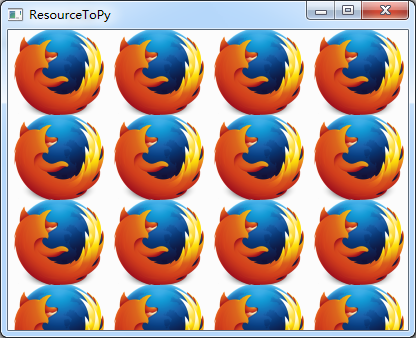
self.setWindowTitle('ResourceToPy') palette1 = QtGui.QPalette(self)
palette1.setBrush(self.backgroundRole(), QtGui.QBrush(QtGui.QPixmap(':picture/img/firefox.png'))) self.setPalette(palette1) # 重载keyPressEvent , 当按下Esc退出
def keyPressEvent(self, event):
if event.key() ==QtCore.Qt.Key_Escape:
self.close() if __name__ == "__main__":
import sys
app = QtGui.QApplication(sys.argv)
resource = showresource()
resource.show()
sys.exit(app.exec_())
五. 打包运行
我使用的是Pyinstaller打包成单一的exe,运行exe查看效果
Pyqt 打包资源文件的更多相关文章
- VS打包资源文件,转自推酷,请小星同学查看
上篇博客把收费系统的总体设计进行了一遍讲解,讲解的同时掺杂了些有关.NET编译机制的总结.程序编写测试完成后接下来我们要做的是打包部署程序,但VS2012让人心痛的是没有了打包工具.不知道出于什么原因 ...
- Webpack 使用url-loader和file-loader打包资源文件
在js中不仅可以通过import引入js文件,还可以引入图片.视频等资源文件,这样webpack打包时就会把所引入的资源文件也一起打包进来 打包进来的文件会返回一个字符串:即文件的路径 要做到这一点, ...
- maven打包资源文件(转)
原文链接:http://blog.csdn.net/u012849872/article/details/51035938 maven工程标准目录结构: src -main –bin ...
- pyinstall打包资源文件
相关代码 main.py import sys import os #生成资源文件目录访问路径 #说明: pyinstaller工具打包的可执行文件,运行时sys.frozen会被设置成True # ...
- ******可用 SpringBoot 项目打包分开lib,配置和资源文件
spring-boot多模块打包后,无法找到其他模块中的类https://blog.csdn.net/Can96/article/details/96172172 关于SpringBoot项目打包没有 ...
- spring/boot 打包,资源/配置/业务文件分离
spring/boot打包,将业务jar包和资源配置文件进行分离打包,打包后的资源在target/release文件夹下面 注意:添加以下配置后,注意修改自己的入口类 <!--相关编译打包依赖- ...
- 使用webpack打包ThinkPHP的资源文件
使用webpack打包ThinkPHP的资源文件 利用自己的空余时间一直在维护http://www.wx2share.com这个小网站,全是一个人在弄,由于只租得起虚拟空间,所以后台采用了简单方便的T ...
- 打包jar文件 外部调用资源 so等
一个非常好的从jar文件中加载so动态库方法,在android的gif支持开源中用到.这个项目的gif解码是用jni c实现的,避免了OOM等问题. 项目地址:https://github.com/k ...
- Android将Activity 打 jar包 (解决资源文件不能打包的问题)
转载地址:http://blog.csdn.net/xiaanming/article/details/9257853 最近有一个需要,我们公司做了一个apk客户端,然后其他的公司可以根据自己的需要来 ...
随机推荐
- 关于在android 4.2.2 上运行runlmbench
在剑锋的基础上加一些自己笔记,让自己更懂一些这个流程. 参考:http://www.cnblogs.com/zengjfgit/p/5731655.html runlmbench 是一款在linux ...
- GCD-Grand Central Dispatch
经常要用的,总结分类一下. //获得队列 DISPATCH_QUEUE_PRIORTY 优先级 dispatch_queue_t Queue = dispatch_get_global_queue(D ...
- Jsoup Element网页信息采集
package zeze; import java.io.IOException; import org.jsoup.Jsoup; import org.jsoup.nodes.Document; i ...
- LinearLayout
概念: LinearLayout是一种线性布局,他会将控件在水平和垂直方向做线性排列 官方文档: http://developer.android.com/guide/topics/ui/layout ...
- NUI控件扩展
摘要:NUI组件是公司新一代的前端开发框架,它精致优雅的前端编程模型,是大家能够,或者想接受学习它的重要原因,在使用它的时候,一定不免会想增加自己的控件,让别人也能够如此优雅的使用. 其实NUI的扩展 ...
- [20160725]ArithmeticTest
public class ArithmeticTest{ public static void main(String[] args) { int [] a={1,3,5,7,9,11,13,15}; ...
- .NET中六个重要的概念:栈、堆、值类型、引用类型、装箱和拆箱 (转)
作者: Edison Chou 来源: 博客园 发布时间: 2014-09-03 15:59 阅读: 318 次 推荐: 2 原文链接 [收藏] 原文作者:Shivprasad k ...
- 隐藏左侧快速导航除DMS导航树之外的其他区域
<style type="text/css"> /*隐藏左侧快速导航除DMS导航树之外的其他区域*/ .ms-quicklaunchouter { display: n ...
- ios 转发一篇对于6 plus的分辨率模式的说明
http://segmentfault.com/q/1010000002545515 分为兼容模式和高分辨率模式. 兼容模式 当你的 app 没有提供 3x 的 LaunchImage 时,系统默认进 ...
- 不知道数据库中表的列类型的前提下,使用JDBC正确的取出数据
概要: 使用jdbc 如果在不知道表结构的情况下,如何读出表信息? 使用ResultSetMetaData; 然后使用getColumnType 获取column 类型 使用getColumnName ...