
oauth2-server-php for windows 的那些坑 (研究中...)
oauth2-server-php for windows 的那些坑
在windwos 环境下,使用vs2017 for php 工具进行调试时,总是搞不出来,
于是分析了一下原因,
首先,oauth2-server-php的环境是linux 而我在windows 环境下,步骤上是有些区别,但也不至于没办法调试
下面就分析一下每个步骤的细微区别“
1、windows 源码地址是,https://github.com/bshaffer/oauth2-server-php/releases 下载最新版本的,基本类同,
https://github.com/bshaffer/oauth2-server-php/releases
OAuth和OpenID的区别:
OAuth关注的是authorization授权,即:'用户能做什么';而OpenID侧重的是authentication认证,即:'用户是谁'。OpenID是用来认证协议,OAuth是授权协议,二者是互补的
OAuth 2.0将分为两个角色: Authorization server负责获取用户的授权并且发布token; Resource负责处理API calls。
如果用户的照片在A网站,他想要在B网站使用A网站的头像,并不需要向B网站提供自己在A网站的用户名和密码,而直接给B一个Access Token来获取A站的照片
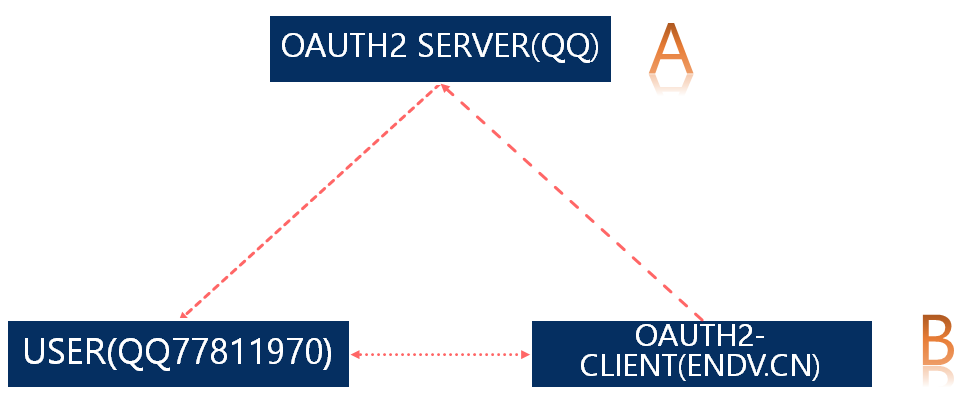
具体流程如下:
1)用户访问网站B
2)B需要验证用户的身份
3)B将用户定向到A网站,用户输入帐号密码登录A网站
4)A网站询问是否要将Authentication的权利给B网站
5)用户告诉A站可以将认证权给B站
6)A网站把Authorization Code发给B站
7)B站用Autorization Code向A站换取Access Token
8)当B站拥有Access Token时,就拥有了用户在A站的一些访问权限
这是典型的Authorization Code Grant,常常运用于网络应用之中
还有Implicit Grant认证方式,这个则省去了AuthCode,开放平台直接返回access_token和有效期,用户ID等数据这种经常运用于手机客户端或者浏览器插件等没有在线服务器的应用
最后一种是Resource Owner Password Credentials Grant
这种是直接在应用中输入帐号密码,然后由应用XAuth技术将其提交给开放平台并得到Access Token
它经常用于PC可执行程序和手机应用,但由于存在一些争议,开发难度也较大,这里我就先不讨论他
使用 OAuth2-Server-php
 CREATE TABLE `oauth_access_tokens` (

 `access_token` varchar(40) NOT NULL,

 `client_id` varchar(80) NOT NULL,

 `user_id` varchar(255) DEFAULT NULL,

 `expires` timestamp NOT NULL DEFAULT CURRENT_TIMESTAMP ON UPDATE CURRENT_TIMESTAMP,

 `scope` varchar(2000) DEFAULT NULL,

 PRIMARY KEY (`access_token`)

 ) ENGINE=InnoDB DEFAULT CHARSET=utf8;

 CREATE TABLE `oauth_authorization_codes` (

 `authorization_code` varchar(40) NOT NULL,

 `client_id` varchar(80) NOT NULL,

 `user_id` varchar(255) DEFAULT NULL,

 `redirect_uri` varchar(2000) DEFAULT NULL,

 `expires` timestamp NOT NULL DEFAULT CURRENT_TIMESTAMP ON UPDATE CURRENT_TIMESTAMP,

 `scope` varchar(2000) DEFAULT NULL,

 PRIMARY KEY (`authorization_code`)

 ) ENGINE=InnoDB DEFAULT CHARSET=utf8;

 CREATE TABLE `oauth_clients` (

 `client_id` varchar(80) NOT NULL,

 `client_secret` varchar(80) NOT NULL,

 `redirect_uri` varchar(2000) NOT NULL,

 `grant_types` varchar(80) DEFAULT NULL,

 `scope` varchar(100) DEFAULT NULL,

 `user_id` varchar(80) DEFAULT NULL,

 PRIMARY KEY (`client_id`)

 ) ENGINE=InnoDB DEFAULT CHARSET=utf8;

 CREATE TABLE `oauth_refresh_tokens` (

 `refresh_token` varchar(40) NOT NULL,

 `client_id` varchar(80) NOT NULL,

 `user_id` varchar(255) DEFAULT NULL,

 `expires` timestamp NOT NULL DEFAULT CURRENT_TIMESTAMP ON UPDATE CURRENT_TIMESTAMP,

 `scope` varchar(2000) DEFAULT NULL,

 PRIMARY KEY (`refresh_token`)

 ) ENGINE=InnoDB DEFAULT CHARSET=utf8;

 CREATE TABLE `oauth_users` (

 `user_id` int(11) NOT NULL AUTO_INCREMENT,

 `username` varchar(255) NOT NULL,

 `password` varchar(2000) DEFAULT NULL,

 `first_name` varchar(255) DEFAULT NULL,

 `last_name` varchar(255) DEFAULT NULL,

 PRIMARY KEY (`user_id`)

 ) ENGINE=InnoDB AUTO_INCREMENT=2 DEFAULT CHARSET=utf8;

 CREATE TABLE `oauth_scopes` (

   `scope` text,

   `is_default` tinyint(1) DEFAULT NULL

 ) ENGINE=InnoDB DEFAULT CHARSET=utf8;

 CREATE TABLE `oauth_jwt` (

   `client_id` varchar(80) NOT NULL,

   `subject` varchar(80) DEFAULT NULL,

   `public_key` varchar(2000) DEFAULT NULL,

   PRIMARY KEY (`client_id`)

 ) ENGINE=InnoDB DEFAULT CHARSET=utf8;

 -- test data

 INSERT INTO oauth_clients (client_id, client_secret, redirect_uri) VALUES ("testclient", "testpass", "http://www.baidu.com/");

 INSERT INTO oauth_users (username, password, first_name, last_name) VALUES ('rereadyou', '8551be07bab21f3933e8177538d411e43b78dbcc', 'bo', 'zhang');
各表的名字说明了表中存取的内容,表名可自定义,自定义位置为:OAuth2/Storage/Pdo.php 74行的 config 数组中,因为这里采用的是 mysql 数据库,所以需要修改的是 Pdo,若是采用其它的存储方案,如 Redis,则自行修改对应文件即可。注意这里的数据库名称是都是单数形式
/Pdo.php
         // debugging

         $connection->setAttribute(\PDO::ATTR_ERRMODE, \PDO::ERRMODE_EXCEPTION);

         $this->config = array_merge(array(

             'client_table' => 'oauth_clients',

             'access_token_table' => 'oauth_access_tokens',

             'refresh_token_table' => 'oauth_refresh_tokens',

             'code_table' => 'oauth_authorization_codes',

             'user_table' => 'oauth_users',

             'jwt_table'  => 'oauth_jwt',

             'jti_table'  => 'oauth_jti',

             'scope_table'  => 'oauth_scopes',

             'public_key_table'  => 'oauth_public_keys',

         ), $config);
配置
我们来建立一个 server.php 文件来配置server,这个文件可以被所有的终端来调用。看require once就知道这个文件是平级的
 <?php

 $dsn = 'mysql:dbname=test;host=localhost';

 $username = 'root';

 $password = 'orbit';

 // error reporting (this is a demo, after all!)

 ini_set('display_errors', 1);

 error_reporting(E_ALL);

 // Autoloading (composer is preferred, but for this example let's just do this)

 require_once('oauth2-server-php/src/OAuth2/Autoloader.php');

 OAuth2\Autoloader::register();

 // $dsn is the Data Source Name for your database, for exmaple "mysql:dbname=my_oauth2_db;host=localhost"

 $storage = new OAuth2\Storage\Pdo(array('dsn' => $dsn, 'username' => $username, 'password' => $password));

 // Pass a storage object or array of storage objects to the OAuth2 server class

 //$server = new OAuth2\Server($storage);

 $server = new OAuth2\Server($storage, array(

     'allow_implicit' => true,

     'refresh_token_lifetime'=> 2419200,

 ));

 // Add the "Client Credentials" grant type (it is the simplest of the grant types)

 $server->addGrantType(new OAuth2\GrantType\ClientCredentials($storage));

 // Add the "Authorization Code" grant type (this is where the oauth magic happens)

 $server->addGrantType(new OAuth2\GrantType\AuthorizationCode($storage));

 //Resource Owner Password Credentials (资源所有者密码凭证许可)

 $server->addGrantType(new OAuth2\GrantType\UserCredentials($storage));

 //can RefreshToken set always_issue_new_refresh_token=true

 $server->addGrantType(new OAuth2\GrantType\RefreshToken($storage, array(

     'always_issue_new_refresh_token' => true

 )));

 // configure your available scopes

 $defaultScope = 'basic';

 $supportedScopes = array(

     'basic',

     'postonwall',

     'accessphonenumber'

 );

 $memory = new OAuth2\Storage\Memory(array(

     'default_scope' => $defaultScope,

     'supported_scopes' => $supportedScopes

 ));

 $scopeUtil = new OAuth2\Scope($memory);

 $server->setScopeUtil($scopeUtil);
Token控制器
下面,我们将建立一个Token控制器,这个控制器URI将会返回OAuth2的Token给客户端
<?php

require_once __DIR__.'/server.php';

// Handle a request for an OAuth2.0 Access Token and send the response to the client

$server->handleTokenRequest(OAuth2\Request::createFromGlobals())->send();
测试Token控制器
Client Credentials Grant (客户端凭证许可)
curl -u testclient:testpass http://localhost/token.php -d 'grant_type=client_credentials'
如果运行正常,则显示
{"access_token":"03807cb390319329bdf6c777d4dfae9c0d3b3c35","expires_in":3600,"token_type":"bearer","scope":null}
资源控制器的建立和测试
你创建了Token,你需要在API中测试它,于是你写了如下代码
<?php

// include our OAuth2 Server object

require_once __DIR__ . '/server.php';

// Handle a request for an OAuth2.0 Access Token and send the response to the client

if (!$server->verifyResourceRequest(OAuth2\Request::createFromGlobals())) {

    $server->getResponse()->send();

    die;

}

echo json_encode(array('success' => true, 'message' => 'You accessed my APIs!'));
然后运行下面的命令,记得将YOUR_TOKEN替换成刚才得到的token,还有确保URL的正确
curl http://localhost/resource.php -d 'access_token=YOUR_TOKEN'
如果没出问题,则会得到下面的结果
{"success":true,"message":"You accessed my APIs!"}
Authorization Code Grant (授权码认证)
Authorize.php代码
 <?php

 // include our OAuth2 Server object

 require_once __DIR__ . '/server.php';

 $request = OAuth2\Request::createFromGlobals();

 $response = new OAuth2\Response();

 // validate the authorize request

 if (!$server->validateAuthorizeRequest($request, $response)) {

     $response->send();

     die;

 }

 // display an authorization form

 if (empty($_POST)) {

     exit('

 <form method="post">

   <label>Do You Authorize TestClient?</label><br />

   <input type="submit" name="authorized" value="yes">

 </form>');

 }

 // print the authorization code if the user has authorized your client

 $is_authorized = ($_POST['authorized'] === 'yes');

 $server->handleAuthorizeRequest($request, $response, $is_authorized);

 if ($is_authorized) {

     // this is only here so that you get to see your code in the cURL request. Otherwise, we'd redirect back to the client

     $code = substr($response->getHttpHeader('Location'), strpos($response->getHttpHeader('Location'), 'code=') + 5, 40);

     //exit("SUCCESS AND DO redirect_uri! Authorization Code: $code");

 }

 $response->send();
然后在浏览器中打开这个URL
http://localhost/authorize.php?response_type=code&client_id=testclient&state=xyz
你将会看到一个表单,当你选择yes的时候会弹出你所获得的Authorization Code现在你可以用这个Authorization Code来刚才建立的token.php获得TOKEN,命令如下
curl -u testclient:testpass http://localhost/token.php -d 'grant_type=authorization_code&code=YOUR_CODE'
就像刚才一样,你获得了一个TOKEN
{"access_token":"6ec6afa960587133d435d67d31e8ac08efda65ff","expires_in":3600,"token_type":"Bearer","scope":null,"refresh_token":"e57fafaa693a998b302ce9ec82d940d7325748d3"}
请在30秒内完成这个操作,因为AuthorizationCode的有效期只有30秒,可以修改 OAuth2/ResponseType/AuthorizationCode.php 中的 AuthorizationCode class 的构造方法配置参数来自定义 authorization_code 有效时间.
access_token 有效期为3600s, refresh_token 有效期为 1209600s,可以在OAuth2/ResponseType/AccessToken.php 中的 AccessToken class 中的构造函数配置中进行修改。
可修改 OAuth2/GrantType/RefreshToken.php 中的 RefreshToken class __construct 方法中的 'always_issue_new_refresh_token' => true 来开启颁发新的 refresh_token.使用 refresh_token 换取 access_token:首先,刷新令牌必须使用授权码或资源所有者密码凭证许可类型检索:
curl -u testclient:testpass http:://localhost/token.php -d 'grant_type=refresh_token&refresh_token=YOUR_REFRESH_TOKEN'
资源所有者密码凭证许可: user 表设计使用 sha1 摘要方式,没有添加 salt.
在 Pdo.php中有protected function checkPassword($user, $password)
curl -u testclient:testpass http://localhost/token.php -d 'grant_type=password&username=rereadyou&password=rereadyou'
用Access Token联系本地用户
当你认证了一个用户并且分派了一个Token之后,你可能想知道彼时到底是哪个用户使用了这个Token
你可以使用handleAuthorizeRequest的可选参数user_id来完成,修改你的authorize.php文件
 $userid = 1; // A value on your server that identifies the user

 $server->handleAuthorizeRequest($request, $response, $is_authorized, $userid);
这样一来,用户ID就伴随Token一起存进数据库了当Token被客户端使用的时候,你就知道是哪个用户了,修改resource.php来完成任务
 if (!$server->verifyResourceRequest(OAuth2\Request::createFromGlobals())) {

     $server->getResponse()->send();

     die;

 }

 $token = $server->getAccessTokenData(OAuth2\Request::createFromGlobals());

 echo "User ID associated with this token is {$token['user_id']}";
scope 需要服务端确定具体的可行操作。
curl -u testclient:testpass http://localhost/token.php -d 'grant_type=client_credentials&scope=postonwall'
scope 用来确定 client 所能进行的操作权限。项目中操作权限由 srbac 进行控制, Oauth2 中暂不做处理
 <?php

 // include our OAuth2 Server object

 require_once __DIR__ . '/server.php';

 $request = OAuth2\Request::createFromGlobals();

 $response = new OAuth2\Response();

 $scopeRequired = 'postonwall'; // this resource requires "postonwall" scope

 if (!$server->verifyResourceRequest($request, $response, $scopeRequired)) {

     // if the scope required is different from what the token allows, this will send a "401 insufficient_scope" error

     $server->getResponse()->send();

     die;

 }

 echo json_encode(array('success' => true, 'message' => 'You accessed my APIs!'));
state 为 client app 在第一步骤中获取 authorization code 时向 OAuth2 Server 传递并由 OAuth2 Server 返回的随机哈希参数。state 参数主要用来防止跨站点请求伪造.
如果对整个调用请求中的参数进行排序,再以随机字符串nonce_str和timestamp加上排序后的参数来对整个调用生成1个sign,黑客即使截获sign,不同的时间点、参数请求所使用的sign也是不同的,难以伪造,自然会更安全。当然,写起来也更费事。加入随机字符串nonce_str主要保证签名不可预测。
 $sign = new SignGenerator($params);

 $sign->onSortAfter(function($that) use($key) {

     $that->key = $key;

 });

 $params['sign'] = $sign->getResult();
oauth2-server-php for windows 的那些坑 (研究中...)的更多相关文章
- 困扰多日的C#调用Haskell问题竟然是Windows的一个坑
最近一直被C#调用Haskell时的“尝试读取或写入受保护的内存”问题所困扰(详见C#调用haskell遭遇Attempted to read or write protected memory,C# ...
- 第一次使用docker for windows 遇到的坑
原文:第一次使用docker for windows 遇到的坑 1. 目前win10安装docker, 不需要安装其他工具,可直接到官网下载 2. 此版本的docker可同时运行Windows con ...
- windows container 踩坑记
windows container 踩坑记 Intro 我们有一些服务是 dotnet framework 的,不能直接跑在 docker linux container 下面,最近一直在折腾把它部署 ...
- 使用 OAuth2-Server-php 在 Yii 框架上搭建 OAuth2 Server
原文转自 http://www.cnblogs.com/ldms/p/4565547.html Yii 有很多 extension 可以使用,在查看了 Yii 官网上提供的与 OAuth 相关的扩展后 ...
- 配置SQL Server去使用 Windows的 Large-Page/Huge-Page allocations
配置SQL Server去使用 Windows的 Large-Page/Huge-Page allocations 目录表->页表->物理内存页 看这篇文章之前可以先看一下下面这篇文章 ...
- minikube windows hyperx填坑记
minikube windows hyperx填坑记 安装了一天半,还是没行,先放弃 开始 minikube start --vm-driver=hyperv --hyperv-virtual-swi ...
- 使用 OAuth2-Server-php 搭建 OAuth2 Server
Yii 有很多 extension 可以使用,在查看了 Yii 官网上提供的与 OAuth 相关的扩展后,发现了几个 OAuth2 的客户端扩展,但是并没有找到可以作为 OAuth2 Server 的 ...
- Installing OpenSSH from the Settings UI on Windows Server 2019 or Windows 10 1809
Installing OpenSSH from the Settings UI on Windows Server 2019 or Windows 10 1809 OpenSSH client and ...
- CAS3.5.x(x>1)支持OAuth2 server
国内私募机构九鼎控股打造APP,来就送 20元现金领取地址:http://jdb.jiudingcapital.com/phone.html内部邀请码:C8E245J (不写邀请码,没有现金送)国内私 ...
随机推荐
- curl_get和curl_post,伪造请求头,绕过防盗链下载文件
//curl-get function curl_get($url, $timeout = 10) { $ch = curl_init();//初始化 curl_setopt($ch, CURLOPT ...
- [xsy3343]程序锁
题意:有两个序列,序列中数字$\in\{-1,0,1\}$ 有两个指针,初始时分别指向两个序列的开始位置,有一个初始为$0$的数$a$,重复以下过程直到两个指针都指向序列末尾后 如果一个指针指向末尾后 ...
- 证明自己吧--------Writeup
原题:http://www.shiyanbar.com/ctf/28 下载一个压缩包,里面有个CrackMe1.exe,查看了下,没有壳. 直接拖到ida去反汇编 一进来就是在main里面,直接F5看 ...
- word-ladder总结
title: word ladder总结 categories: LeetCode tags: 算法 LeetCode comments: true date: 2016-10-16 09:42:30 ...
- python开发_platform_获取操作系统详细信息工具
''' python中,platform模块给我们提供了很多方法去获取操作系统的信息 如: import platform platform.platform() #获取操作系统名称及版本号,'Win ...
- 你的C/C++程序为什么无法运行?揭秘Segmentation fault (2)
什么让你对C/C++如此恐惧? 本篇将继续上一篇来讨论段错误(Segmentation fault). 上一篇: 你的C/C++程序为什么无法运行?揭秘Segmentation fault(1) 追溯 ...
- MySQL增强版命令行客户端连接工具(mycli)
效果: 安装: http://www.mycli.net/install 官网: http://www.mycli.net/install
- 将代码库从 SVN 迁移至 Git 并保留所有 commit 记录
公司内部原本使用 SVN 进行版本控制,但随着 Github 的流行我个人的代码管理习惯逐渐转变.虽然公司项目并非开源,SVN 所具有的标准 trunk / branches / tags 结构完全够 ...
- 写给在Java和.net中徘徊的新手
在很多网站上,网友都会问一个相同的问题,到底是学Java还是.net,个有个的见解. 自从.Net问世以来,程序员都很关心的一个问题是「该学Java或.NET」.我也在挣扎,该「该继续Java的研究, ...
- 配置Tomcat成为系统服务
国内私募机构九鼎控股打造APP,来就送 20元现金领取地址:http://jdb.jiudingcapital.com/phone.html内部邀请码:C8E245J (不写邀请码,没有现金送)国内私 ...