
JAAS authentication in Tomcat example--reference
Introduction
Tomcat provides a default JAAS Realm implementation so developers may implement JAAS Login Modules and easily integrate them with the container. In this tutorial we will implement all the required components to put JAAS up and running in Tomcat web container.
This tutorial considers the following software and environment:
- Ubuntu 12.04
- JDK 1.7.0.09
- Tomcat 7.0.35
The Principals
One of the core concepts of JAAS is the existence of users and roles (roles are similar to groups in UNIX systems). Authorization may be issued to specific users or to roles. In JAAS this is concept is translated to Principals: Principals may represent users orroles independently. Let's define User and Role Principals to be used in this example:
package com.byteslounge.jaas;

import java.security.Principal;

public class UserPrincipal implements Principal {

  private String name;

  public UserPrincipal(String name) {

    super();

    this.name = name;

  }

  public void setName(String name) {

    this.name = name;

  }

  @Override

  public String getName() {

    return name;

  }

}
package com.byteslounge.jaas;

import java.security.Principal;

public class RolePrincipal implements Principal {

  private String name;

  public RolePrincipal(String name) {

    super();

    this.name = name;

  }

  public void setName(String name) {

    this.name = name;

  }

  @Override

  public String getName() {

    return name;

  }

}
Basically we are defining two simple Principals, each one of them requiring just a name so they may be promptly identified (a username or a role name). Remember that our principals must implement the java.security.Principal interface.
The Login Module
Now we need to define a Login Module that will actually implement the authentication process. The Login module must implement the javax.security.auth.spi.LoginModule interface:
package com.byteslounge.jaas;

import java.io.IOException;

import java.util.ArrayList;

import java.util.List;

import java.util.Map;

import javax.security.auth.Subject;

import javax.security.auth.callback.Callback;

import javax.security.auth.callback.CallbackHandler;

import javax.security.auth.callback.NameCallback;

import javax.security.auth.callback.PasswordCallback;

import javax.security.auth.callback.UnsupportedCallbackException;

import javax.security.auth.login.LoginException;

import javax.security.auth.spi.LoginModule;

public class BytesLoungeLoginModule implements LoginModule {

  private CallbackHandler handler;

  private Subject subject;

  private UserPrincipal userPrincipal;

  private RolePrincipal rolePrincipal;

  private String login;

  private List<String> userGroups;

  @Override

  public void initialize(Subject subject,

      CallbackHandler callbackHandler,

      Map<String, ?> sharedState,

      Map<String, ?> options) {

    handler = callbackHandler;

    this.subject = subject;

  }

  @Override

  public boolean login() throws LoginException {

    Callback[] callbacks = new Callback[2];

    callbacks[0] = new NameCallback("login");

    callbacks[1] = new PasswordCallback("password", true);

    try {

      handler.handle(callbacks);

      String name = ((NameCallback) callbacks[0]).getName();

      String password = String.valueOf(((PasswordCallback) callbacks[1])

          .getPassword());

      // Here we validate the credentials against some

      // authentication/authorization provider.

      // It can be a Database, an external LDAP,

      // a Web Service, etc.

      // For this tutorial we are just checking if

      // user is "user123" and password is "pass123"

      if (name != null &&

          name.equals("user123") &&

          password != null &&

          password.equals("pass123")) {

        // We store the username and roles

        // fetched from the credentials provider

        // to be used later in commit() method.

        // For this tutorial we hard coded the

        // "admin" role

        login = name;

        userGroups = new ArrayList<String>();

        userGroups.add("admin");

        return true;

      }

      // If credentials are NOT OK we throw a LoginException

      throw new LoginException("Authentication failed");

    } catch (IOException e) {

      throw new LoginException(e.getMessage());

    } catch (UnsupportedCallbackException e) {

      throw new LoginException(e.getMessage());

    }

  }

  @Override

  public boolean commit() throws LoginException {

    userPrincipal = new UserPrincipal(login);

    subject.getPrincipals().add(userPrincipal);

    if (userGroups != null && userGroups.size()>0){for(String groupName : userGroups){

        rolePrincipal =newRolePrincipal(groupName);

        subject.getPrincipals().add(rolePrincipal);}}returntrue;}@Overridepublicboolean abort()throwsLoginException{returnfalse;}@Overridepublicboolean logout()throwsLoginException{

    subject.getPrincipals().remove(userPrincipal);

    subject.getPrincipals().remove(rolePrincipal);returntrue;}}
All the implemented methods are inherited from javax.security.auth.spi.LoginModule interface and will be called by Tomcat at specific moments during the authentication process.
The login method is responsible for checking if the credentials provided by the end user are valid. This check is made against any kind of authorization entity: It may be a database, a web service, a LDAP, etc. The developer may implement this credentials check in the way required by some specific use case.
Note: The login method must throw a LoginException in case of authentication failure.
In the presence of a successful authentication it should fetch the roles associated with the authenticating user. In this case we simulated and hard coded the admin role as a fetched role from the credentials provider for the current user.
The commit method is called after a successful login method execution and is responsible to store the user and roles obtained by the login method in the respective Subject and in the form of Principals. As you can see in the above module implementation, during the login method execution the credentials are obtained by the means of a callback. This callback is initialized in the initialize method together with Subject initialization.
The logout method is called when the user logs out of the system (and the application implements a logout mechanism). Finally the abort method is called when the login method fails to authenticate the user (throws a LoginException).
The web application
In this example we will secure a specific folder of a Java web application. The application will be very simple and its structure is the following:
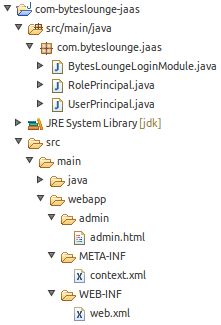
We will be securing the admin folder.
To accomplish this task we must define some configuration elements in web.xml file. These entries go directly under the web-app element:
<security-constraint>

  <web-resource-collection>

    <web-resource-name>Admin</web-resource-name>

    <url-pattern>/admin/*</url-pattern>

  </web-resource-collection>

  <auth-constraint>

    <role-name>admin</role-name>

  </auth-constraint>

</security-constraint>

<security-role>

  <role-name>admin</role-name>

</security-role>

<login-config>

  <auth-method>BASIC</auth-method>

  <realm-name>Admin</realm-name>

</login-config>
In security-constraint element we are defining that all resources under /admin folder are protected and only the admin role is granted to access the resources. All existing roles must be also defined in the security-role element. The login-configelement defines how the credentials will be asked to the end user. In this example we will use the Basic authentication scheme (you may have different mechanisms like presenting a web form or page to the end user, but that will be covered in other tutorial).
Now we must define a new file named context.xml and place it under:
/META-INF/context.xml
<?xml version="1.0" encoding="UTF-8"?>

<Context>

  <Realm className="org.apache.catalina.realm.JAASRealm"

    appName="BytesLoungeLogin"

    userClassNames="com.byteslounge.jaas.UserPrincipal"

    roleClassNames="com.byteslounge.jaas.RolePrincipal" />

</Context>
Here we define the class that will implement the JAAS realm. We are using Tomcat default implementation:org.apache.catalina.realm.JAASRealm. We also define which classes will implement the user and roles Principals and we set them to be the ones we defined earlier in this tutorial (UserPrincipal and RolePrincipal). The attribute appName defines how the application will be globally identified by Tomcat in what matters to security configuration.
Finally we must define a JAAS configuration file. We will name it jaas.config and we will place it in Tomcat conf folder:
$CATALINA_BASE/conf/jaas.config
The file looks like the following:
BytesLoungeLogin {

    com.byteslounge.jaas.BytesLoungeLoginModule required debug=true;

};
This file defines the authentication configuration for BytesLoungeLogin application. Note that it's the same name we used inappName inside context.xml file just above.
Launching Tomcat and testing
Now lets launch Tomcat. We must set a JVM argument that tells Tomcat where the application configuration security file is located, the jaas.config file:
You may set this in the startup catalina.sh file.
When the server is up and running and we access the secure resource:
We will see the Basic authentication dialog asking for credentials:
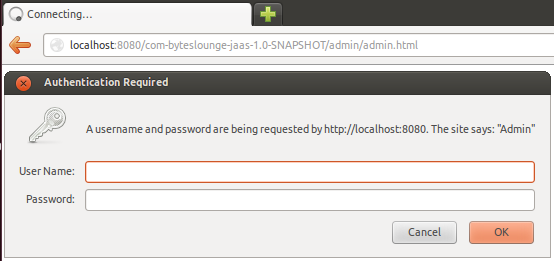
Now we insert the credentials we hard coded in our Login Module. Username: user123 and Password: pass123
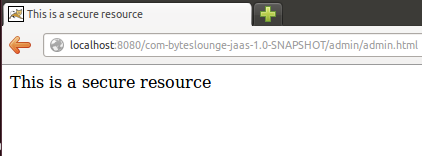
We will be presented the secure resource. Access was granted.
The tutorial full source code is available for download at the end of this page.
Logout process
For more information about the user logout process please refer to the following article:
Keep in mind that this tutorial covered BASIC authentication so your browser will store the user credentials until it's closed.
This means that even if you logout the user, as soon a new request is made against a protected resource the browser will send the credentials again and automatically authenticate the user.
reference from:
JAAS authentication in Tomcat example--reference的更多相关文章
- Using JAAS Authentication in Java Clients---weblogic document
The following topics are covered in this section: JAAS and WebLogic Server JAAS Authentication Devel ...
- ActiveMQ(5.10.0) - Configuring the JAAS Authentication Plug-in
JAAS provides pluggable authentication, which means ActiveMQ will use the same authentication API re ...
- JAAS - Document
JAAS 参考文档: JAAS Reference Guide JAAS Authentication Tutorial JAAS Authorization Tutorial LoginModule ...
- http://wiki.apache.org/tomcat/HowTo
http://wiki.apache.org/tomcat/HowTo Contents Meta How do I add a question to this page? How do I con ...
- Tomcat创建HTTPS访问,java访问https
一 https和ssL HTTPS(全称:Hyper Text Transfer Protocol over Secure Socket Layer),是以安全为目标的HTTP通道,简单讲是HTTP的 ...
- Tomcat应用中post方式传参数长度限制
Tomcat应用中post方式传参数长度限制 jsp页面上是没有限制的,但是在tomcat服务器上有限制,Tomcat 默认的post参数的最大大小为2M, 当超过时将会出错,可以配置maxPostS ...
- Tomcat web.xml配置参数详解
Apache Tomcat Configuration Reference - The Context Containerhttps://tomcat.apache.org/tomcat-5.5-do ...
- 使用JAAS登录kerberos服务器
java代码: package com.snsprj.jaas0822; import javax.security.auth.*; import javax.security.auth.callba ...
- Tomcat:基础安装和使用教程
背景 此文记录了 Tomcat 的基本使用方法,主要为了强化记忆. 安装步骤 第一步:下载和安装 Java 下载地址:http://www.oracle.com/technetwork/java/ja ...
随机推荐
- CENTOS elasticsearch plugin install:Failed: SSLException[java.security.ProviderException,解决
安装Elasticsearch插件时总报SSLException yum upgrade nss 解决
- C语言的预处理命令
C语言编译器处理时经过的第一个步骤是预处理,就是从.c文件处理为.i文件.在预处理时编译器做了一些展开替换的处理. 1>头文件展开,即将#include "stdio.h"类 ...
- jquery 滑动动画
<!DOCTYPE html> <html> <head> <meta charset="UTF-8"> <head> ...
- Noah的学习笔记之Python篇:命令行解析
Noah的学习笔记之Python篇: 1.装饰器 2.函数“可变长参数” 3.命令行解析 注:本文全原创,作者:Noah Zhang (http://www.cnblogs.com/noahzn/) ...
- LightOj_1030 Discovering Gold
题目链接 题意: 在一个1 X N 的格子上, 每个格子都有一定的黄金, 你从第一个格子出发, 问到最后一个格子得到黄金的期望. 每次前进使用骰子投点来决定前进步数, 如果投出的点前进后会超过N, 那 ...
- Uva_11361 Investigating Div-Sum Property
题目链接 题意: 在[A,B]区间内找出满足条件的数有多少个. 条件:这个数本身 能够整除K, 且各位数字之和能够整除K. 思路: 数据范围过大2^31 2^31 = 2147483648 ~ 2*1 ...
- SqlTransaction的解析
SqlTransaction的解析 2011-10-10 19:48 2757人阅读 评论(1) 收藏 举报 exceptionsql serverinsertcommandobjectstring ...
- Linux启动或禁止SSH用户及IP的登录
启动或禁止SSH用户登录 一般情况下,在使用Linux操作系统都不会去机房来操作机器,都是使用一些第三方的工具来操作. 比如使用SSH Secure File Transfer Client工具来传输 ...
- servlet单例多线程
Servlet如何处理多个请求访问? Servlet容器默认是采用单实例多线程的方式处理多个请求的: 1.当web服务器启动的时候(或客户端发送请求到服务器时),Servlet就被加载并实例化(只存在 ...
- wireshark设置抓服务器的包
wireshark设置抓服务器的包: