
#define 的一些用法 以及 迭代器的 [] 与 find()函数的区别
#include "stdafx.h"

#include <map>

#include <string>

#include <iostream>

using namespace std;

#define fn(x) int a##x;        //声明一个ax变量  a常量  x变量

#define tn(x) #x            //可以直接拼一个字符串  int  可以直接输出 int

//可以帮你写一个类

#define cclass(cname,x,y,z) class C##cname\

{\

public:\

    x m_##x;\

    y m_2##y;\

    char m_##z;\

};

/////////////////////////////////////////////////////////////////////////

template <class ContainersType>

void PrintContainersData(ContainersType containers)

{

    ContainersType::iterator begin = containers.begin(),

                             end = containers.end();

    for(;begin!=end;begin++)

    {

        cout<<"Key = "<<begin->first<<"\t"<<"Value = "<<begin->second<<endl;

    }

}

int _tmain(int argc, _TCHAR* argv[])

{

    cout<<"First output :"<<tn(int)<<endl;

    cclass(Hero,int,int,heroName);            //注意:此处用到了 定义的宏

    CHero h1;

    fn();

    a3 = ;

    cout<<"Second output a3 = "<<a3<<endl;

    /////////////////////////////////////////////////////////////////////////

    map<string,float> m;

    m["Tom"] = ;

    m["Jack"] = ;

    m["Jack"] = ;                            //注意:下面的会将上面的成绩修改

    cout<<"Third output : "<<endl;

    map<string,float>::iterator it = m.begin();

    for(; it!=m.end();it++)

    {

        cout<<it->first<<"   "<<it->second<<endl;

    }

    cout<<"Forth output : "<<endl;

    PrintContainersData(m);

    //m.insert(make_pair("Jack",100));        //注意:如果有相同的  则不可插入

    m.insert(map<string,float>::value_type("Jack",));

    //int t = m["ww"];                        //注意[]:找不到 会自动添加这个名字

    cout<<"Fifth output : "<<endl;

    map<string,float>::iterator it2 = m.find("ww");   //注意find():找不到  会处理

    if(it2==m.end())

        cout<<"not find"<<endl;

    return ;

}
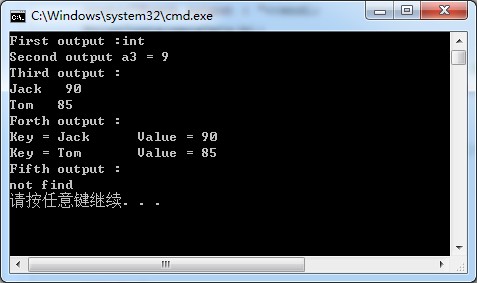
运行结果 如下图:
#define 的一些用法 以及 迭代器的 [] 与 find()函数的区别的更多相关文章
- #ifndef#define#endif的用法
在网上看到了感觉作者总结得很好,作者辛苦了! #ifndef#define#endif的用法 文件中的#ifndef 头件的中的#ifndef,这是一个很关键的东西.比如你有两个C文件,这两个C文件都 ...
- #ifndef#define#endif的用法(整理)
[转] #ifndef#define#endif的用法(整理) 原作者:icwk 文件中的#ifndef 头件的中的#ifndef,这是一个很关键的东西.比如你有两个C文件,这两个C文件都in ...
- c/c++头文件中#ifndef/#define/#endif的用法
想必很多人都看过“头文件中用到的 #ifndef/#define/#endif 来防止该头文件被重复引用”.但是是否能理解“被重复引用”是什么意思?头文件被重复引用了,会产生什么后果?是不是所有的头文 ...
- Oracle 变量 之 define variable declare 用法及区别
Oracle 变量 之 define variable declare 用法及区别 Table of Contents 1. 扯蛋 2. define和accept 3. variable 3.1. ...
- STL之--插入迭代器(back_inserter,inserter,front_inserter的区别)
除了普通迭代器,C++标准模板库还定义了几种特殊的迭代器,分别是插入迭代器.流迭代器.反向迭代器和移动迭代器,定义在<iterator>头文件中,下面主要介绍三种插入迭代器(back_in ...
- Python3基础(4)匿名函数、装饰器、生成器、迭代器、内置函数、json&pickle序列化、软件目录开发规范、不同目录间模块调用
---------------个人学习笔记--------------- ----------------本文作者吴疆-------------- ------点击此处链接至博客园原文------ 1 ...
- CSS 属性 :before && :after的用法,伪类和伪元素的区别
一::before && :after的用法 :before 如同对伪元素的名称一样,:before 是用来给指定的元素的内容前面插入新的内容.举例说明: .before:before ...
- 【转】const的用法,特别是用在函数前面与后面的区别!
在普通的非 const成员函数中,this的类型是一个指向类类型的 const指针.可以改变this所指向的值,但不能改变 this所保存的地址. 在 const成员函数中,this的类型是一个指向 ...
- const的用法,特别是用在函数前面与后面的区别!
const的用法,特别是用在函数后面 在普通的非 const成员函数中,this的类型是一个指向类类型的 const指针.可以改变this所指向的值,但不能改变 this所保存的地址. 在 const ...
随机推荐
- Linq 分页不可缺少的两个方法
//LINQ分页的方法 //1.获取总页数 public int GetPageCount(int pageSize)//pageSize是每页的行数 { //先查出总共有多少行 int rowCou ...
- MyEclipse 开发 Web项目发布到 Tomcat 下的Root 目录
通常情况下,Web项目是发布到Tomcat下的webapps文件目录下的 . 例如:Web应用项目名称为:stock,则部署到tomcat后,是部署在tomcat/webapps/stock中,网址为 ...
- Lucene -- 实时索引
lucene的实时搜索可以分成:实时和近实时的搜索. 实时只能依靠内存了. 近实时可以用lucene中提供org.apache.lucene.index.DirectoryReader.open(In ...
- myeclipse6.0 序列号生成器源码
import java.io.*; public class Test{ private static final String LL = "Decompiling this copyrig ...
- 【CodeForces 596A】E - 特别水的题5-Wilbur and Swimming Pool
Description After making bad dives into swimming pools, Wilbur wants to build a swimming pool in the ...
- 总结css之内联图片的优缺点
会不会有这样一种感觉?IT技术开发知识面很广也很深,总会有你不懂得问题出现.一个接着一个新的问题,一个接着一个新的挑战. 今天,解读[内联图片],什么是内联图片,使用内联图片的优缺点是什么?这个问题是 ...
- groovy-闭包
什么是闭包 一个groovy闭包就像一个代码块或者方法指针,他是定义然后执行的一段代码,但是他有一些特性:隐含变量,支持自由变量,支持currying . 我们先来看看一些例子: 1 def clos ...
- 在使用easyui,datagrid时,JSON中的如果含有换行符,则不能显示数据
http://www.xuebuyuan.com/2103538.html 每项值需处理换行符 item = item.Replace("\r\n", ""); ...
- goto,void,extern,sizeof实例
1.#include <stdio.h>void func(int n){ int* p = NULL; if( n < 0 ) { goto ST ...
- 修复VirtualBox "This kernel requires the following features not present on the CPU: pae Unable to boot
问题描述: 1.机器:Linux主机,特别是主机为大内存,比如: 4G内存的使用pae内核的Ubuntu系统的dell电脑. 2.情况:使用VirtualBox安装Linux系统时,比如:通过Virt ...