CSharpGL(25)一个用raycast实现体渲染VolumeRender的例子
CSharpGL(25)一个用raycast实现体渲染VolumeRender的例子
本文涉及的VolumeRendering相关的C#代码是从(https://github.com/toolchainX/Volume_Rendering_Using_GLSL)的C++代码转换来的。
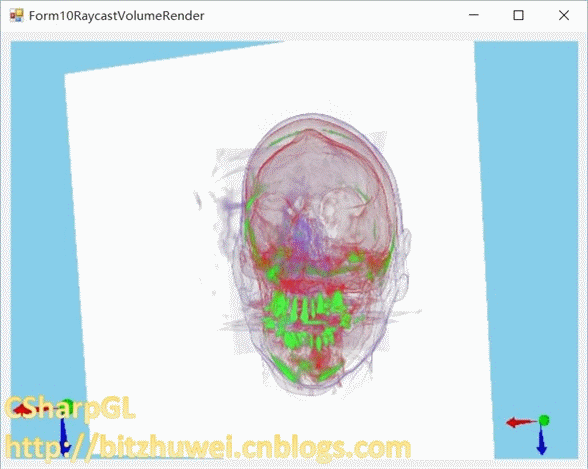
效果图
下载
CSharpGL已在GitHub开源,欢迎对OpenGL有兴趣的同学加入(https://github.com/bitzhuwei/CSharpGL)
实现思路
raycast
用一个3D纹理存储整个模型数据。
如下图所示,从画布上的一个像素点出发,垂直于画布的方向上,一条射线穿过3D纹理,每隔一小段距离采样一次颜色,累加起来就是此像素点应有的颜色。

起始点/终点
从射线接触3D纹理的第一个点开始(起始点),到射线离开3D纹理的位置(终点),这段距离就是要采样的范围。
终点
那么如何获取终点的位置?
办法是:渲染一个恰好包围3D纹理的立方体,且只渲染此立方体的背面(用glCullFace(GL_FRONT);)。因为背面就是终点啊。另外,要把这个渲染结果弄到一个2D纹理上。这就需要一个与画布大小相同的2D纹理来记录终点的位置,即需要一个新的FrameBuffer。(详情可参考http://www.opengl-tutorial.org/intermediate-tutorials/tutorial-14-render-to-texture,以后有时间我会把这个翻译一下)
渲染背面的shader非常简单。
 // for raycasting

 #version

 layout(location = ) in vec3 position;

 layout(location = ) in vec3 color;

 out vec3 passColor;

 uniform mat4 MVP;

 void main()

 {

     passColor = color;

     //passColor = vec4(1, 1, 1, 1);

     gl_Position = MVP * vec4(position, 1.0);

 }
backface.vert
 // for raycasting

 #version

 in vec3 passColor;

 layout (location = ) out vec4 FragColor;

 void main()

 {

     FragColor = vec4(passColor, 1.0);

 }
backface.frag
渲染时则需要注意启用新的framebuffer。这样就会渲染到指定的2D纹理上。
             // render to texture

             glBindFramebufferEXT(OpenGL.GL_FRAMEBUFFER_EXT, frameBuffer[]);

             OpenGL.Clear(OpenGL.GL_COLOR_BUFFER_BIT | OpenGL.GL_DEPTH_BUFFER_BIT);

             this.backfaceRenderer.Render(arg);

             glBindFramebufferEXT(OpenGL.GL_FRAMEBUFFER_EXT, );

注意,上图中左侧是立方体的前面,右侧是立方体的背面。
起始点/raycast
终点有了,起点也就知道怎么找了:渲染一个恰好包围3D纹理的立方体,且只渲染此立方体的前面(用glCullFace(GL_BACK);)。
起始点和终点都有了,就可以通过累加颜色来计算一个像素点的颜色值了。
 #version

 in vec3 EntryPoint;

 in vec4 ExitPointCoord;

 uniform sampler2D ExitPoints;

 uniform sampler3D VolumeTex;

 uniform sampler1D TransferFunc;

 uniform float     StepSize = 0.001f;

 uniform vec2      ScreenSize;

 uniform vec4      backgroundColor = vec4(, , , );// value in glClearColor(value);

 layout (location = ) out vec4 FragColor;

 void main()

 {

     // ExitPointCoord is normalized device coordinate

     vec3 exitPoint = texture(ExitPoints, gl_FragCoord.st / ScreenSize).xyz;

     // that will actually give you clip-space coordinates rather than

     // normalised device coordinates, since you're not performing the perspective

     // division which happens during the rasterisation process (between the vertex

     // shader and fragment shader

     // vec2 exitFragCoord = (ExitPointCoord.xy / ExitPointCoord.w + 1.0)/2.0;

     // vec3 exitPoint  = texture(ExitPoints, exitFragCoord).xyz;

     //background need no raycasting

     if (EntryPoint == exitPoint) { discard; }

     vec3 direction = exitPoint - EntryPoint;

     float directionLength = length(direction); // the length from front to back is calculated and used to terminate the ray

     vec3 deltaDirection = direction * (StepSize / directionLength);

     vec3 voxelCoord = EntryPoint;

     vec3 colorAccumulator = vec3(0.0); // The dest color

     float alphaAccumulator = 0.0f;

     float lengthAccumulator = 0.0;

     float intensity;

     vec4 colorSample; // The src color

     for(int i = ; i < ; i++)

     {

         // get scaler value in the volume data

         intensity =  texture(VolumeTex, voxelCoord).x;

         // get mapped color from 1-D texture

         colorSample = texture(TransferFunc, intensity);

         // modulate the value of colorSample.a

         // front-to-back integration

         if (colorSample.a > 0.0) {

             // accomodate for variable sampling rates (base interval defined by mod_compositing.frag)

             colorSample.a = 1.0 - pow(1.0 - colorSample.a, StepSize * 200.0f);

             colorAccumulator += (1.0 - alphaAccumulator) * colorSample.rgb * colorSample.a;

             alphaAccumulator += (1.0 - alphaAccumulator) * colorSample.a;

         }

         voxelCoord += deltaDirection;

         lengthAccumulator += StepSize;

         if (lengthAccumulator >= directionLength)

         {

             colorAccumulator = colorAccumulator * alphaAccumulator

                 + ( - alphaAccumulator) * backgroundColor.rgb;

             break;  // terminate if opacity > 1 or the ray is outside the volume

         }

         else if (alphaAccumulator > 1.0)

         {

             alphaAccumulator = 1.0;

             break;

         }

     }

     FragColor = vec4(colorAccumulator, alphaAccumulator);

 }
raycast.frag
Raycast所需的vertex shader和backface.vert几乎一样。
 #version

 layout (location = ) in vec3 position;

 // have to use this variable!!!, or it will be very hard to debug for AMD video card

 layout (location = ) in vec3 color;

 out vec3 EntryPoint;

 out vec4 ExitPointCoord;

 uniform mat4 MVP;

 void main()

 {

     EntryPoint = color;

     gl_Position = MVP * vec4(position,1.0);

     ExitPointCoord = gl_Position;

 }
raycast.vert
而(在CSharpGL中)所需的渲染指令也只需一句话。
this.raycastRenderer.Render(arg);
Miscellaneous
在实现上述过程之前,必须初始化很多东西:3D纹理,附带了2D纹理的frameBuffer,用于渲染背面的shader和立方体模型,用于渲染正面/raycast的shader和立方体模型,从float类型的intensity值到vec3类型的颜色值的转换功能(1D纹理),设置uniform变量。
         protected override void DoInitialize()

         {

             InitBackfaceRenderer();

             InitRaycastRenderer();

             initTFF1DTex(@"10RaycastVolumeRender\tff.dat");

             int[] viewport = OpenGL.GetViewport();

             initFace2DTex(viewport[], viewport[]);

             initVol3DTex(@"10RaycastVolumeRender\head256.raw", , , );

             initFrameBuffer(viewport[], viewport[]);

             //this.depthTest = new DepthTestSwitch();

             RaycastingSetupUniforms();

         }

         private void RaycastingSetupUniforms()

         {

             // setting uniforms such as

             // ScreenSize

             // StepSize

             // TransferFunc

             // ExitPoints i.e. the backface, the backface hold the ExitPoints of ray casting

             // VolumeTex the texture that hold the volume data i.e. head256.raw

             int[] viewport = OpenGL.GetViewport();

             this.raycastRenderer.SetUniform("ScreenSize", new vec2(viewport[], viewport[]));

             this.raycastRenderer.SetUniform("StepSize", g_stepSize);

             this.raycastRenderer.SetUniform("TransferFunc", new samplerValue(BindTextureTarget.Texture1D, transferFunc1DTexObj[], OpenGL.GL_TEXTURE0));

             this.raycastRenderer.SetUniform("ExitPoints", new samplerValue(BindTextureTarget.Texture2D, backface2DTexObj[], OpenGL.GL_TEXTURE1));

             this.raycastRenderer.SetUniform("VolumeTex", new samplerValue(BindTextureTarget.Texture3D, vol3DTexObj[], OpenGL.GL_TEXTURE2));

             var clearColor = new float[];

             OpenGL.GetFloat(GetTarget.ColorClearValue, clearColor);

             this.raycastRenderer.SetUniform("backgroundColor", clearColor.ToVec4());

         }

         private void initFrameBuffer(int texWidth, int texHeight)

         {

             // create a depth buffer for our framebuffer

             var depthBuffer = new uint[];

             OpenGL.GetDelegateFor<OpenGL.glGenRenderbuffersEXT>()(, depthBuffer);

             OpenGL.GetDelegateFor<OpenGL.glBindRenderbufferEXT>()(OpenGL.GL_RENDERBUFFER, depthBuffer[]);

             OpenGL.GetDelegateFor<OpenGL.glRenderbufferStorageEXT>()(OpenGL.GL_RENDERBUFFER, OpenGL.GL_DEPTH_COMPONENT, texWidth, texHeight);

             // attach the texture and the depth buffer to the framebuffer

             OpenGL.GetDelegateFor<OpenGL.glGenFramebuffersEXT>()(, frameBuffer);

             OpenGL.GetDelegateFor<OpenGL.glBindFramebufferEXT>()(OpenGL.GL_FRAMEBUFFER_EXT, frameBuffer[]);

             OpenGL.GetDelegateFor<OpenGL.glFramebufferTexture2DEXT>()(OpenGL.GL_FRAMEBUFFER_EXT, OpenGL.GL_COLOR_ATTACHMENT0_EXT, OpenGL.GL_TEXTURE_2D, backface2DTexObj[], );

             OpenGL.GetDelegateFor<OpenGL.glFramebufferRenderbufferEXT>()(OpenGL.GL_FRAMEBUFFER_EXT, OpenGL.GL_DEPTH_ATTACHMENT_EXT, OpenGL.GL_RENDERBUFFER, depthBuffer[]);

             checkFramebufferStatus();

             //OpenGL.Enable(GL_DEPTH_TEST);

         }

         private void checkFramebufferStatus()

         {

             uint complete = OpenGL.GetDelegateFor<OpenGL.glCheckFramebufferStatusEXT>()(OpenGL.GL_FRAMEBUFFER_EXT);

             if (complete != OpenGL.GL_FRAMEBUFFER_COMPLETE_EXT)

             {

                 throw new Exception("framebuffer is not complete");

             }

         }

         private void initVol3DTex(string filename, int width, int height, int depth)

         {

             var data = new UnmanagedArray<byte>(width * height * depth);

             unsafe

             {

                 int index = ;

                 int readCount = ;

                 byte* array = (byte*)data.Header.ToPointer();

                 using (var fs = new FileStream(filename, FileMode.Open, FileAccess.Read))

                 using (var br = new BinaryReader(fs))

                 {

                     int unReadCount = (int)fs.Length;

                     const int cacheSize =  * ;

                     do

                     {

                         int min = Math.Min(cacheSize, unReadCount);

                         var cache = new byte[min];

                         readCount = br.Read(cache, , min);

                         if (readCount != min)

                         { throw new Exception(); }

                         for (int i = ; i < readCount; i++)

                         {

                             array[index++] = cache[i];

                         }

                         unReadCount -= readCount;

                     } while (readCount > );

                 }

             }

             OpenGL.GenTextures(, vol3DTexObj);

             // bind 3D texture target

             OpenGL.BindTexture(OpenGL.GL_TEXTURE_3D, vol3DTexObj[]);

             OpenGL.TexParameteri(OpenGL.GL_TEXTURE_3D, OpenGL.GL_TEXTURE_MAG_FILTER, (int)OpenGL.GL_LINEAR);

             OpenGL.TexParameteri(OpenGL.GL_TEXTURE_3D, OpenGL.GL_TEXTURE_MIN_FILTER, (int)OpenGL.GL_LINEAR);

             OpenGL.TexParameteri(OpenGL.GL_TEXTURE_3D, OpenGL.GL_TEXTURE_WRAP_S, (int)OpenGL.GL_REPEAT);

             OpenGL.TexParameteri(OpenGL.GL_TEXTURE_3D, OpenGL.GL_TEXTURE_WRAP_T, (int)OpenGL.GL_REPEAT);

             OpenGL.TexParameteri(OpenGL.GL_TEXTURE_3D, OpenGL.GL_TEXTURE_WRAP_R, (int)OpenGL.GL_REPEAT);

             // pixel transfer happens here from client to OpenGL server

             OpenGL.PixelStorei(OpenGL.GL_UNPACK_ALIGNMENT, );

             OpenGL.TexImage3D(OpenGL.GL_TEXTURE_3D, , (int)OpenGL.GL_INTENSITY,

                 width, height, depth, ,

                 OpenGL.GL_LUMINANCE, OpenGL.GL_UNSIGNED_BYTE, data.Header);

             data.Dispose();

         }

         private void initFace2DTex(int width, int height)

         {

             OpenGL.GenTextures(, backface2DTexObj);

             OpenGL.BindTexture(OpenGL.GL_TEXTURE_2D, backface2DTexObj[]);

             OpenGL.TexParameteri(OpenGL.GL_TEXTURE_2D, OpenGL.GL_TEXTURE_WRAP_S, (int)OpenGL.GL_REPEAT);

             OpenGL.TexParameteri(OpenGL.GL_TEXTURE_2D, OpenGL.GL_TEXTURE_WRAP_T, (int)OpenGL.GL_REPEAT);

             OpenGL.TexParameteri(OpenGL.GL_TEXTURE_2D, OpenGL.GL_TEXTURE_MIN_FILTER, (int)OpenGL.GL_NEAREST);

             OpenGL.TexParameteri(OpenGL.GL_TEXTURE_2D, OpenGL.GL_TEXTURE_MAG_FILTER, (int)OpenGL.GL_NEAREST);

             OpenGL.TexImage2D(OpenGL.GL_TEXTURE_2D, , OpenGL.GL_RGBA16F, width, height, , OpenGL.GL_RGBA, OpenGL.GL_FLOAT, IntPtr.Zero);

         }

         private void initTFF1DTex(string filename)

         {

             // read in the user defined data of transfer function

             byte[] tff;

             using (var fs = new FileStream(filename, FileMode.Open, FileAccess.Read))

             using (var br = new BinaryReader(fs))

             {

                 tff = br.ReadBytes((int)fs.Length);

             }

             OpenGL.GenTextures(, transferFunc1DTexObj);

             OpenGL.BindTexture(OpenGL.GL_TEXTURE_1D, transferFunc1DTexObj[]);

             OpenGL.TexParameteri(OpenGL.GL_TEXTURE_1D, OpenGL.GL_TEXTURE_WRAP_S, (int)OpenGL.GL_REPEAT);

             OpenGL.TexParameteri(OpenGL.GL_TEXTURE_1D, OpenGL.GL_TEXTURE_MIN_FILTER, (int)OpenGL.GL_NEAREST);

             OpenGL.TexParameteri(OpenGL.GL_TEXTURE_1D, OpenGL.GL_TEXTURE_MAG_FILTER, (int)OpenGL.GL_NEAREST);

             OpenGL.PixelStorei(OpenGL.GL_UNPACK_ALIGNMENT, );

             OpenGL.TexImage1D(OpenGL.GL_TEXTURE_1D, , OpenGL.GL_RGBA8, , , OpenGL.GL_RGBA, OpenGL.GL_UNSIGNED_BYTE, tff);

         }

         private void InitRaycastRenderer()

         {

             var shaderCodes = new ShaderCode[];

             shaderCodes[] = new ShaderCode(File.ReadAllText(@"10RaycastVolumeRender\raycasting.vert"), ShaderType.VertexShader);

             shaderCodes[] = new ShaderCode(File.ReadAllText(@"10RaycastVolumeRender\raycasting.frag"), ShaderType.FragmentShader);

             var map = new PropertyNameMap();

             map.Add("position", "position");

             map.Add("color", "color");

             this.raycastRenderer = new Renderer(model, shaderCodes, map);

             this.raycastRenderer.Initialize();

             this.raycastRenderer.SwitchList.Add(new CullFaceSwitch(CullFaceMode.Back, true));

         }

         private void InitBackfaceRenderer()

         {

             var shaderCodes = new ShaderCode[];

             shaderCodes[] = new ShaderCode(File.ReadAllText(@"10RaycastVolumeRender\backface.vert"), ShaderType.VertexShader);

             shaderCodes[] = new ShaderCode(File.ReadAllText(@"10RaycastVolumeRender\backface.frag"), ShaderType.FragmentShader);

             var map = new PropertyNameMap();

             map.Add("position", "position");

             map.Add("color", "color");

             this.backfaceRenderer = new Renderer(model, shaderCodes, map);

             this.backfaceRenderer.Initialize();

             this.backfaceRenderer.SwitchList.Add(new CullFaceSwitch(CullFaceMode.Front, true));

         }
Initialize
2018-01-16
最近终于解决了在某些电脑上不显示VR的情况。原来是我没有把3个Texture分别绑定到不同的Unit上。
总结
当然,也可以先渲染出起始点,然后再找到终点的时候计算各个像素点的颜色值。
raycast做volume rendering的这个例子中,最耗空间的是3D纹理。但是这是无法避免的。其他空间和时间耗费都是极少的。
欢迎对OpenGL有兴趣的同学关注(https://github.com/bitzhuwei/CSharpGL)
CSharpGL(25)一个用raycast实现体渲染VolumeRender的例子的更多相关文章
- CSharpGL(22)实现顺序无关的半透明渲染(Order-Independent-Transparency)
+BIT祝威+悄悄在此留下版了个权的信息说: CSharpGL(22)实现顺序无关的半透明渲染(Order-Independent-Transparency) 在 GL.Enable(GL_BLEND ...
- CSharpGL(0)一个易学易用的C#版OpenGL
+BIT祝威+悄悄在此留下版了个权的信说: CSharpGL(0)一个易学易用的C#版OpenGL CSharpGL是我受到SharpGL的启发,在整理了SharpGL,GLM,SharpFont等开 ...
- 用体渲染的方法在Unity中渲染云(18/4/4更新)
github: https://github.com/yangrc1234/VolumeCloud 更新的内容在底部 最近在知乎上看到一篇文章讲云层的渲染(https://zhuanlan.zhihu ...
- [译]基于GPU的体渲染高级技术之raycasting算法
[译]基于GPU的体渲染高级技术之raycasting算法 PS:我决定翻译一下<Advanced Illumination Techniques for GPU-Based Volume Ra ...
- chromium 34以后中文字体粗体渲染问题
估计不少人更新后都遇到这个情况了吧,粗体渲染如然变得很模糊,很奇怪,Google下说是字体实现方式变了,国内一些网站用的中文字体都是宋体,但是宋体本身没有粗体,Win下的粗体是微软自己通过某种方式实现 ...
- 一个vue请求接口渲染页面的例子
new Vue({ el:'#bodylist', data: { list: [ { "type_id": "1", "type_name" ...
- NX二次开发-UF_MODL_ask_point_containment获取一个点是在体(面,边)的边界内部,外部,还是边界上
NX9+VS2012 #include <uf.h> #include <uf_modl.h> #include <uf_curve.h> #include < ...
- 体渲染——Volume
基本概念 体渲染(Volume),是绘制类似烟.雾.云的效果.这种渲染和之前的表面渲染不同,光线可以在物体内部进行散射. 体渲染的主要特点 1. 可以在物体内部散射. 2. 从进入vo ...
- 【unity3d游戏开发之基础篇】unity3d射线的原理用法以及一个利用射线实现简单拾取的小例子
原地址:http://www.cnblogs.com/xuling/archive/2013/03/04/2943154.html 最近开始研究U3D,它的强大就不多说了, 今天研究了研究射线相关东西 ...
随机推荐
- 闲来无聊,研究一下Web服务器 的源程序
web服务器是如何工作的 1989年的夏天,蒂姆.博纳斯-李开发了世界上第一个web服务器和web客户机.这个浏览器程序是一个简单的电话号码查询软件.最初的web服务器程序就是一个利用浏览器和web服 ...
- 使用 JavaScriptService 在.NET Core 里实现DES加密算法
文章<ASP.NET Core love JavaScript>和<跨平台的 NodeJS 组件解决 .NetCore 不支持 System.Drawing图形功能的若干问题> ...
- 红黑树——算法导论(15)
1. 什么是红黑树 (1) 简介 上一篇我们介绍了基本动态集合操作时间复杂度均为O(h)的二叉搜索树.但遗憾的是,只有当二叉搜索树高度较低时,这些集合操作才会较快:即当树的高度较高(甚至一种极 ...
- Java中Comparable与Comparator的区别
相同 Comparable和Comparator都是用来实现对象的比较.排序 要想对象比较.排序,都需要实现Comparable或Comparator接口 Comparable和Comparator都 ...
- CSS 3学习——box-sizing和背景
box-sizing 在CSS 2中设置元素的width和height仅仅是设置了元素内容区的宽和高,元素实际的尺寸是margin + border + padding + 内容区. CSS 3(截止 ...
- iOS微信里打开app,Universal Links
这两天在弄分享,从第三方应用或者浏览器打开自己app的东西 传统的方式是通过URL Scheme的方式,但是iOS9以后又出了新的更完美的方式Universal Links. 传统的URL Schem ...
- bash字符串操作
参考 http://www.cnblogs.com/chengmo/archive/2010/10/02/1841355.html 问题:bash怎么提取字符串的最后一位?例如python中strin ...
- JavaScript对象和数组
1.JavaScript中有两个非常重要的数据类型是对象和数组. 通过"."或者"[]"来访问对象属性 举例:var book = { topic:" ...
- 编译器开发系列--Ocelot语言4.类型定义的检查
这里主要介绍一下检查循环定义的结构体.联合体.是对成员中包含自己本身的结构体.联合体进行检查.所谓"成员中包含自己本身",举例来说,就是指下面这样的定义. struct point ...
- SQL Server 批量删除存储过程
原理很简单的'drop proc xxx'即可,下面有提供了两种方式来删除存储过程,其实本质是相同的,方法一是生成删除的sql后直接执行了,方法二会生成SQL,但需要检查后执行,个人推荐第二种做法. ...