Spring Cloud构建微服务架构(一)服务注册与发现
Spring Cloud简介
Spring Cloud是一个基于Spring Boot实现的云应用开发工具,它为基于JVM的云应用开发中的配置管理、服务发现、断路器、智能路由、微代理、控制总线、全局锁、决策竞选、分布式会话和集群状态管理等操作提供了一种简单的开发方式。
Spring Cloud包含了多个子项目(针对分布式系统中涉及的多个不同开源产品),比如:Spring Cloud Config、Spring Cloud Netflix、Spring Cloud CloudFoundry、Spring Cloud AWS、Spring Cloud Security、Spring Cloud Commons、Spring Cloud Zookeeper、Spring Cloud CLI等项目。
微服务架构
“微服务架构”在这几年非常的火热,以至于关于微服务架构相关的产品社区也变得越来越活跃(比如:netflix、dubbo),Spring Cloud也因Spring社区的强大知名度和影响力也被广大架构师与开发者备受关注。
那么什么是“微服务架构”呢?简单的说,微服务架构就是将一个完整的应用从数据存储开始垂直拆分成多个不同的服务,每个服务都能独立部署、独立维护、独立扩展,服务与服务间通过诸如RESTful API的方式互相调用。
对于“微服务架构”,大家在互联网可以搜索到很多相关的介绍和研究文章来进行学习和了解。也可以阅读始祖Martin Fowler的《Microservices》,本文不做更多的介绍和描述。
服务注册与发现
在简单介绍了Spring Cloud和微服务架构之后,下面回归本文的主旨内容,如何使用Spring Cloud搭建服务注册与发现模块。
这里我们会用到Spring Cloud Netflix,该项目是Spring Cloud的子项目之一,主要内容是对Netflix公司一系列开源产品的包装,它为Spring Boot应用提供了自配置的Netflix OSS整合。通过一些简单的注解,开发者就可以快速的在应用中配置一下常用模块并构建庞大的分布式系统。它主要提供的模块包括:服务发现(Eureka),断路器(Hystrix),智能路有(Zuul),客户端负载均衡(Ribbon)等。
所以,我们这里的核心内容就是服务发现模块:Eureka。下面我们动手来做一些尝试。
创建“服务注册中心”
创建一个基础的Spring Boot工程,并在pom.xml中引入需要的依赖内容:
<parent>

    <groupId>org.springframework.boot</groupId>

    <artifactId>spring-boot-starter-parent</artifactId>

    <version>1.3.5.RELEASE</version>

    <relativePath/> <!-- lookup parent from repository -->

</parent>

<dependencies>

    <dependency>

        <groupId>org.springframework.boot</groupId>

    <artifactId>spring-boot-starter-test</artifactId>

    <scope>test</scope>

    </dependency>

    <dependency>

        <groupId>org.springframework.cloud</groupId>

    <artifactId>spring-cloud-starter-eureka-server</artifactId>

    </dependency>

</dependencies>

<dependencyManagement>

    <dependencies>

        <dependency>

        <groupId>org.springframework.cloud</groupId>

        <artifactId>spring-cloud-dependencies</artifactId>

        <version>Brixton.RELEASE</version>

        <type>pom</type>

        <scope>import</scope>

    </dependency>

    </dependencies>

</dependencyManagement>
通过@EnableEurekaServer注解启动一个服务注册中心提供给其他应用进行对话。这一步非常的简单,只需要在一个普通的Spring Boot应用中添加这个注解就能开启此功能,比如下面的例子:
@EnableEurekaServer

@SpringBootApplication

public class Application {

public static void main(String[] args) {

new SpringApplicationBuilder(Application.class).web(true).run(args);

}

}
在默认设置下,该服务注册中心也会将自己作为客户端来尝试注册它自己,所以我们需要禁用它的客户端注册行为,只需要在application.properties中问增加如下配置:
server.port=1111

eureka.client.register-with-eureka=false

eureka.client.fetch-registry=false

eureka.client.serviceUrl.defaultZone=http://localhost:${server.port}/eureka/
为了与后续要进行注册的服务区分,这里将服务注册中心的端口通过server.port属性设置为1111。
启动工程后,访问:http://localhost:1111/
可以看到下面的页面,其中还没有发现任何服务
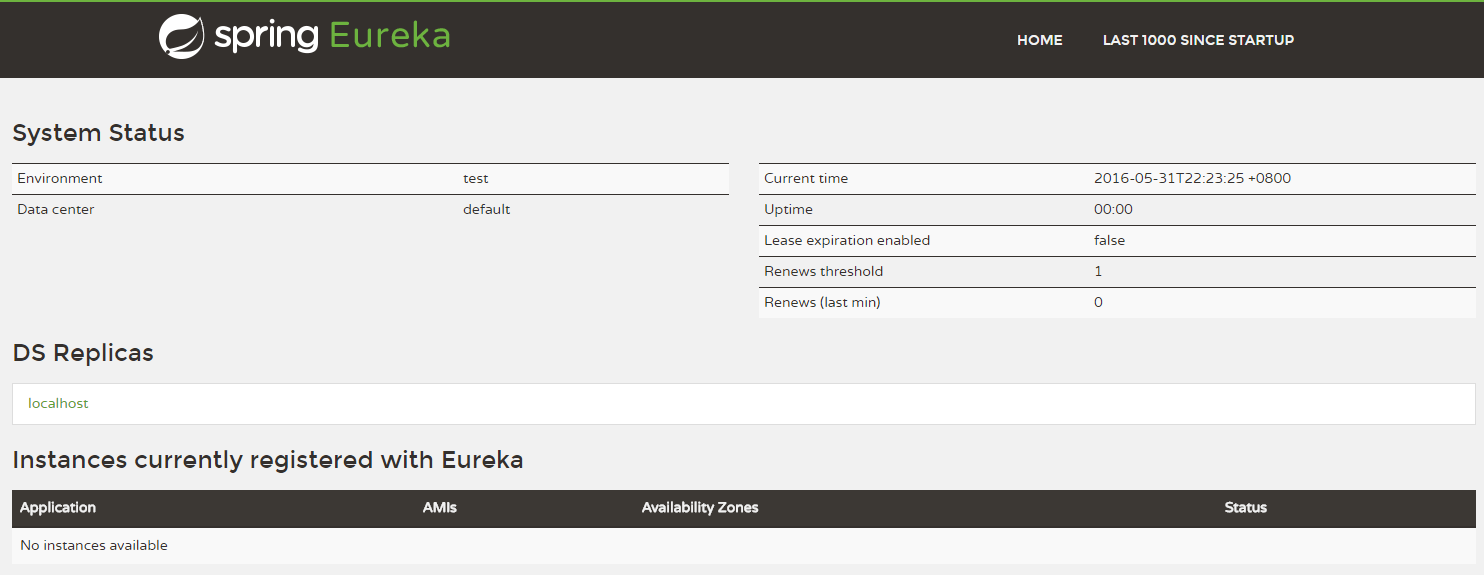
该工程可参见:Chapter9-1-1/eureka-server
创建“服务提供方”
下面我们创建提供服务的客户端,并向服务注册中心注册自己。
假设我们有一个提供计算功能的微服务模块,我们实现一个RESTful API,通过传入两个参数a和b,最后返回a + b的结果。
首先,创建一个基本的Spring Boot应用,在pom.xml中,加入如下配置:
<parent>

<groupId>org.springframework.boot</groupId>

<artifactId>spring-boot-starter-parent</artifactId>

<version>1.3.5.RELEASE</version>

<relativePath/> <!-- lookup parent from repository -->

</parent>

<dependencies>

<dependency>

<groupId>org.springframework.boot</groupId>

<artifactId>spring-boot-starter-test</artifactId>

<scope>test</scope>

</dependency>

<dependency>

<groupId>org.springframework.cloud</groupId>

<artifactId>spring-cloud-starter-eureka</artifactId>

</dependency>

</dependencies>

<dependencyManagement>

<dependencies>

<dependency>

<groupId>org.springframework.cloud</groupId>

<artifactId>spring-cloud-dependencies</artifactId>

<version>Brixton.RELEASE</version>

<type>pom</type>

<scope>import</scope>

</dependency>

</dependencies>

</dependencyManagement>
其次,实现/add请求处理接口,通过DiscoveryClient对象,在日志中打印出服务实例的相关内容。
 1 @RestController

 2 public class ComputeController {

 3

 4 private final Logger logger = Logger.getLogger(getClass());

 5

 6 @Autowired

 7 private DiscoveryClient client;

 8

 9 @RequestMapping(value = "/add" ,method = RequestMethod.GET)

10 public Integer add(@RequestParam Integer a, @RequestParam Integer b) {

11 ServiceInstance instance = client.getLocalServiceInstance();

12 Integer r = a + b;

13 logger.info("/add, host:" + instance.getHost() + ", service_id:" + instance.getServiceId() + ", result:" + r);

14 return r;

15 }

16

17 }
最后在主类中通过加上@EnableDiscoveryClient注解,该注解能激活Eureka中的DiscoveryClient实现,才能实现Controller中对服务信息的输出。
1 @EnableDiscoveryClient

2 @SpringBootApplication

3 public class ComputeServiceApplication {

4

5 public static void main(String[] args) {

6 new SpringApplicationBuilder(ComputeServiceApplication.class).web(true).run(args);

7 }

8

9 }
我们在完成了服务内容的实现之后,再继续对application.properties做一些配置工作,具体如下:
spring.application.name=compute-service

server.port=2222

eureka.client.serviceUrl.defaultZone=http://localhost:1111/eureka/
eureka.client.serviceUrl.defaultZone属性对应服务注册中心的配置内容,指定服务注册中心的位置。通过spring.application.name属性,我们可以指定微服务的名称后续在调用的时候只需要使用该名称就可以进行服务的访问。
为了在本机上测试区分服务提供方和服务注册中心,使用server.port属性设置不同的端口。
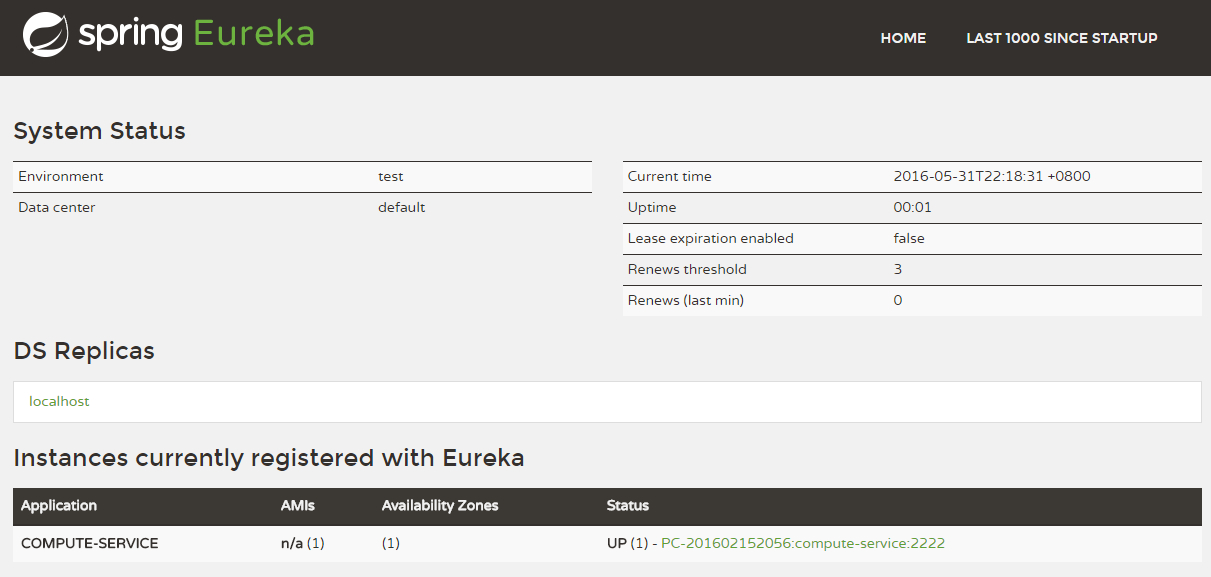
启动该工程后,再次访问:http://localhost:1111/
可以看到,我们定义的服务被注册了。
Spring Cloud构建微服务架构(一)服务注册与发现的更多相关文章
- Spring Cloud构建微服务架构(二)服务消费者
Netflix Ribbon is an Inter Process Communication (IPC) cloud library. Ribbon primarily provides clie ...
- Spring Cloud构建微服务架构:服务网关(路由配置)【Dalston版】
转载:http://blog.didispace.com/spring-cloud-starter-dalston-6-2/ 原创 2017-08-26 翟永超 Spring Cloud 被围观 ...
- Cola Cloud 基于 Spring Boot, Spring Cloud 构建微服务架构企业级开发平台
Cola Cloud 基于 Spring Boot, Spring Cloud 构建微服务架构企业级开发平台: https://gitee.com/leecho/cola-cloud
- Spring Cloud构建微服务架构(五)服务网关
通过之前几篇Spring Cloud中几个核心组件的介绍,我们已经可以构建一个简略的(不够完善)微服务架构了.比如下图所示: 我们使用Spring Cloud Netflix中的Eureka实现了服务 ...
- Spring Cloud构建微服务架构 - 服务网关
通过之前几篇Spring Cloud中几个核心组件的介绍,我们已经可以构建一个简略的(不够完善)微服务架构了.比如下图所示: alt 我们使用Spring Cloud Netflix中的Eureka实 ...
- Spring Cloud构建微服务架构
Dalston版本 由于Brixton和Camden版本的教程已经停止更新,所以笔者计划在2017年上半年完成Dalston版本的教程编写(原计划完成Camden版本教程,但由于写了两篇Dalston ...
- Spring Cloud构建微服务架构(三)消息总线
注:此文不适合0基础学习者直接阅读,请先完整的将作者关于微服务的博文全部阅读一遍,如果还有疑问,可以再来阅读此文,地址:http://blog.csdn.net/sosfnima/article/d ...
- 《Spring Cloud构建微服务架构》系列博文示例
SpringCloud-Learning 源码下载地址:http://download.csdn.net/detail/k21325/9650968 本项目内容为Spring Cloud教 ...
- 第1章 Spring Cloud 构建微服务架构(一)服务注册与发现
一.Spring Cloud 简介 Spring Cloud是一个基于Spring Boot实现的云应用开发工具,它为基于JVM的云应用开发中的配置管理.服务发现.断路器.智能路由.微代理.控制总 ...
随机推荐
- TextView字体大小及颜色设置
TextView设置文字大小及颜色: 1.1)通过xml配置 <TextView android:layout_width="match_parent" a ...
- HTML学习笔记汇总
笔记几乎涵盖了日常开发中全部的知识点以及相关注意事项 想要学习网页制作的初学者可以通过本篇笔记初步掌握HTML的使用,也可以将该笔记作为查阅资料查看 HTML简单结构 <html> < ...
- java学习笔记 --- 继承
继承 (1)定义:把多个类中相同的成员给提取出来定义到一个独立的类中.然后让这多个类和该独立的类产生一个关系, 这多个类就具备了这些内容.这个关系叫继承. (2)Java中如何表示继承呢?格式 ...
- javascript . 02 break和continue、while、数组、冒泡排序
1.1 知识点 NaN是number类型 null是object类型 /** + 回车 多行注释 table 会为内部的tr td 自动补齐闭合标签 1.2 循环结构 1.2.1 Break和c ...
- QConf简要搭建过程
QConf的组件: ZooKeeper as the server, restore all configurations, so the limit data size of single conf ...
- 【C++】模拟实现auto_ptr
看了<Effctive C++>,里面提到用对象去管理资源,可以有效防止内存泄漏. 结合auto_ptr特性,稍微思考了一下,实现了一个简单的auto_ptr (因为代码量小,就不分文件了 ...
- JS中new的运行方式
---恢复内容开始--- 在JS中,有两个基础原型,分别是Function.prototype和Object.prototype.这两个原型组成了JS中的所有实例他们的关系是 Function.pro ...
- Spring整合Struts2,Hibernate的xml方式
作为一个学习中的码农,一直学习才是我们的常态,所以最近学习了SSH(Spring,Struts2,Hibernate)整合,数据库用的MySQL. 写了一个简单的例子,用的工具是IntelliJ Id ...
- 修改数据库用户名--CMD环境执行有效
--CMD环境执行有效 --修改数据库用户名 select * from user$ where name='aa'; update user$ set name='bb' where name ...
- UE32修改TAB键为空格键