Netty源码分析之NioEventLoop(二)—NioEventLoop的启动
上篇文章中我们对Netty中NioEventLoop创建流程与源码进行了跟踪分析。本篇文章中我们接着分析NioEventLoop的启动流程;
Netty中会在服务端启动和新连接接入时通过chooser选择器,分别为NioServerSocketChannel与NioSocketChannel选择绑定一个NioEventLoop,接下来我们就分别从这两个方面梳理NioEventLoop的启动源码
一、服务端启动
首先我们结合下图看下Netty服务启动过程中,NioServerSocketChannel绑定的NioEventLoop启动流程
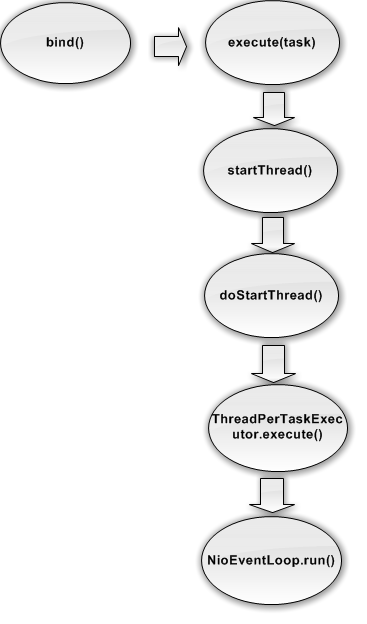
bind()部分源码我们在之前服务端启动过程中进行过说明,我们进一步跟踪进入doBind0()方法中可以看到channel.eventLoop().execute的执行,需要说明的是这里其实启动的NioServerSocketChannel绑定的 bossGroup,用来负责处理新连接接入的。
    /**

     * read by jsf

     *

     * @param regFuture

     * @param channel

     * @param localAddress

     * @param promise

     */

    private static void doBind0(final ChannelFuture regFuture, final Channel channel, final SocketAddress localAddress,

            final ChannelPromise promise) {

        //该方法向 NioServerSocketChannel 的 eventLoop 提交了一个任务,当 future(其实就是 promise) 成功后执行

        //NioServerSocketChannel 的 bind 方法,并添加一个关闭监听器。我们主要关注 bind 方法。

        // This method is invoked before channelRegistered() is triggered. Give user

        // handlers a chance to set up

        // the pipeline in its channelRegistered() implementation.

        channel.eventLoop().execute(new Runnable() {

            @Override

            public void run() {

                if (regFuture.isSuccess()) {

                    channel.bind(localAddress, promise).addListener(ChannelFutureListener.CLOSE_ON_FAILURE);

                } else {

                    promise.setFailure(regFuture.cause());

                }

            }

        });

    }
进入NioEventLoop父类SingleThreadEventExecutor中的execute方法,改方法通过inEventLoop()会首先判断当前的线程是否是NioEventLoop本身绑定的线程,结合inEventLoop的代码可以看到NioEventLoop本身线程还未初始化为空,这里返回false,执行启动线程操作,同时会任务放入任务队列中。
    @Override

    public void execute(Runnable task) {

        if (task == null) {

            throw new NullPointerException("task");

        }

        //首先判断当前线程是否是该EventLoop绑定的线程

        boolean inEventLoop = inEventLoop();

        //把传入的任务加入任务对立

        addTask(task);

        if (!inEventLoop) {//如果不是同一条线程

            startThread();

            if (isShutdown() && removeTask(task)) {

                reject();

            }

        }

        if (!addTaskWakesUp && wakesUpForTask(task)) {

            wakeup(inEventLoop);

        }

    }
    @Override

    public boolean inEventLoop(Thread thread) {

        return thread == this.thread;

    }
继续跟踪进入startThread()方法中
    private void startThread() {

        if (state == ST_NOT_STARTED) {

            if (STATE_UPDATER.compareAndSet(this, ST_NOT_STARTED, ST_STARTED)) {

                try {

                    doStartThread();

                } catch (Throwable cause) {

                    STATE_UPDATER.set(this, ST_NOT_STARTED);

                    PlatformDependent.throwException(cause);

                }

            }

        }

    }
在 doStartThread()中主要实现了以下功能:
1、执行传入的ThreadPerTaskExecutor的execute方法,创建一个新的线程,并与这个NioEventLoop对象绑定;
2、在开启的线程中执行SingleThreadEventExecutor.this.run(),也就是NioEventLoop的run方法,开始NioEventLoop的执行操作;
    private void doStartThread() {

        assert thread == null;

        //线程执行器通过线程工厂创建线程

        executor.execute(new Runnable() {

            @Override

            public void run() {

                //开启线程,并赋值

                thread = Thread.currentThread();

                if (interrupted) {

                    thread.interrupt();

                }

                boolean success = false;

                updateLastExecutionTime();

                try {

                    //执行NioEventLoop的run方法

                    SingleThreadEventExecutor.this.run();

                    success = true;

                } catch (Throwable t) {

                    logger.warn("Unexpected exception from an event executor: ", t);

                } finally {

                    for (;;) {

                        int oldState = state;

                        if (oldState >= ST_SHUTTING_DOWN || STATE_UPDATER.compareAndSet(

                                SingleThreadEventExecutor.this, oldState, ST_SHUTTING_DOWN)) {

                            break;

                        }

                    }

                    // Check if confirmShutdown() was called at the end of the loop.

                    if (success && gracefulShutdownStartTime == 0) {

                        if (logger.isErrorEnabled()) {

                            logger.error("Buggy " + EventExecutor.class.getSimpleName() + " implementation; " +

                                    SingleThreadEventExecutor.class.getSimpleName() + ".confirmShutdown() must " +

                                    "be called before run() implementation terminates.");

                        }

                    }

                    try {

                        // Run all remaining tasks and shutdown hooks.

                        for (;;) {

                            if (confirmShutdown()) {

                                break;

                            }

                        }

                    } finally {

                        try {

                            cleanup();

                        } finally {

                            STATE_UPDATER.set(SingleThreadEventExecutor.this, ST_TERMINATED);

                            threadLock.release();

                            if (!taskQueue.isEmpty()) {

                                if (logger.isWarnEnabled()) {

                                    logger.warn("An event executor terminated with " +

                                            "non-empty task queue (" + taskQueue.size() + ')');

                                }

                            }

                            terminationFuture.setSuccess(null);

                        }

                    }

                }

            }

        });

    }
OK到这一步,基于服务端启动绑定端口的NioServerSocketChannel,也就是服务端Channel绑定的NioEventLoop已经启动。
二、新连接接入
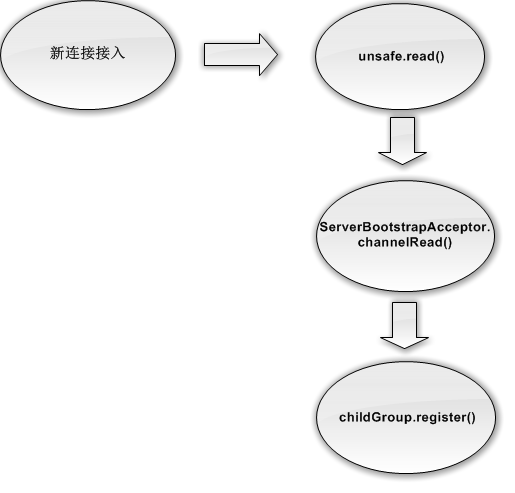
首先我们结合下图看下当有客户端接入时,创建NioSocketChannel,然后绑定NioEventLoop并启动的流程
服务端启动时会在NioServerSocketChannel的任务链中添加ServerBootstrapAcceptor对象,这就是用来处理新新连接接入的
        p.addLast(new ChannelInitializer<Channel>() {

            @Override

            public void initChannel(final Channel ch) throws Exception {

                final ChannelPipeline pipeline = ch.pipeline();

                ChannelHandler handler = config.handler();

                if (handler != null) {

                    pipeline.addLast(handler);

                }

                // 服务端NioServerSocketChannel的pipeline中添加ServerBootstrapAcceptor

                ch.eventLoop().execute(new Runnable() {

                    @Override

                    public void run() {

                        pipeline.addLast(new ServerBootstrapAcceptor(

                                ch, currentChildGroup, currentChildHandler, currentChildOptions, currentChildAttrs));

                    }

                });

            }

        });
在新连接接入事件触发时,执行unsafe.read();
   private void processSelectedKey(SelectionKey k, AbstractNioChannel ch) {

        final AbstractNioChannel.NioUnsafe unsafe = ch.unsafe();

        if (!k.isValid()) {

            final EventLoop eventLoop;

            try {

                eventLoop = ch.eventLoop();

            } catch (Throwable ignored) {

                // If the channel implementation throws an exception because there is no event loop, we ignore this

                // because we are only trying to determine if ch is registered to this event loop and thus has authority

                // to close ch.

                return;

            }

            // Only close ch if ch is still registered to this EventLoop. ch could have deregistered from the event loop

            // and thus the SelectionKey could be cancelled as part of the deregistration process, but the channel is

            // still healthy and should not be closed.

            // See https://github.com/netty/netty/issues/5125

            if (eventLoop != this || eventLoop == null) {

                return;

            }

            // close the channel if the key is not valid anymore

            unsafe.close(unsafe.voidPromise());

            return;

        }

        try {

            int readyOps = k.readyOps();

            // We first need to call finishConnect() before try to trigger a read(...) or write(...) as otherwise

            // the NIO JDK channel implementation may throw a NotYetConnectedException.

            if ((readyOps & SelectionKey.OP_CONNECT) != 0) {

                // remove OP_CONNECT as otherwise Selector.select(..) will always return without blocking

                // See https://github.com/netty/netty/issues/924

                int ops = k.interestOps();

                ops &= ~SelectionKey.OP_CONNECT;

                k.interestOps(ops);

                unsafe.finishConnect();

            }

            // Process OP_WRITE first as we may be able to write some queued buffers and so free memory.

            if ((readyOps & SelectionKey.OP_WRITE) != 0) {

                // Call forceFlush which will also take care of clear the OP_WRITE once there is nothing left to write

                ch.unsafe().forceFlush();

            }

            // Also check for readOps of 0 to workaround possible JDK bug which may otherwise lead

            // to a spin loop

            //新连接接入

            if ((readyOps & (SelectionKey.OP_READ | SelectionKey.OP_ACCEPT)) != 0 || readyOps == 0) {

                unsafe.read();

            }

        } catch (CancelledKeyException ignored) {

            unsafe.close(unsafe.voidPromise());

        }

    }
unsafe.read()的具体实现为NioMessageUnsafe中的read(),在read()方法中主要实现了两个功能:
1、创建客户端Channel,也就是NioSocketChannel;
2、开始服务端NioServerSocketChannel的任务链传递,首先执行之前已经加入任务链的ServerBootstrapAcceptor中的channelRead
        @Override

        public void read() {

            assert eventLoop().inEventLoop();

            final ChannelConfig config = config();

            final ChannelPipeline pipeline = pipeline();

            final RecvByteBufAllocator.Handle allocHandle = unsafe().recvBufAllocHandle();

            allocHandle.reset(config);

            boolean closed = false;

            Throwable exception = null;

            try {

                try {

                    do {

                        //这里创建客户端连接,也就是NioSocketChannelChannel

                        int localRead = doReadMessages(readBuf);

                        if (localRead == 0) {

                            break;

                        }

                        if (localRead < 0) {

                            closed = true;

                            break;

                        }

                        allocHandle.incMessagesRead(localRead);

                    } while (allocHandle.continueReading());

                } catch (Throwable t) {

                    exception = t;

                }

                int size = readBuf.size();

                for (int i = 0; i < size; i ++) {

                    readPending = false;

                    //在这里开始NioServerSocketChannel的任务链传递,会首先执行ServerBootstrapAcceptor中的channelRead

                    pipeline.fireChannelRead(readBuf.get(i));

                }

                readBuf.clear();

                allocHandle.readComplete();

                pipeline.fireChannelReadComplete();

                if (exception != null) {

                    closed = closeOnReadError(exception);

                    pipeline.fireExceptionCaught(exception);

                }

                if (closed) {

                    inputShutdown = true;

                    if (isOpen()) {

                        close(voidPromise());

                    }

                }

            } finally {

                // Check if there is a readPending which was not processed yet.

                // This could be for two reasons:

                // * The user called Channel.read() or ChannelHandlerContext.read() in channelRead(...) method

                // * The user called Channel.read() or ChannelHandlerContext.read() in channelReadComplete(...) method

                //

                // See https://github.com/netty/netty/issues/2254

                if (!readPending && !config.isAutoRead()) {

                    removeReadOp();

                }

            }

        }
接下来在ServerBootstrapAcceptor中的channelRead中会获取到传入的NioSocketChannel,针对NioSocketChannel主要会执行以下操作:
1、配置childHandler任务链;
2、配置childOptions;
3、为NioSocketChannel分配NioEventLoop
        @Override

        @SuppressWarnings("unchecked")

        public void channelRead(ChannelHandlerContext ctx, Object msg) {

            final Channel child = (Channel) msg;

            //配置childHandler任务链

            child.pipeline().addLast(childHandler);

            //配置childOptions

            setChannelOptions(child, childOptions, logger);

            for (Entry<AttributeKey<?>, Object> e: childAttrs) {

                child.attr((AttributeKey<Object>) e.getKey()).set(e.getValue());

            }

            try {

                //为新连接分配NioEventLoop,并启动执行

                childGroup.register(child).addListener(new ChannelFutureListener() {

                    @Override

                    public void operationComplete(ChannelFuture future) throws Exception {

                        if (!future.isSuccess()) {

                            forceClose(child, future.cause());

                        }

                    }

                });

            } catch (Throwable t) {

                forceClose(child, t);

            }

        }
看以看到EventLoopGroup中register具体实实现:
1、关于next(),我们之前讲过是专门用来分配NioEventLoop;
2、register()主要负责了EventLoop的绑定和启动;
   @Override

    public ChannelFuture register(ChannelPromise promise) {

        return next().register(promise);

    }
        @Override

        public final void register(EventLoop eventLoop, final ChannelPromise promise) {

            if (eventLoop == null) {

                throw new NullPointerException("eventLoop");

            }

            if (isRegistered()) {

                promise.setFailure(new IllegalStateException("registered to an event loop already"));

                return;

            }

            if (!isCompatible(eventLoop)) {

                promise.setFailure(

                        new IllegalStateException("incompatible event loop type: " + eventLoop.getClass().getName()));

                return;

            }

            //与NioEventLoop绑定

            AbstractChannel.this.eventLoop = eventLoop;

            //首先判断线程是否一致,当前线程是NioServerSocketChannel的线程,与当前创建NioSocketChannel的eventLoop线程不一致

            if (eventLoop.inEventLoop()) {

                register0(promise);

            } else {

                try {

                    //在这里NioEventLoop启动

                    eventLoop.execute(new Runnable() {

                        @Override

                        public void run() {

                            register0(promise);

                        }

                    });

                } catch (Throwable t) {

                    logger.warn(

                            "Force-closing a channel whose registration task was not accepted by an event loop: {}",

                            AbstractChannel.this, t);

                    closeForcibly();

                    closeFuture.setClosed();

                    safeSetFailure(promise, t);

                }

            }

        }
上面代码中的 eventLoop.execute我们已经分析过,经过一系列的流程,最后会执行NioEventLoop的run方法开始轮询感兴趣的IO事件。
以上我们主要从服务启动与客户端连接两个方面分析了NioEventLoop的启动流程与源码,其实也就对应NioServerSocketChannel与NioSocketChannel分别绑定的NioEventLoop,其中有错误和不足之处还请指正与海涵。
关注微信公众号,查看更多技术文章。

Netty源码分析之NioEventLoop(二)—NioEventLoop的启动的更多相关文章
- Netty源码分析第2章(NioEventLoop)---->第1节: NioEventLoopGroup之创建线程执行器
Netty源码分析第二章: NioEventLoop 概述: 通过上一章的学习, 我们了解了Server启动的大致流程, 有很多组件与模块并没有细讲, 从这个章开始, 我们开始详细剖析netty的各个 ...
- Netty源码分析第2章(NioEventLoop)---->第2节: NioEventLoopGroup之NioEventLoop的创建
Netty源码分析第二章: NioEventLoop 第二节: NioEventLoopGroup之NioEventLoop的创建 回到上一小节的MultithreadEventExecutorG ...
- Netty源码分析第2章(NioEventLoop)---->第3节: 初始化线程选择器
Netty源码分析第二章:NioEventLoop 第三节:初始化线程选择器 回到上一小节的MultithreadEventExecutorGroup类的构造方法: protected Multi ...
- Netty源码分析第2章(NioEventLoop)---->第4节: NioEventLoop线程的启动
Netty源码分析第二章: NioEventLoop 第四节: NioEventLoop线程的启动 之前的小节我们学习了NioEventLoop的创建以及线程分配器的初始化, 那么NioEvent ...
- Netty源码分析第2章(NioEventLoop)---->第5节: 优化selector
Netty源码分析第二章: NioEventLoop 第五节: 优化selector 在剖析selector轮询之前, 我们先讲解一下selector的创建过程 回顾之前的小节, 在创建NioEv ...
- Netty源码分析第2章(NioEventLoop)---->第6节: 执行select操作
Netty源码分析第二章: NioEventLoop 第六节: 执行select操作 分析完了selector的创建和优化的过程, 这一小节分析select相关操作 跟到跟到select操作的入口 ...
- Netty源码分析第2章(NioEventLoop)---->第7节: 处理IO事件
Netty源码分析第二章: NioEventLoop 第七节:处理IO事件 上一小节我们了解了执行select()操作的相关逻辑, 这一小节我们继续学习select()之后, 轮询到io事件的相关 ...
- Netty源码分析第2章(NioEventLoop)---->第8节: 执行任务队列
Netty源码分析第二章: NioEventLoop 第八节: 执行任务队列 继续回到NioEventLoop的run()方法: protected void run() { for (;;) ...
- Netty 源码分析系列(二)Netty 架构设计
前言 上一篇文章,我们对 Netty做了一个基本的概述,知道什么是Netty以及Netty的简单应用. Netty 源码分析系列(一)Netty 概述 本篇文章我们就来说说Netty的架构设计,解密高 ...
- Netty源码分析 (三)----- 服务端启动源码分析
本文接着前两篇文章来讲,主要讲服务端类剩下的部分,我们还是来先看看服务端的代码 /** * Created by chenhao on 2019/9/4. */ public final class ...
随机推荐
- bzoj3114 LCM Pair Sum
题意:以质因数分解的方式给定n,求所有满足:lcm(a, b) = n的无序数对的价值和.其中(a, b)的价值为a + b 解: 定义首项为a,公比为q,项数为n的等比数列的和为getQ(a, q, ...
- 9:@RequestMapping 用法详解之地址映射
引言: 前段时间项目中用到了RESTful模式来开发程序,但是当用POST.PUT模式提交数据时,发现服务器端接受不到提交的数据(服务器端参数绑定没有加任何注解),查看了提交方式为applicatio ...
- Java基础-算术运算符(Arithmetic Operators)
Java基础-算术运算符(Arithmetic Operators) 作者:尹正杰 版权声明:原创作品,谢绝转载!否则将追究法律责任. Java程序通过运算符实现对数据的处理,Java中的运算符包括: ...
- JAVA记录-Servlet RequestDispatcher请求转发
RequestDispatcher接口提供将请求转发送到另一个资源的功能,它可能是html,servlet或jsp等. 此接口也可用于包括另一资源的内容.它是servlet协作的一种方式. 在Requ ...
- [整理]WebAPP开发的框架
http://www.zhihu.com/question/27210335 http://ionicframework.com/getting-started/ http://cordova.apa ...
- 记一道有趣的Twitter面试题
微信上的“程序员的那些事”想必是很多码农们关注的公众账号之一,我也是其粉丝,每天都会看看里面有没有什么趣事,前段时间“程序员的那些事”分享了一篇博文<我的Twitter技术面试失败了>挺有 ...
- Spring Boot实战系列-----------邮件发送
快速导航 添加Maven依赖 配置文件增加邮箱相关配置 Service.Test项目代码构建 五种邮件发送类型讲解 文本邮件 html邮件 附件邮件 html内嵌图片邮件 模板邮件 问题汇总 添加ma ...
- 第13月第25天 ios11 uitableview reloaddata contentsize
1. [tableView reloadData]; dispatch_after(dispatch_time(DISPATCH_TIME_NOW, (int64_t)(0.1 * NSEC_PER_ ...
- 图文详解 解决 MVC4 Code First 数据迁移
在使用Code first生成数据库后 当数据库发生更改时 运行程序就会出现数据已更改的问题 这时可以删除数据库重新生成解决 但是之前的数据就无法保留 为了保留之前的数据库数据 我们需要使用到C ...
- Android EditText被软键盘遮盖处理
这两天android app新增了透明栏效果,结果发现键盘弹起后会遮盖屏幕底部的EditText,没有像想象中的调整窗口大小,并滚动ScrollView,将EditText显示在键盘上方.之前也遇到过 ...