@ServeletComponentScan和@ComponentScan的区别
一、SpringBoot中使用Servlet
在SpringBootApplication上使用@ServletComponentScan注解后,Servlet、Filter、Listener可以直接通过@WebServlet、@WebFilter、@WebListener注解自动注册,无需其他代码。
1.在入口Application类上加入注解@ServletComponentScan
- package com.hui;
- import org.springframework.boot.SpringApplication;
- import org.springframework.boot.autoconfigure.SpringBootApplication;
- import org.springframework.boot.web.servlet.ServletComponentScan;
- @SpringBootApplication
- @ServletComponentScan
- public class Application {
- public static void main(String[] args) {
- SpringApplication.run(Application.class, args);
- }
- }
2.新建Servlet类,继承HttpServlet并且加入注解@WebServlet(name=“TestServlet”,urlPatterns="/test")
- package com.hui.qiang;
- import java.io.IOException;
- import javax.servlet.ServletException;
- import javax.servlet.annotation.WebServlet;
- import javax.servlet.http.HttpServlet;
- import javax.servlet.http.HttpServletRequest;
- import javax.servlet.http.HttpServletResponse;
- @WebServlet(name="TestServlet",urlPatterns="/test")
- public class TestServlet extends HttpServlet {
- private static final long serialVersionUID = 1L;
- @Override
- protected void doGet(HttpServletRequest req, HttpServletResponse resp)
- throws ServletException, IOException {
- System.out.println("doGet");
- }
- }
3.之后运行代码,在浏览器地址栏输入http://localhost:8080/test,若看到控制台打印doGet,则表示Servlet创建成功。
注意:
(1)如果不加@ServletComponentScan注解则会报404即找不到页面,控制台也扫描不到我们配置的servlet:/test,即无法被映射
(2)如果Application类和Servlet类不在同一包下,则@ServletComponentScan需要添加相应的路径,如Application类在包com.hui.xiao下,则写为@ServletComponentScan(“com.hui.xiao”)或@ServletComponentScan(“com.hui”)


二、Spring, Spring Boot中的@ComponentScan注解用法介绍
@ComponentScan
如果你理解了ComponentScan,你就理解了Spring.
Spring是一个依赖注入(dependency injection)框架。所有的内容都是关于bean的定义及其依赖关系。
定义Spring Beans的第一步是使用正确的注解-@Component或@Service或@Repository.
但是,Spring不知道你定义了某个bean除非它知道从哪里可以找到这个bean.
ComponentScan做的事情就是告诉Spring从哪里找到bean
由你来定义哪些包需要被扫描。一旦你指定了,Spring将会将在被指定的包及其下级的包(sub packages)中寻找bean
下面分别介绍在Spring Boot项目和非Spring Boot项目(如简单的JSP/Servlet或者Spring MVC应用)中如何定义ComponentScan
注:@ComponentScan的不同写法
1.@ComponentScan({“com.xiao.hui”,“com.xiao.qiang”})或@ComponentScan(basePackages = {“com.xiao.hui”,“com.xiao.qiang”})
2.@ComponentScan(“com.xiao”)或@ComponentScan(value = “com.xiao”)或@ComponentScan(basePackages = { “com.xiao” })
3.@ComponentScan(basePackageClasses=要扫描类.class所在位置的包) 意思是要扫描哪个类所在的包,如@ComponentScan(basePackageClasses=hehe.class),这种写法不如上面的那种写法好有局限性
Spring Boot项目
总结:
1.SpringBoot在写启动类的时候如果不使用@ComponentScan指明对象扫描范围,默认指扫描当前启动类所在的包里的对象,如果你的其他包都在使用了@SpringBootApplication注解的主类所在的包及其下级包,则你什么都不用做,SpringBoot会自动帮你把其他包都扫描了。为了方便,我一般都把主类放在了所有类的上一级包中,如项目所有的class文件都放在了包com.beauty的下级包中,则把spring boot的主类放在包com.beauty下。
2.如果当前启动类没有包,则在启动时会报错:Your ApplicationContext is unlikely to start due to a @ComponentScan of the default package错误,因为启动类不能直接放在main/java文件夹下,必须要建一个包把它放进去或者使用@ComponentScan指明要扫描的包。
3.如果你有一些bean所在的包,不在主类的包及其下级包,那么你需要手动加上@ComponentScan注解并指定那个bean所在的包。
举个栗子,看下面定义的类:
- package com.xiao.qiang.qianming;
- import org.springframework.boot.SpringApplication;
- import org.springframework.boot.autoconfigure.SpringBootApplication;
- import org.springframework.context.ApplicationContext;
- import org.springframework.context.ConfigurableApplicationContext;
- @SpringBootApplication
- public class SpringbootApplication {
- public static void main(String[] args) {
- ApplicationContext applicationContext =
- SpringApplication.run(SpringbootApplication.class, args);
- for (String name : applicationContext.getBeanDefinitionNames()) {
- System.out.println(name);
- }
- }
- }
类SpringbootApplication在com.xiao.qiang.qianming包下,这个类使用了@SpringBootApplication注解,该注解定义了Spring将自动扫描包com.xiao.qiang.qianming及其子包下的bean
如果你项目中所有的类都定义在上面的包及其子包下,那你不需要做任何事。
但假如你一个类定义在包com.xiao.hui下,则你需要将这个新包也纳入扫描的范围,有两个方案可以达到这个目的。
方案1
定义@ComponentScan(“com.xiao”),这么做扫描的范围扩大到整个父包com.xiao
- @ComponentScan("com.xiao")
- @SpringBootApplication
- public class SpringbootIn10StepsApplication {
方案2
定义分别扫描两个包
- @ComponentScan({"com.xiao.hui","com.xiao.qiang"})
- @SpringBootApplication
- public class SpringbootIn10StepsApplication {
非Spring Boot项目
在非Spring Boot项目中,我们必须显式地使用@ComponentScan注解定义被扫描的包,可以通过XML文件在应用上下文中定义或在Java代码中对应用上下文定义
Java代码方式:
- @ComponentScan({"com.xiao.package1","com.xiao.package2"})
- @Configuration
- public class SpringConfiguration {
注:@Configuration 和@ComponentScan注解背后会做什么呢?
其实很简单,@ComponentScan告诉Spring 哪个packages 的用注解标识的类 会被spring自动扫描并且装入bean容器。
例如,如果你有个类用@Controller注解标识了,那么,如果不加上@ComponentScan,自动扫描该controller,那么该Controller就不会被spring扫描到,更不会装入spring容器中,因此你配置的这个Controller也没有意义。
类上的注解@Configuration 是最新的用注解配置spring,也就是说这是个配置文件,和原来xml配置是等效的,只不过现在用java代码进行配置了 加上一个@Configuration注解就行了,是不是很方便,不需要那么繁琐的xml配置了,这样基于注解的配置,可读性也大大增高了。
XML文件方式:
<context:component-scan base-package=“com.xiao.package1, com.xiao.package2” />
三、使用@ComponentScan自动扫描组件实例
包扫描会扫描只要标注了@Controller,@Service,@Repository,@Component这四个注解都会被扫描到容器中。
1、@Controller 控制器(注入服务)
用于标注控制层,相当于struts中的action层
2、@Service 服务(注入dao)
用于标注服务层,主要用来进行业务的逻辑处理
3、@Repository(实现dao访问)
用于标注数据访问层,也可以说用于标注数据访问组件,即DAO组件.
4、@Component (把普通pojo实例化到spring容器中,相当于配置文件中的 )
泛指各种组件,就是说当我们的类不属于各种归类的时候(不属于@Controller、@Services等的时候),我们就可以使用@Component来标注这个类。
案例:<context:component-scan base-package=”com.*”>
上面的这个例子是引入Component组件的例子,其中base-package表示为需要扫描的所有子包。
有一篇不错的文章(Spring注解详解):https://blog.csdn.net/xyh820/article/details/7303330/

新增控制层的java类:TestController和HelloController
- import org.springframework.stereotype.Controller;
- @Controller
- public class TestController {
- }
- import org.springframework.web.bind.annotation.RequestMapping;
- import org.springframework.web.bind.annotation.RequestMethod;
- import org.springframework.web.bind.annotation.RestController;
- @RestController
- public class HelloController {
- @RequestMapping(value="/hello", method = RequestMethod.GET)
- public String hello() {
- return "Hello, Spring Boot";
- }
- }
新建一个业务逻辑层类:TestService
- import org.springframework.stereotype.Service;
- @Service
- public class TestService {
- }
新建一个数据库连接Dao类:TestDao
- import org.springframework.stereotype.Repository;
- @Repository
- public class TestDao {
- }
新建一个Person:
- public class Person {
- public Person(String string, int i) {
- }
- }
主方法测试:
spring boot:
- import org.springframework.boot.SpringApplication;
- import org.springframework.boot.autoconfigure.SpringBootApplication;
- import org.springframework.context.ApplicationContext;
- import org.springframework.context.annotation.ComponentScan;
- @SpringBootApplication
- @ComponentScan(value = "com.hui")
- public class Application {
- public static void main(String[] args) {
- ApplicationContext applicationContext =
- SpringApplication.run(Application.class, args);
- for (String name : applicationContext.getBeanDefinitionNames()) {
- System.out.println(name);
- }
- }
- }
非spring boot:
- import org.springframework.context.ApplicationContext;
- import org.springframework.context.annotation.AnnotationConfigApplicationContext;
- import org.springframework.context.annotation.Bean;
- import org.springframework.context.annotation.ComponentScan;
- import org.springframework.context.annotation.Configuration;
- import com.hui.entity.Person;
- @Configuration
- @ComponentScan(value = "com.hui")
- public class ComponentTest {
- @Bean
- public Person getPerson() {
- return new Person("百度好帅", 10000);
- }
- public static void main(String[] args) {
- @SuppressWarnings("resource")
- ApplicationContext applicationContext =
- new AnnotationConfigApplicationContext(ComponentTest.class);
- String[] beanNames = applicationContext.getBeanDefinitionNames();
- for (String bean : beanNames) {
- System.out.println(bean);
- }
- }
- }
运行Application:
控制台扫描到了/hello,即映射成功


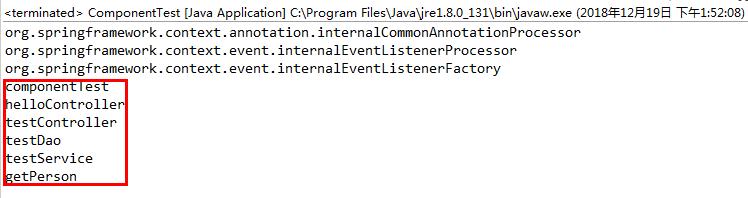
把Application注释掉运行ComponentTest:
参考:
https://blog.csdn.net/Lamb_IT/article/details/80918704
https://jingyan.baidu.com/article/7908e85cc6930daf481ad2b6.html
@ServeletComponentScan和@ComponentScan的区别的更多相关文章
- annotation-config 和 component-scan 的区别
<context:annotation-config> 和 <context:component-scan>是Spring Core里面的两个基础概念,每个使用者都有必要理解怎 ...
- <context:annotation-config> 和 <context:component-scan>的区别
转自:GOOD spring <context:annotation-config> 跟 <context:component-scan>诠释及区别 <context:a ...
- @MapperScan和@ComponentScan的区别
区别 今天在撸SpringBoot的时候,突然对注解产生了混淆,@MapperScan和@ComponentScan都是扫描包,二者之间有什么区别呢? 首先,@ComponentScan是组件扫描注解 ...
- Spring 开启Annotation <context:annotation-config> 和 <context:component-scan>诠释及区别
<context:annotation-config> 和 <context:component-scan>的区别 <context:annotation-config& ...
- spring <context:annotation-config> 跟 <context:component-scan>诠释及区别
<context:annotation-config> 和 <context:component-scan>的区别 Difference between <context ...
- Spring 配置 Annotation <context:annotation-config> 和 <context:component-scan>标签的诠释及区别
Spring 开启Annotation <context:annotation-config> 和 <context:component-scan>诠释及区别 <cont ...
- (转)Spring开启Annotation<context:annotation-config> 和 <context:component-scan>诠释及区别
转自:https://www.cnblogs.com/leiOOlei/p/3713989.html <context:annotation-config> 和 <context:c ...
- Spring <context:annotation-config> 和 <context:component-scan>区别
转自:http://www.cnblogs.com/leiOOlei/p/3713989.html <context:annotation-config> 和 <context:co ...
- Spring----注释----开启Annotation <context:annotation-config> 和 <context:component-scan>诠释及区别
来源:http://www.cnblogs.com/leiOOlei/p/3713989.html <context:annotation-config> 和 <context:co ...
随机推荐
- 51nod 1305 Pairwise Sum and Divide
有这样一段程序,fun会对整数数组A进行求值,其中Floor表示向下取整: fun(A) sum = 0 for i = 1 to A.length for j = ...
- P1983 车站分级[拓扑]
题目描述 一条单向的铁路线上,依次有编号为 1, 2, -, n1,2,-,n的 nn个火车站.每个火车站都有一个级别,最低为 11 级.现有若干趟车次在这条线路上行驶,每一趟都满足如下要求:如果这趟 ...
- 如何防护DDOS攻击策略
DDoS是目前最凶猛.最难防御的网络攻击之一.现实情况是,这个世界级难题还没有完美的.彻底的解决办法,但采取适当的措施以降低攻击带来的影响.减少损失是十分必要的.将DDoS防御作为整体安全策略的重要部 ...
- Python语言程序设计(3)--实例2-python蟒蛇绘制-turtle库
1. 2. 3.了解turtle库 Turtle,也叫海龟渲染器,使用Turtle库画图也叫海龟作图.Turtle库是Python语言中一个很流行的绘制图像的函数库.海龟渲染器,和各种三维软件都有着良 ...
- Machine learning system design---Error analysis
Error analysis--让我们系统的去判断我们接下来要做什么,而不是随机的,凭直觉地选择一个去做 我们在设计机器学习应用时,刚开始使用简单(简单的features)的算法来很快的完成它,它可能 ...
- 1.什么是spring
spring框架是一个为java应用程序的开发提供了综合,广泛的基础性支持的java开源框架, 使得开发者不用去关心一些冗杂的基础性问题,从而可以更加专注于应用程序的开发. spring框架是一个分层 ...
- PHP高手干货分享:不能不看的50个细节!
1.用单引号代替双引号来包含字符串,这样做会更快一些.因为PHP会在双引号包围的字符串中搜寻变量, 单引号则不会,注意:只有echo能这么做,它是一种可以把多个字符串当作参数的”函数”(译注:PHP手 ...
- go语言-流程控制--if
一.基本语法介绍 表达式后一定要带{},表达式不需要带(),在if中支持直接定义一个变量,如a:=2 if 表达式{ 代码执行块 }else if{ 代码执行块 }else{ 代码执行块 } 案例1. ...
- 2019ICPC徐州网络赛 A.Who is better?——斐波那契博弈&&扩展中国剩余定理
题意 有一堆石子,两个顶尖聪明的人玩游戏,先取者可以取走任意多个,但不能全取完,以后每人取的石子数不能超过上个人的两倍.石子的个数是通过模方程组给出的. 题目链接 分析 斐波那契博弈有结论:当且仅当石 ...
- java.util.Properties 读取配置文件中的参数
用法 getProperty方法的返回值是String类型. java.util.Properties 读取配置文件中的参数 //读取配置文件 FileInputStream inStream = n ...