如何使用 libtorch 实现 AlexNet 网络?
如何使用 libtorch 实现 AlexNet 网络?
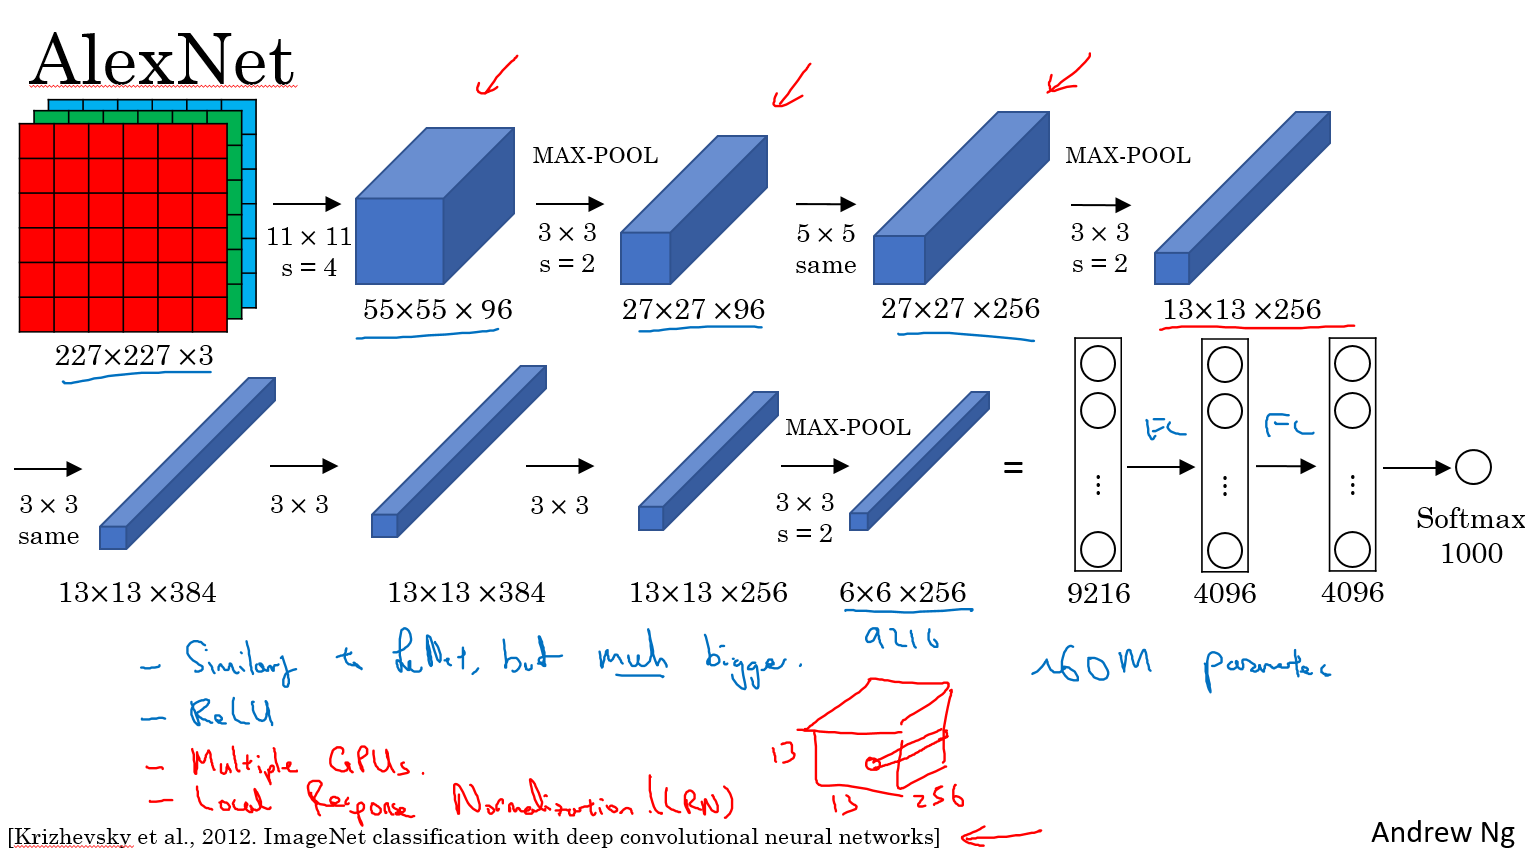
按照图片上流程写即可。输入的图片大小必须 227x227 3 通道彩色图片
// Define a new Module.

struct Net : torch::nn::Module {

	Net() {

		conv1 = torch::nn::Conv2d(torch::nn::Conv2dOptions(3, 96, { 11,11 }).stride({4,4}));

		conv2 = torch::nn::Conv2d(torch::nn::Conv2dOptions(96, 256, { 5,5 }).padding(2));

		conv3 = torch::nn::Conv2d(torch::nn::Conv2dOptions(256, 384, { 3,3 }).padding(1));

		conv4 = torch::nn::Conv2d(torch::nn::Conv2dOptions(384, 384, { 3,3 }).padding(1));

		conv5 = torch::nn::Conv2d(torch::nn::Conv2dOptions(384, 256, { 3,3 }).padding(1));

		fc1 = torch::nn::Linear(256*6*6,4096);

		fc2 = torch::nn::Linear(4096, 4096);

		fc3 = torch::nn::Linear(4096, 1000);

	}

	// Implement the Net's algorithm.

	torch::Tensor forward(torch::Tensor x) {

		x = conv1->forward(x);

		x = torch::relu(x);

		//LRN

		x = torch::max_pool2d(x, { 3,3 }, { 2,2 });

		x = conv2->forward(x);

		//LRN

		x = torch::relu(x);

		x = torch::max_pool2d(x, { 3,3 }, { 2,2 });

		x = conv3->forward(x);

		x = torch::relu(x);

		x = conv4->forward(x);

		x = torch::relu(x);

		x = conv5->forward(x);

		x = torch::relu(x);

		x = torch::max_pool2d(x, { 3,3 }, { 2,2 });

		x = x.view({ x.size(0),-1 });

		x = fc1->forward(x);

		x = torch::relu(x);

		x = torch::dropout(x,0.5,is_training());

		x = fc2->forward(x);

		x = torch::relu(x);

		x = torch::dropout(x, 0.5, is_training());

		x = fc3->forward(x);

		x = torch::log_softmax(x,1);

		return x;

	}

	// Use one of many "standard library" modules.

	torch::nn::Conv2d conv1{ nullptr };

	torch::nn::Conv2d conv2{ nullptr };

	torch::nn::Conv2d conv3{ nullptr };

	torch::nn::Conv2d conv4{ nullptr };

	torch::nn::Conv2d conv5{ nullptr };

	torch::nn::Linear fc1{ nullptr };

	torch::nn::Linear fc2{ nullptr };

	torch::nn::Linear fc3{ nullptr };

};
具体可参考这个
name: "AlexNet"

layer {

  name: "data"

  type: "Input"

  top: "data"

  input_param { shape: { dim: 10 dim: 3 dim: 227 dim: 227 } }

}

layer {

  name: "conv1"

  type: "Convolution"

  bottom: "data"

  top: "conv1"

  param {

    lr_mult: 1

    decay_mult: 1

  }

  param {

    lr_mult: 2

    decay_mult: 0

  }

  convolution_param {

    num_output: 96

    kernel_size: 11

    stride: 4

  }

}

layer {

  name: "relu1"

  type: "ReLU"

  bottom: "conv1"

  top: "conv1"

}

layer {

  name: "norm1"

  type: "LRN"

  bottom: "conv1"

  top: "norm1"

  lrn_param {

    local_size: 5

    alpha: 0.0001

    beta: 0.75

  }

}

layer {

  name: "pool1"

  type: "Pooling"

  bottom: "norm1"

  top: "pool1"

  pooling_param {

    pool: MAX

    kernel_size: 3

    stride: 2

  }

}

layer {

  name: "conv2"

  type: "Convolution"

  bottom: "pool1"

  top: "conv2"

  param {

    lr_mult: 1

    decay_mult: 1

  }

  param {

    lr_mult: 2

    decay_mult: 0

  }

  convolution_param {

    num_output: 256

    pad: 2

    kernel_size: 5

    group: 2

  }

}

layer {

  name: "relu2"

  type: "ReLU"

  bottom: "conv2"

  top: "conv2"

}

layer {

  name: "norm2"

  type: "LRN"

  bottom: "conv2"

  top: "norm2"

  lrn_param {

    local_size: 5

    alpha: 0.0001

    beta: 0.75

  }

}

layer {

  name: "pool2"

  type: "Pooling"

  bottom: "norm2"

  top: "pool2"

  pooling_param {

    pool: MAX

    kernel_size: 3

    stride: 2

  }

}

layer {

  name: "conv3"

  type: "Convolution"

  bottom: "pool2"

  top: "conv3"

  param {

    lr_mult: 1

    decay_mult: 1

  }

  param {

    lr_mult: 2

    decay_mult: 0

  }

  convolution_param {

    num_output: 384

    pad: 1

    kernel_size: 3

  }

}

layer {

  name: "relu3"

  type: "ReLU"

  bottom: "conv3"

  top: "conv3"

}

layer {

  name: "conv4"

  type: "Convolution"

  bottom: "conv3"

  top: "conv4"

  param {

    lr_mult: 1

    decay_mult: 1

  }

  param {

    lr_mult: 2

    decay_mult: 0

  }

  convolution_param {

    num_output: 384

    pad: 1

    kernel_size: 3

    group: 2

  }

}

layer {

  name: "relu4"

  type: "ReLU"

  bottom: "conv4"

  top: "conv4"

}

layer {

  name: "conv5"

  type: "Convolution"

  bottom: "conv4"

  top: "conv5"

  param {

    lr_mult: 1

    decay_mult: 1

  }

  param {

    lr_mult: 2

    decay_mult: 0

  }

  convolution_param {

    num_output: 256

    pad: 1

    kernel_size: 3

    group: 2

  }

}

layer {

  name: "relu5"

  type: "ReLU"

  bottom: "conv5"

  top: "conv5"

}

layer {

  name: "pool5"

  type: "Pooling"

  bottom: "conv5"

  top: "pool5"

  pooling_param {

    pool: MAX

    kernel_size: 3

    stride: 2

  }

}

layer {

  name: "fc6"

  type: "InnerProduct"

  bottom: "pool5"

  top: "fc6"

  param {

    lr_mult: 1

    decay_mult: 1

  }

  param {

    lr_mult: 2

    decay_mult: 0

  }

  inner_product_param {

    num_output: 4096

  }

}

layer {

  name: "relu6"

  type: "ReLU"

  bottom: "fc6"

  top: "fc6"

}

layer {

  name: "drop6"

  type: "Dropout"

  bottom: "fc6"

  top: "fc6"

  dropout_param {

    dropout_ratio: 0.5

  }

}

layer {

  name: "fc7"

  type: "InnerProduct"

  bottom: "fc6"

  top: "fc7"

  param {

    lr_mult: 1

    decay_mult: 1

  }

  param {

    lr_mult: 2

    decay_mult: 0

  }

  inner_product_param {

    num_output: 4096

  }

}

layer {

  name: "relu7"

  type: "ReLU"

  bottom: "fc7"

  top: "fc7"

}

layer {

  name: "drop7"

  type: "Dropout"

  bottom: "fc7"

  top: "fc7"

  dropout_param {

    dropout_ratio: 0.5

  }

}

layer {

  name: "fc8"

  type: "InnerProduct"

  bottom: "fc7"

  top: "fc8"

  param {

    lr_mult: 1

    decay_mult: 1

  }

  param {

    lr_mult: 2

    decay_mult: 0

  }

  inner_product_param {

    num_output: 1000

  }

}

layer {

  name: "prob"

  type: "Softmax"

  bottom: "fc8"

  top: "prob"

}
如何使用 libtorch 实现 AlexNet 网络?的更多相关文章
- AlexNet 网络详解及Tensorflow实现源码
版权声明:本文为博主原创文章,未经博主允许不得转载. 1. 图片数据处理 2. 卷积神经网络 2.1. 卷积层 2.2. 池化层 2.3. 全链层 3. AlexNet 4. 用Tensorflow搭 ...
- 第十六节,卷积神经网络之AlexNet网络实现(六)
上一节内容已经详细介绍了AlexNet的网络结构.这节主要通过Tensorflow来实现AlexNet. 这里做测试我们使用的是CIFAR-10数据集介绍数据集,关于该数据集的具体信息可以通过以下链接 ...
- 第十五节,卷积神经网络之AlexNet网络详解(五)
原文 ImageNet Classification with Deep ConvolutionalNeural Networks 下载地址:http://papers.nips.cc/paper/4 ...
- Caffe训练AlexNet网络,精度不高或者为0的问题结果
当我们使用Caffe训练AlexNet网络时,会遇到精度一值在低精度(30%左右)升不上去,或者精度总是为0,如下图所示: 出现这种情况,可以尝试使用以下几个方法解决: 1.数据样本量是否太少,最起码 ...
- 如何使用 libtorch 实现 LeNet 网络?
如何使用 libtorch 实现 LeNet 网络? LeNet 网络论文地址: http://yann.lecun.com/exdb/publis/pdf/lecun-01a.pdf
- AlexNet网络
AlexNet 中包含了比较新的技术点,首次在CNN中成功应用了 ReLu .Dropout和LRN等Trick. 1.成功使用了Relu作为CNN的激活函数,并验证其效果在较深的网络中超过了Sigm ...
- AlexNet网络的Pytorch实现
1.文章原文地址 ImageNet Classification with Deep Convolutional Neural Networks 2.文章摘要 我们训练了一个大型的深度卷积神经网络用于 ...
- 深入理解AlexNet网络
原文地址:https://blog.csdn.net/luoluonuoyasuolong/article/details/81750190 AlexNet论文:<ImageNet Classi ...
- pytorch实现AlexNet网络
直接上图吧 写网络就像搭积木
随机推荐
- 存档格式选择--JSON
游戏里存档可以直接用lua,但是lua需要有一定编程基础:另外可以用ini,不过ini又太简单了,复杂的 格式无法用ini描述:还可以用xml,它的表达能力非常丰富,甚至有限数据库都用xml来作存储结 ...
- Eclipse报Caused by: java.lang.OutOfMemoryError: PermGen space解决思路
一.修改tomcat/bin目录下的catalina.bat 在“rem ----- Execute The Requested Command ----------------------”下加入 ...
- AM335x 添加 HUAWEI MU609 Mini PCIe Module,并用pppd 启动相关设备
kernel 的配置 kernel 3.2.0 make menuconfig Device Drivers ---> [*] USB support ---> <*> USB ...
- Android——Intent(意图)
//Intent的属性 Intent in1 = new Intent(); ComponentName componentName = new ComponentName(this,Activity ...
- Bitmap转灰度字节数组byte[]
工作中遇到图片转灰度数组的须要,经过研究和大神的指导.终于得到例如以下两个方法.能够实现位图转灰度数组 简单的位图转灰度数组就是:得到位图中的每一个像素点,然后依据像素点得到RGB值,最后对RGB值, ...
- 浅析 Hadoop 中的数据倾斜
转自:http://my.oschina.net/leejun2005/blog/100922 最近几次被问到关于数据倾斜的问题,这里找了些资料也结合一些自己的理解. 在并行计算中我们总希望分配的每一 ...
- 面向对象方法的重载(overloading)和覆盖(overriding)
面向对象方法的重载(overloading)和覆盖(overriding). 在有些JAVA书籍中将overriding称为重载,overloading称为过载. Overloading在一个类中可以 ...
- 基于docker部署的微服务架构(四): 配置中心
原文:http://www.jianshu.com/p/b17d65934b58%20 前言 在微服务架构中,由于服务数量众多,如果使用传统的配置文件管理方式,配置文件分散在各个项目中,不易于集中管理 ...
- Window发声函数Beep、MessageBeep
C++ Code 1234567891011 WINBASEAPI BOOL WINAPI Beep(__in DWORD dwFreq, __in DWORD dwDuration ...
- java泛型之泛型边界
http://blog.csdn.net/renwuqiangg/article/details/51296621