Swagger2 生成 Spring Boot API 文档
Swagger 是一个规范和完整的框架,用于生成、描述、调用和可视化 RESTful 风格的 Web 服务。本文主要介绍了在 Spring Boot 添加 Swagger 支持, 生成可自动维护的 API 文档。
POM 文件
在pom.xml中加入Swagger2的依赖
<dependency>

	<groupId>io.springfox</groupId>

	<artifactId>springfox-swagger2</artifactId>

	<version>2.6.1</version>

</dependency>

<dependency>

	<groupId>io.springfox</groupId>

	<artifactId>springfox-swagger-ui</artifactId>

	<version>2.6.1</version>

</dependency>
代码支持
其次我们需要在代码中添加支持,于 Application 同级目录添加 Swagger 配置类,类名随意,但需要增加@EnableSwagger2和@Configuration注解,如下:
import org.springframework.context.annotation.Bean;

import org.springframework.context.annotation.ComponentScan;

import org.springframework.context.annotation.Configuration;

import springfox.documentation.builders.ApiInfoBuilder;

import springfox.documentation.builders.RequestHandlerSelectors;

import springfox.documentation.service.ApiInfo;

import springfox.documentation.service.Contact;

import springfox.documentation.spi.DocumentationType;

import springfox.documentation.spring.web.plugins.Docket;

import springfox.documentation.swagger2.annotations.EnableSwagger2;

@Configuration

@EnableSwagger2

public class Swagger2 {

    @Bean

    public Docket config() {

        return new Docket(DocumentationType.SWAGGER_2)

                .apiInfo(apiInfo())

                .useDefaultResponseMessages(false)

                .select()

                .apis(RequestHandlerSelectors.basePackage("com.pxx.xxx.controller"))

                .build();

    }

    //构建Api文档的详细信息函数

    private ApiInfo apiInfo() {

        return new ApiInfoBuilder()

                .title("Blog系统API文档")

                .contact(new Contact("作者", "访问地址", "联系方式"))

                .build();

    }

}
通过@Configuration注解,让Spring来加载该类配置,@EnableSwagger2注解来启用Swagger2。
再通过createRestApi函数创建Docket的Bean之后,apiInfo()用来创建该Api的基本信息(这些基本信息会展现在文档页面中)。select()函数返回一个ApiSelectorBuilder实例用来控制哪些接口暴露给Swagger来展现,本例采用指定扫描的包路径来定义,Swagger会扫描该包下所有Controller定义的API,并产生文档内容(除了被@ApiIgnore注解的API)
PS:这里需要注意的是.apis(RequestHandlerSelectors.basePackage("com.pxx.xxx.controller")) 指定了 Swagger 的扫描包名, 假如不指定此项, 在 Spring Boot 项目中, 会生成 base-err-controller 的 api 接口项。
访问地址
Ok. 接下来运行项目, 访问 http://项目启动地址/v2/api-docs , 就可以访问到生成的文档的json结构. (如下图 )
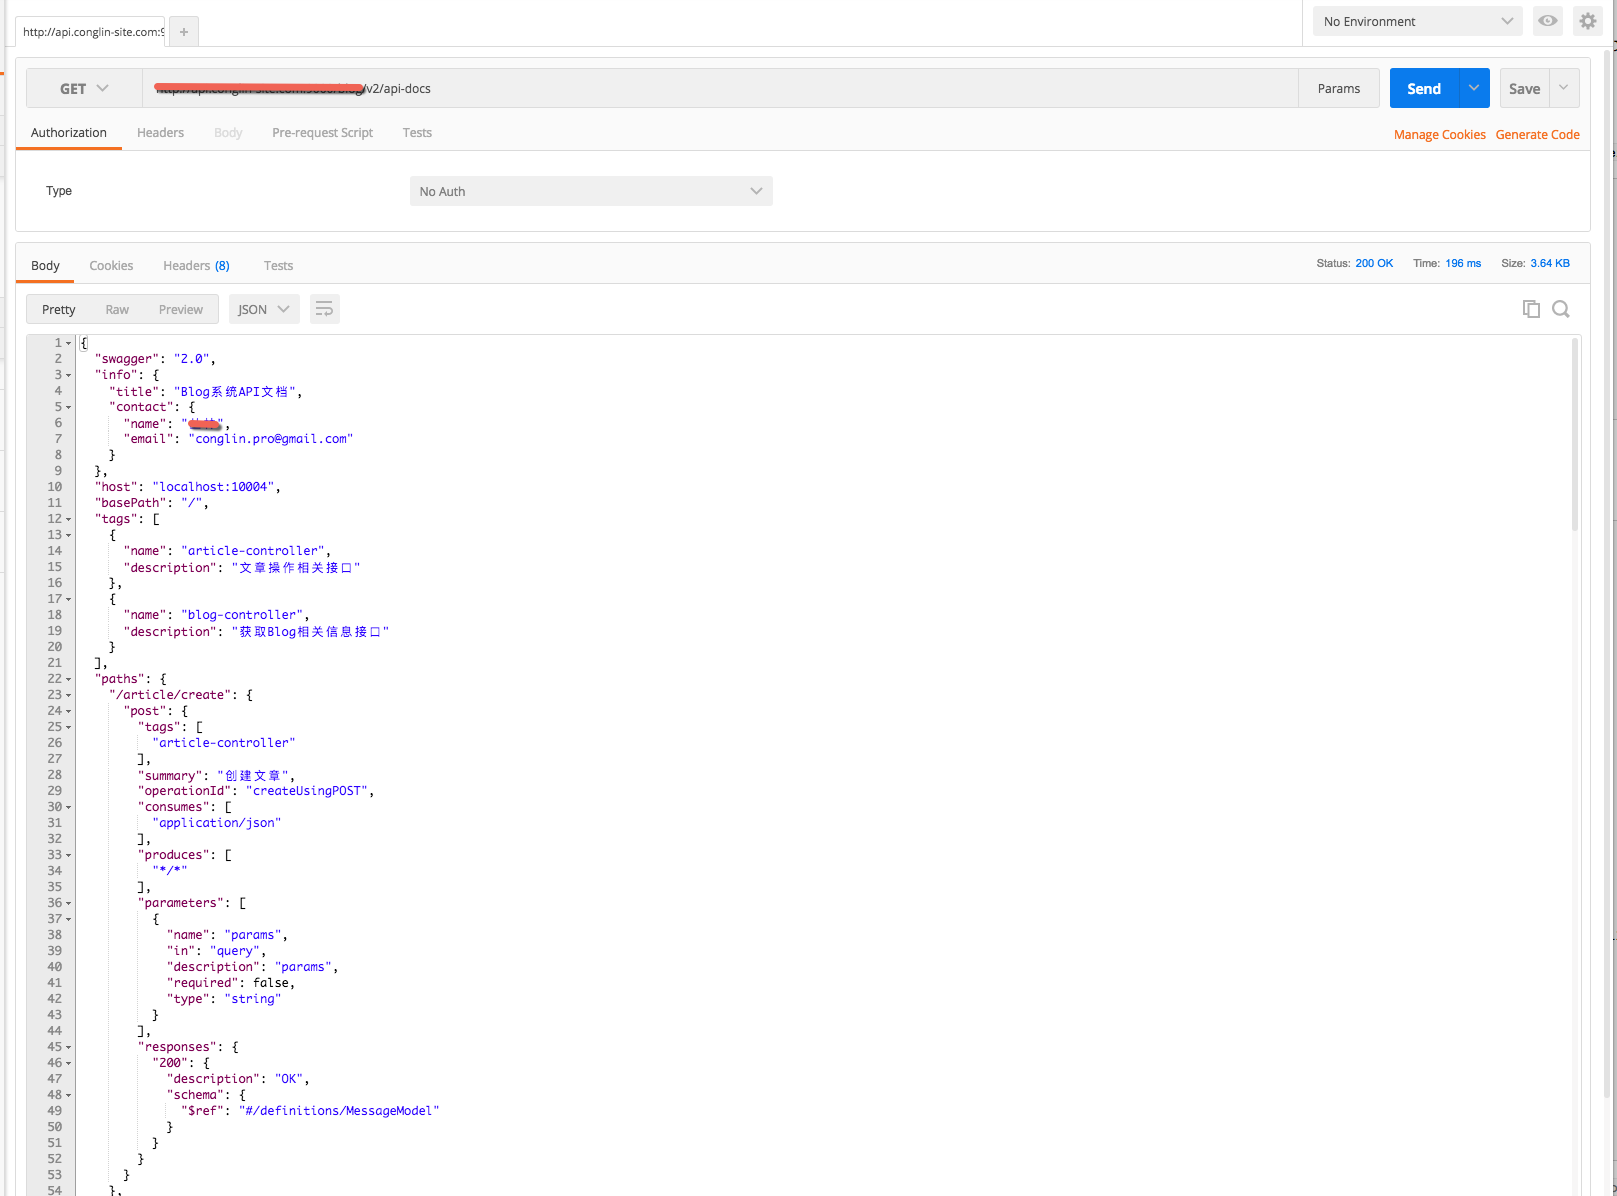
具体结构可参阅 Swagger官方示例
Swagger UI地址: 访问 http://项目启动地址//swagger-ui.html
注解
OK. 现在所有工作基本就绪,通过添加相应注解就可以快速生成相关接口文档, 这也是个人认为比较好的一点。
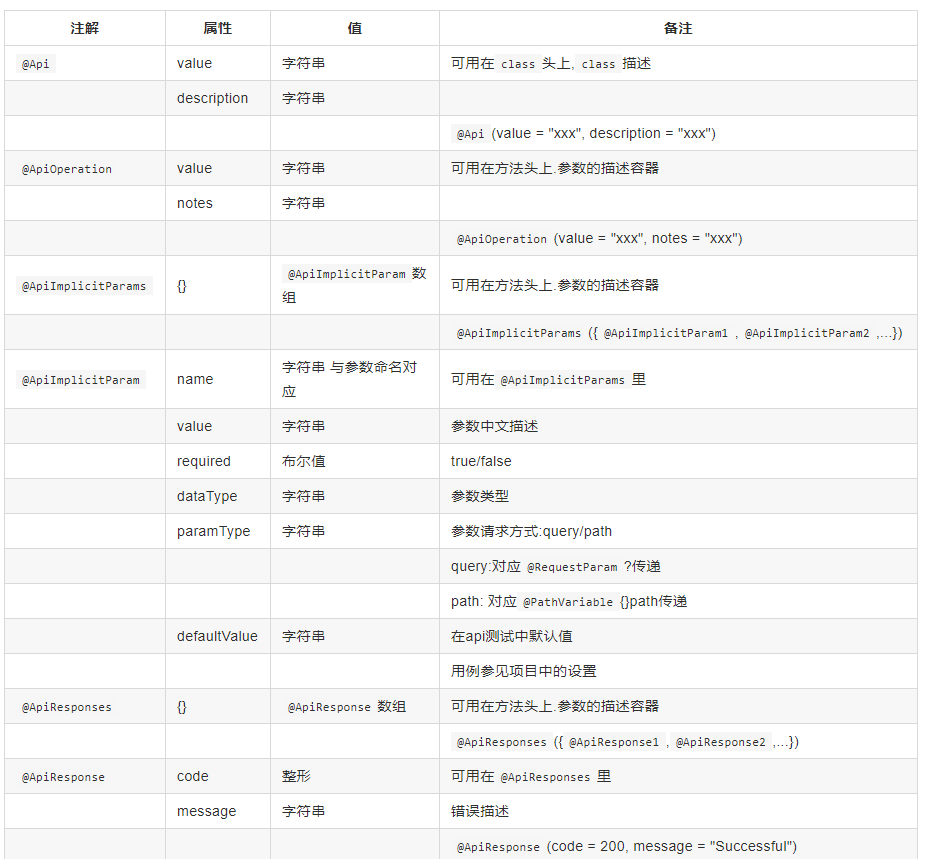
这里开始编写自己的RESTful Controller,跟正常开发没什么区别。主要是接口方法上面新增了几个注解:
- 通过@ApiOperation注解来给API增加说明
- 通过@ApiImplicitParams、@ApiImplicitParam注解来给参数增加说明
- 通过@ApiIgnore来忽略那些不想让生成RESTful API文档的接口
@Api(description = "文章操作相关接口")

@RestController

@RequestMapping("/article")

public class ArticleController {

    private final Logger logger = LoggerFactory.getLogger(ArticleController.class);

    @Autowired

    private BlogService blogService;

    @Autowired

    private JsonMapper jsonMapper;

    @Autowired

    private Environment env;

    @Autowired

    private PxxHttp pxxHttp;

    @ApiOperation(value="创建文章", notes="")

    @RequestMapping(value = {"/create"} , method = RequestMethod.POST)

    MessageModel create(@ApiParam @RequestParam("params") String params) throws IOException {

        return result;

    }

    @ApiOperation(value="更新文章", notes="")

    @RequestMapping(value = "/update", method = RequestMethod.POST)

    public @ResponseBody

    MessageModel update(@ApiParam @RequestParam("params") String params) throws Exception {

        return result;

    }

    @ApiOperation(value="mns更新文章", notes="")

    @RequestMapping(value = "/updatearticle", method = RequestMethod.POST)

    public @ResponseBody

    MessageModel updateArticle(@ApiParam @RequestParam("params") String params) throws Exception {

        return result;

    }

}
@Api(description = ""): 对整个 Controller 的定义做一个解释@ApiOperation(value="", notes=""): 对 Controller 内 function 定义的内容作一解释@ApiParam: 添加到参数前, Swagger 会自动生成 API 文档中对参数的标示
package com.osp.ethscan.config;

import org.springframework.context.annotation.Bean;

import org.springframework.context.annotation.Configuration;

import springfox.documentation.builders.ApiInfoBuilder;

import springfox.documentation.builders.PathSelectors;

import springfox.documentation.builders.RequestHandlerSelectors;

import springfox.documentation.service.ApiInfo;

import springfox.documentation.service.Contact;

import springfox.documentation.spi.DocumentationType;

import springfox.documentation.spring.web.plugins.Docket;

import springfox.documentation.swagger2.annotations.EnableSwagger2;

/**

 *

 * @author zhangmingcheng

 * @date 2018年9月25日

 */

@Configuration

@EnableSwagger2

public class Swagger2 {

	@Bean

	public Docket createRestApi() {

		return new Docket(DocumentationType.SWAGGER_2).apiInfo(apiInfo()).select()

				.apis(RequestHandlerSelectors.basePackage("com.osp.ethscan.controller")).paths(PathSelectors.any())

				.build();

	}

	/**

	 * 构建Api文档的详细信息函数

	 *

	 * @return

	 */

	private ApiInfo apiInfo() {

		return new ApiInfoBuilder().title("osp-etherscan api文档")

				.description("简单优雅的restful风格,https://www.cnblogs.com/zhangmingcheng")

				.contact(new Contact("zmcheng", "", ""))

				.termsOfServiceUrl("https://www.cnblogs.com/zhangmingcheng").version("1.0").build();

	}

}
Controller:
package com.osp.ethscan.controller; import java.util.List; import org.springframework.beans.factory.annotation.Autowired;
import org.springframework.web.bind.annotation.PathVariable;
import org.springframework.web.bind.annotation.RequestMapping;
import org.springframework.web.bind.annotation.RequestMethod;
import org.springframework.web.bind.annotation.RestController; import com.osp.ethscan.entity.UserEntity;
import com.osp.ethscan.mapper.UserMapper;
import com.osp.ethscan.service.MailService; import io.swagger.annotations.Api;
import io.swagger.annotations.ApiImplicitParam;
import io.swagger.annotations.ApiOperation;
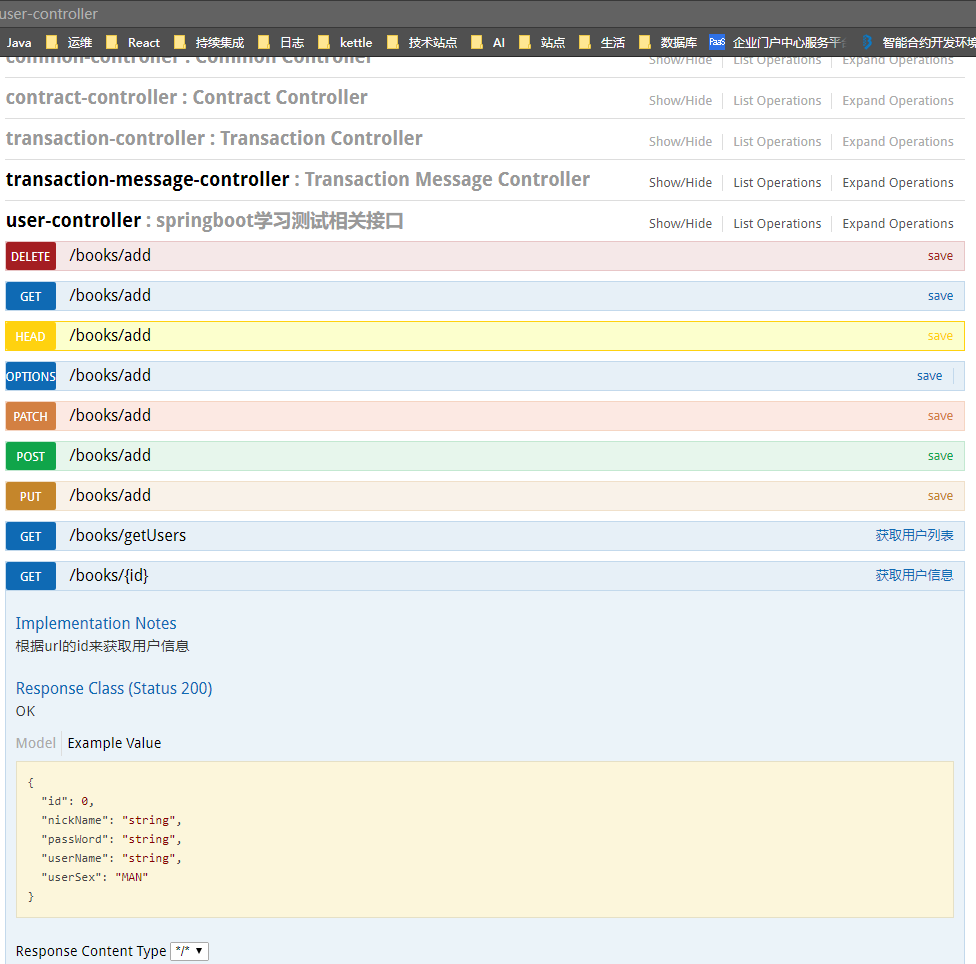
import springfox.documentation.annotations.ApiIgnore; @Api(description = "springboot学习测试相关接口")
@RestController
@RequestMapping(value = "/books")
public class UserController { @Autowired
private UserMapper userMapper; @Autowired
private MailService mailService; @ApiOperation(value = "获取用户列表", notes = "")
@RequestMapping(value = "/getUsers", method = { RequestMethod.GET })
public List<UserEntity> getUsers() {
List<UserEntity> users = userMapper.getAll();
mailService.sendSimpleMail("18753377530@163.com", "test simple mail", " hello this is simple mail");
return users;
} // 如果请求参数在url上,@ApiImplicitParam上加paramType = "path"
@RequestMapping(value = "/{id}", method = { RequestMethod.GET })
@ApiImplicitParam(name = "id", value = "用户ID", required = true, dataType = "Long", paramType = "path")
@ApiOperation(value = "获取用户信息", notes = "根据url的id来获取用户信息")
public UserEntity getUser(@PathVariable Long id) {
UserEntity user = userMapper.getOne(id);
return user;
} @RequestMapping("/add")
public void save(UserEntity user) {
userMapper.insert(user);
} @ApiIgnore // 使用该注解忽略这个API
@RequestMapping(value = "update")
public void update(UserEntity user) {
userMapper.update(user);
} @ApiIgnore // 使用该注解忽略这个API
@RequestMapping(value = "/delete/{id}")
public void delete(@PathVariable("id") Long id) {
userMapper.delete(id);
} }
Swagger2 生成 Spring Boot API 文档的更多相关文章
- Swagger2生成后台的API文档
添加依赖: <!--Swagger2API生成--> <dependency> <groupId>io.springfox</groupId> < ...
- SpringBoot入门教程(二十)Swagger2-自动生成RESTful规范API文档
Swagger2 方式,一定会让你有不一样的开发体验:功能丰富 :支持多种注解,自动生成接口文档界面,支持在界面测试API接口功能:及时更新 :开发过程中花一点写注释的时间,就可以及时的更新API文档 ...
- Spring Boot 2.x基础教程:使用Swagger2构建强大的API文档
随着前后端分离架构和微服务架构的流行,我们使用Spring Boot来构建RESTful API项目的场景越来越多.通常我们的一个RESTful API就有可能要服务于多个不同的开发人员或开发团队:I ...
- 使用apidoc 生成Restful web Api文档——新手问题与解决方法
使用apidoc工具来给项目做接口文档,不仅有合理的源码注释,还可以生成对应的文档.是给源码写备注的一个极佳实践. 工具名称:apiDoc Git地址:https://github.com/apido ...
- apidoc 生成Restful web Api文档
在服务器项目开发过程中,总会牵扯到接口文档的设计与编写,之前使用的都是office写一个文档,不够直观.下面介绍一种工具生成Apidoc.,该工具是Nodejs的模块,请务必在使用前安装好nodejs ...
- 使用apidoc 生成Restful web Api文档
在项目开发过程中,总会牵扯到接口文档的设计与编写,之前使用的都是office工具,写一个文档,总也是不够漂亮和直观.好在git上的开源大神提供了生成文档的工具,so来介绍一下! 该工具是Nodejs的 ...
- Api文档生成工具与Api文档的传播(pdf)
点击查看apidoc生成文档demo 1 环境和工具 win10 apidoc:注释生成api文档 wkhtmltopdf:apidoc生成的是html,不适合传播,于是通过wkhtmltopdf将h ...
- spring boot:swagger3文档展示分页和分栏的列表数据(swagger 3.0.0 / spring boot 2.3.3)
一,什么情况下需要展示分页和分栏的数据的文档? 分页时,页面上展示的是同一类型的列表的数据,如图: 分栏时,每行都是一个列表,而且展示的数据类型也可能不同 这也是两种常用的数据返回形式 说明:刘宏缔的 ...
- SpringBoot中使用springfox+swagger2书写API文档
随着前后端的分离,借口文档变的尤其重要,springfox是通过注解的形式自动生成API文档,利用它,可以很方便的书写restful API,swagger主要用于展示springfox生成的API文 ...
随机推荐
- VC++:Debug出错,提示错误在findfile.cpp (Line 369)
调试程序的Debug版本,出现断言框,定位于库文件findfile.cpp 第369行: void CFileFind::AssertValid() const { // if you trip th ...
- 第四章 Spring.Net 如何管理您的类___IObjectPostProcessor接口
官方取名叫 对象后处理器 (object post-processor) , 听起来很高级的样子啊!实际上就是所有实现了这个接口的类,增加了两个方法. Spring.Objects.Factory.C ...
- Python 爬虫知识点 - 淘宝商品检索结果抓包分析(续二)
一.URL分析 通过对“Python机器学习”结果抓包分析,有两个无规律的参数:_ksTS和callback.通过构建如下URL可以获得目标关键词的检索结果,如下所示: https://s.taoba ...
- Javascript 字符串替换
<!DOCTYPE html><html><head> <meta http-equiv="Content-Type" content=& ...
- 安装memcacheq
1.下载memcacheq包 下载地址:http://code.google.com/p/memcacheq/downloads/list 解压包:# tar -zxvf memcache ...
- beginUpdates和endUpdates-实现UITableView的动画块
我们在做UITableView的修改,删除,选择时,需要对UITableView进行一系列的动作操作. 这样,我们就会用到 [tableView beginUpdates]; if (newCount ...
- PyQt4 Box布局
使用布局类别方式的布局管理器比绝对方式的布局管理器更加灵活实用.它是窗口部件的首选布局管理方式.最基本的布局类别是QHBoxLayout和QVBoxLayout布局管理方式,分别将窗口部件水平和垂直排 ...
- 互斥锁mutex
https://blog.csdn.net/rqc112233/article/details/50015069 //g++ mute.cpp -o mute -g -lrt -lpthread #i ...
- 腾讯正式开源高性能超轻量级 PHP 框架 Biny
概况 Biny是一款高性能的超轻量级PHP框架 遵循 MVC 模式,用于快速开发现代 Web 应用程序 Biny代码简洁优雅,对应用层,数据层,模板渲染层的封装简单易懂,能够快速上手使用 高性能,框架 ...
- 学习C++服务端一:MySql与C++
mysql学习: http://www.cnblogs.com/cy163/archive/2008/10/16/1312277.html http://developer.51cto.com/art ...