React native中DrawerNavigator,StackNavigator,TabNavigator导航栏使用
import React from 'react';
import { View, Text,Button } from 'react-native';
import { DrawerNavigator,StackNavigator,TabNavigator } from 'react-navigation';
/*
* 主屏幕,可以跳转至Tab Navigator和DrawerNavigator*/
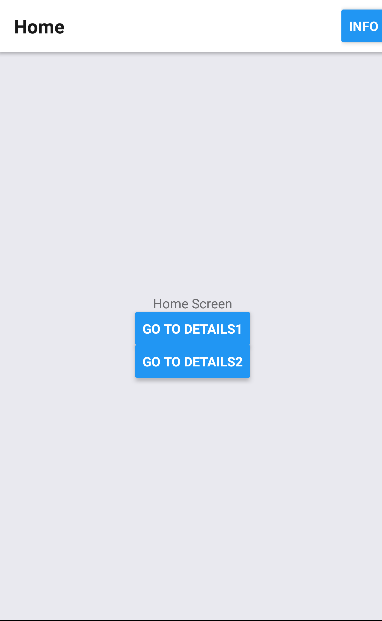
const HomeScreen = ({ navigation }) => (
<View style={{ flex: 1, alignItems: 'center', justifyContent: 'center' }}>
<Text>Home Screen</Text>
<Button
onPress={() => navigation.navigate('Details1')}
title="Go to details1"
/>
<Button
onPress={() => navigation.navigate('Details2')}
title="Go to details2"
/>
</View>
);
/*次屏幕一
* 用于承接TabNavigator
* */
const DetailsScreen1 = () => (
<View style={{ flex: 1, alignItems: 'center', justifyContent: 'center' }}>
<Text>Details1 Screen</Text>
</View>
);
/*
* 次屏幕二
* 用于承接DrawerNavigator
* */
const DetailsScreen2 = () => (
<View style={{ flex: 1, alignItems: 'center', justifyContent: 'center' }}>
<Text>Details2 Screen</Text>
</View>
);
/*
* TabNavigator主屏幕
* */
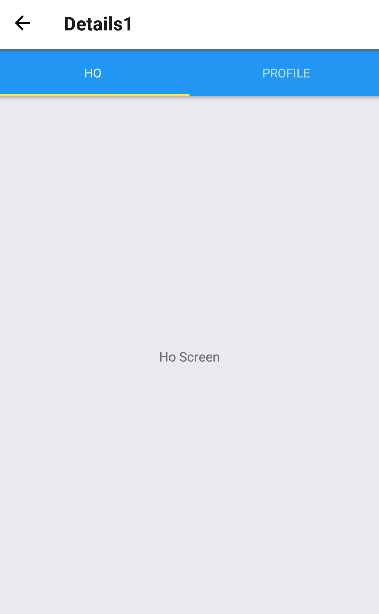
const HoScreen = () => (
<View style={{ flex: 1, alignItems: 'center', justifyContent: 'center' }}>
<Text>Ho Screen</Text>
</View>
);
/*
* TabNavigator次屏幕
* */
const ProfileScreen = () => (
<View style={{ flex: 1, alignItems: 'center', justifyContent: 'center' }}>
<Text>Profile Screen</Text>
</View>
);
/*TabNavigator
* */
const RootTabs = TabNavigator({
Ho: {
screen: HoScreen,
},
Profile: {
screen: ProfileScreen,
},
});
/*
* DrawerNavigator主屏幕
* */
const HScreen = ({navigation}) => (
<View style={{ flex: 1, alignItems: 'center', justifyContent: 'center' }}>
<Text>H Screen</Text>
<Button
onPress={() => navigation.navigate('DrawerToggle')}
title="Open Drawer"
/>
</View>
);
/*
* DrawerNaivigator
* 次屏幕
* */
const ProScreen = () => (
<View style={{ flex: 1, alignItems: 'center', justifyContent: 'center' }}>
<Text>Pro Screen</Text>
</View>
);
/*
* DrawerNavigator
* */
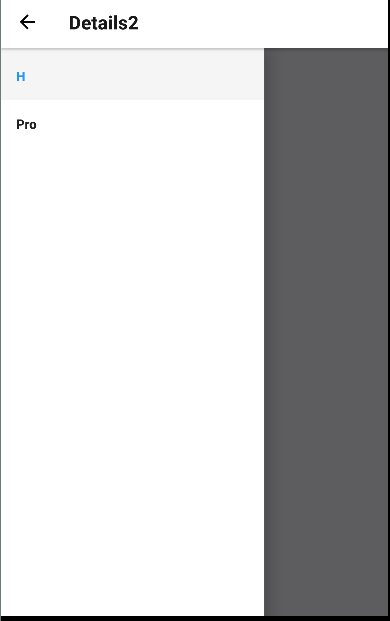
const RootDrawer = DrawerNavigator({
H: {
screen: HScreen,
},
Pro: {
screen: ProScreen,
},
});
/*
*
* StackNavigator
* */
const RootNavigator = StackNavigator({
Home: {
screen: HomeScreen,
navigationOptions: {
headerTitle: 'Home',
headerRight: <Button title="Info" />,
},
},
Details1: {
screen: RootTabs,
navigationOptions: {
headerTitle: 'Details1',
},
},
Details2: {
screen: RootDrawer,
navigationOptions: {
headerTitle: 'Details2',
},
},
});
export default class App extends React.Component {
render() {
return <RootNavigator/>;
}
}
效果图
React native中DrawerNavigator,StackNavigator,TabNavigator导航栏使用的更多相关文章
- React Native(四)——顶部以及底部导航栏实现方式
效果图: 一步一步慢慢来: 其实刚入手做app的时候,就应该做出简单的顶部以及底部导航栏.无奈又在忙其他事情,导致这些现在才整理出来. 1.顶部导航栏:react-native-scrollable- ...
- React Native 的组件之底部导航栏 TabBarIOS(一)
import React,{Component}from 'react'; import { AppRegistry, StyleSheet, Text, View, TabBarIOS, } fro ...
- react native 中的ListView
ListView 的运用: 1.首先在react native中引入这个组件: 2.初始化的ListView 的相关属性: constructor(props) { super(props); con ...
- React Native 中 CSS 的使用
首先声明,此文原作者为黎 跃春 React Native中CSS 内联样式 对象样式 使用Stylesheet.Create 样式拼接 导出样式对象 下面的代码是index.ios.js中的代码: / ...
- react native中的欢迎页(解决首加载白屏)
参照网页: http://blog.csdn.net/fengyuzhengfan/article/details/52712829 首先是在原生中写一些方法,然后通过react native中js去 ...
- React Native中的网络请求fetch和简单封装
React Native中的网络请求fetch使用方法最为简单,但却可以实现大多数的网络请求,需要了解更多的可以访问: https://segmentfault.com/a/1190000003810 ...
- [转] 「指尖上的魔法」 - 谈谈 React Native 中的手势
http://gold.xitu.io/entry/55fa202960b28497519db23f React-Native是一款由Facebook开发并开源的框架,主要卖点是使用JavaScrip ...
- [转] 在React Native中使用ART
http://bbs.reactnative.cn/topic/306/%E5%9C%A8react-native%E4%B8%AD%E4%BD%BF%E7%94%A8art 前半个月捣腾了一下Rea ...
- react native中使用echarts
开发平台:mac pro node版本:v8.11.2 npm版本:6.4.1 react-native版本:0.57.8 native-echarts版本:^0.5.0 目标平台:android端收 ...
随机推荐
- 微信小程序 页面跳转方式
// 保留当前页面,跳转到应用内的某个页面,使用wx.navigateBack可以返回到原页面. // 注意:调用 navigateTo 跳转时,调用该方法的页面会被加入堆栈,但是 redirectT ...
- django模型系统(一)
django模型系统(一) djangode ORM ORM:对像关系映射 用python概念去表达数据库 数据库配置(mysql) 安装pumysql 修改项目目录下的__init__.py imp ...
- Asp.Net MVC+EF+三层架构
架构图: 使用的数据库: 一张公司的员工信息表,测试数据 解决方案项目设计: 1.新建一个空白解决方案名称为Company 2.在该解决方案下,新建解决方案文件夹(UI,BLL,DAL,Model) ...
- win10下安装vs2013无法安装解决方案
win10下安装vs2013无法安装解决方案 win+r,输入cmd进入命令行 进入界面后选择修复 进入vs_ultimate文件所在目录,输入: vs_ultimate /Uninstall ...
- servlet(3)
常见的网络访问后缀: - .html : 网页 - .htm : 网页 - .php : php技术实现的动态网页 - .jsp : Java Server pages Java代码+HTML代码实现 ...
- Oracle数据库TNS错误解决方法
ORA-12154: TNS:could not resolve the connect identifier specified ,即无法解析指定的连接 标识符.这说明缺少了一个环境变量,TNS_A ...
- 爬取字段 spider_text
__author__ = 'sus'import urllibimport urllib2import re def getPage(url): #获取网页 request = urll ...
- 数据库更新记录时,记录不存在则创建的sql语句
INSERT INTO 表名 (字段1(主键),字段2,字段3) values (#{value1},#{value2},#{value3}) ON DUPLICATE KEY UPDATE 字段2= ...
- windows环境下,spring boot服务使用docker打包成镜像并推送到云服务器私有仓库
最近在淘宝上学习springcloud教程,其中有几节课是讲解讲本地springboot服务打包成镜像并推送到云服务器私有仓库,但是教程里面用的事Mac环境,我的是Windows环境,而且课程里面没有 ...
- C++ 之sizeof运算符
sizeof运算符用来计算某个对象在内存中占用的字节数. 此运算符的使用形式为:sizeof(类型名)或sizeof(表达式). 计算结果是这个类型或者这个表达式结果在内存中占的字节数.