
【微信小程序canvas】实现小程序手写板用户签名(附代码)
工作中公司业务需要的微信小程序用户签字功能
先看效果图:

wxml:
<view class="wrapper">

  <view class="handBtn">

    <image catchtap="selectColorEvent" src="{{ selectColor === 'black' ? '../../images/color_black_selected.png' : '../../images/color_black.png' }}" class="{{ selectColor === 'black' ? 'color_select' : '' }} black-select" data-color="black"

      data-color-value="#1A1A1A"></image>

    <image catchtap="selectColorEvent" src="{{ selectColor === 'red' ? '../../images/color_red_selected.png' : '../../images/color_red.png' }}" class="{{ selectColor === 'red' ? 'color_select' : '' }} red-select" data-color="red"

      data-color-value="#ca262a"></image>

    <button catchtap="retDraw" class="delBtn">重写</button>

    <!-- <button catchtap="subCanvas" class="subBtn">完成</button> -->

  </view>

  <view class="handCenter">

    <canvas class="handWriting" disable-scroll="true" bindtouchstart="uploadScaleStart" bindtouchmove="uploadScaleMove"

      bindtouchend="uploadScaleEnd" bindtap="mouseDown" canvas-id="handWriting">

    </canvas>

  </view>

  <view class="handRight">

    <view class="handTitle">手写板</view>

  </view>

</view>
上面代码中所用的图片资源:

color_black.png

color_black_selected.png

color_red.png

color_red_selected.png
js
data:
  data: {

    canvasName: 'handWriting',

    ctx: '',

    canvasWidth: 0,

    canvasHeight: 0,

    transparent: 1, // 透明度

    selectColor: 'black',

    lineColor: '#1A1A1A', // 颜色

    lineSize: 1.5,  // 笔记倍数

    lineMin: 0.5,   // 最小笔画半径

    lineMax: 4,     // 最大笔画半径

    pressure: 1,     // 默认压力

    smoothness: 60,  //顺滑度,用60的距离来计算速度

    currentPoint: {},

    currentLine: [],  // 当前线条

    firstTouch: true, // 第一次触发

    radius: 1, //画圆的半径

    cutArea: { top: 0, right: 0, bottom: 0, left: 0 }, //裁剪区域

    bethelPoint: [],  //保存所有线条 生成的贝塞尔点;

    lastPoint: 0,

    chirography: [], //笔迹

    currentChirography: {}, //当前笔迹

    linePrack: [] //划线轨迹 , 生成线条的实际点

  },
初始化:
  onLoad () {

    let canvasName = this.data.canvasName

    let ctx = wx.createCanvasContext(canvasName)

    this.setData({

      ctx: ctx

    })

    var query = wx.createSelectorQuery();

    query.select('.handCenter').boundingClientRect(rect => {

      this.setData({

        canvasWidth: rect.width,

        canvasHeight: rect.height

      })

    }).exec();

  },
事件函数
笔迹开始
  // 笔迹开始

  uploadScaleStart (e) {

    if (e.type != 'touchstart') return false;

    let ctx = this.data.ctx;

    ctx.setFillStyle(this.data.lineColor);  // 初始线条设置颜色

    ctx.setGlobalAlpha(this.data.transparent);  // 设置半透明

    let currentPoint = {

      x: e.touches[0].x,

      y: e.touches[0].y

    }

    let currentLine = this.data.currentLine;

    currentLine.unshift({

      time: new Date().getTime(),

      dis: 0,

      x: currentPoint.x,

      y: currentPoint.y

    })

    this.setData({

      currentPoint,

      // currentLine

    })

    if (this.data.firstTouch) {

      this.setData({

        cutArea: { top: currentPoint.y, right: currentPoint.x, bottom: currentPoint.y, left: currentPoint.x },

        firstTouch: false

      })

    }

    this.pointToLine(currentLine);

  },
笔迹移动
  // 笔迹移动

  uploadScaleMove (e) {

    if (e.type != 'touchmove') return false;

    if (e.cancelable) {

      // 判断默认行为是否已经被禁用

      if (!e.defaultPrevented) {

        e.preventDefault();

      }

    }

    let point = {

      x: e.touches[0].x,

      y: e.touches[0].y

    }

    //测试裁剪

    if (point.y < this.data.cutArea.top) {

      this.data.cutArea.top = point.y;

    }

    if (point.y < 0) this.data.cutArea.top = 0;

    if (point.x > this.data.cutArea.right) {

      this.data.cutArea.right = point.x;

    }

    if (this.data.canvasWidth - point.x <= 0) {

      this.data.cutArea.right = this.data.canvasWidth;

    }

    if (point.y > this.data.cutArea.bottom) {

      this.data.cutArea.bottom = point.y;

    }

    if (this.data.canvasHeight - point.y <= 0) {

      this.data.cutArea.bottom = this.data.canvasHeight;

    }

    if (point.x < this.data.cutArea.left) {

      this.data.cutArea.left = point.x;

    }

    if (point.x < 0) this.data.cutArea.left = 0;

    this.setData({

      lastPoint: this.data.currentPoint,

      currentPoint: point

    })

    let currentLine = this.data.currentLine

    currentLine.unshift({

      time: new Date().getTime(),

      dis: this.distance(this.data.currentPoint, this.data.lastPoint),

      x: point.x,

      y: point.y

    })

    // this.setData({

    //   currentLine

    // })

    this.pointToLine(currentLine);

  },
笔迹结束
  // 笔迹结束

  uploadScaleEnd (e) {

    if (e.type != 'touchend') return 0;

    let point = {

      x: e.changedTouches[0].x,

      y: e.changedTouches[0].y

    }

    this.setData({

      lastPoint: this.data.currentPoint,

      currentPoint: point

    })

    let currentLine = this.data.currentLine

    currentLine.unshift({

      time: new Date().getTime(),

      dis: this.distance(this.data.currentPoint, this.data.lastPoint),

      x: point.x,

      y: point.y

    })

    // this.setData({

    //   currentLine

    // })

    if (currentLine.length > 2) {

      var info = (currentLine[0].time - currentLine[currentLine.length - 1].time) / currentLine.length;

      //$("#info").text(info.toFixed(2));

    }

    //一笔结束,保存笔迹的坐标点,清空,当前笔迹

    //增加判断是否在手写区域;

    this.pointToLine(currentLine);

    var currentChirography = {

      lineSize: this.data.lineSize,

      lineColor: this.data.lineColor

    };

    var chirography = this.data.chirography

    chirography.unshift(currentChirography);

    this.setData({

      chirography

    })

    var linePrack = this.data.linePrack

    linePrack.unshift(this.data.currentLine);

    this.setData({

      linePrack,

      currentLine: []

    })

  },
其他函数:
 retDraw () {

    this.data.ctx.clearRect(0, 0, 700, 730)

    this.data.ctx.draw()

  },

  //画两点之间的线条;参数为:line,会绘制最近的开始的两个点;

  pointToLine (line) {

    this.calcBethelLine(line);

    return;

  },

  //计算插值的方式;

  calcBethelLine (line) {

    if (line.length <= 1) {

      line[0].r = this.data.radius;

      return;

    }

    let x0, x1, x2, y0, y1, y2, r0, r1, r2, len, lastRadius, dis = 0, time = 0, curveValue = 0.5;

    if (line.length <= 2) {

      x0 = line[1].x

      y0 = line[1].y

      x2 = line[1].x + (line[0].x - line[1].x) * curveValue;

      y2 = line[1].y + (line[0].y - line[1].y) * curveValue;

      //x2 = line[1].x;

      //y2 = line[1].y;

      x1 = x0 + (x2 - x0) * curveValue;

      y1 = y0 + (y2 - y0) * curveValue;;

    } else {

      x0 = line[2].x + (line[1].x - line[2].x) * curveValue;

      y0 = line[2].y + (line[1].y - line[2].y) * curveValue;

      x1 = line[1].x;

      y1 = line[1].y;

      x2 = x1 + (line[0].x - x1) * curveValue;

      y2 = y1 + (line[0].y - y1) * curveValue;

    }

    //从计算公式看,三个点分别是(x0,y0),(x1,y1),(x2,y2) ;(x1,y1)这个是控制点,控制点不会落在曲线上;实际上,这个点还会手写获取的实际点,却落在曲线上

    len = this.distance({ x: x2, y: y2 }, { x: x0, y: y0 });

    lastRadius = this.data.radius;

    for (let n = 0; n < line.length - 1; n++) {

      dis += line[n].dis;

      time += line[n].time - line[n + 1].time;

      if (dis > this.data.smoothness) break;

    }

    this.setData({

      radius: Math.min(time / len * this.data.pressure + this.data.lineMin, this.data.lineMax) * this.data.lineSize

    });

    line[0].r = this.data.radius;

    //计算笔迹半径;

    if (line.length <= 2) {

      r0 = (lastRadius + this.data.radius) / 2;

      r1 = r0;

      r2 = r1;

      //return;

    } else {

      r0 = (line[2].r + line[1].r) / 2;

      r1 = line[1].r;

      r2 = (line[1].r + line[0].r) / 2;

    }

    let n = 5;

    let point = [];

    for (let i = 0; i < n; i++) {

      let t = i / (n - 1);

      let x = (1 - t) * (1 - t) * x0 + 2 * t * (1 - t) * x1 + t * t * x2;

      let y = (1 - t) * (1 - t) * y0 + 2 * t * (1 - t) * y1 + t * t * y2;

      let r = lastRadius + (this.data.radius - lastRadius) / n * i;

      point.push({ x: x, y: y, r: r });

      if (point.length == 3) {

        let a = this.ctaCalc(point[0].x, point[0].y, point[0].r, point[1].x, point[1].y, point[1].r, point[2].x, point[2].y, point[2].r);

        a[0].color = this.data.lineColor;

        // let bethelPoint = this.data.bethelPoint;

        // console.log(a)

        // console.log(this.data.bethelPoint)

        // bethelPoint = bethelPoint.push(a);

        this.bethelDraw(a, 1);

        point = [{ x: x, y: y, r: r }];

      }

    }

    this.setData({

      currentLine: line

    })

  },

  //求两点之间距离

  distance (a, b) {

    let x = b.x - a.x;

    let y = b.y - a.y;

    return Math.sqrt(x * x + y * y);

  },

  ctaCalc (x0, y0, r0, x1, y1, r1, x2, y2, r2) {

    let a = [], vx01, vy01, norm, n_x0, n_y0, vx21, vy21, n_x2, n_y2;

    vx01 = x1 - x0;

    vy01 = y1 - y0;

    norm = Math.sqrt(vx01 * vx01 + vy01 * vy01 + 0.0001) * 2;

    vx01 = vx01 / norm * r0;

    vy01 = vy01 / norm * r0;

    n_x0 = vy01;

    n_y0 = -vx01;

    vx21 = x1 - x2;

    vy21 = y1 - y2;

    norm = Math.sqrt(vx21 * vx21 + vy21 * vy21 + 0.0001) * 2;

    vx21 = vx21 / norm * r2;

    vy21 = vy21 / norm * r2;

    n_x2 = -vy21;

    n_y2 = vx21;

    a.push({ mx: x0 + n_x0, my: y0 + n_y0, color: "#1A1A1A" });

    a.push({ c1x: x1 + n_x0, c1y: y1 + n_y0, c2x: x1 + n_x2, c2y: y1 + n_y2, ex: x2 + n_x2, ey: y2 + n_y2 });

    a.push({ c1x: x2 + n_x2 - vx21, c1y: y2 + n_y2 - vy21, c2x: x2 - n_x2 - vx21, c2y: y2 - n_y2 - vy21, ex: x2 - n_x2, ey: y2 - n_y2 });

    a.push({ c1x: x1 - n_x2, c1y: y1 - n_y2, c2x: x1 - n_x0, c2y: y1 - n_y0, ex: x0 - n_x0, ey: y0 - n_y0 });

    a.push({ c1x: x0 - n_x0 - vx01, c1y: y0 - n_y0 - vy01, c2x: x0 + n_x0 - vx01, c2y: y0 + n_y0 - vy01, ex: x0 + n_x0, ey: y0 + n_y0 });

    a[0].mx = a[0].mx.toFixed(1);

    a[0].mx = parseFloat(a[0].mx);

    a[0].my = a[0].my.toFixed(1);

    a[0].my = parseFloat(a[0].my);

    for (let i = 1; i < a.length; i++) {

      a[i].c1x = a[i].c1x.toFixed(1);

      a[i].c1x = parseFloat(a[i].c1x);

      a[i].c1y = a[i].c1y.toFixed(1);

      a[i].c1y = parseFloat(a[i].c1y);

      a[i].c2x = a[i].c2x.toFixed(1);

      a[i].c2x = parseFloat(a[i].c2x);

      a[i].c2y = a[i].c2y.toFixed(1);

      a[i].c2y = parseFloat(a[i].c2y);

      a[i].ex = a[i].ex.toFixed(1);

      a[i].ex = parseFloat(a[i].ex);

      a[i].ey = a[i].ey.toFixed(1);

      a[i].ey = parseFloat(a[i].ey);

    }

    return a;

  },

  bethelDraw (point, is_fill, color) {

    let ctx = this.data.ctx;

    ctx.beginPath();

    ctx.moveTo(point[0].mx, point[0].my);

    if (undefined != color) {

      ctx.setFillStyle(color);

      ctx.setStrokeStyle(color);

    } else {

      ctx.setFillStyle(point[0].color);

      ctx.setStrokeStyle(point[0].color);

    }

    for (let i = 1; i < point.length; i++) {

      ctx.bezierCurveTo(point[i].c1x, point[i].c1y, point[i].c2x, point[i].c2y, point[i].ex, point[i].ey);

    }

    ctx.stroke();

    if (undefined != is_fill) {

      ctx.fill(); //填充图形 ( 后绘制的图形会覆盖前面的图形, 绘制时注意先后顺序 )

    }

    ctx.draw(true)

  },

  selectColorEvent (event) {

    console.log(event)

    var color = event.currentTarget.dataset.colorValue;

    var colorSelected = event.currentTarget.dataset.color;

    this.setData({

      selectColor: colorSelected,

      lineColor: color

    })

  }
在原代码中增加 保存、预览、上传等功能:
设置背景函数:
    //设置canvas背景色  不设置  导出的canvas的背景为透明

    //@params:字符串  color

    setCanvasBg(color){

        console.log(999);

        /* 将canvas背景设置为 白底,不设置  导出的canvas的背景为透明 */

        //rect() 参数说明  矩形路径左上角的横坐标,左上角的纵坐标, 矩形路径的宽度, 矩形路径的高度

        //这里是 canvasHeight - 4 是因为下边盖住边框了,所以手动减了写

        this.data.ctx.rect(0, 0, this.data.canvasWidth, this.data.canvasHeight - 4);

        // ctx.setFillStyle('red')

        this.data.ctx.setFillStyle( color )

        this.data.ctx.fill()  //设置填充

        this.data.ctx.draw()    //开画

    },
修改上面 其他函数 中的:
retDraw函数为(给canvas设置个白色的背景,不然导出的是透明的,根据自己的情况选择是否用):
  retDraw() {

    this.data.ctx.clearRect(0, 0, 700, 730)

    this.data.ctx.draw();

    //设置canvas背景

    this.setCanvasBg("#fff");

  },
初始化onload钩子函数中也,给canvas添加白色背景:
onLoad: function (options) {

    let canvasName = this.data.canvasName

    let ctx = wx.createCanvasContext(canvasName)

    this.setData({

      ctx: ctx

    })

    var query = wx.createSelectorQuery();

    query.select('.handCenter').boundingClientRect( rect => {

      this.setData({

        canvasWidth: rect.width,

        canvasHeight: rect.height

      })

    /* 将canvas背景设置为 白底,不设置  导出的canvas的背景为透明 */

    // console.log(this, 'hahah');

    this.setCanvasBg('#fff');

    }).exec();

  },
保存到相册:
    //保存到相册

    saveCanvasAsImg(){

        wx.canvasToTempFilePath({

            canvasId: 'handWriting',

            fileType: 'png',

            quality: 1, //图片质量

            success(res) {

                // console.log(res.tempFilePath, 'canvas生成图片地址');

                wx.saveImageToPhotosAlbum({

                    filePath: res.tempFilePath,

                    success(res) {

                        wx.showToast({

                            title: '已保存到相册',

                            duration: 2000

                        });

                    }

                })

            }

        })

    },
预览:
    //预览

    previewCanvasImg(){

            wx.canvasToTempFilePath({

                canvasId: 'handWriting',

                fileType: 'jpg',

                quality: 1, //图片质量

                success(res) {

                    // console.log(res.tempFilePath, 'canvas生成图片地址');

                    wx.previewImage({

                        urls: [res.tempFilePath], //预览图片 数组

                    })

                }

            })

    },
上传:
    //上传

    uploadCanvasImg() {

        wx.canvasToTempFilePath({

            canvasId: 'handWriting',

            fileType: 'png',

            quality: 1, //图片质量

            success(res) {

                // console.log(res.tempFilePath, 'canvas生成图片地址');

                //上传

                wx.uploadFile({

                    url: 'https://example.weixin.qq.com/upload', // 仅为示例,非真实的接口地址

                    filePath: res.tempFilePath,

                    name: 'file_signature',

                    formData: {

                        user: 'test'

                    },

                    success(res) {

                        const data = res.data

                        // do something

                    }

                })

            }

        })

    },
wxss
page {

  background: #fbfbfb;

  height: auto;

  overflow: hidden;

}

.wrapper {

  width: 100%;

  height: 95vh;

  margin: 30rpx 0;

  overflow: hidden;

  display: flex;

  align-content: center;

  flex-direction: row;

  justify-content: center;

  font-size: 28rpx;

}

.handWriting {

  background: #fff;

  width: 100%;

  height: 95vh;

}

.handRight {

  display: inline-flex;

  align-items: center;

}

.handCenter {

  border: 4rpx dashed #e9e9e9;

  flex:;

  overflow: hidden;

  box-sizing: border-box;

}

.handTitle {

  transform: rotate(90deg);

  flex:;

  color: #666;

}

.handBtn button {

  font-size: 28rpx;

}

.handBtn {

  height: 95vh;

  display: inline-flex;

  flex-direction: column;

  justify-content: space-between;

  align-content: space-between;

  flex:;

}

.delBtn {

  position: absolute;

  top: 250rpx;

  left: 0rpx;

  transform: rotate(90deg);

  color: #666;

}

.delBtn image {

  position: absolute;

  top: 13rpx;

  left: 25rpx;

}

.subBtn {

  position: absolute;

  bottom: 52rpx;

  left: -3rpx;

  display: inline-flex;

  transform: rotate(90deg);

  background: #008ef6;

  color: #fff;

  margin-bottom: 30rpx;

  text-align: center;

  justify-content: center;

}

.black-select {

  width: 60rpx;

  height: 60rpx;

  position: absolute;

  top: 30rpx;

  left: 25rpx;

}

.black-select.color_select {

  width: 90rpx;

  height: 90rpx;

  top: 30rpx;

  left: 10rpx;

}

.red-select {

  width: 60rpx;

  height: 60rpx;

  position: absolute;

  top:140rpx;

  left:25rpx;

}

.red-select.color_select {

  width: 90rpx;

  height: 90rpx;

  top: 120rpx;

  left: 10rpx;

}
-----------------------------------------------------
新增保存、预览、上传等按钮。
略改后的效果:
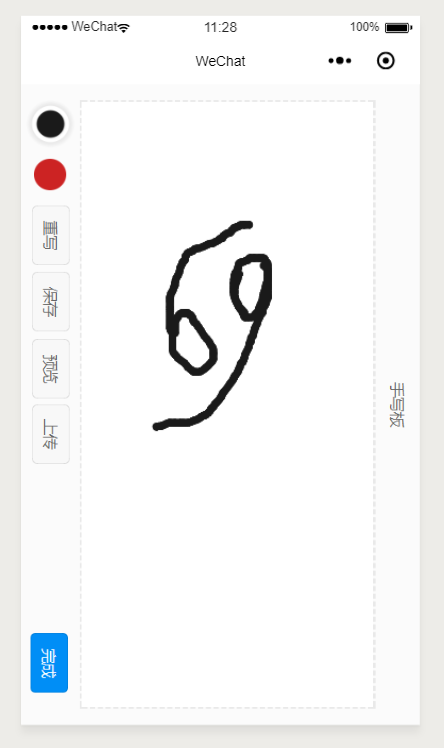
上图中的效果请见 github地址:https://github.com/Ta0hua/wechat-signature
------------------------------------------------------
github地址:https://github.com/momtboy/handwriting-weapp
备用地址(拉取的作者的):https://github.com/Ta0hua/handwriting-weapp
转载:https://www.jianshu.com/p/84dcc0adfe44
【微信小程序canvas】实现小程序手写板用户签名(附代码)的更多相关文章
- wx.getImageInfo和wx.downloadFile下载用户头像报错(小程序canvas以及小程序图片下载部分)
我先上图 之前我们后台配置的 downloadFile 合法域名是 https://wx.qlogo.cn, 用了好久都没出问题, 前段时间, 用户反馈 分享海报, 用户头像出不来!!!! ...
- Unity利用Share SDK实现QQ、微信及微博第三方登录及定制内容分享(附代码)
最近因为公司的项目需要添加一些实用性的功能,需要添加第三方登录及分享,采用的是Mob的SDK,可以先到其官网下载对应的SDK 点击这里,为了方便后期进行数据统计和分析,所以可以先添加一个应用,添加成功 ...
- 小程序和ThinkPHP5结合实现登录状态(含代码)
本篇文章给大家带来的内容是关于小程序和ThinkPHP5结合实现登录状态(附代码),有一定的参考价值,有需要的朋友可以参考一下,希望对你有所帮助. 微信小程序中,一般会涉及三种登录方式: 1. 使用微 ...
- 原创:WeZRender:微信小程序Canvas增强组件
WeZRender是一个微信小程序Canvas增强组件,基于HTML5 Canvas类库ZRender. 使用 WXML: <canvas style="width: 375px; h ...
- 微信小程序-canvas绘制文字实现自动换行
在使用微信小程序canvas绘制文字时,时常会遇到这样的问题:因为canvasContext.fillText参数为 我们只能设置文本的最大宽度,这就产生一定的了问题.如果我们绘制的文本长度不确定或者 ...
- 微信小程序 canvas 字体自动换行(支持换行符)
微信小程序 canvas 自动适配 自动换行,保存图片分享到朋友圈 https://github.com/richard1015/News 微信IDE演示代码https://developers.w ...
- 微信小程序--canvas画布实现图片的编辑
技术:微信小程序 概述 上传图片,编辑图片大小,添加文字,改变文字颜色等 详细 代码下载:http://www.demodashi.com/demo/14789.html 概述 微信小程序--ca ...
- 微信小程序 | canvas绘图
1.新的尺寸单位 rpx rpx(responsive pixel): 可以根据屏幕宽度进行自适应. 规定屏幕宽为750rpx.如在 iPhone6 上,屏幕宽度为375px,共有750个物理像素,则 ...
- 微信小程序canvas生成并保存图片
---恢复内容开始--- 微信小程序canvas生成并保存图片,具体实现效果如下图 实现效果需要做以下几步工作 一.先获取用户屏幕大小,然后才能根据屏幕大小来定义canvas的大小 二.获取图 ...
随机推荐
- C# 比较多个数组(lambda,匿名比较器)
//逐个比较,找出最大的那个数组 static void Main(string[] args) { //测试数据 , , }; , , }; , , }; , , }; List<int[]& ...
- commons-httpclient 实现get和post请求
引入的jar包为: <!-- https://mvnrepository.com/artifact/commons-httpclient/commons-httpclient --> &l ...
- BUG-‘Tokenizer’ object has no attribute ‘oov_token’
使用keras包实现NLP问题时,报错 /lib/python3./dist-packages/keras/preprocessing/text.py”, line , in texts_to_seq ...
- 服务器配置 ssl 证书
最近因为公司的 服务器 ssl证书即将到期(服务器 和 ssl证书管理都在 腾讯云上), 所以为了能顺利的 重新申请 ssl证书 ,我和小伙伴 在他的个人服务器上尝试了一波(我们居然都不会 ...) ...
- Java程序设计第一次作业
虽说这学期Java比上学期的C语言要简单些许,但是初次面对java程序,还是有点难度的.
- 博弈论中的Nim博弈
瞎扯 \(orzorz\) \(cdx\) 聚聚给我们讲了博弈论.我要没学上了,祝各位新年快乐.现在让我讲课我都不知道讲什么,我会的东西大家都会,太菜了太菜了. 马上就要回去上文化课了,今明还是收下尾 ...
- python通过套接字来发送接收消息
案例如下: 1.启动一个服务端套接字服务 2.启动一个客户端套接字服务 3.客户端向服务端发送一个hello,服务端则回复一个word,并打印 参考地址:https://www.cnblogs.com ...
- 【DirectX12】第六章-练习
练习3. (a) //LINELIST std::array<VPosData, > posData = { VPosData({ XMFLOAT3(-2.0f, -1.0f, +1.0f ...
- axios formData提交数据 && axios设置charset无效???
但是这样会出现一个问题,什么问题呢? 我设置了请求头编码utf-8,但是没生效 content-type里面没有出现utf-8???????查了很多资料,说这是axios固有的bug,我....... ...
- [经验交流] k8s mount 文件到容器目录
docker 的 volume 可以 mount 单个文件(比如单个配置文件)到容器目录.同时保留原目录的内容.放到 k8s 中,结果却变成了这样:k8s 的 volume 把文件mount 到容器目 ...