memcached命令行、Memcached数据导出和导入、php连接memcache、php的session存储到memcached
1、memcached命令行
telnet 127.0.0.1 11211
set key2 0 30 2
ab
STORED
get key2
VALUE key2 0 2
ab
END


如:
set key3 1 100 4
abcd
STORED
get key3
VALUE key3 1 4
abcd
END
replace key3 1 200 5
abcdx
STORED
get key3
VALUE key3 1 5
abcdx
END
delete key3
DELETED
get key3
END
2、memcached数据导出和导入

查看状态:
然后导出:
导入:
memcached-tool 127.0.0.1:11211 dump
注意,在导入的时候,会有过期时间,所以,在导入的时候,要调时间值,否则导入后,就没有数据
3、php连接memcache
先安装php的memcache扩展
cd /usr/local/src/
wget -c http://pecl.php.net/get/memcache-2.2.7.tgz (php5最新稳定版)
wget -c http://pecl.php.net/get/memcache-3.0.8.tgz (php5最新开发版)
wget -c https://github.com/websupport-sk/pecl-memcache/archive/php7.zip (php7可用版)
解压:tar zxf memcache****.tgz
cd memcache***
/usr/local/php7fpm/bin/phpize
./configure --with-php-config=/usr/local/php7fpm/bin/php-config
make && make install
安装完后会有类似这样的提示:Installing shared extensions: /usr/local/php7fpm/lib/php/extensions/no-debug-non-zts-20170718/
然后修改php.ini添加一行echo "extension=memcache.so" >>/usr/local/php7fpm/etc/php.ini
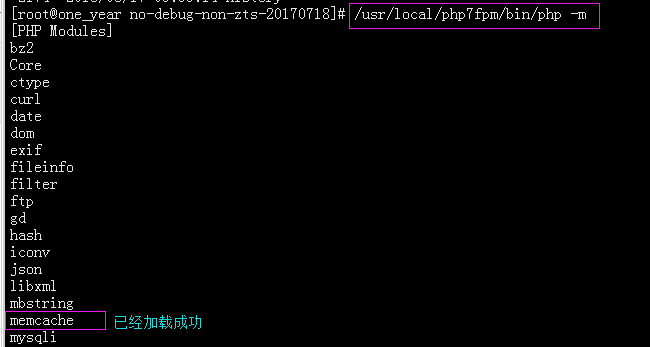
检查/usr/local/php7fpm/bin/php-fpm -m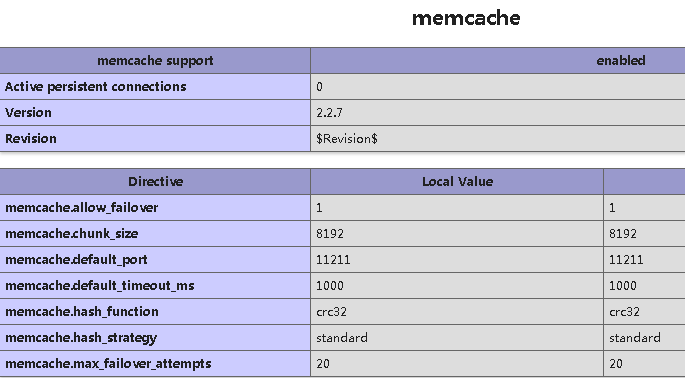
php安装memcached:
wget -c https://pecl.php.net/get/memcached-3.0.4.tgz
tar -xvf memcached-3.0.4.tgz
cd memcached-3.0.4/
/usr/local/php7fpm/bin/phpize
./configure
若缺libmemcached 需要安装这两个依赖包:yum install libmemcached libmemcached-devel
./configure
make && make install
echo "extension=memcached.so" >>/usr/local/php7fpm/etc/php.ini
/etc/init.d/php7fpm restart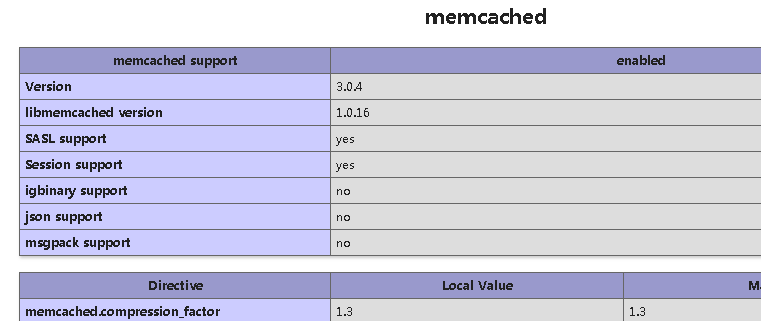

具体相关:

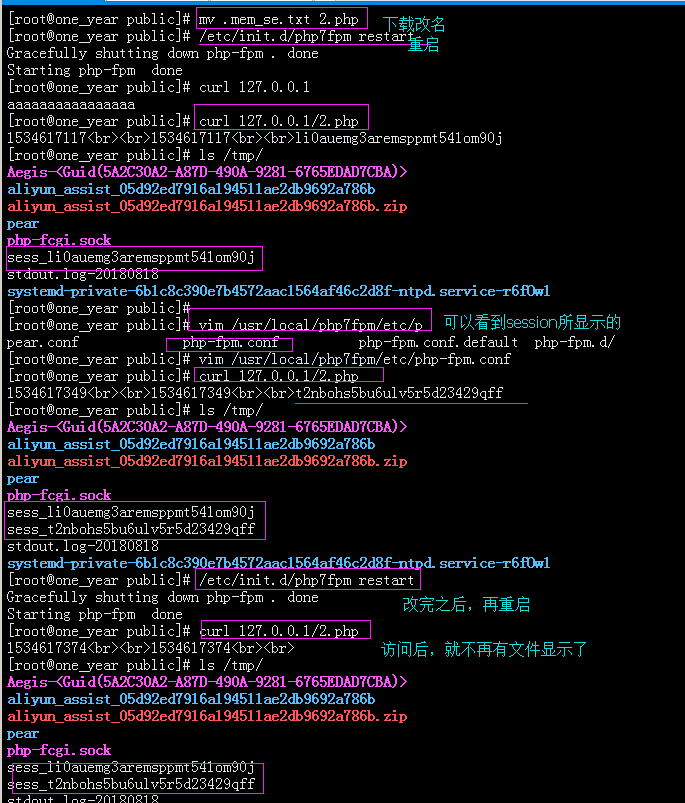
测试:url www.apelearn.com/study_v2/.memcache.txt > 1.php 2>/dev/null
/usr/local/php7fpm/bin/php 1.php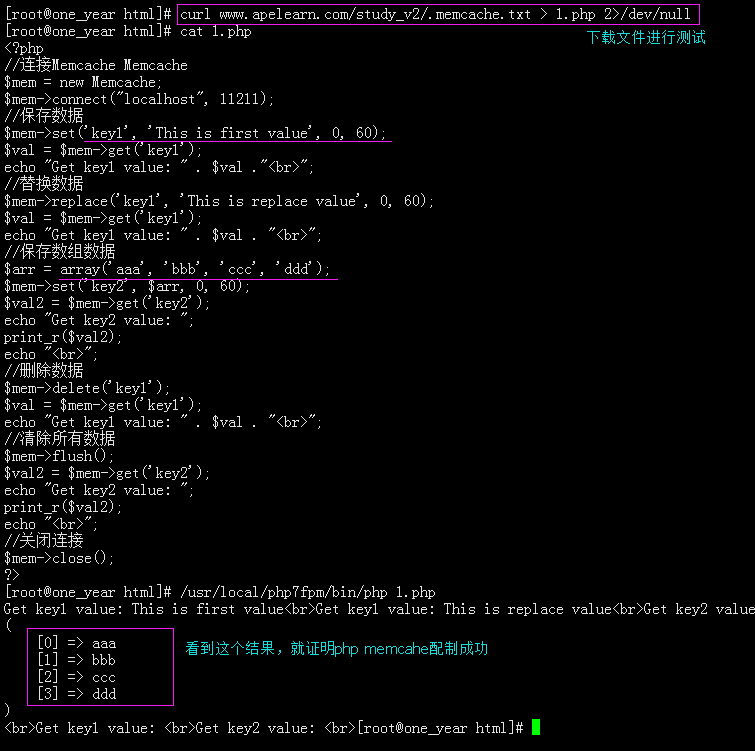
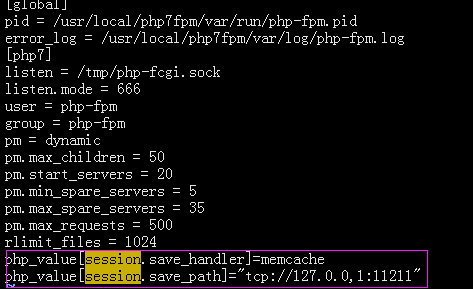
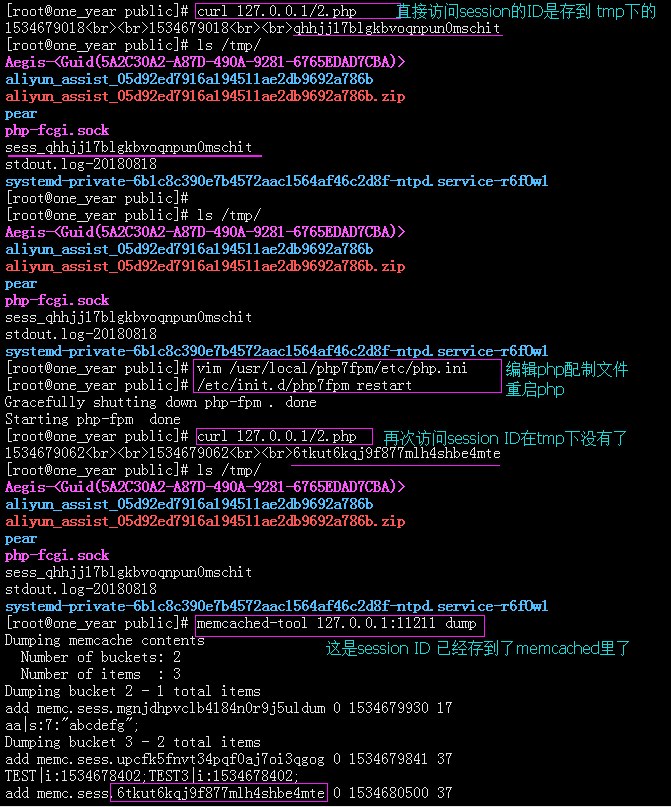
4、php的session存储到memcached
编辑php.ini添加两行
for memcache:
session.save_handler = memcache
session.save_path="tcp://192.168.0.9:11211"
for memcahed:
session.save_handler = memcached
session.save_path = "localhost:11211" 或 session.save_path = "127.0.0.1:11211"
或者httpd.conf中对应的虚拟主机中添加
for memcache:
php_value session.save_handler "memcache"
php_value session.save_path"tcp://192.168.0.9:11211"

或者php-fpm.conf对应的pool中添加
for memcache:
php_value[session.save_handler]=memcache
php_value[session.save_path]="tcp://192.168.0.9:11211"
for memcahed:
php_value[session.save_handler] = memcached
php_value[session.save_path] = "127.0.0.1:11211" 或 php_value[session.save_path] = "localhost:11211"
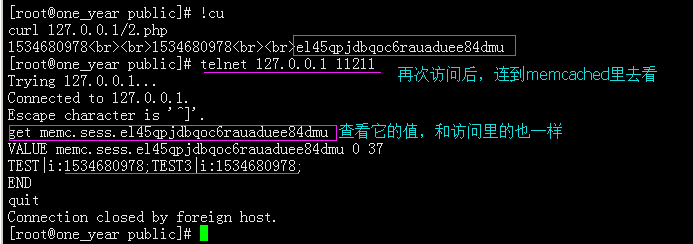
测试:
wget http://study.lishiming.net/.mem_se.txt
mv .mem_se.txt /usr/local/apache2/htdocs/session.php
telnet 127.0.0.1 11211
for memcahed:
memcached命令行、Memcached数据导出和导入、php连接memcache、php的session存储到memcached的更多相关文章
- memcached命令行、Memcached数据导出和导入
1.memcached命令行 telnet 127.0.0.1 11211set key2 0 30 2abSTOREDget key2VALUE key2 0 2abEND 如: set key3 ...
- memcached命令行操作详解,命令选项的详细解释
连接到memcached命令行下: telnet 127.0.0.1 11211 1.set / add / replace : 格式:<command> <key> < ...
- 可以在命令行直接使用密码来进行远程连接和远程拉取文件的命令:sshpass
应用范围:可以在命令行直接使用密码来进行远程连接和远程拉取文件. 使用前提:对于未连接过的主机.而又不输入yes进行确认,需要进行sshd服务的优化: # vim /etc/ssh/ssh_con ...
- memcached命令行参数说明(转)
1.启动Memcache 常用参数 -p <num> 设置TCP端口号(默认不设置为: 11211) -U <num> UDP监听端口(默认: 11211, ...
- memcached 命令行举例
1.启动Memcache 常用参数 memcached 1.4.3 -p <num> 设置端口号(默认不设置为: 11211) -U <num> UDP监听端口 (默 ...
- Memcached 命令行操作
telnet 用于连接 Memcached: [root@localhost ~]# telnet Trying 127.0.0.1... Connected to 127.0.0.1. Escape ...
- mongoDB 数据导出与导入
一.导出 命令格式:在mongodb/bin目录下 mongoexport -h IP --port 端口 -u 用户名 -p 密码 -d 数据库 -c 表名 -f 字段 -q 条件导出 --csv ...
- Elasticsearch的数据导出和导入操作(elasticdump工具),以及删除指定type的数据(delete-by-query插件)
Elasticseach目前作为查询搜索平台,的确非常实用方便.我们今天在这里要讨论的是如何做数据备份和type删除.我的ES的版本是2.4.1. ES的备份,可不像MySQL的mysqldump这么 ...
- 使用Scrapy命令行工具【导出JSON文件】时编码设置
Windows 10家庭中文版,Python 3.6.4,virtualenv 16.0.0,Scrapy 1.5.0, 使用scrapy命令行工具建立了爬虫项目(startproject),并使用s ...
随机推荐
- JavaScript超酷时钟的制作
<!DOCTYPE html PUBLIC "-//W3C//h2D XHTML 1.0 Transitional//EN" "http://www.w3.org/ ...
- Python-接口自动化(十)
ddt+unnittest+excel处理测试数据(九) (十一)ddt 1.利用ddt实现数据驱动,ddt是第三方模块,在终端输入pip install ddt 进行安装 导入:from ddt i ...
- matplotlib图表组成元素
一.函数 1.plot() -- 展示变量的趋势与变化 用法: plt.plot(x,y,ls="-",lw=2,label="plot figure" ...
- vue组件的通信
组件的引入两种方式 动态组件 <p is="com-a"></p> 直接引入 <com-a></com-a> 插槽功能 父组件引入 ...
- python入门(三)
一.判断(精简代码) 非空为真,非0为真# 不为空的话就是true,是空的话就是false# 只要不是0就是true,是0就是falsea=[]#list也是假的b={}#字典也是假的c=0 #也是假 ...
- java基础3(二)
基础加强 类加载器 A.类加载器获取classpath下任意内容 注意: 可以通过ClassLoader可以获取classpath下的所有内容. SpringMVC 1.整体架构 流程图 2.流程细节 ...
- 5 第一个Django第4部分(表单和通用视图)
上一节完成了视图编写,这一节为应用添加投票功能,也就是表单提交. 5.1编写一个简单的表单 5.2使用通用视图 5.3改良视图 5.1编写一个简单的表单 在网页设计中添加Form元素 polls/te ...
- 运行python脚本时,报错InsecurePlatformWarning: A true SSLContext object is not available,解决方法
今天,要在新环境里运行一个python脚本,遇到下面的报错: /usr/lib/python2.7/site-packages/urllib3/util/ssl_.py:160: InsecurePl ...
- 关于org.apache.jasper.JasperException解决方法
没有导入jstl.jar包 解决办法:在项目pom.xml中添加maven项目的jstl.jar 如果导入jstl.jar包 解决办法:检查jstl.jar版本是否与项目兼容,不兼容则切换jstl.j ...
- python "import this"
The Zen of Python, by Tim Peters Beautiful is better than ugly.Explicit is better than implicit.Simp ...